


The color of this movie seems quiet strange (a bit green or yellow, give me a kind of "old" and "outdated" feeling)
I just want to make them into this kind of feeling, really lush color. Not very bright and not very dark. Also, not "old".

+ Reply to Thread
Results 1 to 30 of 74
-
Last edited by xuguang_he; 15th Apr 2013 at 10:11. Reason: The picture is not valid.
-
-
I think he's referring to the overall grading , not the bleedingOriginally Posted by hech54

Anyways, the difference is what the colorist chose for this, and the biggest difference is increased saturation in the 2nd set of pics . So If you increase the saturation , it will come close probably to the look you want
You can adjust the colors however you want , but your ability to do so will be limited compared to if you had what the original colorist had access to (you're working from a low quality dvd version, with low chroma resolution) -
Use Vegas color correction and see what happens.
-
Originally Posted by pepegot1
Yes, this will give you more control - or at least some application with color wheels . Most NLE's will give you this type of control
For example if you feel the highlights are a bit too "yellow" you can move them towards magenta or blue , and along with an increase in saturation it should come close to match what you want -
Start by determining the white point and black point. It helps to keep luma and colors within 16-240 spec. I made some quick notes of problems to look for:
Image 1: Too green. Blacks, grays, whites off-color. Undersaturated. Low gamma. Darks crushed.
Image 2: Too green. Blacks, grays, whites off-color. Undersaturated. Low gamma.
Image 3: Too green. Blacks, grays, whites off-color. Low Gamma. Darks crushed.
Image 4: Too yellow. Blacks, grays, whites off-color. Low Gamma. Undersaturated
Image 5: Too yellow. Undersaturated. Low gamma, brights suppressed.
Image 6: Blue soppressed. Undersaturated. Low gamma.
Image 7: Too green. Low gamma and contrast. Uneven color: darks and brights have different color balance.
Image 8: Too green. Low gamma and contrast. Poor midtone/bright balance.
Image 9: Too red. Oversauratd, darks crushed and corrupt, brights pushed and clipped. midtones suppressed. Grainy shadows.
Image10: Oversaturated. Too red. Darks crushed, low gamma.
Image 11: Too yellow. Low gamma, brights clipped.
Image 12" Low gamma, darks crushed. Midtones too red, brights yellow, blacks red.
Image 13: Oversaturated, highlights pushed. bright reds puhsed, midtonees green.
Image 14: Oversturated. Too dark, reds puhsed, brights green. Grainy shadows.
Image 15: Color completely corrupt, oversaturated, reds pushed, blacks blue and cruished, highlights clipped.
4 sample corrections with gradation curves, Color Mill, Levels. Primary white-black points determined with After Effects.
I made only one quick pass at these. A few gave me a lot of trouble. I tend to look for convincing color and levels. Sometimes it's just a matter of taste, but over saturation is usually a turnoff. To each his own.Last edited by sanlyn; 15th Apr 2013 at 20:17.
-
May I ask what code should I use and how to set it up exactly? (Just as the sanlyn's picture show)
-
Currently, I prefer to use SmoothTweak().
-
Unless you plan to spend a month going through the movie scene by scene you'll probably want to do what poisondeathray suggested, crank up the saturation. Blues have faded because of the age of the print so you might adjust that a bit too. Something like:
before, after:Code:RgbAdjust(b=1.2, bb=-16) ConvertToYV12() Tweak(sat=1.2)
Last edited by jagabo; 16th Apr 2013 at 07:41.
-
VHS source, even when issued as DVD, is difficult to correct completely with code alone, especially aged and faded VHS. But code running in the capture's original YUV colorspace is where it should begin (the images were already converted to RGB, which adds to the difficulty). The more you can correct in YUV, the better. Every image shows the original capture or recording has crushed darks, and some have blown-out highlights. Without some of the original capture it's difficult to be precise, but.....
Increasing contrast will worsen the crushed darks, but increasing "brightness" alone will make the washed-out look worsen. So for a YUV source that's too dark, the best tactic would be something like: "ColorYUV(off_y=10)" will shift all luma values to a brighter point, revealing more dark detail. For scenes that are too saturated and dense, reduce saturation and/or contrast with Tweak, but only if over saturation is the main problem. You can get brighter middle tones and bring more "light" into the image by increasing gamma -- "ColorYUV(gamma_y=20", for example. Note that in ColorYUV, gamma for the chroma channels doesn't do anything. Gamma works only with "Y", or luma.
If all this sounds strange at first, then you have to experiment and read up on ColorYUV, Tweak, and the Levels filter. All of the work I posted was in RGB, because RGB images were all you that you posted -- and many of those had been resized or otherwise processed. It's not practicable to go into great detail about working with YUV without seeing something of the original capture.
Correcting levels and color with VHS is a chore. VHS color is uneven and inaccurate to begin with, even with good tapes. And eventually the video would have to be finished in RGB with something like VirtualDub filters or the advanced color controls in something like Vegas, Premiere, After Effects, etc., although VirtualDub's color filters would suffice.Last edited by sanlyn; 26th Mar 2014 at 07:17.
-
There's no way this is a VHS capture.Originally Posted by sanlyn
-
I'm making a video clip and will post here.
-
I don't know the original source, what I'm dealing with is just a region 2 (Spain) DVD from 20th Century Fox Studio. This DVD is th best souce exist now. It present an original 2.35:1 CinemaScope range.
-
I have some digital broadcasts and a couple of DVD's that appear to have been mastered from broadcast tapes. In any case, the source from which the images were made sure resembles my DVD copies and broadcasts. Mine look similarly faded and often rather grim and gloomy (one of them is a musical !! Another infamous DVD is the older The Quiet Man, which surely came from a tape source). If the original is DVD, I'd work directly with the VOB's in YUV first.
Last edited by sanlyn; 16th Apr 2013 at 08:07.
-
The other post I post about spilling color, the source is also a region 2 DVD. The quality is questionable. Region 1 Fox Studio released a DVD early last month but is in 4:3 Pan-and-Scan format and has been cropped badly. (Needless to say, I preferred original widescreen version) So I'm just concerned about how to make this video look better. (but it seems helpless)
https://forum.videohelp.com/threads/355281-How-to-deal-with-color-spilling -
These are common problems with many inferior DVD issues.It's possible to generalize from posted still images, but getting more specific requires a sample of original, unprocessed video. You can use the free DGIndex utility to cut a portion from a VOB and save it as m2v for posting. That m2v would be in the original color space and essentially unprocessed. A few seconds is usually all that's needed.
Last edited by sanlyn; 26th Mar 2014 at 07:18.
-
Moreover, is there any solution to decimate this "aging dots" on the picture?

-
RemoveSpots(). Jagabo's old post is here: https://forum.videohelp.com/threads/344962-VHS-Cleanup-What-can-i-do?p=2152076&viewfull=1#post2152076
In the above image, the black levels are too high, bright green and bright red are clipped, and the image is too green. It takes a while to pinpoint many problems, but most people get the idea. Learning to use histograms and pixel samplers also helps.
-
This is it, the video clip

-
SmoothTweak(brightness=7, contrast=1.3, saturation=1.5, hue1=5, hue2=0)
I tried this but not as satisfying as the result sanlyn has given

-
Also, I've post another clip of the color spilling DVD.
https://forum.videohelp.com/threads/355281-How-to-deal-with-color-spilling -
Maybe it wasn't the writer's/director's intent to have a brightly lit restaurant scene. Maybe it was supposed to be dark and romantic.Originally Posted by xuguang_he
-
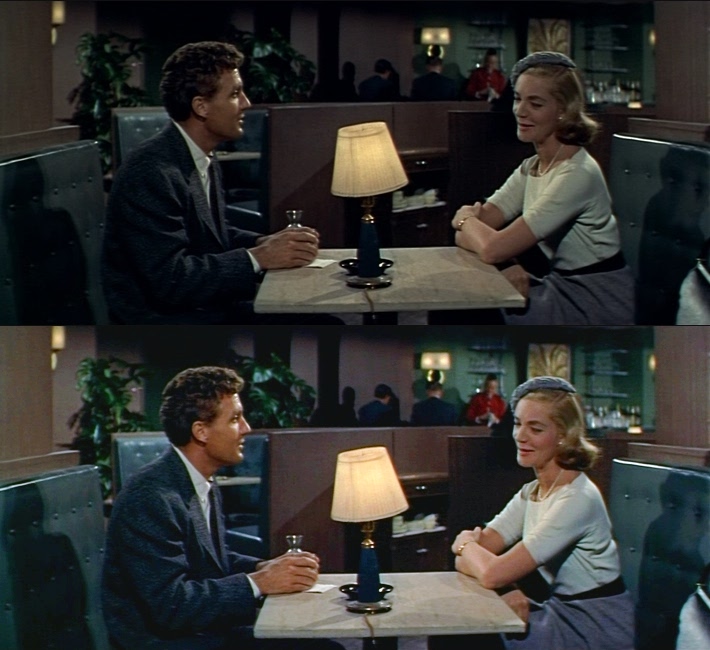
Looks OK to me, as does the SmoothTweak earlier; that's the kind of YUV code one would start with (using the original source). It's tough with something that's been RGB'd and JPG'd, with no prep in the original colorspace. Note that working with YUV retained more detail in bright areas like that table lamp. Best to correct that first, as done here. When I go to RGB it's usually to tweak what was done earlier.
Last edited by sanlyn; 16th Apr 2013 at 09:55.
-
The film was in DeLuxe color. Comparing with the movies been filmed before or after this film by 20th Century Fox (This was filmed in 1958), they all have luxury color, not merely the work done by the same cinematographer.
This is the one shot during that period of time. Its color is dark but not "old" and not strange at all.


-
Is there any code just to make the video look like what sanlyn has made the picture been?
-
Glad you have recognized it, sanlyn. The film named "The Gift of Love", starring Lauren Bacall, Robert Stack. One of the melodrama been made at that time.
-
Your results above look pretty good. Some tips I've often seen in video and photo sites about correcting this sort of thing:
- Work in dim light. In bright light, even with sunlight spilling from a window, eyes tend to "shut down" in the presence of bright objects even if they're off to one side.
- Don't stare at anything for too long a time. Over time, your senses adjust to dark or bright scenes and to color casts, to make them look "normal". Do something else for a few minutes (don't stare at the sun, that would make things even worse !!). When you come back to the work things will look different.
I made one pass at all the images, then worked on something else for a while and came back, then tweaked. And probably could have spent more time on it, but those crushed darks and grimy shadows in some shots were too frustrating. A lot of video work is easier than this. "Problem" videos just take more patience. -
That is to say, SmoothTweak() will make it look like this (your screenshot):

But to tell the truth, I must say that no matter how I change the settings, the result was still not as good as your picture above shows. -
I could only made it look like this:
with the code of " SmoothTweak(brightness=7, contrast=1.3, saturation=1.5, hue1=5, hue2=0) "


 Quote
Quote
Similar Threads
-
Improve Combattler V color. How ?!
By SB4 in forum RestorationReplies: 2Last Post: 1st Apr 2013, 08:25 -
Improve color in Sony Vegas 8
By namphong0612 in forum EditingReplies: 2Last Post: 25th Sep 2011, 23:06 -
Improve anime color
By SB4 in forum RestorationReplies: 7Last Post: 8th Jun 2011, 18:23 -
[color=blue]video oediting software for ASUS Eee PC (white ones)[/color]
By helpmepls in forum Newbie / General discussionsReplies: 1Last Post: 6th Feb 2009, 08:53 -
Color shift in ffmpeg X - ffmpegX native color space and gamma?
By rbot1980 in forum ffmpegX general discussionReplies: 0Last Post: 2nd Feb 2009, 22:16