


Hi,
I looked through some FAQ's by lordsmurf and some other posts. I think I got some info but i am still confused and need help. When i capture video to my pc it looks grainy and dark. I see peoples videos on youtube, etc and the quality looks very good in alot of cases. Obviously those came from the pc so what the heck am i doing wrong?
My issue: Video captured to PC looks much darker and grainier than when I play it on my TV. I did read that some of this is expected, but how do the other people that post on you tube have good files?
I also read you can capture in interlaced mode but it still doesn't seem to change anything. Is there a way to change the monitor settings to behave like a tv?
My setup:
Camera: Canon ZR850
Capture: Hi quality firewire cable to my firewire card
OS: Windows Vista Ultimate
Software: Adobe Premier 2.0
Thank you for any help.
+ Reply to Thread
Results 1 to 19 of 19
-
-
Computer monitors have different gamma curves than televisions. Video will look dark on a computer because of this. If you are producing video to be watched on TV you should ignore the fact that it looks dark on the computer. If you want video that's only to be viewed on the computer you can brighten it up with any number of video editing packages.
Another possible issue: Most media players use Windows' graphics overlay feature. Overlay usually uses separate brightness and contrast settings from the desktop's. You can adjust the overlay settings from the graphics card's configuration applet.
Note that capturing from your camcorder via firewire is basically a file copy. The digital video in the resulting AVI file is exactly what was on the DV tape. -
Thank you for your reply. Do you have any suggestions of packages to brighten it up? Also, if If I change the overlay settings, do those only apply to played video and not the rest of the PC? Like games and the desktop?Originally Posted by jagabo
-
Member

- May 2006
- United States


[quote="opflash"]
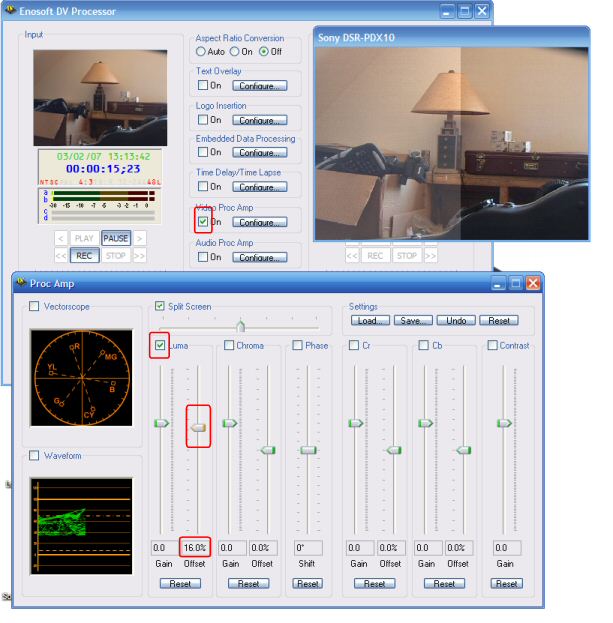
Use our Enosoft DV Processor. It's one of the things it was designed for and is by far the fastest way to do it. Plus it is very easy. And free for personal use.Originally Posted by jagabo
You can apply the brightness adjustment either during capture to the incoming DV or to existing DV files on your system.
Use the Proc Amp function and increase the Luma Offset - this is the same as brightness. It also has a split screen function to help see the before-and-after.
 John Miller
 -
[quote="opflash"]
Originally Posted by jagabo
I just realized.....if it is a direct copy, why does it look deinterlaced then on the monitor but not on the pc? Is there a way to make the monitor behave as a TV besides the overlay options?
Thanks again! -
[quote="JohnnyMalaria"]
Originally Posted by opflash
Damn, thanks for that reply. that looks very useful and has screenshots. I really appreciate that! I also noticed my video looks grainier on the PC. This may help as well? -
You only see one field at a time on a TV. On the computer monitor you see two fields at once (unless the playback software is automatically deinterlacing on-the-fly -- like Microsoft's DV decoder and Windows Media player).Originally Posted by opflash
Not really. You could turn off the overlay feature, then videos would be drawn to the desktop. Then you could adjust the desktop brightness and contrast to make the video look good. But everything else on your desktop would be too bright and washed out.Originally Posted by opflash -
Thank you so much for taking the time to help.
Is there a way to change what file format it is copied in? It always captures in avi format. If i capture in Windows movie maker will it cause it to use MS DV codec?
I guess those people on youtube must go through alot of hassles to get the video to look good. I don't mind doing the extra work, I just want to know what I'm doing. -
Member
- May 2006
- United States
-
You're most welcomeOriginally Posted by opflash
The grainier appearance is probably because a PC monitor is a very accurate and high resolution display. A typical TV is rather crude in comparison and can hide a multitude of sins.
I recommend the following workflow with our program:
1. Set the Input to be an existing AVI or a live feed from your camcorder
2. Since you are using Vista, set the audio options to use a non-DirectSound option (See the help file).
3. Set the Output to be a Video Renderer.
4. Start the processor (Run)
5. Turn on the Proc Amp and fiddle around until the brightness is how you want it to be.
6. Stop the processor.
7. Save the configuration (Save... on the main window) so you can load them at a later date
8. Change the Output to be an AVI file (Type 1 or Type 2 DV, depending on your needs)
9. Run the processor. Now the Input will be converted and written to an AVI file. If you are using a pre-existing AVI, the processor will automatically stop when it reaches the end.
Next time you need to adjust the brightness, simply load the configuration that you saved before and set your Input and Output as needed. If you use your camcorder as the Input, the configuration will automatically connect to it. Once you set everything up once, it will only be a couple of mouse clicks in the future to perform the brightness adjustments.John Miller -
I recommend you not process your DV AVI as you capture. That is you master copy. You want it to be as faithful to the original as possible. Every time you decompress, process, and recompress you'll be losing quality.
Since it looks like you will be converting to some other format later, you might as well do the brightness and contrast adjustments then.
And keep in mind that if you brighten the picture up so it looks good on the computer, it will look over bright and washed out if you ever view it on TV. -
Is your goal to optimize the file only for computer progressive display or do you also intend to play this file to a TV. The processes are different.Originally Posted by opflash
The process I use assumes future optimal TV playback (standard TV or HDTV). Then I modify that file for a separate deinterlaced PC playback file if needed. That way you get optimal playback for both. -
Member
- May 2006
- United States
-
FYI, adjusting the brightness on-the-fly with our software preserves the full, original quality - there is absolutely no generation loss. You can adjust brightness on DV streams simply by changing DC coefficients - you don't need to decompress/decode the DV data at all.Originally Posted by jagabo
Not with the way our software does its thing.....a bold claim, perhaps? But I can guarantee there will be no quality loss when adjusting the video brightness.Originally Posted by jagabo
Also, if capturing from tape, the master is on the tape.John Miller -
Again, thatnk you all for your help. I think everyone has some great input. To answer the above: I want to keep the original file intact and make one copy that will be for Pc presentaion only. It is that file I need to make presentable and make it look like i am watching it on TVOriginally Posted by edDV
-
Process summary for standard definition (DV camcorder or TV capture)
For TV/HDTV playback:
---------------------------------------------
1a. Capture DV to DV AVI file (interlace)
1b. Capture TV to 480i uncompressed or 480i MPeg2 (interlace)
Note: you can view these files on the computer with a deinterlacing player like VLC, WinDVD, or PowerDVD.
2. edit 480i (DV, uncompressed or MPeg2)
3a. encode to interlace DVD standard MPeg2. Optionally archive the timeline to higher quality DV or Huffyuv files for future use.
Note: For film based TV captures only, inverse telecine may optionally be used to create a progressive DVD.
4. The resulting DVD will play optimally to a TV or can be played on the computer with a deinterlacing player like VLC, WinDVD, or PowerDVD.
For PC-internet optimization:
-----------------------------------
3b. Deinterlace the edit timeline. The deinterlace method differs depending on intended purpose. For internet distribution, field discard to 352x240 is an easy method. Then encode to your intended progressive distribution format (e.g. divx, xvid, wmv, flash media, h.264, etc.). -
Thanks. Is there a software that is user friendly that does this easily? I have Adobe Premiere 2.0 but it isn't all that user friendly. I'm almost sorry I bought it.Originally Posted by edDV
-
Member
- May 2006
- United States
-
Windows Movie Maker
You can easily create WMV movies with the right size for internet distribution.John Miller -
For Premiere Pro 2 or any of the consumer versions (Premeire Elements, Vegas Movie Studio, ULead Video Studio, etc.) the process is similar.Originally Posted by opflash
For DV source,
1. Set project format to DV, 29.97, lower field first.
2. Edit your video
3. Export timeline to MPeg2 720x480, Bottom field first, VBR or CBR 8000Kb/s (average) or above.
4. Pass the MPeg2 file to the DVD authoring program.
5. Burn the DVD.
6. For divx, wmv, flash, etc. go back to the editing program and export to the format you want if supported. If it isn't supported, export to DV-AVI or uncompressed or Huffyuv and use a separate encoder.
For MPeg2 source,
The process is similar but project selection may require top field first depending on capture device. If the picture jumps vertically during motion, change top/bottom setting. For MPeg2 source, DV or uncompressed project settings can be used. -
Agreed that is the shortcut to UTube. They will convert your wmv to flash.Originally Posted by JohnnyMalaria
-
Really wish I could use Enosoft DV Processor with HDV....
Cheers,Hugh from Winnipeg
 Quote
QuoteSimilar Threads
-
Very Poor Video/sound quality
By mikey56hernandez in forum Newbie / General discussionsReplies: 1Last Post: 9th Aug 2011, 21:27 -
best audio video quality of youtube poor quality and not hq flv videos.
By nusratjaveid in forum Video ConversionReplies: 3Last Post: 20th Jun 2010, 20:23 -
Poor Video Quality
By itsernst in forum Capturing and VCRReplies: 20Last Post: 10th Feb 2010, 17:32 -
Poor video quality on WinTV-HVR-1600
By brightgreen in forum Capturing and VCRReplies: 7Last Post: 28th Nov 2009, 23:47 -
Poor video quality full screen
By gman0417 in forum Media Center PC / MediaCentersReplies: 2Last Post: 9th May 2008, 09:00