Restoring a short clip of damaged VHS video
This is my first attempt at a guide, so please bear with me if I screw something up.
Okay, let’s say that you are doing a VHS to DVD transfer but your tape isn’t in pristine condition. Let’s say that there is one critical section in particular that is damaged (maybe the part of a home video where your one year old daughter is giggling and saying “Dada” for the first time) and you are willing to invest some serious effort in “repairing” this part of the video.
Tools you will need:
VirtualdubMod
AVIQuick
Microsoft Paint or a photo editor of your choice
Lots of harddrive space
An Mpeg converter and DVD authoring software
Lots of time and patience
I am assuming that you know the basics of working with VirtualdubMod.
First, transfer your video clip to your PC. Open the clip in VirtualdubMod (you can use Virtualdub instead, if your video is not in mpeg format). Once it is in VirtualdubMod (or Virtualdub), trim the video until only the ‘damaged’ section is left remaining. Next, demux the audio to a separate file and save it for later. (You will re-mux the audio back in once you have fixed the video. Since there are already excellent guides for de-muxing the audio, I'll skip that process here.)
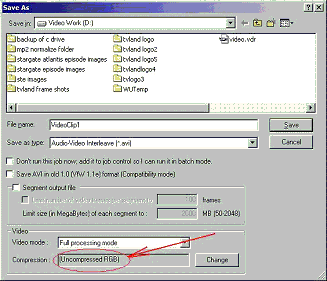
Now save to a file in uncompressed RGB format.
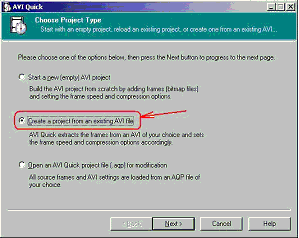
Open the AVIQuick program.
This program will take an avi clip and convert it to a series of numbered images in a subfolder of your choosing. It is perfect for what you need to do. Assuming that the video is half resolution (352 X 480), then each frame will be converted to a 496 kilobyte bmp file. Hopefully, the avi clip you need to ‘restore’ is reasonably short.
Select “Create a project from an existing AVI file” and then click NEXT.
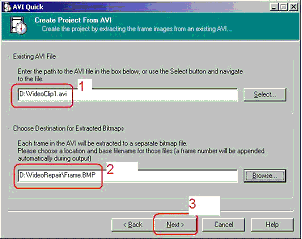
Now click the ‘SELECT’ button and find the avi clip.
Next, select the BROWSE button and create a subfolder for the bmp files. Specify the filename root, for example “Frame”. AVIQuick will create a series of bmp files named Frame1.bmp, Frame2.bmp, Frame3.bmp, etc. Now click on NEXT and watch the frames get converted.
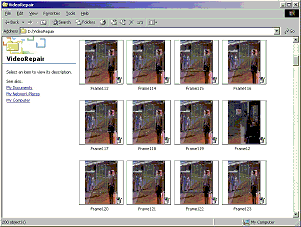
Close AVIQuick. Now, use Windows to view the bmp files in your subfolder. Select the VIEW > THUMBNAILS. This will allow you to identify which frames need some attention with your photo editor.
Restoring the frames.
This part of the operation will take you a considerable amount of time and effort to perform. It is not something that you would want to do unless the video is extremely important. Fortunately, there are a few tricks that you can use to help the process along.
For instance, if you are working with NTSC video, then it could be telecine video, where some frames are repeated. When you have a damaged bmp ‘frame’, take a look at the frames on either side. Is either one of those a repeat of the damaged frame? If so, is the other frame in good shape? If yes to both questions, then replace your damaged frame file with a copy of the good one and rename the file to maintain its position within the sequence of files.
Okay, so the damaged frame is not repeated or maybe the frames on either side are damaged too. Now you have to be more inventive.
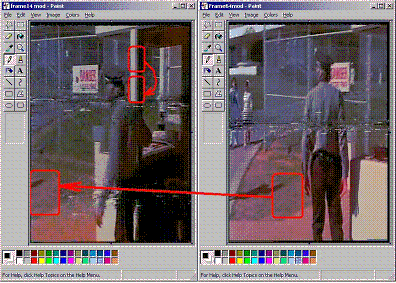
Take a look at the frames further ‘upstream’ and ‘downstream’ in the sequence. Due to motion of the camera and objects in view, these frames will not be identical. But perhaps the background hasn’t changed very much or perhaps you can find areas in common - damaged in one frame but not the other. In that case, open both frames in Microsoft Paint. Use the box tool to select the ‘good’ section of the ‘good’ frame and then copy it over to the damaged section of the frame you are restoring. Take care to align the borders so that it blends in as closely as possible.
When you have done what you can with sections from other frames, then you can try using sections within the same frame. For instance, the post of the guard shack in Frame14 of our example video.
Clearly, cut-and-paste methods will have their limits. At some point, you are going to have to fix the video frame pixel-by-pixel. It will get a bit tedious here. However, remember that perfection is not required. Each frame is one frame in a long sequence of frames and minor imperfections will not be noticed. Use your best judgment. By all means, spend some time practicing and developing your artistic skills. Learn what gives acceptable results (to you) with the amount of effort expended.
What about jitter?
One of the most annoying side effects of a damaged VHS tape is the tendency to jitter (vertical upward bounce of one or more scan lines) from frame to frame. Even tapes in good shape can have this problem and Time Base Correctors (TBCs) may not correct it.
If you have jitter in the video clip that you are restoring, then there is something you can do about it.
First, identify the frames with the problem. Re-open the avi clip in Virtualdub and step through it frame-by-frame, making a note which frames jitter. Also, take note on how many scan lines it moved vertically. (Remember: Virtualdub starts counting frames at “0” and AVIQuick starts at “1”.)
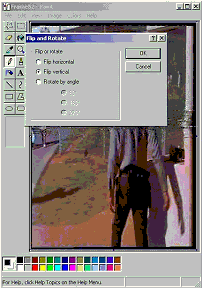
Use Microsoft Paint and open the corresponding first jitter-affected bmp file. Then go to IMAGE > FLIP/ROTATE and select FLIP VERTICAL. Select OK.
Now your ‘frame’ is upside –down.
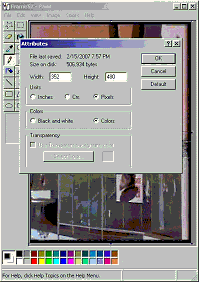
Now open IMAGE > ATTRIBUTES. Here the image width and height is specified. Increase the height by one for each scan line that the frame ‘jittered’ upward. (For example, if the frame is 352 X 480 and the frame jumped up one scan line, then increase 480 to 481). Click OK. Now the frame has a thin white line on the bottom.
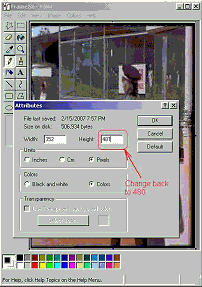
Perform the IMAGE>FLIP/ROTATE> FLIP VERTICAL again to put the frame back upright. Now, select the IMAGE>ATTRIBUTES again and reduce the height number back to ‘normal’ (In our example, back to 480). This will delete scan line(s) at the bottom of the frame.
In effect, you have shifted the whole frame back down to where it needed to be. The only side effect is that there are now white scan lines at the top of the frame. However, in comparison to the jitter, this is a minor problem and on some TV’s will never be noticed.
Save your bmp file. Continue on to the other frames that jittered and fix them too.
Getting back to your AVI
Okay, you have now done what you can to restore your video clip on a frame-by-frame basis. Now you need to put it all back together again and test it out.
Open VirtualdubMod, select FILE > OPEN VIDEO FILE and then browse until you find the subfolder with your ‘restored’ bmp images. Select the first numbered frame. VirtualdubMod will automatically detect the sequence of numbered files once you have specified the first file. Click OK. Next, re-mux in the audio file that you saved at the beginning of this whole process. Now, save your restored avi file.
You now have a restored avi clip. Using VirtualdubMod, you can now import the original video file, delete the bad section, append the ‘restored’ clip and move it into place where the old deleted section used to be. Now, save the whole thing or frameserve it to your favorite mpeg encoder and dvd authoring program (there are plenty of other guides for how to do that so I won’t go into that part of the operation here).
It should be clear by now that this process of frame restoration is not going to make your video as good as new. Nothing is going to do that. However, your final product is going to be better than the original. In some cases, depending on the time and effort and your degree of artistic talent, it will be MUCH better video than what you started with. Have fun!mgy999a
+ Reply to Thread
Results 1 to 1 of 1
Similar Threads
-
Sync/align one short clip into one big clip
By diamondback in forum AudioReplies: 1Last Post: 2nd Nov 2011, 10:31 -
cd/dvd players burners..Any better with restoring scratched or damaged cd's
By scustalow in forum DVD & Blu-ray WritersReplies: 4Last Post: 13th Dec 2009, 17:36 -
How to make a short animated movie/video clip? Example included.
By UmmAddan in forum Newbie / General discussionsReplies: 1Last Post: 3rd Feb 2009, 10:36 -
Short video clip to stills
By swkenney in forum Video ConversionReplies: 2Last Post: 16th Sep 2007, 13:25 -
How to make a short clip?
By kenzo69 in forum ffmpegX general discussionReplies: 2Last Post: 18th May 2007, 20:15


 Quote
Quote