


Hi guys,
Thought I'd make a bit of a story/guide to lapping your CPU. It's been mentioned already by rallynavvie here:
https://forum.videohelp.com/topic264928.html#1280431
As you can see, those CPUs appear to have copper IHSs (integrated heatspreaders). I'll be having a go at doing this to my Intel Core 2 Duo E6600 tonight.
Currently, using F@H on both cores, ORTHOS (dual-core, GROMACS test) and a dual-CPU DivX encode, Core #0 is hitting 60 deg C and Core #1 is hitting 64 deg C (using CoreTemp to read these from the internal thermal diode). I should add that my E6600 has been overclocked from 2.4GHz to 3.2GHz with no voltage increases, and I'm using an Arctic Cooling Freezer 7 Pro with Arctic Silver 5 TIM.
I'll do the lapping over the next few hours and I'll let you all know how it goes... If the CPU survives!
Here we go...
EDIT - In case anybody is wondering, "lapping" something means to sand away at the surface in order to smooth it out. A flat, smooth surface interfacing with a flat, smooth surface usually trnasfers heat better than rough, uneven surfaces.
+ Reply to Thread
Results 1 to 18 of 18
-
-
Have you already lapped the heatsink?
-
Lapping compound, wow I haven't thought of that in years. We used to use back in the seventies for vacuum pump repair.
Any good machine shop supply shop should have it really cheap. Don't forget that the surface you lap on has to be flat and the cou must be held flat too. IOWs the two surfaces should be parallel.
Good Luck and be sure the CPU is good since you will be voiding the warranty.
Cheers -
I've lapped down heatsinks before, but never a CPU.
 Most bigger hardware stores should carry 400, 600, 800 and sometimes finer grits of 'wet or dry' sandpaper. The 400 is for 'leveling', but I would only use that on a copper or aluminum heatsink and only if it's fairly distorted.
Then you need a piece of plate glass. A thicker one is preferred, maybe 3/8". Try a glass shop and they may have a scrap for cheap. About 12" square is plenty. Don't get tempered glass. If you scratch it, it 'explodes' in many tiny pieces.
I would start with 800G and some water, just to see how level the HS is. Then if it's bad, use a courser grit. You wet the sandpaper on both sides, then it 'sticks' to the glass and stays in place. Smooth out any bubbles. Rinse the paper occasionally to keep it from loading up and keep the grit surface wet. A spray bottle of water is handy.
Hardware stores often carry polishing compound also. If not, try a hobby shop. Most of those compounds have oil in them, so be sure to wash off your heatsink with dish soap and warm water. Best to remove the fan before any of this.
You can put the polishing compound directly on the glass for final polishing. They polish telescope mirrors the same way.
It should really build up your arm muscles.
-
It's done. And, I'm sure, you'd like to know what happened. Does my E6600 have wings and a halo?
No. It certainly doesn't. Photos will follow tomorrow (it's a bit late tonight, and it's been a long, hard day at work) but my IHS was pretty concave - this is normal enough for Core 2 Duo IHSs. I worked away all the nickel plating from the IHS, then began polishing the copper underneath. I didn't manage to bring it up to a perfect polish with only 1500 grit paper to work with, but it's close enough.
Now, the temperature differences. Remember that the previous temperatures were with fully-bedded-in AS5 TIM, and this is new stuff (obviously) so it'll need 300 hours to properly bed in. That will drop the temperatures another few degrees from what I've seen.
Core #0: 60 deg C (no change)
Core #1: 60 deg C (-4 deg C)
Once the TIM beds in, I'll probably see a further 1 - 3 deg C drop on both cores. Not bad for an hour of work. Not bad at all. Plus, it's brought both cores in-line with one another.
I won't be posting results after 300 hours. Nor will I be lapping my Freezer 7 Pro HSF (it's poorly finished just now). There's a good reason for this: in a few days time, I'll get around to fitting a Corsair Nautilus 500 liquid cooling system. 8) -
Here's what I did - it's dead easy.
First of all, get yourself some sandpaper. 320, 600, 800 and 1500-grit will suffice. 3M "Sandblaster" paper is excellent - no idea how it manages to be so much better than bog-standard sandpaper, but there you go. Do not use water - apart from anything else, if it gets into your CPU you'll have had it. Take it slowly with dry sandpaper.
Here's a step-by-step:
- Clean the TIM (thermal interface material) from the CPU using isopropanol (propan-2-ol)
- Open the socket up and, if possible, take a photo. Note the position of the little gold triangle (LGA775) or any identifying mark so you know where to put the CPU once you've sanded off the writing (which some people use to get the CPU in the right way when they don't have the instructions to hand)... Or:
- Remove the CPU and clean it up properly using isopropanolOriginally Posted by TBoneit

- Take some masking tape and cover the hole up on the CPU (there's a gap that you'll see between the green board and the IHS (integrated heatspreader) - this doesn't need to be perfect
- Take a sheet of glass - from a photo frame for example - this will provide a flat surface for you to tape the sandpaper to
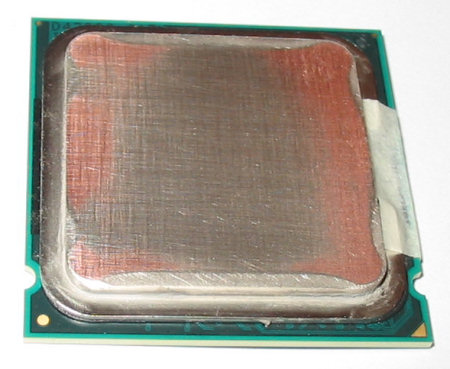
- Begin with the 320-grit sandpaper, rubbing in circles - don't apply pressure, just let the weight of your hand and the sandpaper do the work. Every few seconds, rotate the CPU 90 degrees.
- Notice how it rubs off unevenly? The first bits to turn copper-coloured are the high points. Most Core 2 Duo CPUs are concave - the centre is lower than the edges
- Once all the nickel is gone, switch to the 600-grit sandpaper. Rub in a combination of circles and straight lines. Again, no pressure on the CPU - allow gravity to do the work. Keep going until you're free of all the big scratches
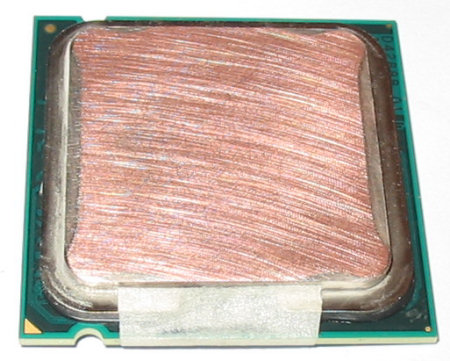
- Move on to 800-grit sandpaper - this will simply polish the CPU up a little
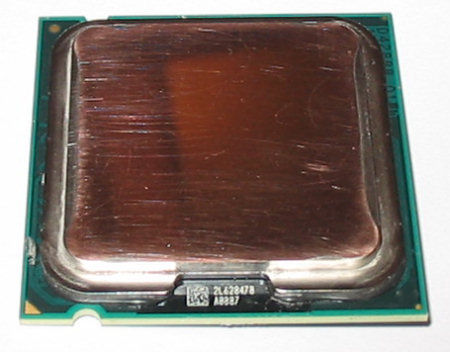
- Move on to 1500-grit sandpaper. If this is the final stage, be very gentle and aim for the smoothest finish you can. Don't worry - you won't get rid of all the scratches and it won't be a mirror, but it's OK. That's what TIM is there for.
Your CPU will now look something like this:
Clean up all the rubbish from the CPU using isopropanol, and make sure the masking tape is removed. Reinstall into the socket as per instructions (remember to use TIM), boot up, and enjoy lower temperatures!
I can't take any reponsibility for damage to your equipment if you follow this (somewhat rough) guide. If you decide to go ahead, it's your CPU and at your own risk. I can't guarantee that this is foolproof... Although if I can do it, I'm fairly certain anyone can! I just have to say this bit so I don't get landed with a bill from someone who screwed it up somehow. Also, if you don't have an IHS (the metal bit on your CPU) and it has an exposed core (like the older Athlon XP series, eg. XP2500) DO NOT try to lap that! It'll certainly run cooler... Because it'll be dead.
Thanks to TBoneit for the tip about aligning Core 2 Duo CPUs with their sockets! -
I smoothed down my Thermaltake heatsink this evening. I didn't have the proper sandpaper handy, so I used polishing compound. It took about half an hour to get it down level.

29C at idle, ( AMD Athlon AM2 5200+) but I haven't installed any programs in the new HTPC. At least I was able to minimize the amount of Arctic Silver on the heat spreader. I didn't expect much improvement, but I was a little surprised how warped the cooler base was.
Cobra, at 60C, I would be considering water cooling also. -
I've got a Corsair Nautilus 500 in the next room, just waiting to fit it when I get a free day. It'll take me that long because I'm wanting to completely strip the PC then rebuild it.
-
Do you have the water blocks for the northbridge and the GPU? That's where I'm seeing a lot of heat from newer MBs. I need to check the temps for the northbridge on the computer I'm putting together now, as soon as I find my temperature gun. I know it's hot enough to burn my finger.
But water cooling is nice, as long as it's quieter than fans. I'm using all 'quiet' fans, so it's a little harder to manage heat than with some of the 'leaf blower' cooling systems.
-
I'm planning to water-cool the CPU only. I could fit waterblocks for NB and GPU, but the NB has a good heatsink with heatpipes leading to extra heatsinks (also cooling VRMs) so removing it would not only be difficult, but it would leave the VRMs without cooling. As for the graphics card - it's a 7900GTO with a massive heatsink and fan on it. Under load it hits only 60 deg C, so it's no big deal (thankfully).
I'll definitely have to consider water-cooling NB if it becomes too hot, though, you're right.
-
BTW on the Core 2 Duo cpus you only have to align the two notches to the socket. To me it is a improvement as it can only go into the socket one way unlike the older P4s where people were always coming in to get the pins unbent. I have seen someone ruin the MB socket. It looked like he dropped the CPU on the pins in it and bent them.
-
So that's what those notches are for!
I didn't stop to think. Would you mind if I updated the post/guide/story with that piece of information? -
Sure why not. Videohelp is about helping others.
-
Thanks, TBoneit. I've added it in.
Right - time to completely rebuild this machine and strap on that liquid cooling system. -
I thought the new sockets recess the pins into the socket housing until you clamp it down so that you'd have to really try to bend the pins on the board? My newest boards are Socket 603/604 so I haven't built a rig with the new pin-less chips. Must make lapping a lot easier though
Speaking of which:
 FB-DIMM are the real cause of global warming
 -
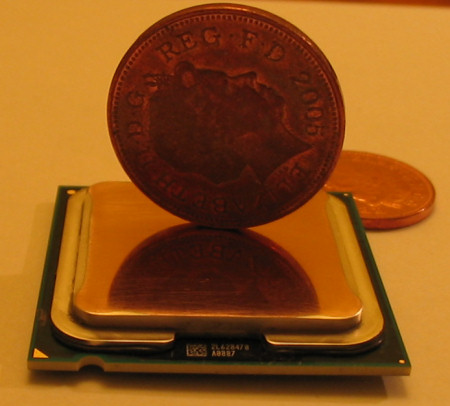
You deserve an award for that shine! 8)
Looks like you've polished your RAM up, too.
I installed the water-cooling kit on my PC and took a look at the temperatures.
CPU: 3.2GHz (356 x 9) vCore 1.3250 (stock)
Core #0: 50 deg C (-14 deg C)
Core #1: 48 deg C (-12 deg C)
The negative temperatures indicate the drop from the Arctic Cooling Freezer 7 Pro. My stress test consists of ORTHOS (dual-core stress test set to GROMACS), a dual-core DivX encode using VirtualDub, and an instance of RealStorm (not multithreaded) just to add a little extra work.
3.2GHz was the maximum stable overclock I got from air cooling, due to the temperatures and stability (I didn't raise vCore). However, I am now achieving 3.7GHz (412 x 9) with a vCore of 1.4250v (also stable at 1.4000v with minimum testing).
I did try for 3.8GHz, but it wouldn't boot. I raised the vCore from the 1.4000v used for a stable 3.7GHz clock to 1.4250v but this didn't cure it. That indicated that the CPU was probably topping out. I backed the frequency down but left vCore that little bit higher. +0.1v vCore isn't going to hurt, and the extra buffer for stability is always useful.
My temperatures are now running at 62 deg C under stress. It leveled off at 62 deg C after about 45 minutes of ORTHOS running. That's a nice temperature - hot, but not too hot.
A 1.3GHz overclock over stock frequencies isn't too shabby, either. 8) -
http://valid.x86-secret.com/show_oc.php?id=232266
There's all the information regarding the overclock. Notice the RAM is running 1:1 with the CPU now, too, thanks to the fairly high FSB of 406MHz (1624MHz effective).
EDIT - It passed all the stress-testing, but I've backed it off by 50MHz just to give a small buffer. 2.4GHz --> 3.65GHz on FSB alone isn't bad at all. -
It must be flying!
I'll bet the lapping to get a better contact would work on the current crop of AMDs too. The bigger problem with those being that they have pins unlike the Intels do now. So to be safe lapping the amd AM2 chips you would be best off with a AM2 socket off of a defunct motherboard to hold the CPU during the lapping to protect the pins.

 Quote
QuoteSimilar Threads
-
New CPU
By Sckinhunter in forum ComputerReplies: 9Last Post: 13th Apr 2011, 02:10 -
CPU
By HotDamn! in forum ComputerReplies: 7Last Post: 17th Dec 2009, 02:21 -
Installing CPU
By HotDamn! in forum ComputerReplies: 11Last Post: 11th Dec 2009, 01:40 -
CPU-Z reading for Intel Allendale cpu
By budz in forum ComputerReplies: 11Last Post: 8th Jul 2007, 20:33 -
I'm having two problems with my CPU.
By supaduparocka in forum Software PlayingReplies: 5Last Post: 16th May 2007, 14:55