


1GB to 4GB each
9800GT, 7600GT, ATI-9550
Canopus ADVC-100, HVR-1600, ATI 550/650, PVR-350, ...
Philips 5992, Pioneer DV-363, JVC, Sony various
LG D787, Lite-On, Ony, various
Pioneer 111D, Sony BX-37 Blu-Ray
LG-BH10LS30 Blu-Ray Burner
GigaByte (2), VIA, Asus
1 Mac/FCE, 2 DV/HDV PC edit stations Sony Vegas Pro 11, Platinum 10, Premiere Pro, plus others")
I'll do huffyuv in a sec.
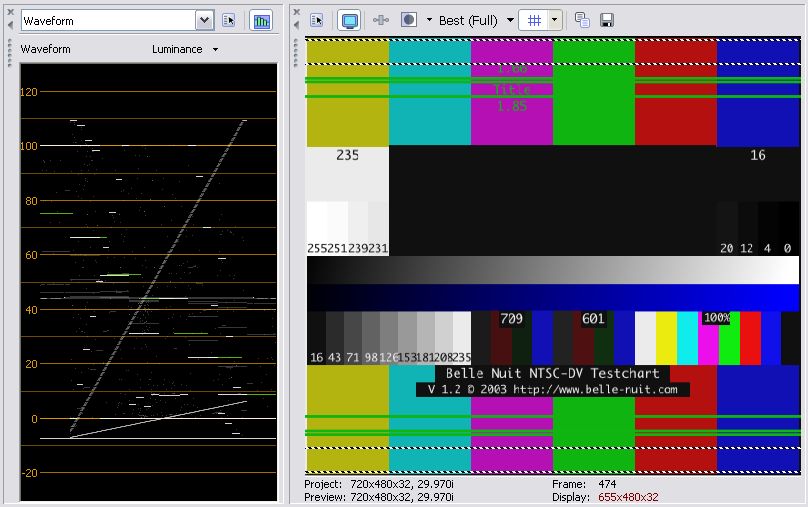
First here is case one with VirtualDubMod (Panasonic DV codec).
Settings Uncomressed RBG, Save as AVI.
Input file is the SMPTE DV (ITU-REC601 levels) color bar.
The DV file is decoded by the Panasonic codec to uncompressed RGB 0-255 levels. When I output as AVI, the waveform looks like this.
Note that everthing below 16 black and above 235 white gets clipped off.
If I encode this to DVD MPeg2 in Vegas using default settings, the levels are non-standard 0-255
.mpg.jpg)
+ Reply to Thread
Results 61 to 79 of 79
-
-
I did screen grabs using Sony Vegas 6.0a
These frames match the original two frames that I posted using the VirtualDubMod/Photoshop method.
Can you see the difference?
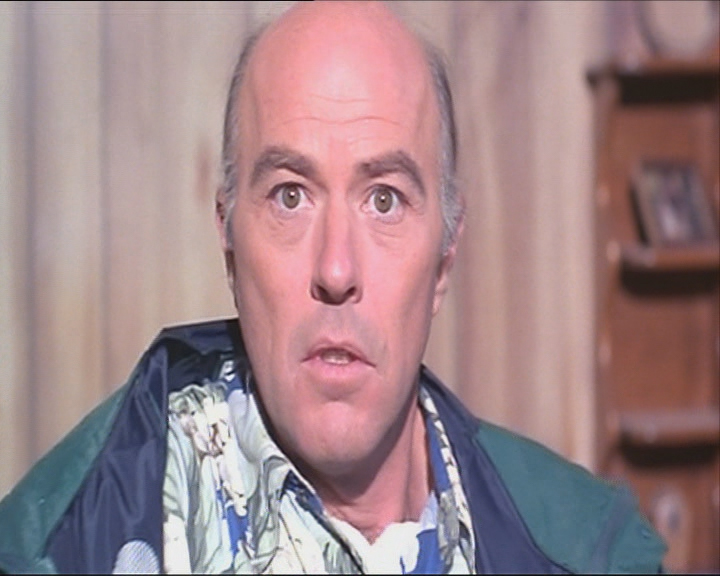
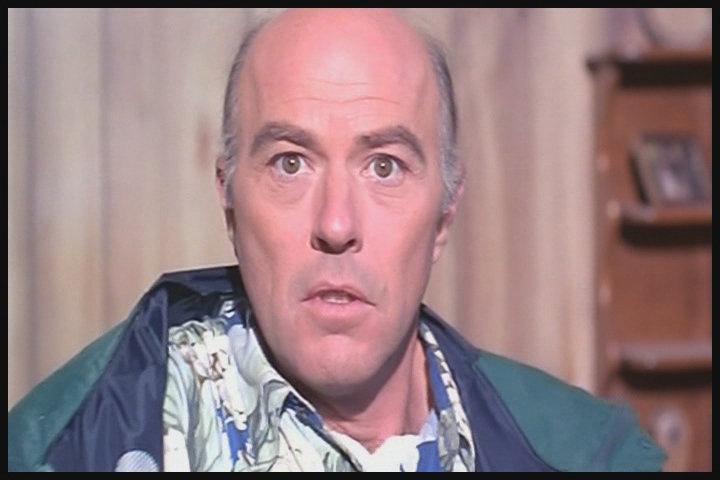
PAL DVD using VirtualDubMod and Photoshop

PAL DVD using Vegas 6.0a
NTSC DVD using VirtualDubMod and Photoshop

NTSC DVD using Vegas 6.0a

Yes I know there is an aspect ratio difference but the important thing is that there should be a difference in IRE levels between the two method i.e., VirtualDubMod/Photoshop VS Sony Vegas 6.0a
- John "FulciLives" Coleman
*** EDIT ***
When I did the VEGAS screen grabs I was 2 frames off so I just re-did the VirtualDubMod/Photoshop images since it was easier to re-do them. So all frames match now exactly (meaning I got the exact same frame 4 times) but there is still an IRE difference. This would indicated the VirtualDubMod/Photoshop method is flawed OR there are settings that need to be tweaked. BTW I did resize the VirtualDubMod images in Photoshop to match the size of the Vegas screen shots."The eyes are the first thing that you have to destroy ... because they have seen too many bad things" - Lucio Fulci
EXPLORE THE FILMS OF LUCIO FULCI - THE MAESTRO OF GORE
-
Vegas versions show correct here.
Did you see my VirtualDubMod post? -
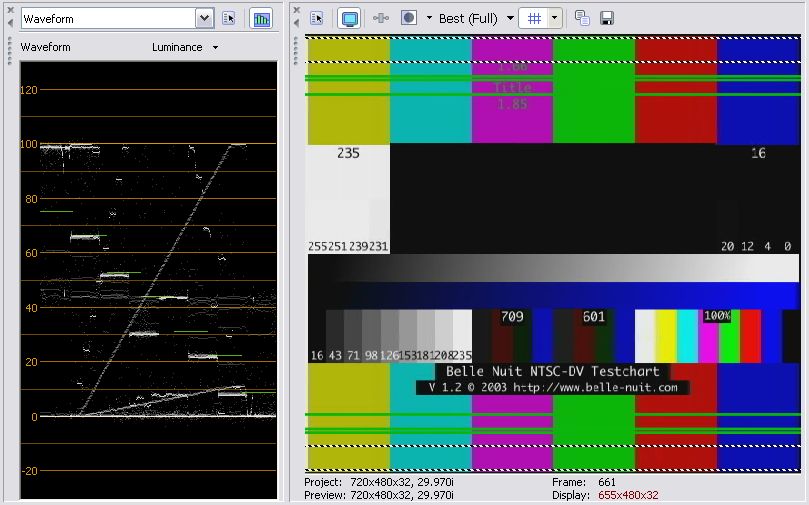
VirtualDubMod Case 2. DV input, DV output.
When the internal RGB 0-255 is re-encoded in the Panasonic DV codec, levels are resored to YCbCr 16-235, but all the material between 0-16 and 236-255 has been removed. (note the pluge is missing).
The above was repeated with uncompressed YCbCr (16-235) not using the Panasonic DV codec and the exact same thing happens. I would expect huffyuv to be the same.
The elimination of the overshoots will be most important for TV and VHS captures since noise alone will cause overshoots (and thus clipping). -
I just fixed my last post of the 4 images comparing the VirtualDubMod/Photoshop method with the Vegas 6.0a method.
All frames "match" now (I was off before) and the VirtualDubMod/Photoshop images were resized (in Photoshop) to match the size of the Vegas 6.0a screen grabs.
There is definately a difference in IRE levels between the two methods.
What to do now for future screen grab options?
Use Vegas ???
- John "FulciLives" Coleman
*** UPDATE ***
Here is a new picture to note:
Now this picture is a composite like I did before with PAL on the LEFT and NTSC on the RIGHT only this time I used the JPG images that were saved out of Vegas instead of the first time around when I used the JPG images from VirtualDubMod. So I used the Vegas images but to make this composite I had to load the images into Photoshop to resize the PAL to the NTSC size and then cut them in half and put them together. The important thing to note here is that the IRE levels are still the same after going through Photoshop. The Vegas images straight from Vegas and then those same images once processed through Photoshop still have the same IRE levels! My conclusion ... the changed IRE levels from the VirtualDubMod/Photoshop method is due to VirtualDubMod and not Photoshop."The eyes are the first thing that you have to destroy ... because they have seen too many bad things" - Lucio Fulci
EXPLORE THE FILMS OF LUCIO FULCI - THE MAESTRO OF GORE
-
Looks Good.
I discovered something tonight while posting those test patterns.
"Copy Snapshot to Clipboard" from Vegas Preview window looks better than save to JPG from Vegas. -
For those that don't have Vegas I've found you can use AVISynth with VirtualDub (any flavor) to produce stills with the MPEG files original luma levels. AVISynth's MPEGDecoder.dll filter will open the MPEG file and output YV12 in the 16-235 range (with the occasional overshoot and undershoot). The regular ConvertToRGB() filter works just like VirtualDub's in that the luma is stretched to 0-255 with anything below 16 or over 235 (in the source) cropped. But you can use either the PC.709 or PC.601 matrices to retain the original luma values when converting to RGB:Originally Posted by FulciLives
LoadPlugin("C:\Program Files\AviSynth 2.5\plugins\MPEGDecoder.dll")
MPEGSource("test.mpg")
ConvertToRGB(matrix="PC.709")
Opening this AVS file in VirtualDub will maintain the MPEG source's black (16) and white (235) levels and over/under shoot (0-15, and 236-255). -
Would you mind posting a more detailed explanation of the steps in this process, and where to get the filters, etc. I have basically no experience using AviSynth, let alone in concert with VirtualDub.Originally Posted by jagabo
-
Install AVISynth 2.5 from here:
http://www.avisynth.org/
http://sourceforge.net/project/showfiles.php?group_id=57023
Download Mpegdecoder (Nic's) from here:
http://www.avisynth.org/warpenterprises/
http://www.avisynth.org/warpenterprises/files/mpegdecoder_25_dll_20030216.zip
Unzip files into AVISynth's plugin folder, usually:
C:\Program Files\AviSynth 2.5\plugins
Create a text file (Notepad, whatever) with the extension AVS with the following lines:
# -= AviSynth v2.5.5.0 script v1.2.4 =-
LoadPlugin("C:\Program Files\AviSynth 2.5\plugins\MPEGDecoder.dll")
MPEGSource("File.mpg")
ConvertToRGB(matrix="PC.709")
If you installed AVISynth and/or MPEGDecoder.dll somewhere else be sure to change the LoadPlugin() line to the proper path.
If the AVS script isn't in the same folder as the MPG file you want to open change the MPEGSource() line to include the full path to the MPG file.
Open the AVS file in VirtualDub/MPEG2/Mod just like you would open any video file, File -> Open Video File.
A second way to do this without having to manually create an AVS file each time is to create a template for VirtualDubMod. Put the following text into a file with the extension AVST in VirtualDubMod's Template folder:
#ASYNTHER MPEG2Source Retain Luma
LoadPlugin("C:\Program Files\AviSynth 2.5\plugins\MPEGDecoder.dll")
MPEGSource("%f")
ConvertToRGB(matrix="PC.709")
I called it MPEG2RetainLuma.AVST.
Now when you Open an MPEG file in VirtualDubMod, use the "Use AVISynth Template" pulldown at the bottom of the dialog to select "MPEG2Source Retain Luma" and open the MPG file. AVISynth will automatically create an AVS file and use it to open the MPG.
By the way, Nic's Mpegdecoder.dll can't open VOB files (at least not the one I happen to have on my hd). I'm looking for a solution for VOB files now... -
Thanks for the instructions, I will definitely check it out!
-
I tried this and it works. A nice neat way of doing it without having to write an AVS script each time. I like itOriginally Posted by jagabo

However no joy here ... the IRE levels are still not "correct".
PAL MPEG using VirtualDubMod and MPEG2RetainLuma
PAL MPEG using Vegas 6.0a

NTSC MPEG using VirtualDubMod and MPEG2RetainLuma
NTSC MPEG using Vegas 6.0a
As you can see they still do not match!
For the record here are the AVS scripts made by the MPEG2RetainLuma function:
PAL MPEG
NTSC MPEGCode:#ASYNTHER MPEG2Source Retain Luma LoadPlugin("C:\Program Files\AviSynth 2.5\plugins\MPEGDecoder.dll") MPEGSource("C:\PHANTASM3\P3_PAL_TEST_CLIP.mpg") ConvertToRGB(matrix="PC.709")
Does that look correct?Code:#ASYNTHER MPEG2Source Retain Luma LoadPlugin("C:\Program Files\AviSynth 2.5\plugins\MPEGDecoder.dll") MPEGSource("C:\PHANTASM3\P3_NTSC_TEST_CLIP.mpg") ConvertToRGB(matrix="PC.709")
BTW I used the VirtualDubMod option to save direct to a PNG file but they were too big so I opened the PNG files into Photoshop to make the JPG files seen here but I could see the IRE was off just looking at the opened VirtualDubMod window so it wasn't Photoshop or anything that caused the "incorrect" IRE levels. I'm getting a good feel of this image now LOL
- John "FulciLives" Coleman
P.S.
Maybe someone can test these to make sure the IRE levels differ using Vegas or whatever but they look different to me. Who knows maybe my eyes are getting crossed after all this LOL"The eyes are the first thing that you have to destroy ... because they have seen too many bad things" - Lucio Fulci
EXPLORE THE FILMS OF LUCIO FULCI - THE MAESTRO OF GORE
-
My findings above showed clipping above digital 235 and below 16 when exchanging files with VirtualDubMod (VDM). I had seen funny things happening before when going between Vegas and VDM and also to and from Premiere v6.5. I've had no problems exchanging files between Vegas and Premiere Pro.
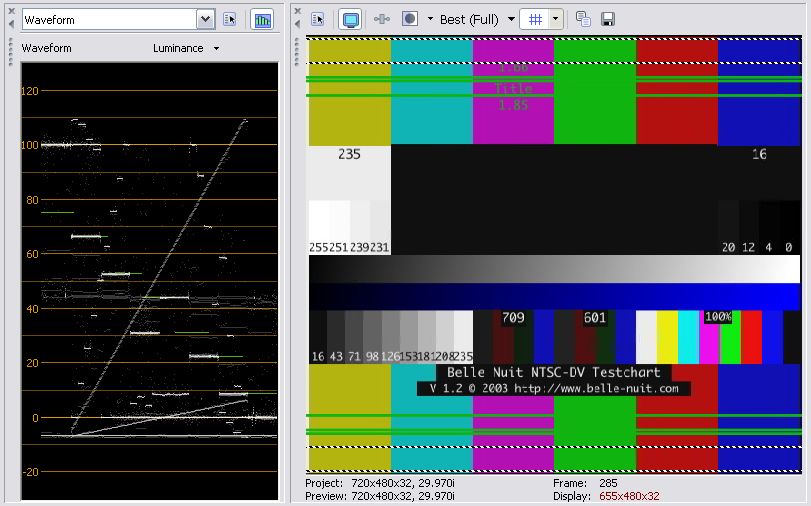
I've decided to dig deeper and this time use the Belle-Nuit-NTSC-DV TIF. I modified the test pattern by copying level 16 over the central area so that only levels tests remained.

Below I'll only show the interesting central part of the slide. From the slide, I made two short video files in Vegas. The first was uncompressed YCbCr. The second was DV format.
Test 1: Uncompressed video, Vegas -> VirtualDubMod -> Vegas
Good news, the uncompressed path works fine.
Next I decided to try uncompressed to VDM, but try Huffyuv for the return path. This too worked well. There were some very minor vertical level shifts.

Test 2: DV video, Vegas -> VirtualDubMod -> Vegas
I'm using the popular Panasonic DV codec (file created November 19, 1999). First test was DV in, DV out. It is clear that the codec is causing the clipped top 236-255 and bottom 0-16 but it looks more like everything above 235 was squashed to 235 and everything below 16 was pulled up to 16. There are other distortions that are unexpalined.
Next I decided to look at DV in and uncompressed out since most of my original material is DV format. This proved to be a disaster. You get the cropping plus the result is scaled to 0-255.
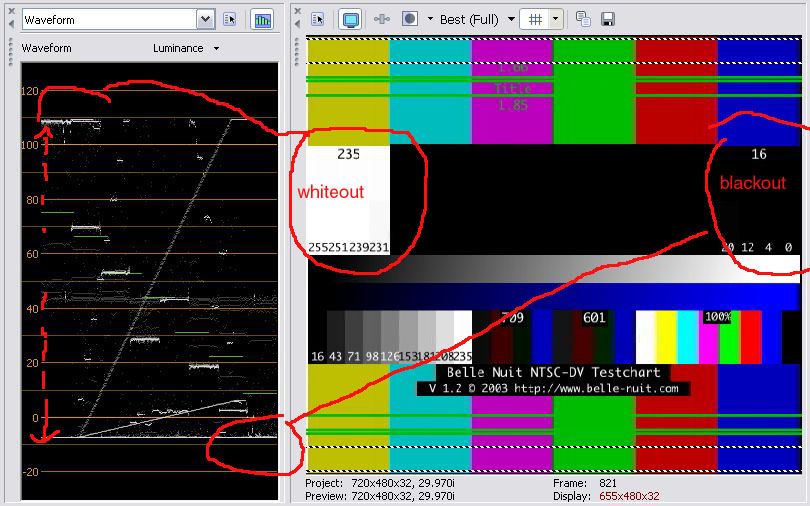
Final test was outputting huffyuv. The result was the same.

Conclusion:
Use uncompressed or huffyuv to transfer files to and from Virtualdubmod from a DV format environment. Don't send DV format.
The problem seems to be the Panasonic codec. Maybe other codecs pass the full range.
Next I'm going to do the same tests with Premiere v6.5.
PS: Here is what the Vegas-Mainconcept DV encoder produces from the test slide. Default encoder settings were used ("good" not "best"). The levels are full range and accurate. Also decompression in Vegas results in accurate levels.
-
Using PC.601 instead of PC.709 might make a difference. I was only looking at black and white levels earlier but PC.601 and PC.709 might give a difference in the middle colors. Your samples differ more in their colors than the black (the dark area under the collar was the same) and white (whites on the shirt were the same) levels.Originally Posted by FulciLives
EDIT:
Yes, I downloaded your MPEG file and used PC.601 instead of PC.709 and the colors were much closer.
According to this:
http://en.wikipedia.org/wiki/YCbCr
PC.601 should be used for standard definition video, PC.709 for high def. -
Oops, accidentally did a reply instead of an edit. Previous message edited.
-
I tried the edDV method described above for grabbing stills from an MPEG2 (VOB)... it works!
I loaded the THX test pattern VOB file into Sony Vegas, then rendered the clip as a Default Template (uncompressed) AVI. Then, I loaded the AVI into VirtualDubMod and copied a couple of frames to the clipboard, saving them as JPG picture files using IrfanView.
When I loaded the JPG still frame grabs created using this method back into Vegas, the MPEG2 (VOB) original video levels were maintained, not re-mapped to 0-255 like when you load a VOB into VirtualDubMod directly.
THX multi-purpose pattern JPG (from uncompressed AVI rendered by Vegas):

Here's how the JPG charts out... it is showing correct levels:
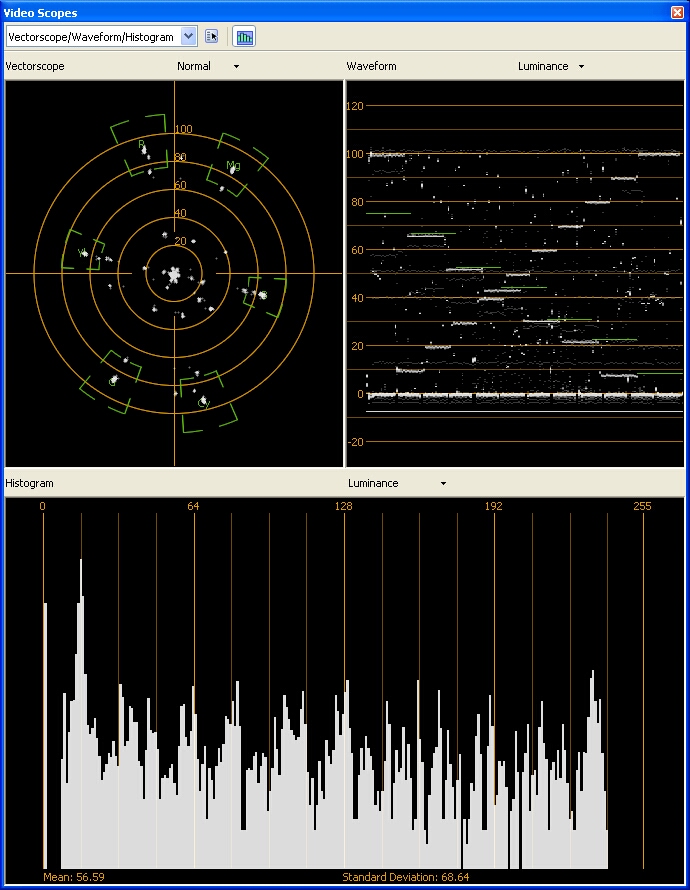
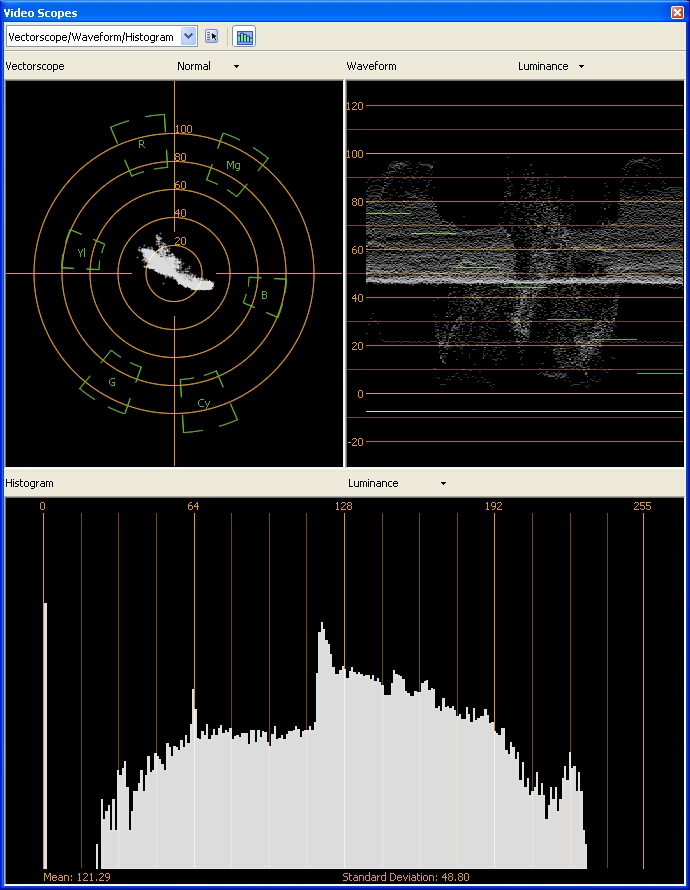
The "Sid" THX test DVD still frame JPG created by the same method:
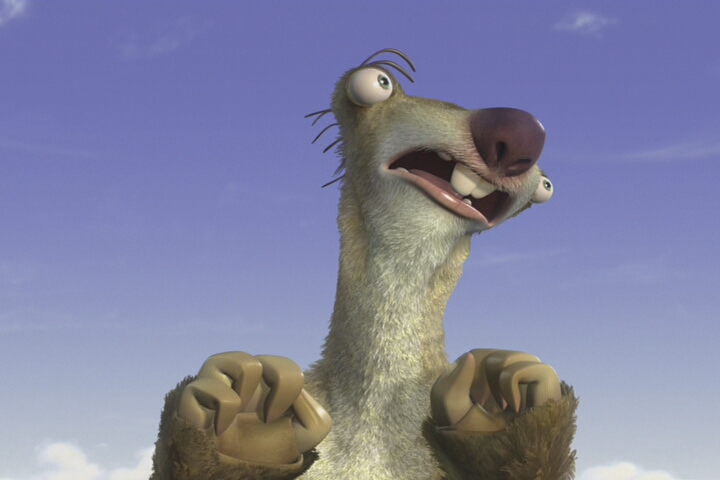
And the "Sid" frame JPG picture levels (matches the MPEG2):
-
Is it me or does that seem like too many steps?Originally Posted by gshelley61
I mean if you are going to use Vegas then can't you just load the MPEG or VOB into Vegas and then save from Vegas to a JPG file and be done with it?
- John "FulciLives" Coleman"The eyes are the first thing that you have to destroy ... because they have seen too many bad things" - Lucio Fulci
EXPLORE THE FILMS OF LUCIO FULCI - THE MAESTRO OF GORE
-
It appeared to me that creating a JPG from Vegas pulls the image from the preview pane... not very good quality. Unless I am doing something wrong? Is there a way to copy a frame right from the raw MPEG2 (VOB)?
The method above retains the visual quality of the original MPEG2 (the detail, resolution, color, etc.) -
Well I think you are wrong on this point but maybe edDV knows best?Originally Posted by gshelley61
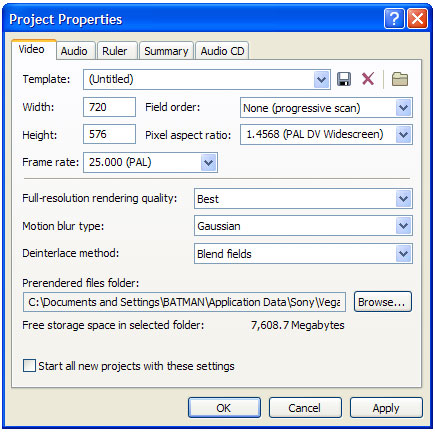
Here is my PAL MPEG file loaded into VEGAS.
First I set up VEGAS like this since this is a PAL 16x9 MPEG file:
Then on the preview I set it to BEST (FULL):
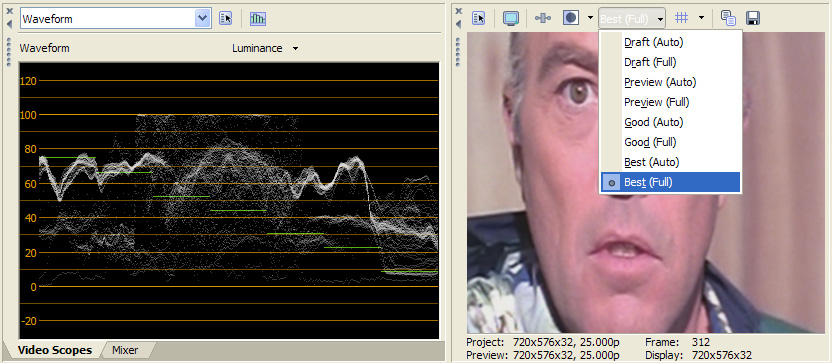
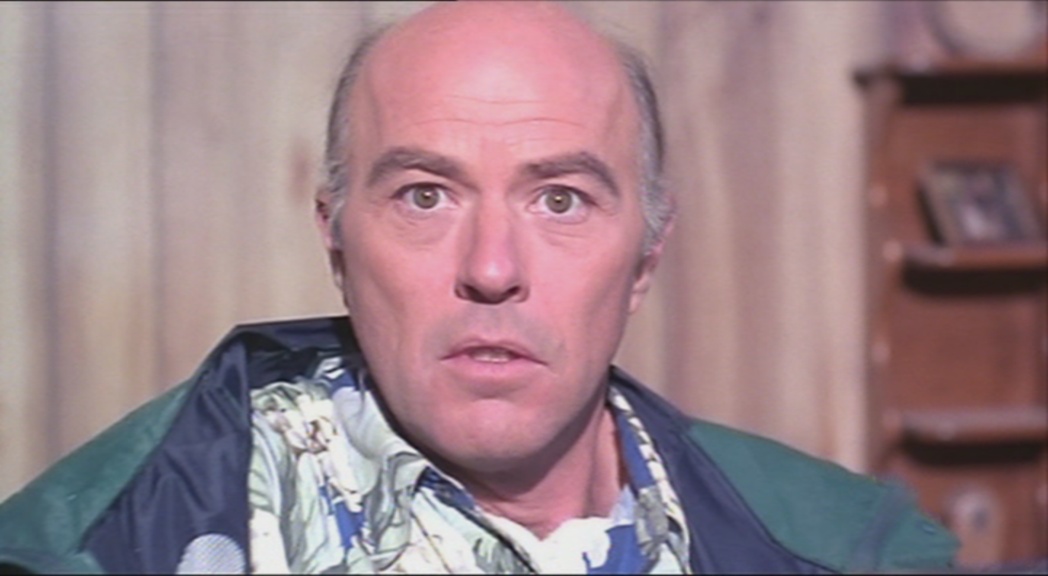
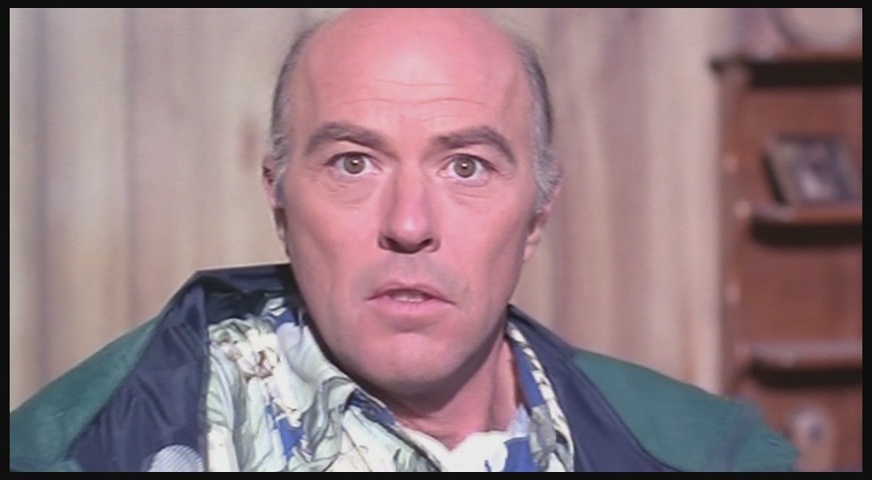
Now you have two options for creating an image. You can COPY TO THE CLIPBOARD. When I did this and then PASTED the image into Photoshop I got an image 720x576 which I saved as a JPG image.
COPY TO CLIPBOARD ... PASTED in Photoshop ... SAVED AS JPG [720x576]

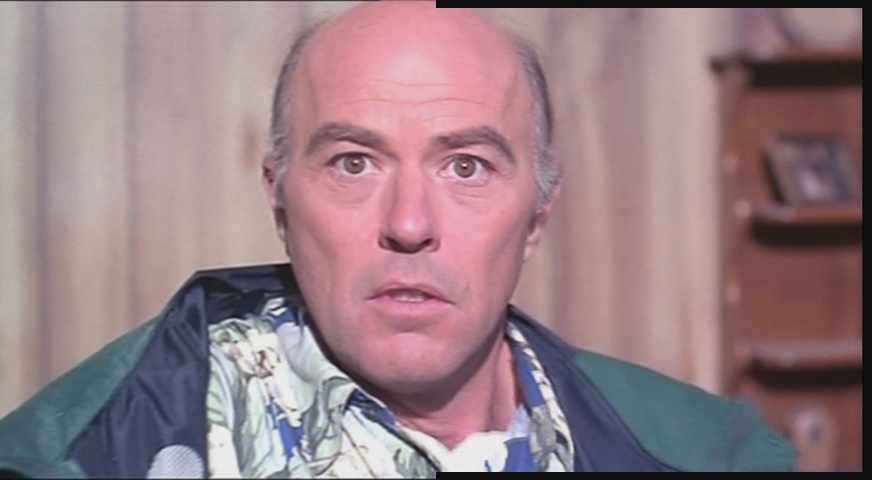
The other option is to save as a JPG straight out from VEGAS. Since this is a 16x9 WS PAL MPEG it creates an image 1048x576 ... if you do this with a 16x9 WS NTSC MPEG it creates an image 842x480.
JPG SAVED STRAIGHT TO JPG FROM VEGAS [1048x576]

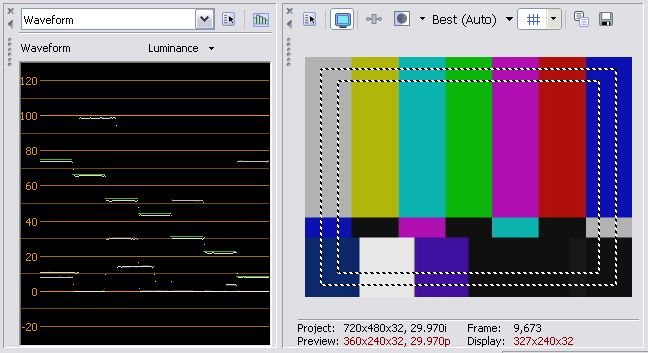
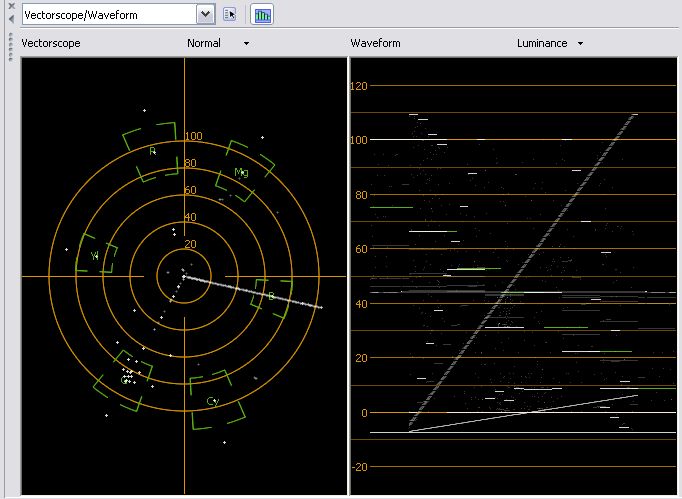
This next screen shot is the 720x576 image loaded into Vegas. Note the Waveform Monitor.
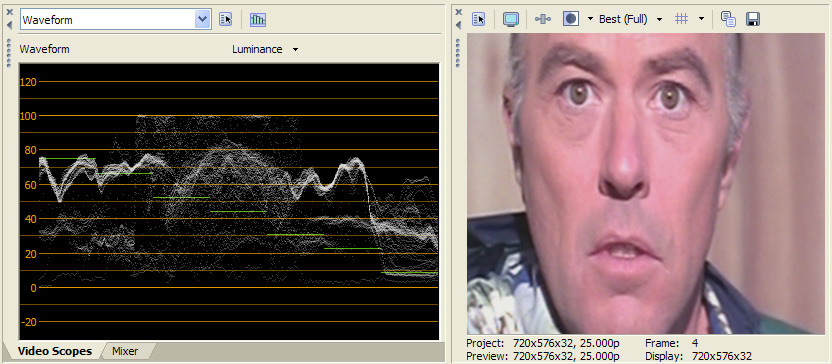
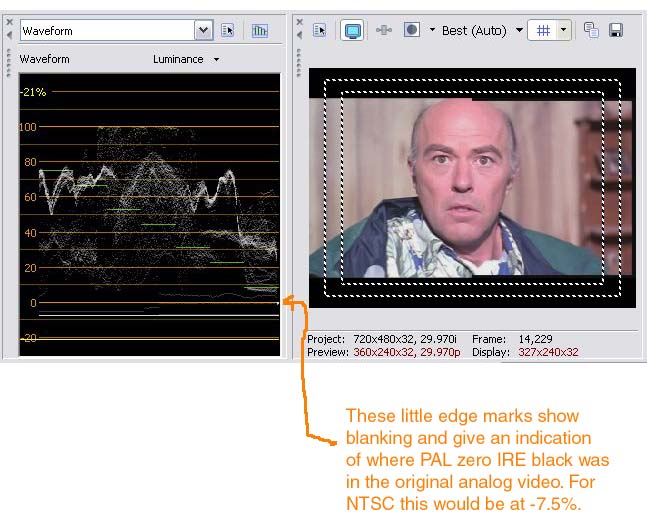
This next screen shot is the 1048x576 image Vegas. Note the Waveform Monitor.

What is important to note is that both screen shots when loaded into VEGAS match the original video when you look at the Waveform Monitor.
I say use the COPY TO CLIPBOARD method ... import into your favorite Photo Editing software ... then save as a JPEG.
Please note that when you load the JPG into VEGAS you have to change the aspect ratio to 1:1 otherwise leave the settings at PAL or NTSC to match the source.
- John "FulciLives" Coleman"The eyes are the first thing that you have to destroy ... because they have seen too many bad things" - Lucio Fulci
EXPLORE THE FILMS OF LUCIO FULCI - THE MAESTRO OF GORE
-
Fulci, I tried the method you suggested (with the preview pane on Best quality) and the results are fine.
Here's the THX DVD multipurpose test pattern from the original MPEG2 (VOB) video file, loaded into Vegas, copied to the clipboard from the preview pane (set to Best, Full), and then saved to JPG using Irfanview:
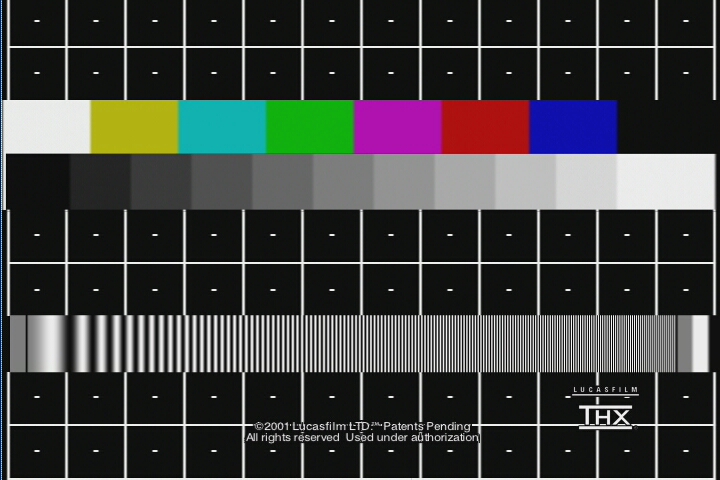
The quality is identical to the render to uncompressed AVI method, and the video levels are the same.
Thanks for the tip, Fulci!
.jpg)
.jpg)
 Quote
QuoteSimilar Threads
-
Pioneer Elite CLD-99 laserdisc player - black levels?
By echo1434 in forum RestorationReplies: 40Last Post: 15th Oct 2012, 19:39 -
Black Levels in Windows Media Center using Hauppauge HD PVR
By Mitterhouse in forum Capturing and VCRReplies: 0Last Post: 17th Jun 2011, 13:16 -
Correct Black Levels
By MasterOfPuppets in forum Capturing and VCRReplies: 7Last Post: 10th Jul 2010, 15:38 -
Confused about black levels... again.
By binister in forum Newbie / General discussionsReplies: 5Last Post: 16th Dec 2008, 20:43 -
How do I merge 2 AVI to DVD adding saturation +black levels?
By JoeBolden in forum Video ConversionReplies: 2Last Post: 23rd Jul 2008, 12:01