


Here is a short sample of my Dad's 8mm films we had transferred in 2005, they were delivered as DVDs, I have some basic knowledge of Avisynth and seek advice on how best to clean the spots and scratches.
+ Reply to Thread
Results 1 to 24 of 24
-
-
[edit] Oh good grief, I uploaded the wrong file (below). See my later post for the correct file.
Here are links to three very long, but very complete discussions which provide details of how to do what you want:
The power of Avisynth: restoring old 8mm films
Capturing and restoring old 8mm films
The power of Avisynth: new 8mm film restoring examples
Before you can do any of the things shown in these threads, you need to get your video into a frame accurate format. Your sample has blended fields that were added to make the 16 fps film play at the right speed when shown on PAL 25 fps TV. Those fields need to first be removed, or you need to get the transfer done so that the video is 16 (or 18) fps progressive. SRestore is the AVISynth function that may be able to get you where you want to go. Any attempt to do restoration on the sample you uploaded, without first doing this step, will fail because adjacent video frames do not represent the adjacent frames of the original film.
I used this code (which refers to the SRestore script) to remove the blended fields:
I then ran that through my version of VideoFred's film restoration script (I posted my version in those threads I linked to above). Here is a link where you can download the result.Code:loadPlugin("c:\Program Files\AviSynth 2.5\plugins\TIVTC.dll") loadplugin("C:\Program Files\AviSynth 2.5\plugins\MVTools\mvtools2.dll") loadPlugin("C:\Program Files\AviSynth 2.5\plugins\Srestore\mt_masktools-25.dll") Import("C:\Program Files\AviSynth 2.5\plugins\Srestore\srestore.avs") source=AVISource("E:\fs.avi").KillAudio().converttoYV12(interlaced=true).AssumeTFF() bob(source,-0.2,0.6) output=srestore(frate=18, omode=6).filldrops() return output function filldrops (clip c) { super=MSuper(c,pel=2) vfe=manalyse(super,truemotion=true,isb=false,delta=1) vbe=manalyse(super,truemotion=true,isb=true,delta=1) filldrops = mflowinter(c,super,vbe,vfe,time=50) fixed = ConditionalFilter(c, filldrops, c, "YDifferenceFromPrevious()", "lessthan", "0.1") return fixed }
Restored Version
I could have turned up the dirt removal setting and gotten rid of more dirt, but if you go to high, the woman's hands will disappear when she waves. If you want, you can do two passes, one with lots of dirt remove and one with less, and switch between them on frames where the dirt removal gets rid of things that should remain.
Also, if you ever get more film transfers done, try to find someone who knows how to control the highlights. Yours are too bright and are sometimes blown out. Note the lack of detail in the car and the sign in the first scene. Once details are blown out by the transfer (they were almost certainly there on the original film), you'll never get them back.
I applied a lot of sharpening because your film transfer system introduced a lot of blooming around the edges of bright objects. Normally I don't like over-sharpened film transfers, but I think it works well here. I also applied a small amount of color correction in Vegas before I served the result into the scripts.
I think you'll notice the motion stabilization. That sure makes it easier to watch the film. I needed to apply a little more border correction (you'll notice that the borders wander around a little). That is fixable with a little more time.
Scratches have to be handled by doing a wet-gate transfer where the film is coated in lubricant before it is transferred. This is very effective in getting rid of scratches. Doing scratch removal digitally has to be done frame-by-frame, by hand, because the scratches wander around and because they extend for the entire height of the film.
Good luck with your film restoration.
P.S.
Here are some of my own samples showing what can be done with old amateur film:
https://www.youtube.com/watch?v=tBAHzO7rJS0Last edited by johnmeyer; 26th Aug 2017 at 23:47. Reason: fixed links that were broken by this forum's automatic word replacement ("AVISynth")
-
Another example:
Stronger spot removal but more detail removal too.Code:Mpeg2Source("Super8-Films.d2v", CPU2="ooooxx", Info=3) # restore 18 fps film frames QTGMC(preset="fast") SRestore(frate=18) # white balance src=last ConvertToRGB() RGBAdjust(r=0.95, g=1.0, b=1.25) ConvertToYV12() # but only white balance brights Overlay(src, last, mask=src.ColorYUV(cont_y=30, off_y=-30)) # gamma adjustment and saturation increase ColorYUV(gamma_y=100, gain_y=-20, off_y=-8, cont_u=60, cont_v=60) # remove spots RemoveDirtMC(30) # sharpen aWarpSharp(depth=5) Sharpen(0.4, 0.2)Last edited by jagabo; 26th Aug 2017 at 10:32.
-
If you still have the films, it may be worth while to physically clean them and have them scanned frame-by-frame. Your DVD version will always be a bit blurry because it was a film-chain transfer, not even telecine.
-
Thanks for the detailed replies and sample videos, that's exactly what I wanted, I'll do some more reading and try out the scripts with the results uploaded soon

-
Actually, I think his transfer may have actually been done by a frame-accurate system (i.e., one frame of film to one frame of video) but it was then telecined (i.e., pulldown fields added) to get to 25 fps before it was delivered. However, instead of doing a simple field repeat to pad the film to get to video frame rates, which is the "right"way to do it, someone did a field blend. Fortunately, SRestore was able to fix it pretty much 100%. Better, of course, to not have that unnecessary step done at all, and instead have the film delivered at 15, 16, or 18 fps progressive.Originally Posted by JVRaines

-
By the way, most of the detail loss in the video I uploaded was from the low bitrate encoding, not the filtering. You can reduce the detail loss of the filtering by reducing the gamma adjustment (that causes loss of detail in bright areas) and the RemoveDirtMC argument. Then, of course, use better encoder settings for your final output.
-
Oh my, I just realized I uploaded the wrong file in my earlier email. That file was the one I created with SRestore, and is the same as the original, except for having the field blends removed.
Sorry about that.
Here is the real restored version:
Restored (SRestore + Film Restoration Script) -
Thanks for this John, we are pretty happy with the transfer done back in 2005 but I thought we could do better with another company offering new technology with a RetroScan Universal film scanner this year but I think the film may have degraded quite considerably since the first transfer. The color has faded and they cropped quite a lot of pixels on one side upscale to 1080. I tried to restore it but I don't have the scripting skills required, some of the footage is quite iconic from the late 1960s.Originally Posted by johnmeyer
Attached some of the Retroscan transfer footage plus my effort to restore it using your modified version of Fred's script. I'd like to try deshaker for the stabilization workflow as it has done a brilliant job on our Video8 footage and easy to setup, tried using mercalli4 video stabilizer (trial) and it zoomed too much so I'm sticking with deshaker for now.
You guys are legends, I really appreciate the work Fred and you have done on these restoration scripts, and the work done by the people writing the modules it's amazing output. Thanks also jagabo for your input and experience - QTGMC looks very interesting
Last edited by film; 27th Aug 2017 at 06:33. Reason: Clips are faulty cuts with FR no good
-
The question now is should I try and restore the first transfer delivered on DVD or the more recent transfer done by the Retroscan and cropped heavily?
-
The Retroscan is better in every way. It was a waste, of course, to have it scanned and delivered in 1920x1080: small gauge film doesn't have enough resolution to justify HD, and SD is perfectly adequate.
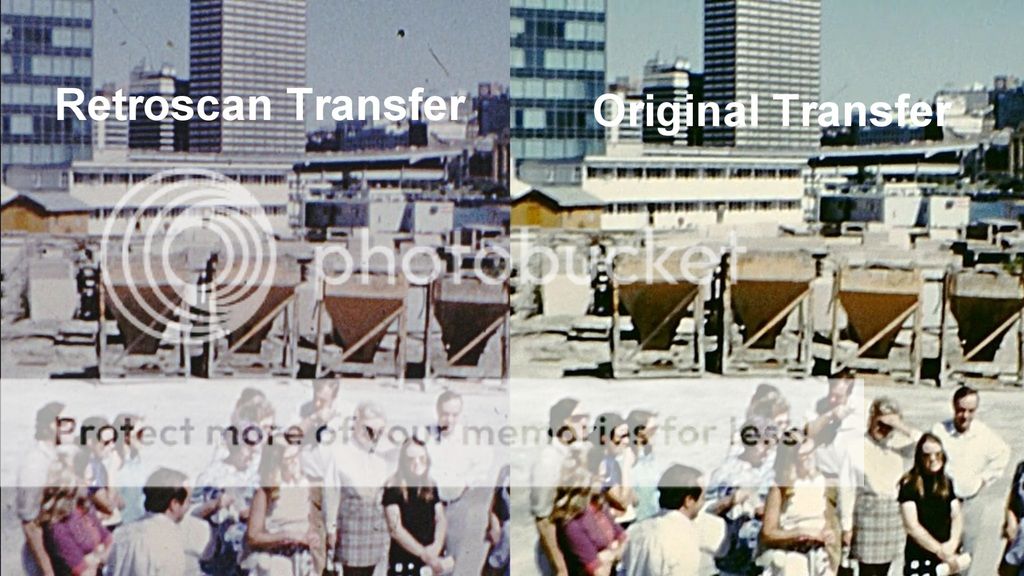
The color look just fine to me; you just need to apply some gamma and color correction. Here's a before/after on your Retroscan (which is a great unit, BTW):

If you compare the detail in the women's white shirts, and the detail in the concrete hoppers in the background with what you have on your original transfer, this is better in every way. -
I agree the new scan is better. Maybe they can adjust the framing to keep more of the picture?
First 561 frames attached.Code:LWLibavVideoSource("Reel #3 (Orange)-Retroscan-source.avi") AssumeFPS(18) Crop(236,0,-236,-0) Spline36Resize(960, 720) brights=ConvertToRGB().RGBAdjust(r=0.90).ConvertToYV12() darks=ConvertToRGB().RGBAdjust(r=0.9,b=0.6).ConvertToYV12() Overlay(darks, brights, mask=ColorYUV(gain_y=300, off_y=-25)) ColorYUV(gain_y=120, off_y=-6, cont_u=300, cont_v=300) ColorYUV(off_y=-16).ColorYUV(gamma_y=50).ColorYUV(off_y=16) maxstabH=50 #maximum values for the stabiliser maxstabV=50 mdata=DePanEstimate(last,trust=1.0,dxmax=maxstabH,dymax=maxstabV) DePanStabilize(last,data=mdata,dxmax=maxstabH,dymax=maxstabV,method=1,mirror=15,cutoff=1,damping=1,prev=0,next=0,blur=0) RemoveDirtMC(30) aWarpSharp(depth=10) Sharpen(0.3) Trim(0,560) -
The gamma and color-corrected Retroscan frame is on the left, and your restoration (which looks good) of the original transfer is on the right. Notice the difference in detail in the shadows (you can almost see the woman's face who has her hand over her eyes); notice the total lack of detail in the woman's blouse who is dead center (with the glasses); notice the additional detail in the lines on the buildings in the background, even after you applied sharpening to the image on the right. I don't think the colors have faded at all. If this is Kodachrome, then fading is not an issue. I have transferred original Kodachrome from 1942 and it has held up remarkably well.
[edit]I just noticed another thing: look at the women in the lower left who is wearing a purple dress and note how much more detail you can see in her dress.
The blown-out highlights in your original transfer are still my biggest issue. That detail is lost forever and you cannot bring it back through restoration.
I should probably have spent a little more time on the color correction because there still is a little residual purple in the Retroscan transfer.
The cropping is an issue, and I don't understand how that happened. I have one of Roger Evan's earlier transfer units (Roger makes the Retroscan) and it has an enlarged gate so you get the entire frame, including part of the sprocket holes. I'd go back to the outfit who did the Retroscan transfer and find out if they can deliver a version to you that isn't cropped, if they still have the original files.Last edited by johnmeyer; 27th Aug 2017 at 12:22. Reason: added phrase about sharpening
-
Thanks for this but can't seem to fix this error - tried downloading all the required dllsOriginally Posted by jagabo
I'm trying to use this version https://pastebin.com/PgkQc9X4Last edited by film; 28th Aug 2017 at 07:44. Reason: more details
-
There are many variations of RemoveDirtMC. I think the one in this post is the one I'm using:
https://forum.videohelp.com/threads/326835-VirtualDub-AviSynth-Error-Code#post2023923 -
Thank you jagabo, it is loading without error now but there is no dirt removal at all, I have no idea which parameter / variable to change on the belowOriginally Posted by jagabo
Tried the alternative settings but the video fails to load with those.
#REMOVE DIRT FUNCTION
#................................................. .................................................. .................................................. .................
function RemoveDirt(clip input, int limit, bool _grey)
{
clensed=input.Clense(grey=_grey, cache=4)
alt=input.RemoveGrain(2)
return RestoreMotionBlocks(clensed,input,alternative=alt, pthreshold=6,cthreshold=8, gmthreshold=40,dist=3, dmode=2,debug=false,noise=limit,noisy=4, grey=_grey)
# Alternative settings
#return RestoreMotionBlocks(clensed,input,alternative=alt, pthreshold=4,cthreshold=6, gmthreshold=40,dist=1,dmode=2,debug=false,noise=li mit,noisy=12,grey=_grey,show=true)
#return RestoreMotionBlocks(clensed,input,alternative=alt, pthreshold=6,cthreshold=8, gmthreshold=40,dist=3,tolerance= 12,dmode=2,debug=false,noise=limit,noisy=12,grey=_ grey,show=false)
}
function RemoveDirtMC(clip,int limit, bool "_grey")
{
_grey=default(_grey, false)
limit = default(limit,6)
i=MSuper(clip,pel=2)
bvec = MAnalyse(i,isb=false, blksize=8, delta=1, truemotion=true)
fvec = MAnalyse(i,isb=true, blksize=8, delta=1, truemotion=true)
backw = MFlow(clip,i,bvec)
forw = MFlow(clip,i,fvec)
clp=interleave(backw,clip,forw)
clp=clp.RemoveDirt(limit,_grey)
clp=clp.SelectEvery(3,1)
return clip
} -
The last line of RemoveDirtMC reads "return clip". Change that to "return clp".
-
NiceOriginally Posted by jagabo
works perfectly now
-
Note the motion vectors are reversed in that function (although it probably still works ok)
for the backward vector, bvec, isb ("is backward") should be "true" ; and likewise isb should be false for the fvec -
Thank you John for this analysis, the highlights still look too high in the second transfer, it was shot on a Canon super8 (cannot remember the model) camera with Kodak film, we contacted them shortly after they delivered the transfer and asked if they had the transfer in 720 but no response, I'm guessing they used the wrong gate? If we lived in the US there would have been a lot more choice.Originally Posted by johnmeyer
Last edited by film; 28th Aug 2017 at 21:29. Reason: grammar
-
Thanks PDR, I'll try that out tonight, you clearly have an eye for scripting detail as well.Originally Posted by poisondeathray
-
Hi,Originally Posted by johnmeyer
I tried to execute the script on post #2.
My avi does not show any improvements on remove dirts, cleanup etc.
Is there specific parameters that I could edit to try -
That script in the code box in post #2 is only for deblending, and replacing duplicate frames with motion interploated version. There is no cleanup or dirt removalOriginally Posted by Beefcat
-
The scripts you want to use are given in the links in post #2. As poisondeathray said, the actual script I posted there was to prepare the OP's film transfer to removed repeated fields so it could then be cleaned up with those scripts in the links.Originally Posted by Beefcat
Last edited by johnmeyer; 11th May 2020 at 23:22. Reason: attributed wrong person
 Quote
QuoteSimilar Threads
-
super 8mm transfer
By tom_nito in forum Newbie / General discussionsReplies: 3Last Post: 23rd Jul 2017, 19:02 -
8mm film transfer tutorial
By videofred in forum RestorationReplies: 1Last Post: 27th Apr 2016, 08:38 -
Looking for some 8mm transfer advice
By Bruce/Fl in forum RestorationReplies: 12Last Post: 16th Jul 2014, 23:17 -
Looking for advice on 8mm film transfer options
By Gordon F in forum Newbie / General discussionsReplies: 11Last Post: 27th Jun 2013, 17:40 -
using CMOS web camera for 8mm film transfer
By mammo1789 in forum Capturing and VCRReplies: 0Last Post: 31st Aug 2012, 21:19