


Hi guys im trying to make a rare concert better but there seems to be 2 persons on the same video etc ill show you the pic so you can see what i mean. i tried my best with edge blurring etc and got rid of most but you guys here might have the solution.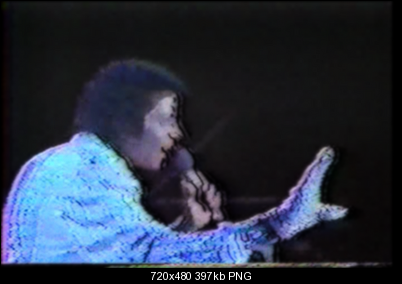
Try StreamFab Downloader and download from Netflix, Amazon, Youtube! Or Try DVDFab and copy Blu-rays!
+ Reply to Thread
Results 1 to 23 of 23
Thread
-
-
With all those macroblock artifacts it's pretty hopeless. Even without them any halo removal will leave you with a blurry image.
-
From the top image, it is easy to tell that your source was a VHS copy of a VHS copy of a VHS copy. This was the major shortcoming of analog -- it did not duplicate well. That halo effect is very typical of multi-generational dubbing, and as jagabo has pointed out, there is little that can be done at this point. You either live with the halo effect or blur the image to a blob.
-
you can manually work on each frame (e.g. in photoshop or after effects) with use of rotoscoping and masks to aid; at least you limit the "damage" to the reducing the halos or sections of the frame instead of blurring the whole image
MJ is great and all, but the quality of this footage sucks -
Maybe it's his ghost.
Rock on, Michael. We miss you!There are no problems - only chances to excel.
-- Unknown -
hi is there a way to auto detect edges and blur that area only while keeping detail on the rest of the image?Originally Posted by poisondeathray

manually will take forever, over 11,000 frames per song!!! lol -
Not as accurate as manually doing it; there's a lot more error. e.g. You might blur good parts and miss some halos.Originally Posted by kopmjj
Someone asked the same thing on this same footage over at doom9, you can read didee's reply there
http://forum.doom9.org/showthread.php?p=1399795#post1399795
You're talking about bluring with a mask to limit area of effect. I'm talking about replacing pixels in an area, not just blurring.
Honestly, the only way you will get decent results, without blurring the rest of the good parts is to "air brush" it
A true MJ fan would do it manually
-
What is it with these awful quality MJ videos turning up now? (There's another thread about another one here).
They must have been professionally recorded originally - someone somewhere must have a better copy.
Cheers,
David. -
hope so but these are rare concerts not many had this version until few months back, and unfortunately this is the best quality for this concert. thats why im trying to make the best quality possible.Originally Posted by 2Bdecided
-
ok i got rid of most of it, now how do i auto detect edges so i can add blur? either in photoshop, avisynth or other programs i dont mind, i know there must be a way to auto detect the edges, i dont mind if its not 100% accurate, but this will save me manually editing, heres the new improved b4 and after.
-
anyone? i have searched google how to find edge automatic and then blur but got no real info, and someone here said its possible but not accurate, i have tried magic wand tool in photoshop but when i apply a script it doesnt always select where i want to, so is there any plugins or programs that finds the edges and selects so i can apply Gaussian blur? or any avisynth script?
-
Try an emboss filter. You can create an emboss filter in AviSynth by subtracting the frame from a copy of itself shifted left or right.
src=ImageSource("0000.png", start=0, end=23, fps=23.976).Crop(0,0,-2,-2)
emboss=subtract(src,crop(src,2,0,-0,-0).AddBorders(0,0,2,0)).ConvertToYV12()
That will give you a grayscale image where flat areas are medium gray (128) and edges are either darker or lighter:
So you'll have to follow up with an absolute value, abs(y-128). In the absence of abs() you could Merge() two ColorYUV() filters in AviSynth:
src=ImageSource("0000.png", start=0, end=23, fps=23.976).Crop(0,0,-2,-2)
emboss=subtract(src,crop(src,2,0,-0,-0).AddBorders(0,0,2,0)).ConvertToYV12()
v1=ColorYUV(emboss, off_y=-128)
v2=Invert(emboss).ColorYUV(off_y=-128)
Merge(v1,v2).ColorYUV(gain_y=1000)
Then you'll probably want to blur that and use it as a mask. You can adjust the threshold of the mask by subtracting from it (ColorYUV(off_y=-32), for example) and/or adjust the strength by increasing the gain (ColorYUV(gain_y=1000) shown).
In the end, this probably won't help you much because the DeHalo() filter does something very similar internally.Last edited by jagabo; 20th May 2010 at 08:02.
-
Hi thank you for your reply can i do this with video in avisynth?
like load source video, add your emboss settings, make that a mask, blur it then overlay on top of source video? can you show me an example script please thanks.
heres my example script it dont make any difference can you help im trying the above.
clip1=AVISource("C:\Users\king\Desktop\wbss.avi")
clip2=AVISource("C:\Users\king\Desktop\wbss.avi")
emboss=subtract(clip2,crop(clip2,2,0,-0,-0).AddBorders(0,0,2,0)).ConvertToYV12()
v1=ColorYUV(emboss, off_y=-128)
v2=Invert(emboss).ColorYUV(off_y=-128)
Merge(v1,v2).ColorYUV(gain_y=1000)
Blur(1.00)
merge(clip1,clip2)
the blur bit is only a test i will apply Gaussian blur in final if this works.
Last edited by kopmjj; 20th May 2010 at 12:05.
-
Did you look at that link I posted? The fellow working on the same source?
His approach is the same, but it's far from perfect, it misses halos and blurs some good parts, but it's definitely better than blurring the whole image
http://www.youtube.com/watch?v=QWnT8a-0Mos
Ask him for his edge detection script. He probably used some masktools functions like edgemask
There are several other scripts in that thread you can try -
Use BlindDehalo3() to create a well dehaloed version -- it will be blurry. You may find it works better if you shrink the width, dehalo, then expand it back to the original size. Then use the emboss/merge method to create a mask from the original image. Finally, use Overlay() to merge the dehaloed image over the original according to the mask: overlay(source, dehaloed, mask).
-
thanks im gonna try that,but the thing is i cant do the mask thing it dont work on my script can you just quickly show the mask and overlay bit please?Originally Posted by jagabo
-
I wouldn't bother trying to create your own dehalo script because someone has already done it. Try something two passes of BlindDehalo3(rx=4, ry=1, strength=200).
-
ahhh this is frustrating cant get this script to work please im trying to what you told me ,im trying to overlay the source, dehaloed, mask like you said but this doesnt work? just one example would help me, this is the 1st time im ever using mask so im confused how to do it. below is the script that has errors invalid argument to convertoyv12.Originally Posted by jagabo
HTML Code:clip1 = AVISource("C:\Users\king\Desktop\wbss.avi") clip2 = AVISource("C:\Users\king\Desktop\wbss.avi") ConvertToYV12() Lanczos4Resize(352,240) Import("I:\plugins 2\BlindDeHalo3.avs") BlindDehalo3(rx=4, ry=1, strength=200) Lanczos4Resize(720,480) emboss=subtract(crop(2,0,-0,-0).AddBorders(0,0,2,0)).ConvertToYV12() v1=ColorYUV(emboss, off_y=-128) v2=Invert(emboss).ColorYUV(off_y=-128) Merge(v1,v2).ColorYUV(gain_y=1000) dehalo_alpha() Overlay(clip1, clip2, mode="blend", opacity=0.5) -
Your script make no sense. I suggest you simply do this:
If you really to try building your own mask you could try something like the following. But it will take a lot of fine tuning and you probably won't be able to do any better than the above script.Import("I:\plugins 2\BlindDeHalo3.avs")
AVISource("C:\Users\king\Desktop\wbss.avi")
BlindDehalo3(rx=4, ry=1, strength=200)
BlindDehalo3(rx=4, ry=1, strength=200)
The first thing you should know is that when you open a file without naming it, or run a filter without an explicit named video you get a default video called "last". For example:
is the same as:AVISource("C:\Users\king\Desktop\wbss.avi")
ConvertToYV12()
The basic structure:last=AVISource("C:\Users\king\Desktop\wbss.avi")
last=ConvertToYV12(last)
return(last)
That's a starting point. You will have to fiddle around a lot with the mask to get it properly aligned, smoothed, and the right intensity.Import("I:\plugins 2\BlindDeHalo3.avs")
source = AVISource("C:\Users\king\Desktop\wbss.avi").Conver tToYV12()
dehalo = BlindDehalo3(source, rx=5, ry=1, strength=200).BlindDehalo3(rx=5, ry=1, strength=200)
emboss=subtract(source, crop(source,2,0,-0,-0).AddBorders(0,0,2,0))
v1=ColorYUV(emboss, off_y=-128)
v2=Invert(emboss).ColorYUV(off_y=-128)
mask=Merge(v1,v2).ColorYUV(gain_y=4000).Blur(1,0). Crop(0,0,-2,-0).AddBorders(2,0,0,0)
masked=Overlay(source, dehalo, 0, 0, mask)
Interleave(\
Subtitle(source,"source"),\
Subtitle(dehalo,"dehalo"),\
Subtitle(mask, "mask"),\
Subtitle(masked, "masked"))Last edited by jagabo; 20th May 2010 at 20:12.
-
Thank you very much man just 1 last question the end starting point script you gave me has some funny playback? when i preview it its a mix between source video and suddenly its playing mask video with all the white lines, how do i get final output of the video ?Originally Posted by jagabo
-
I interleaved the intermediate frames so you could flip back and forth between them in an editor. To see just the final result change:Originally Posted by kopmjj
to justInterleave(\
Subtitle(source,"source"),\
Subtitle(dehalo,"dehalo"),\
Subtitle(mask, "mask"),\
Subtitle(masked, "masked"))
return(masked) -
Thank you man, you are the man and very helpful wish there was more like you:P
anyway just to update i used your blindehalo3 settings and tweaked it and added see saw and changed levels etc, added grain and its looking quite good thanks to you, heres a comaprison. any suggestions in improving even more or what sharpen is better for this situation, i like see saw but maybe limited sharpen faster? i need something that brings out as much detail as possible.
-
Ya, as you say, it's far from perfect. It was a work in progress... And I processed the two interlaced fields separately but I used the masks of the top fields for the bottom fields on this version... so some halos that should be removed aren't.Originally Posted by poisondeathray
I didn't use mask tool functions for the detection. I wrote my own program from scratch. Kopmjj was working with me on this concert but I didn't hear about this thread... it would have been helpful and would have saved me a lot of time. It also gives some great ideas to enhance things even more...
 Quote
QuoteSimilar Threads
-
NTSC (29.97) to PAL in order to get rid of ghost effect
By Talayero in forum Video ConversionReplies: 54Last Post: 25th Sep 2011, 08:53 -
Ghosting effect
By nikgelfi in forum CapturingReplies: 27Last Post: 6th May 2011, 07:38 -
What Vdub filter can get rid of the green "Ghosting"?
By Brainiac in forum RestorationReplies: 5Last Post: 3rd Sep 2009, 18:08 -
Looking to duplicate this effect
By yesac in forum EditingReplies: 4Last Post: 11th Sep 2008, 18:48 -
Ghosting or not?
By mrwhitethc in forum RestorationReplies: 4Last Post: 25th Aug 2008, 11:23