VideoHelp Forum


+ Reply to Thread
Results 1 to 6 of 6
  1. Member
    Join Date
    Nov 2005
    Location
    Brazil
    Search Comp PM
    Hi folks,

    This is my second post so thank you for your attention. Does somebody have or know where to find a REAL Multi-VTS or Multi-language DVD guide for DVDLab PRO. The situation is that: I’ve authored a huge DVD with Multi-language support (English/Portuguese) and it means that this DVD has a VTS1 that contains its own ROOT, PTT, Audio and Subtitle Menus (All in English) and the Main Movie (That is the same for both languages) and another VTS called VTS2 that contains its own ROOT, PTT, Audio and Subtitle Menus (All in Portuguese) and a intro movie. Well, my questions are:

    I know that a bridge in DVDlab PRO can do the work of linking VTS2 menus and items to the main movie in VTS1, but I’ve problems with that. When the main movies end how can I instruct the DVD to go back to the VTS2 Root menu if the user access the movie for Portuguese language or the VTS1 Root menu if the user used English language instead of Portuguese? About VTS2 chapters and audio how to connect them to the VTS1 main movie? In the end I’ll have the same problem?

    I’ve other kind of question:

    Do you have some observations or guides for Dual Layer DVD-VIDEO authored with DVDLab PRO, I mean is there some problem with DVDLab PRO layer break? I’ve authored a Dual Layer DVD in DVDLab PRO, Am I supposed just to burn with Nero 6.6.0.18, for instance, with no worries or are there some things to set or consider before it?

    And at last, I’ve an VBR movie and DVDLab PRO shows this Bitrate is 8200 in the movie tab, I know it’s a average Bitrate, but what I want to know is if will there be some trouble with DVD specs because this movie has two audio Dolby 5.1 448 kbps and Dolby 2.0 192 kbps? Well, in the movie tab DVDLab PRO math shows that the maximum Bitrate do not exceed the DVD specs. In DVDLab PRO bitrate viewer I can see some peaks that exceed the 8900 is that a trouble or I should look only to the average bitrates?

    See you later,

    Aeolis
    Quote Quote  
  2. Always Watching guns1inger's Avatar
    Join Date
    Apr 2004
    Location
    Miskatonic U
    Search Comp PM
    Peak is the problem, although if that peak is correct you are well within spec. Some players have problems reading burned disks with high bitrates due to the different reflectivity of the surfaces. There is no way to predict which will or wont with what media, so you can do as some do, and err on the side of caution and low bitrates, or be a man and author how you see fit.

    As for the dual layer question, author and set the layer break in DVD Lab Pro, use imgtools classic to create an ISO image of your dual layer disk, then burn it with DVD Decrypter or ImgBurn. I would not burn a DL with Nero.
    Read my blog here.
    Quote Quote  
  3. Serene Savage Shadowmistress's Avatar
    Join Date
    Mar 2004
    Location
    Controlled Chaos
    Search Comp PM
    Why are you using 2 VTS? You can do multi-language multi-sub selection from within the same VTS. I don't think it's possible to get it to work the way you have it set up now.

    Here's a guide from dvdlab forums. http://www.mmbforums.com/phpbb/viewtopic.php?t=11736
    I didn't write it, just found it. It's for 3 language audio and subs, but I've highlighted the text you don't need in red, and the numbers in blue you need to adjust by -1. You can still add motion, chapter selection menus, or whatever else you like after setting these up.

    Originally Posted by Stuart J Sykes
    HERES A NICE WALKTHROUGH

    Setting up 3 Audio Languages and 3 types of Subtitles on DVD Lab Pro
    You will need 1 video file (the movie) and 3 audio files (the languages)

    • Start DVD Lab Pro (setup for PAL or NTSC DVD) (Movie 1 & Menu 1 created by default)

    • Import the Video file into the “Video & Audio” workspace (either m2v or mpv etc.)

    • Import the 3 Audio files into the “Video & Audio” workspace (either mp2 – mpa - wav – ac3 etc.)

    (be sure that each of the audio files length matches the video file length)

    • Drag the movie from “Video & Audio” workspace to the movie timeline

    • Drag the first audio file to Audio 1 timeline (press green button to set language type) English

    • Drag the second audio file to Audio 2 timeline (press green button to set language type) Francais

    • Drag the third audio file to Audio 3 timeline (press green button to set language type) Espanol

    • Create 2 more menus MENU – ADD – ADD NEW MENU

    • Rename the menus to: MAIN MENU – AUDIO MENU – SUBTITLES MENU

    (to rename any movie or menu select it in connections window and press F2)


    (be sure that First Play and Title Button point to MAIN MENU)


    Add some subtitles to the movie's timeline
    Click Sub 1 ….to add some English subtitles (subtitles can be imported if necessary)

    (type some text, insert start and end time then press generate subtitle stream. Save as English.sp1)

    Click Sub 2 ….to add some French subtitles (subtitles can be imported if necessary)

    (type some text, insert start and end time then press generate subtitle stream. Save as French.sp2)

    Click Sub 3 ….to add some Spanish subtitles (subtitles can be imported if necessary)

    (type some text, insert start and end time then press generate subtitle stream. Save as Spanish.sp3)


    Main Menu
    • Add 3 buttons to the menu (Play Movie – Audio Setup – Subtitles)

    • Link the above buttons to the corresponding movie and menus (right click on button – link)

    Audio Menu
    • Add 3 buttons (English – Francais – Espanol) (to match your audio files in step 3)

    Subtitles Menu
    • Add 4 buttons (Subtitles Off – English – Francais - Espanol) (to match your audio files in step 3)

    Create 2 Command Objects
    • Right click anywhere in the connections window and select:

    • ADD – ADD COMMAND OBJECT – IN VTS DOMAIN (Command1 Created)

    • AND AGAIN……………..

    • ADD – ADD COMMAND OBJECT – IN VTS DOMAIN (Command2 Created)

    • Rename Command1 to Audio Link (renaming as described previously)

    • Draw a link in the connections window (cross tool) from Audio Link to Main Menu

    • Rename Command2 to Subtitle Link (renaming as described previously)

    • Draw a link in the connections window (cross tool) from Subtitles Link to Main Menu

    These are used for setting parameters and sending the user back to the main menu after setting Audio and Subtitles.

    Add some PRE COMMANDS to the AUDIO MENU
    This section makes sure that the current audio button is highlighted by default when entering the Audio Menu.
    • Select the Audio Menu in the connections window

    • Right click it and select Edit VM Commands

    • In the PRE Commands sequence select EDIT

    Copy and paste the text below into the pre commands section:

    GPRM0 = SPRM1

    GPRM1 = 1024

    if (GPRM0 == 1) GPRM1 = 2048

    if (GPRM0 == 2) GPRM1 = 3072

    SetHL_BTN GPRM1

    Break

    Click OK then CLOSE

    Add some PRE COMMANDS to the SUBTITLES MENU
    This section makes sure that the current subtitle button is highlighted by default when entering the Subtitles Menu.

    • Select the Subtitles Menu in the connections window

    • Right click it and select Edit VM Commands

    • In the PRE Commands sequence select EDIT

    Copy and paste the text below into the pre commands section:

    GPRM0 = SPRM2

    GPRM1 = 1024

    if (GPRM0 == 64) GPRM1 = 2048

    if (GPRM0 == 65) GPRM1 = 3072

    if (GPRM0 == 66) GPRM1 = 4096

    SetHL_BTN GPRM1

    Break

    Click OK then CLOSE

    SET THE AUDIO LINK COMMAND & THE SUBTITLES LINK COMMAND
    • Double Click the Audio Link Command in the connections window

    • The VM Script window is displayed

    Copy and paste the text below into the script window section:

    SetSTN (audio=GPRM2 )

    Click OK

    • Double Click the Subtitles Link Command in the connections window

    • The VM Script window is displayed

    Copy and paste the text below into the script window section:

    SetSTN (subp=GPRM3ff )

    Click OK

    SETTING UP THE AUDIO MENU BUTTONS
    • Select the first button (English) in the Audio Menu

    • Right Click and select LINK – SET VPRM and LINK..

    • On first dropdown select GPRM2 = 0

    • On second dropdown select Audio Link

    • Click OK

    • Select the second button (Francais) in the Audio Menu

    • Right Click and select LINK – SET VPRM and LINK..

    • On first dropdown select GPRM2 = 1

    • On second dropdown select Audio Link

    • Click OK

    • Select the third button (Espanol) in the Audio Menu

    • Right Click and select LINK – SET VPRM and LINK..

    • On first dropdown select GPRM2 = 2

    • On second dropdown select Audio Link

    • Click OK

    SETTING UP THE SUBTITLES MENU BUTTONS
    • Select the first button (Subtitles Off) in the Subtitles Menu

    • Right Click and select LINK – SET VPRM and LINK..

    • On first dropdown select GPRM3 = 0

    • On second dropdown select Subtitles Link

    • Click OK

    • Select the first button (English) in the Subtitles Menu

    • Right Click and select LINK – SET VPRM and LINK..

    • On first dropdown select GPRM3 = 64

    • On second dropdown select Subtitles Link

    • Click OK

    • Select the second button (Francais) in the Subtitles Menu

    • Right Click and select LINK – SET VPRM and LINK..

    • On first dropdown select GPRM3 = 65

    • On second dropdown select Subtitles Link

    • Click OK

    • Select the third button (Espanol) in the Subtitles Menu

    • Right Click and select LINK – SET VPRM and LINK..

    • On first dropdown select GPRM3 = 66

    • On second dropdown select Subtitles Link

    • Click OK

    COMPILE THE DVD AND TEST IN POWER DVD or WIN DVD
    Text not edited except for coloring.
    (I think I've got the coloring right, but feel free to proof me on it.)
    Quote Quote  
  4. Member
    Join Date
    Nov 2005
    Location
    Brazil
    Search Comp PM
    Hi folks,

    Well, I want to really thank you guns1inger and Shadowmistress, but I think I’ve not made myself clear enough (English is not my mother language…). What I'm trying to do is everything I said before in this structure above:

    One global main menu with English and Portuguese buttons where each button leads to its on path, for instance, when the user click Portuguese button ALL menus (ROOT, PTT, AUDIO and SUBTITLE) will be written in Portuguese and in the English button case ALL menus (ROOT, PTT, AUDIO and SUBTITLE) will be written in English. And the main movie is common for the both paths, that’s are why I tried to do that using one VMG menu with the English/Portuguese buttons and two VTS each one containing its on ROOT, PTT, AUDIO and SUBTITLE menus written in the chosen language. In the end of the common main movie the DVD is supposed to return to the right ROOT menu, for instance, if the user chose English language in the beginning, the DVD is supposed then to return to the English ROOT menu.

    See you,

    Aeolis.
    Quote Quote  
  5. Serene Savage Shadowmistress's Avatar
    Join Date
    Mar 2004
    Location
    Controlled Chaos
    Search Comp PM
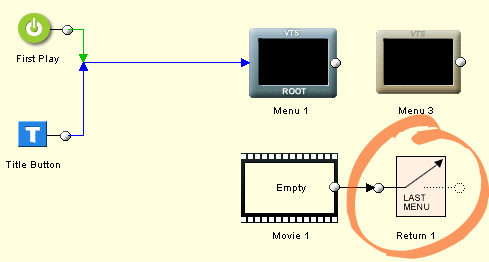
    Dvdlab has this thing called Return to last menu. When you connect the movie to this, the movie will return to whatever menu you saw last.

    Quote Quote  
  6. Member
    Join Date
    Nov 2005
    Location
    Brazil
    Search Comp PM
    Hi folks,

    Thank you very much. I think it ends my doubts. Well, at least for now.

    See you,

    Aeolis
    Quote Quote  


Similar Threads

Visit our sponsor! Try DVDFab and backup Blu-rays!