


how can I make photos look like this using photoshop?

+ Reply to Thread
Results 1 to 15 of 15
-
-
You can't. That graphic was probably done in a draw program which uses only linear lines as opposed to Photoshop which uses only bitmap pixles and edits that way. Adobe Illustrator or Corel Draw will create in the style you want, but believe me it's not easy.
The closest that I can suggest using Photoshop is to use the selection lassoo to select the head, then open the Brightness/Contrast filter; slightly darken the brightness (not too much), then tweak the contrast higher until you get to where you want it. Again, it's nowhere near what you are looking for, but that's the best I can suggest. After you tweak it as close as possible, try different filters in Photoshop to see if you can tweak it closer.
Sounds like a fun project. -
Sorry, didn't have any people photos available. I boosted up the brightness and contrast and the saturation to blow out the detail, blurred a little, then use the 'Cutout' filter. There may be a 'posterize' filter that would work better:
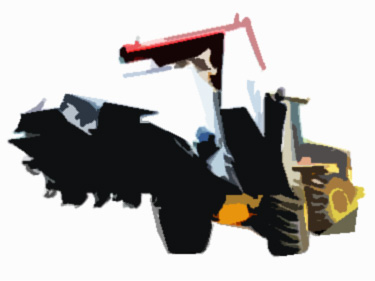
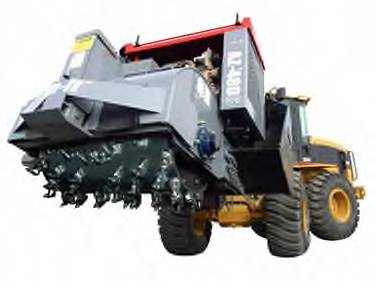
The original:
-
I don't have Photoshop but if I was trying to recreate that affect I would first do a edge preserving blur to eevn the colors out. Save it as a .gif with a reduced color pallette.
Here's a quick example, saved at 10 colors:
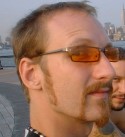

That's probably about how they accomplished it, if you look at the nose you can see som spots of color. If you're famialar with working with a gif pallete you should be able to to crete a better image that the one I posted creating a custom pallete. -
You can do that in Photoshop.
Use your lasso (magnetic if you need it) and then create paths from your various selections. Paths are vectors, just like in Illustrator. These paths can be used as masks/selections.
With masks active, FILL the various sections with the appropriate choices from you reduced color pallet.
Since you're still working in Photoshop, ultimately you're still stuck with a bitmapped image, so you DO NOT want to resize AFTER filling in. If you have to, resize to your final desired size before doing anything (otherwise, you'll blur/smear the edges/transitions).
Scott
>>>>>>>>>
edit: What thecoalman did is quite similar to "Posterize" ( [Image | Adjustments | Posertize...] ). -
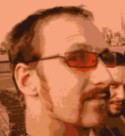
Taking it a step further after converting it to gif and reducing the colors convert it back to true color and apply a gaussian blur to to smooth out the edges. Note that all these images have been reduced in size from the ones i was working on...
-
That's the first thing i went for in my image editor but the options are limited and it didn't work very well in my editor.Originally Posted by Cornucopia
-
Here's what I did quick-n-dirty. You can do alot better if you make layers first, refine your selections first, etc.

Scott -
hi,
Now I am just really learning myself on using photoshop and I have a ways to go.. many time knowing what the orginial picture looks like determine what technique/procedure to use..
in this picture I would venture to say , first maybe several several layers and
a combination of masking things off and using the color sampling maybe and the brush... maybe some hue saturation...
if you want really want to learn from people are really good with photoshop, and these guys are good.... take ride over to http://www.retouchpro.com/ , they have a very active forum and there willing to help, also there a lot of tutorials avail on there site that you might find very usefull..
the group there is always challenging each other and h elp out us newbies on the various techniques and usage of tools....
Originally Posted by vijaygunners -
thanks for the link i'll check it out ^^^^^^
-
that looks very good, can you dumb down the explaination on how you did it if its possibleOriginally Posted by Cornucopia
-
The best way to do that would be to draw it in Illustrator. In Photoshop, there is a quick, dirty way to achieve a similar look using the cutout filter.
His name was MackemX
What kind of a man are you? The guy is unconscious in a coma and you don't have the guts to kiss his girlfriend? -
Going from memory...
1. Load picture
2. Make selection (with wand, lasso, rect, color select, etc)
3. [Paths tab] click OptionsMenuArrow(in corner) Make Work Path (with ## pixels of tracing tolerance)
4. Make new layer
5. Choose new foreground color
6. Back to Paths tab, work path should still be there
7. Fill with foreground color
8. Repeat 2-7 for each "object" you want to have a separate color for.
That's all I did (of course, I forgot to use layers, but I was in a hurry).
Scott -
Video Restorer

- Jun 2003
- dFAQ.us/lordsmurf


You can also turn the image into a high-res video, use a "cartoonizer" type video filter, then extract a still from the encoded video (the video is probably just 1 frame anyway).
Want my help? Ask here! (not via PM!)
FAQs: Best Blank Discs • Best TBCs • Best VCRs for capture • Restore VHS
 Quote
QuoteSimilar Threads
-
Encore to photoshop
By shaolin2006 in forum Newbie / General discussionsReplies: 0Last Post: 18th Oct 2009, 15:50 -
Working with photoshop
By romanstopme in forum ComputerReplies: 9Last Post: 4th Feb 2009, 00:13 -
Photoshop
By romanstopme in forum ComputerReplies: 4Last Post: 3rd Jun 2008, 23:55 -
Photoshop 2.0
By Tom in HD in forum MacReplies: 13Last Post: 27th Jan 2008, 04:42 -
Photoshop PAR
By kippard in forum ComputerReplies: 2Last Post: 7th Oct 2007, 04:15