


I shot 2 tapes worth of DV for my nieces recital. The lighting was very,very,very bad as they rented a hall and didn't know how to operate the lights.
Anyways, I simple went into MF 4.0 to build the dvds and quickly saw the videos were BRUTAL and basically useless.
Reading these forums I quickly tried VirtualDub with the brightness filter. One night later I have a little brighter video that looses sounds sync after 30 minutes. I tried virtualdub mod also ith the same results.
Are there any sure proven ways to clean a video and brighten it? My friend has Premiere Pro on his machine and I could go over there but don't want to bug him if I don't have to.
Any ideas are appreciated,.
+ Reply to Thread
Results 1 to 30 of 33
-
-
Member

- Aug 2001
- Kennesaw, GA - USA

, PC 3200
PNY GeForce FX 5500 AGP 8x
Pinnacle PCTV Pro
Pioneer DV563A-S
Sony DRU500a
ECS 848P-A")

Don't use brightness filter. Use instead the Levels filter. Play around with gamma and white level (the top sliders). For noise, I don't know without seeing it, but I'd guess the 2d Cleaner and a temporal filter might do the trick for you. Good luck.
Darryl -
Where dose this audio issue happen ... you better not be playing it back in virtualdub with filters engaged ... it dont work .
---------------------------------------------------------------
Audio sync :
Open video in virtualdub
Now hit the first of these two buttons .

Now go 10 minute's , and hit the second button .
Save as avi .
(you might want to check audio / video compressor's)
Or set video and audio to direct stream copy is fine .
Now hit the "right" arrow key on keyboard (move's to next frame at end of first)
Repeat the above step's , create second file .
Repeat step's to create third file ... and stop .
We now save what remain's as a single file , and work on audio issue .
This can be time consuming .
Open this last video clip , goto audio , set to full processing , then goto interleaving , now to "audio scew correct" .
Use + to push forward , - to pull backward .
Try a value of 1200 , + or minus depend's which way it is heading out of sync .
Now try preview (disable second preview window) .
If audio need's more or less , adjust that audio scew number , then repeat preview ... when it's smack on , that's right to go ... but we need to repeat the previous setup where you will now save this as video 4 .
Hit that first button I showed , play till audio sync hit's again ... stop , go to just before this audio sync reappear's , and hit that second button ... now save as video clip four .
We are still using the original 4th part of the video , and now have saved the 4th clip out ...
Hit left arrow key , hit first button , go to end of this clip , hit second button , save this out as "dummy" , when done , close vdub , and delete "THIS" clip ... not clip 4 we just made .
So we now have the first 40 minute's done , 3 x 10 min's , and 1 x ?? minute's ... and this original clip (somewhere + to end of file)
Open this original clip we have been saving from in vdub .
You now repeat the audio sync technique's as explained before , saving each clip out ... the next one is called five .
Eventually you we reach the end of this video you are dealing with ... you are not done .
You will now use the "append" feature in virtualdub to rejoin all your clip's in the correct order , then save this out ... Audio sync is gone .
You will now have the option to save with compression on both video and audio .
You also have the ability to frameserve this to bbmpeg and to generate legal mpeg2 stream for dvd ... in all dvd supported format's .
Bbmpeg m2v video stream's will be accepted by all dvd authoring tool's ... using any other encoder is at your own risk of wasting your time .
Ifoedit will accept all dvd compliant m2v stream's generated by bbmpeg ... including ntsc sourced ...
=======================
This cover's how to deal with audio that gose gradually out of sync ... the worse it is , the longer you will be at it ...
Just from some people .. dont use "audio preload" , you will be wanting to shot yourself in the head later ... -
Hi-
The best filter I've seen for what you want is the AviSynth HDR AGC filter, still under heavy development:
http://strony.aster.pl/paviko/hdragc.htm
Here's the main thread:
http://forum.doom9.org/showthread.php?t=93571
There are lots more before and after pics scattered around the thread, including here:
http://forum.doom9.org/showthread.php?p=655751#post655751
Be warned, though, this filter is very slow. But it's also very good. It has a cleaner built in, but there are a ton more available in AviSynth, such as Convolution3D. -
If you post a frame or two, we could play with various filters.
BTW, "Brightness" sets black level. -
Thank you for the replies folks it's much appreciated.
I'm trying them all now!
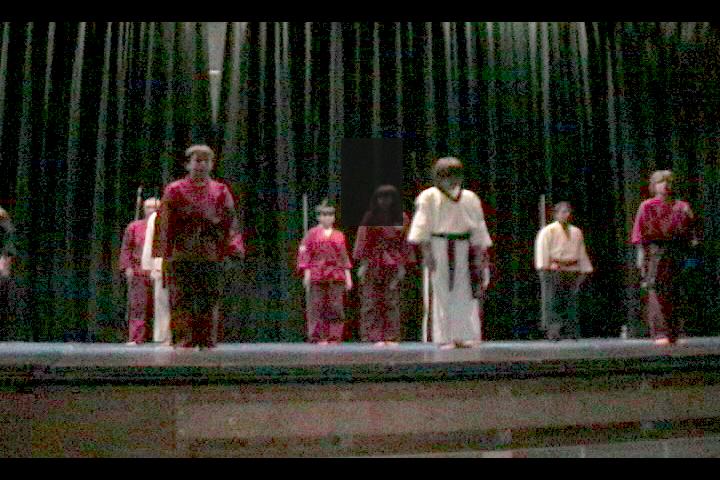
Here is a example image mpeg snapshot.
Another question: I captured the dv by using MF4 straight to mpeg2 for dvd editing. I usually use DVIO.exe but didn't see any adantage of having to re-encode again for DVD editing. Would DV straight be better for video correction?
Thanks again.
averagedark.jpg -
BTW, most would say "why even bother ?" after looking at that snapshot and I would agree but even after informing the parents how crap it is they want it bad...
Its a no-win situation for me and if I thought I could get away with "the tape got chewed" I would try...
Again, thanks for the help, I'm not expecting miracles just the best possible under the crappy situation. -
Hi-
I don't capture, and have never worked with home movies and VCR tapes, and know next to nothing about colorimetry or correcting luma or anything of that sort. A quick test with that filter I mentioned did this:

This is the script:
LoadPlugin("C:\Path\To\AGC.dll")
ImageSource("C:\Path\To\averagedark.bmp")
ConvertToYV12()
ColorYUV(autogain=true)
HDRAGC(coef_gain=1.5,coef_sat=3,reducer=1,Protect= 1)
Levels(0,1,255,16,235,coring=false)
ColorYUV(Analyze=True)
I'm sure you and others could do much better by reading the doc and fooling around more with it. This isn't really my thing. A short segment of the video might help as well. Leave off ColorYUV(Analyze=True) if you don't want any writing on the screen. -
Here is one using primarilly gamma (Vegas Levels Filter).
Gamma to 2.3
Black -6%
White -30%
-
Is there another program I can use? I don't know how to use that plugin!
-
Well , if you can afford a little money , go into ebay , and buy ulead video studio 9 se ... cheap .
You can also download it (30 day trial) , just to get this project done .
If you still have the original dv tape , use ulead to import it ...
There may be an option to add filter's before importing ... if not they can be applied when video has been placed onto timeline for editing .
Export also has other option's such as antiflickering , and other .
It's a really easy to use product ... packed with many feature's such as mpeg cutting and more .
Freeware tool's can require extensive explaination's that leave newbies wondering why they asked in the first place . -
Most levels programs adjust these values. It was meant to be generic not specific to Vegas.Originally Posted by edDV
-
Raycaster,
FWIW noting here..
Right now, and from where I'm sitting, reviewing and analizing your
posted image (though in jpeg -- not a good idea of posting these) I
can see you image is showing its tipicle "grain-like" quality. And,
I can see that it looks to be in the 16-235 color range. When you
adjust this, you have (or should) do so in this same setup of 16-235.
If you don't, you upset the balance of your images' black level, though
you probably wouldn't notice it.. so its not that important to worry
about.
The other side to all this, is two-fold..
1, Your camera's profile
2, your scenary setup
The bottom line here, is your sceneary setup. It's obviously a low-lit
stage (try not to think of it as wrong) and you shot video of this.
It is possible that you could have better prepared for this shoot, but
(personally) I'm pretty sure you did not do this, and just took video
of what was going on -- tipically so.. any normal person would have
done the same thing in your shoes.
The other factor, as I *briefly* note above, is your camera setup. It
is obvious to me that you did not take any care or preporation in this
area. Again, any normal person would have.. yada yada..
Therefore, what you have is a low-lit stage on video by a camera that
was not properly prepared for the scene, thus.. amature video footage.
( did I mention that I am not a pro ? )
Overlay mode and your Graphics Card..
Now here, is a key feature/tool to understand in the things of video
and image processing.
The problem with your image (though not really a prob) is the display
you are viewing it on, and the color space. This alone is missleading
you to seeing something else that is not entirely accurate.
Your display is RGB, and you are viewing your image in a non Overlay
mode. If you were in overlay mode, you might actually begin to see
the real video's colormetry. But, this fact (and level of feature) is
also dependant on your given Graphics card extended capabilities.
I have an older generation graphics card, one that I refuse to give up,
and it *seems* to be the only card that gives me the most "true" image
representation of any Video or Image when inside an Overlay mode window.
And the G.card that I have is an ATI older gen board. And, with this one
that I have in my system is unique, in that (though I have other ATI cards)
this one is the only one that shows "true" image representation.. pixels;
noise; grain; color; artifacts; mpeg pixelations; mpeg DCT; etc. etc. etc.
And, because of this, for years, I have always been one step ahead of the
rest, in terms of image analisys reporting what-not's.
With that said..
If you want to review an Image (or Video) sequence, you are better off
doing so inside a window that is setup for Overlay mode. Then, you can
dicern more accurately the image's detail. But remember what I noted on
above, that YMMV from G.Card to G.Card, and chances are, you won't get
very far from where you are anyways, (inside RGB) colorspace. But, it is
better than nothing.
In order to accomplish this, (for post and editing processes) I can only
think of one windows application that features this. And, this app is
none other than TMPGenc
What you do..
** Open your video source file in question inside TMPGenc.
** click on Settings
** select Advanced TAB
** double-click [x] Custom color correction
Now, the first thing you'll notice is how dark your image (video) is.
But, once you set the option below, you should begin to see things a
little differently. Proceed..
** then, click [x] Overlay
By now, you video image should turn up brighter here.
Now, once inside this setup, you can review (or analize) your video's
detail, and fine-tune it's colormetry by using the various filters at
your fingertips. And, as you configure your filter params, you can
view them in real-time and inside this Overlay mode. Hopefully, your
G.Card will reveal much "true" details as I was on about, above
I have been using this routine since time begain.. ok.. Since I relized
that I had a unique tool built into my G.Card
Good luck,
-vhelp 3992 -
[quote="edDV"]
I hope this program does the job Windows Media Player does viewing dark dark dark dark videos. I was able to make out the faces of the people in my shots. I just can't save it with the brightness/contrast settings set in video enhancement inside WMP. I tried virtualdub and premiere but both of those program do not bring the people out of the complete darkness like WMP. Hope Ulead does the job.Originally Posted by edDV -
Where did you find that quote? I don't recall ever sending people to Ebay to find Video Studio SE. Also I doubt I ever said "There may be an option to add filter's before importing ... ". This is never been the case in Video Studio.Originally Posted by bluestar88
And I'm sure I never wrote this:
"Export also has other option's such as antiflickering , and other . It's a really easy to use product ... packed with many feature's such as mpeg cutting and more . Freeware tool's can require extensive explaination's that leave newbies wondering why they asked in the first place ."
Why are you quoting me saying this? -
He meant to say Bjs. His post is farther up.
He's not really trying to sully your good name.
-
Oh, never mind.
-
Ok, I just tried the trial Ulead VideoStudio and it did not brighten up my video. By the way it's an mpg file. Can I still use avisynth to brighten up my video? Is there a way I can have WMP save the video settings? I can use the video settings to have the movie brighten up perfectly in WMP. When I raise the contrast in WMP it doesnt just black out the whole screen, it adds a type of night vision look to the clip which is what I want to do. My video is completely black without WMP video setting correction.
-
Windows Media Player is a media player, not a media editor. Just about every video editing program has brightness and contrast filters.
Ulead VideoStudio has them, you just have to apply them. After adding a clip to the timeline apply the brightness/contrast filter. -
Is your goal to make a dvd for viewing on a TV. If yes then keep in mind that your video will look brighter on your TV than it does on your computer monitor.
-
True, many make the mistake of judging video from a computer monitor. A computer monitor has poor dark gray detail.Originally Posted by danzeb
A test DVD needs to be made. Try several filter settings and pick the settings that look best on the TV. Next level of precision is proper calibration of the TV set. If you want the video to look good on other TV sets, you need to work off a calibrated display.
http://www.videouniversity.com/tvbars2.htm
http://www.indianapolisfilm.net/article.php?story=20040117004721902 -
Yes I will be viewing this on dvd. I'll try to make some sample vcd or something to see if the video is bright enough. thanks.
-
Hi-
By the way it's an mpg file. Can I still use avisynth to brighten up my video?
Yes. -
Ok, I think I will have to end up using avisynth.
Here's what I'm trying to do:

That's an example of what I found from people using hdr agc. Is there a guide anywhere that teaches me how to use this scripting thing? Thanks!
No other editting program was able to do that. premiere, videostudio, virtuadub, etc. -
somehow you blew over vhelp's comments, he is VERY correct about the explanation of viewing content on a computer screen that is destined for a tv. VERY different brightness levels, and he explains how to check and adjust those levels (tmpgenc)
-
Yes, a computer monitor produces a picture a little bit darker than does a TV set. However, what bluestar88 has to do with his source video goes way beyond the monitor/TV differences.
bluestar88, I pretty much gave you the .avs script above, and that HDRAGC thread to which I linked before gives a bunch more scripts for you to play around with. Anyway, I was using ImageSource, because I only had the picture as a source. For the full video you'll be using MPEG2Source, something like maybe:
LoadPlugin("C:\Path\To\AGC.dll")
MPEG2Source("C:\Path\To\Video.d2v")
ConvertToYV12()#if not in YV12 already
ColorYUV(autogain=true)
HDRAGC(coef_gain=1.5,coef_sat=3,reducer=1,Protect= 1)
If your video is interlaced, you'll have to modify that script as shown in the first post in the HDRAGC thread over at Doom9
Install AviSynth and the DGMPGDec package (it contains both DGIndex and the DGDecode.dll needed for your script) and stick the AGC.dll somewhere, like maybe the AviSynth Plugins folder. Open the MPG in DGIndex and go File->Save Project. That will give you the D2V file which you'll need. Create a .txt file, like maybe Video.txt, and then change the .txt extension to .avs. Inside of that now Video.avs file, put in that script above, adjusting for the paths. Try and open the script in VDub(Mod) and scroll around. Use what you learned in the HDRAGC thread to adjust the settings. You may not need the ColorYUV(autogain=true) line if you can get the output to your liking without it.
For more info on AviSynth, go to www.avisynth.org. In addition, inside the DGMPGDec package are 3 help files, all of which, especially the QuickStart Guide, are very useful in getting you started using AviSynth. -
is Mpeg2source a program? where can i get it? Cause when I open the script inside vdub I get "Script error: there is no function named "mpeg2source".
-
Hi-
MPEG2Source is built into AviSynth. You don't need to download anything special. I already told you the things you download. I also suggested reading the QuickStart Guide included in the DGMPGDec package. Had you done that, you would have come across this:
So, I might suggest making your first simple script of those 2 lines, and then opening it in VDub(Mod) to test it out. After you cross that threshold, you can then start adding in the other plugins and filters. And looking again carefully, I see I forgot to load the DGDecode.dll:What is This Index File and What Do I Do with It?
DGIndex created an index file called *.d2v. It is read by DGDecode, which actually decodes the MPEG and delivers the video. The index file just contains information that tells DGDecode where each frame is located and some information about each frame.
But you can't just execute DGDecode directly! It has to be done through Avisynth. We'll make a script file called myvob.avs using a text editor. Later in this document I'll show you how to configure DGIndex to make the script automatically, but for now, you need to know the old-fashioned way. So put this text into a new text file you make called 'myvob.avs':
LoadPlugin("...\DGDecode.dll")
MPEG2Source("myvob.d2v")
Replace the path '...' in the first line with the path to the location where you placed DGDecode.dll.
Finally, use VirtualDub to open the 'myvob.avs' script file just as if it was an AVI file. That's it! You have your video and can navigate randomly on the VirtualDub timeline. Does life get much sweeter than this?
LoadPlugin("C:\Path\To\DGDecode.dll")
LoadPlugin("C:\Path\To\AGC.dll")
MPEG2Source("C:\Path\To\Video.d2v")
ConvertToYV12()#if not in YV12 already
ColorYUV(autogain=true)
HDRAGC(coef_gain=1.5,coef_sat=3,reducer=1,Protect= 1)
My fault entirely. Sorry to waste your time and cause you frustration. -
I seee... well should've read... thanks a lot for all the help!
-
Hi everyone... again.
I was not able to get these results with HDR AGC =(
Here are his settings: http://forum.doom9.org/showthread.php?p=648321#post648321
I don't know why his vid came out so clear! I cannot do "ConvertToRGB32" like he did. Would that make the difference? I wonder how he was able to get those results using HDR AGC?
 Quote
Quote
Similar Threads
-
noising capture
By backslash in forum LinuxReplies: 6Last Post: 28th Jun 2010, 21:33 -
Brightening a DVD
By RAN1DOM2 in forum EditingReplies: 3Last Post: 9th Aug 2009, 16:20 -
brightening dark MPEG-2 skin tones without brightening anything else
By rch15 in forum EditingReplies: 4Last Post: 18th Aug 2008, 02:53 -
Dark Video
By jan9ella in forum RestorationReplies: 14Last Post: 27th Jun 2008, 15:43 -
brightening color
By Russo in forum Newbie / General discussionsReplies: 4Last Post: 8th May 2007, 15:44