
+ Reply to Thread

Results 1 to 15 of 15
-
Hi Marley_,
So, just to confirm, you've got DV AVI files.
You can use VirtualDub with DV AVI and it will work with audio and video separately. I have to confess that I'm not too clear on what you want to do exactly, so I'm thinking that a video editing tool might be able to do what you want too.There is some corner of a foreign field that is forever England: Telstra Stadium, Sydney, 22/11/2003.
Carpe diem.
If you're not living on the edge, you're taking up too much room. -
Hi Daamon,
I thought dvd2avi and vitualdub do the same thing? I am only assuming. Shouldn't I use virtualdubMOD instead? I heard it was the same thing, but more updated?
I just need to be able to cut & merge (able to do this using Tmpegenc, right?) and edit audio, as in replacing undesirable sound.
btw, how do I make the ending credits? What software would I need? also, is it possible to roll credits over taped scenes? -
Marley, I think you may be a bit mixed up. Could you be more specific on what you're doing? Are you using the audio from the DV (camcorder) at all? Are you adding a seperate soundtrack? Any "voice over" to be added? Are you adding 'faeds" or other transitions?
Most will say to do your editing and "creating" THEN use TMPGenc (or any quality encoder) to convert the "project" to mpeg2 - ready for DVD authoring. You'd need an editing program for this. VDubMod can cut/join/filter, but not much of a "creating" program.
Again, just explain what you want as the final output and I'm sure someone here can help you. -
The film has to be on VHS so i am going to try and edit on my computer, then transfer it back to dv tape, then plug the camcorder into the tv and rec from my vcr.
I am using audio recorded from the camcorder, but if there are some ugly parts I want to record over, I was wondering what I would have to use.
also, what would I need to make ending credits? -
OK, that should be easy enough. You basically just need a to transfer to the computer then edit then send back to the camcorder. Windows Movie Maker can probably do all the things you need and it's free and fairly easy to use. it's by no means a great editing program, but those can cost quite a bit.
Just capture with WMM thru firewire port (DV port on Sony camcorders i think) edit until you like the final product. WMM has a "send to DV camera choice once you're done editing. Just do as you say - send it to the camcorder then camcorder to VHS.
There are many other programs that can cut/edit just fine - many better than WMM. But it's already probably on your computer (ALL Programs/accessories/entertainment) and it'll do what you need. VdubMod is somewhat combersome for editing like this and the other program you mentioned has nothing to do with editing.
Oh, and tell the teacher that he/she needs to get with it! VHS!?!?!?!?!? hey, it's the new millenium! 8-track's and VHS are so "last century". j/k -
unfortunately, i don't have access to WMM since i'm running win98se.
Any suggestions what I should use w/ a win98se system?
I might be able to use my friend's computer (which has adobe premiere). Would that be able to do all I need?
Thank you so much for your help! -
Hi Marley_,
DVD2AVI is, as the name suggests, for taking DVDs (and (S)VCDs or other MPEGs) and converting to AVI. Quite what other functionality it has I'm not sure. It may have things in common with VirtualDub but I don't think they're the same.
tmh has already covered VirtualDubMod.
From what you describe, you need a half-decent NLE (non-linear editing) tool. Adobe Premiere will definitely do the job, but - because it's powerful, it's not the simplest thing to learn. You won't need TMPGEnc at all.
Here's what you need to do:
1. Capture via firewire from DV cam to PC hard drive. Premiere will do this, but I find WinDV (free) better as it splits the clips into separate files every time you started recording a new clip.
2. Load the DV AVI files into Premiere and arrange as you want them. You can also cut out unwanted audio, and overlay new audio in new tracks.
3. If it's Premiere 6.0 (which I use), you can create rolling titles, but you have to put blank lines at the beginning and end so that when it scrolls, it goes through the blank lines first, then the credits, then the blank lines at the end to clear the screen. For later versions of Premiere, you don't need to do the blank lines.
Be sure to have a black background if you want "to roll credits over taped scenes".
4. Here's how to do credits rolling over video:
a) Save the rolling title to a known location.
b) Place that file on the timeline in a track that's above the footage you want it to play over.
c) Click once on the titles in the timeline to select it.
d) In the "Effect Controls" palette, click on "Setup" for the "Transparency".
e) Because you (hopefully) have a black background in the titles, you'll need to use the alpha channel.
f) Play with the settings to get it as you want - there's a preview in the transparency settings.
g) When done, close the settings window.
5. When totally finished, render the project.
6. You want it on VHS and are gonna do this via your DV cam. So, export the project back to the cam from Premiere. File -> Export... I can't remember the exact wording, but it should be apparent. I know it's NOT "Export to tape" as this is for PC to VHS directly and you need to have the right outputs at the back.
7. Once on DV cam, hooking it up to your TV and then recording on the VCR probably won't work - unless you've done it before and know it does. You'll need to hook the DV cam direct to the VCR.
Good luck...There is some corner of a foreign field that is forever England: Telstra Stadium, Sydney, 22/11/2003.
Carpe diem.
If you're not living on the edge, you're taking up too much room. -
OK, daamon gave you all you'll need to do it in Adobe - which is actually MUCH BETTER than Windows Movie Maker - just not free. The only thing I'd do different is I'd capture right in premiere (as DV-AVI file) rather than WinDV if it was just for the one project - why learn 2 programs for one project. However, I DO use WinDV - as daamon taught me to many months ago
 - so use it if you have a few extra min. to learn it. It should make no difference to the video quality one way or the other.
If it turns out you can't use our buddy's Adobe Premiere for whatever reason, then post back and someone will have another idea for you. You could download a trial version of an editing program - look in Tools section - and maybe you'd like it enough to buy it. Most put some mark on the video until you pay for it, but maybe there's one that doesn't. There are also other free editing programs, but they don't seem that user friendly to me - they would do what you need though, I think. -
thank you for your help tmh & daamon, I will see what I can do.
I will definitely be posting back since this project is due in only a few weeks and I have two major finals due in the same time frame. I am going to have to time manage like a mofo and I will need all the help I can get to finish the project on time!
I liked daamon's idea of using windv to capture from DV b/c it will (hopefully ^_^ ) save me some time splitting up the scenes b/c I shot way out of order.
is there something special I need to do to configure WinDv to do this or does it automatically do this regardless?it splits the clips into separate files every time you started recording a new clip.
I found a guide on this website to capture DV video and convert to dvd (which I will ignore the latter of course). Is this suitable? Or should I be capturing a diff. way? -
No problem.Originally Posted by Marley_
As well as learning all this stuff, you'll also learn that video projects will always need about 3x as much time as you initially think - until you get accustomed to their complexity that is. In short, plan well in advance...
Using WinDV:Originally Posted by Marley_
1. Download zip file. There's nothing to install, just read the "readme.txt" and put the "WinDV.exe" file where you want it.
2. Open WinDV. "Capturing from DV Device" tab -> Click "..." of "Capture file" field. Select capture location, and provide filename. Click OK (or whatever).
3. "Capturing from DV Device" tab -> "Config" button -> 2nd "Capturing from DV Device" tab:
a) Set to "Type-2 AVI"
b) Threshold: 1. Max AVI: 1,000,000 (Don't put commas in. One million frames is around 10 hours, stops WinDV chopping long clips short of their end). N-th frame: 1
c) Set date / time as you want.
d) Set "numbering digits" as you want. I use 2. This will give you "filename.XX.avi" where the XX are numbers starting "00" and increasing by 1. Using 3 would give XXX etc.
4. Click OK. Start DV cam rolling. As soon as picture appears, click "Capture".
5. All DV capture is "real time". So if your footage is 80 minutes, it'll take 80 minutes to capture. Leave DV capturing, go and have a beer / cup of tea and come back when it's done.
There's probably loads of guides, so it's tough to say whether it's suitable or not. Provide the link...Originally Posted by Marley_There is some corner of a foreign field that is forever England: Telstra Stadium, Sydney, 22/11/2003.
Carpe diem.
If you're not living on the edge, you're taking up too much room. -
My fault. I assumed there was only one since I looked up WinDV in the Tools section and clicked on guides from there and only one appeared. You're right, there are probably more that are just not linked from that location.There's probably loads of guides, so it's tough to say whether it's suitable or not. Provide the link...
I don't think I'll be needing a guide anyway since it seems you've got all the info I need on WinDV in your previous post. Again, many thanks.
no kidding! That's why i'm studying two weeks in advance for my tests so when I have access to editing, I can hopefully get it done!As well as learning all this stuff, you'll also learn that video projects will always need about 3x as much time as you initially think - until you get accustomed to their complexity that is. In short, plan well in advance...
-
hey guys, ok, i've got access to premiere, but he doesn't know how to use it either
; it's his dad's. I found a decent guide online, but I still don't know how to adjust the brightness/contrast of a clip. I highlighted the clip, and clicked show video effects, chose brightness/contrast, but how do I apply my settings to the clip?
-
Ok, SCRATCH the above, I found a decent guide.
http://tlt.its.psu.edu/fmc/premiere6.pdf
this is good. The best one i've found.
Ok, the only thing it didn't really go over was audio editing.
w/ premiere, there's a way to edit the audio in a similar fashion to the way you edit the video, right? What I would like to do would be to toy w/ the "in" and "out" of the audio track. -
Hi Marley_,
Adjusting audio volume (and left-right balancing) is quite straightforward in Premiere 6.0 onwards. I use Premiere 6.0, and the following screen prints are taken from there. Later versions are probably similar...
I'm assuming you have put the video clip on to the "Timeline" - just drag from the "bin", and drop into a video track. The associated audio will display in an audio track.
1. Set the timespan of the timeline to 2 seconds or less. This will allow you to see the audio's waveform. Any more than 2 seconds and it's not displayed.
2. Click the audio "Collapse / Expand Track" button to display / hide the waveform. Viewing this will allow you to judge where to edit the audio better.
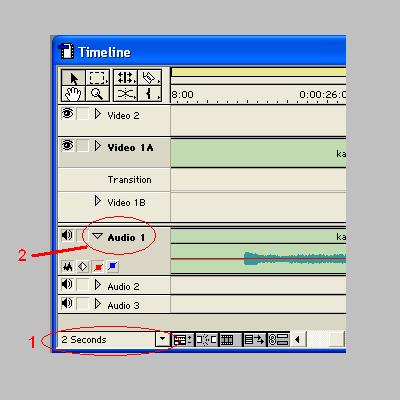
In the middle of the waveform, you'll see a horizontal red line (if the red button on the left of the timeline, in that audio track, is clicked - if not, click it). This is called the "rubber band" for the audio's volume. As it's in the centre, it's 100% (i.e. normal) volume. It can go down to 0% and up to 200%.
Adjusting the volume is done by clicking (once) on the red line to establish what's called a "handle". The handle can be dragged up or down to increase or decrease the volume's percentage.
To do fine adjustments, in increments / decrements of 1%, press and hold "Shift" then drag the handle. Dragging the handle to beyond the waveform will delete it. Handles can also be dragged left-right to adjust their position in the timeline.
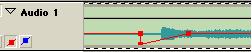
In the image above, I've set a handle at 100% to establish an end point for the preceeding audio. The very next frame then has a handle at 0% and the volume will gradually increase (as per the gradually rising red line) back to 100%.
This will have the effect of suddenly stopping the original audio, then fading it up from silence to normal.
NOTE: By default, there are immovable handles at the beginning and end of the audio clip, so if you want the effect to start at a certain point, you must place a handle there or the effect will start from the beginning of the audio.
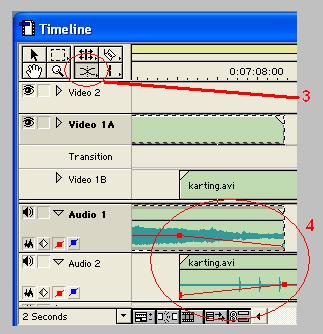
If you have two audio tracks overlapping, you can click on the "Cross Fade Tool" button (item 3 in the screen shot below). You then click on the first audio track (the cursor will change to the same as the button you've just clicked) and then click on the second audio track.
This will have the effect of fading out the audio track that's playing first, whilst at the same time fading in the subsequent audio track. See item 4 in the screen shot below - it's self-explanatory.
Play with it to figure out how to achieve what you want.
The same can be done with the left-right balance - just click the blue button in the relevant audio track and the same rules to handles on the balance "rubber band" apply.
Hope that helps...There is some corner of a foreign field that is forever England: Telstra Stadium, Sydney, 22/11/2003.
Carpe diem.
If you're not living on the edge, you're taking up too much room.


 Quote
QuoteSimilar Threads
-
Two OS on seperate HD update/boot?
By neworldman in forum ComputerReplies: 1Last Post: 25th Jul 2010, 18:53 -
Two seperate VLC playback issues
By ecc in forum Software PlayingReplies: 13Last Post: 25th Sep 2009, 07:36 -
Splitting AC3 Into Seperate Files
By travelagent73 in forum AudioReplies: 4Last Post: 19th Aug 2009, 14:46 -
Help.Winavi converts to 2 seperate folders
By hitmanhill in forum Video ConversionReplies: 0Last Post: 7th May 2007, 02:26