


I have been trying to edit some videos that I took with my small camera; I converted them to .avi, and downloaded Virtualdub which seems to have the editing capabilities that I need.
I am able to open the file; then go to Video > Filters > Add > highlight (Brightness/Contrast, and adjust it to my liking, and click Preview: the picture brightness/contrast is indeed improved. But there is no way to save it.
I was told that in order to a filter, I need to go through a series of steps (which I am attaching), which I was able to follow up to where it says that I need to click "Advanced Options". I cannor find any such "Advanced Option".
This is all very new to me, nor am I tech-savvy.
Is there an easier way of editing videos? (my ultimate goal is to put them on DVD, together with some slides.)
Any/all suggestions are highly welcome.
temp-1.docx
+ Reply to Thread
Results 1 to 30 of 53
-
-
To save ... video must be re-compressed when applying filters ... depending on audio format it too may need re-compression (unless vdub supports it).
And save such documents in windows 2003 format or RTF rather than docx (2007) -
Click on Video -> Full processing (probably is already if you have added filters).
Click on Video -> Compression and select a codec and configure it.
Click on File -> Save As and browse to where you want to save the video, give it a name, and click OKRead my blog here.
-
to BJS: HOW do I recompress it? I went through some steps (see attachment to previous message) and then got stuck when it asked me to click on "Advanced Options".
- When do I save? Under "File" there are 4 Save options:
AVI
Old Format AVI
Segmented AVI
WAV
none of which is Windows-related.
To gunslinger:
I did just that and clicked on Xvid MPEG-4 Codec and then got stuck - see above.
Please help! -
I'm a MEGA Super Moderator

- Aug 2000
- Sweden


File->Save as AVI.
And as you are going to convert it to dvd later do NOT convert to xvid as you will lose a lot of quality. Convert to a lossless codec like huffyuv or lagarith. The files will be huge but you wont lose any quality. If you still still prefer xvid then you don't have to use any 2-pass encoding, use constant quality encoding with highest quality setting -
File -> Open Video File
Video -> Filters... Add... Brigntness/Contrast, adjust as before
Video -> Compression... select and config codec, HuffYUV or Lagarith if you're going to DVD later
File -> Save as AVI
The file will be very big but since this is an intermediate (before compressing to MPEG 2 for DVD) you want to retain as much quality as possible. If you just want something for watching on the computer try Xvid, "Load Defaults", change the Target Quantizer to 3. -
-
sorry here's the attachment
temp-2.docx -
You will have to download and install them.Originally Posted by rosmari
-
rosmari, please do not use .docx documents here. Very few of us have the capability of opening them and you are just wasting your time. Use Notepad or post a screenshot: https://forum.videohelp.com/topic271697.html#1322414
redwudz -
I thought it was just me! LOLOriginally Posted by redwudz
-
Video Restorer

- Jun 2003
- dFAQ.us/lordsmurf
-
.docx is why I installed Open Office.
The import crap tool from MS messed up my Outlook 2000.Want my help? Ask here! (not via PM!)
FAQs: Best Blank Discs • Best TBCs • Best VCRs for capture • Restore VHS -
OK - I downloaded Huffyuf since it seems a little less complicated than Lagarith.
I opened Easyzip that came up (p.1 of attachment): I have no idea what to do with the 3 options shown.
Then I went to Easyzip-Help and picked Virtualdub, and started following their instructions, but got stuck at 4) - my Easyzip window gives me 13 options ??? (p.2 of attachment).
IF I then will have no problem following the rest of the instructions - will that allow me to save the filters that I edit?
I am sending the attachment as pdf - or I can send it as .doc if you prefer.
temp-2.pdf -
After you have extracted the HuffyUV files, R click on the .inf file and you should see 'Install' near the top of the menu. L Click that and you should be done. When you open 'Compression' in VD, you should see the HuffyUV codec.
-
I assume you mean to R click Huffyuv.inf of p.1 in previous attachment. But all I get is "Open/Add/Delete/Extract/View/etc".
Or is there another way to extract the HuffyUV files? -
Extact the files from the archive first -- for example drag them onto your desktop (or other suitable location). Then right click on the INF file and select Install.
-
Windows xp > right click on zip archive and select "extract all" and follow prompts ... when asked to view files click yes ... then right click the inf file and select "install" ... done.
What has easyzip help got to do with vitualdub ???
Maybe this is due to you not having extracted vdub from the zip as well ? ... if so you should extract it as well ... then use the program as intended.
Ahh ... clever buggers ... rename docx to zip and extract it ... tada ... I can now see what your talking about in vdubs video compressors, lolll
Close vdub and relaunch it after the other video compressors have been installed as mentioned by others ... if you dont they simply will not appear as available video compressors. -
where IS the archive - how do I find it?
I'm sorry I'm so dense, but this whole video area is new to me.
But thank you for your patience! -
The file you downloaded is the archive. When you double click on it your archive software (EasyZip, apparently) will show you the contents. Drag the three files (huffyuv.dll, huffyuv.inf, readme.txt) onto your desktop or some suitable folder on your hard drive, like c:\temp. Close the archive program then right click on Huffyuv.inf and select Install. After installing you can delete the files on your desktop.
-
Alright - it worked so far: I left-clicked "install" but nothing seemed to happen. And when I checked in the Virtualdub Compression selection, it was not there. I was under the impression that it would be added ???
A picture of that selection is on p.3 of the attached pdf
temp-2.pdf -
If VD was open when you installed, you need to close it and open it again before the codec shows. You usually see a momemtary flash on the screen as it installs.
-
YES!
Now I've got this Menu box with 4 choices (p.4 of attachment). What do I click?
And what other steps will I need to be able to save the filters?
temp-2.pdf -
I suggest the following:
YUY2 compression method: Predict Median
RGB compression method: Convert to YUY2
All other options off. -
Thank you.
I went to Virtualdub, opened my file > filters > Brightness > adjusted that to my satisfaction, then clicked OK. But the picture still was dark. Then I went to File, Saved as AVI, hoping that would help - but the picture remains dark. ????
Thanks again for your patience. -
Did you leave Video -> Full Processing Mode enabled? Did you leave the little checkbox box at the left of the Brightness/Contrast filter (in the Filters dialog) enabled?
-
yes, the little checkbox is on. Then I click OK, and the Filter window disappears, and the picture is back to its original darkness. It did show the correction in "Preview" (same window as used for adjusting).
-
I've never had it fail to work. You should see the difference in the output pane after closing the Filters dialog:
-
I'm attaching 3 shots:
1) before and after (as seen in Preview).
2) I clicked OK
3) this is what came up - i.e. the original darkness
What do I do wrong? Shouldn't I save that filtered picture ? How?
You say that I should see the new picture in the "Output pane". What do you mean by output pane?
Also, I notice that you have "CBR.1pass.mpv" after Virtualdub 1.9.5 in the field above your picture; mine doesn't say that. Maybe that's the step I'm missing ??
temp-2.pdf -
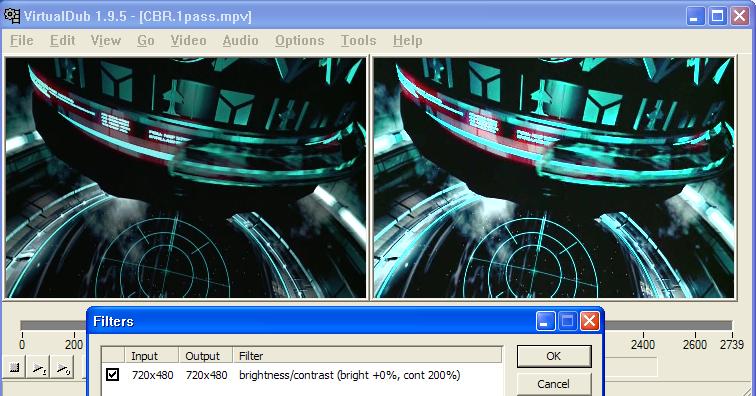
You should have two panes within the VirtualDub window. Like my sample image shows. One pane displays the input video (before filtering) the other displays the output video (after filtering). If your videos are too big to see all of both panes you can right click on a pane to reduce its size. In the image I posted both panes were being displayed at 50 percent so I could post a small image.
The default is to display the input on the left and the output on the right. But there are options to reverse them or stack them veritically instead of horizontally. Each pane can be disabled or enabled via View -> Input Video Pane and View -> Output Video Pane. This disables display of the image within the pane. The pane remains visible but will no longer be updated.
If you press the Play button with the small "I" on it (near the bottom left corner) VirtualDub will play the input video (also available through File -> Preview Input). The Play button with the small "O" will preview the output (also File -> Preview Filtered).
The "CBR.1pass.mpv" in my title bar is simply the name of the video I was using. You see "DSCN0383.avi" because that is the video you opened. -
No, I have only one pane; again, my procedure is to click "open" after having "previewed" it. And it opense with just this one, old, pane.
For it to play, I have to press the first little arrow; the "I" at the beginning of the scale line doesn't do. Again, see p.1 of attachment.
--Just curious: your message was posted at 4:22 AM; you must be a night-owl or located at least a quarter around the world from me - I'm in California.
I do appreciate your hanging in with me.
temp-2.pdf
 Quote
Quote
Similar Threads
-
Editing Question about Virtualdub
By gatewayedit in forum EditingReplies: 5Last Post: 14th Jul 2011, 16:26 -
New to editing with VirtualDub
By xNesX in forum EditingReplies: 2Last Post: 18th May 2011, 23:56 -
Editing video in virtualdub taking so long!
By admirer in forum Newbie / General discussionsReplies: 14Last Post: 8th Apr 2010, 13:43 -
HD Video from VirtualDub to Premiere Pro for editing - What codec is best?
By gliebetronics in forum Video ConversionReplies: 6Last Post: 14th Jul 2008, 11:57 -
mp3 editing with VirtualDub
By tomchook in forum AudioReplies: 2Last Post: 2nd Jul 2008, 11:48