


 / Vista 64bit
Intel Pentium D 950 @ 3400 MHz
SAMSUNG 250 GB / 80gig wd
1024 MB
Nvidia Corp GeForce 6600 LE
Avertv Usb2 / Winfast dvt2000h dvb
centrex , voxson , hyundia , xms888
liteon - xj-hd165h
LG / HL-DT-ST DVDRAM GSA-H10N
Ga - P4M800Pro-8237
Wintal dvdrx250 , Xbox360")
This guide show's how to produce a slide show movie from a series of picture's using
Slide Show Move Maker (freeware) , located here : http://www.joern-thiemann.de/tools
Run's on Win98 to Xp .
While there you might grab two other program's for you tool kit .
--------------------------------------------------------------------------------------------------
This is not in anyway created to take away from dvdslideshowgui , but to be a supplement for user's
still using win98 / Me , as dvdslideshowgui is for xp only .
There are still of course bug's in dvdslideshowgui , especially output chosen as dvd or vob .. stick
with mpeg should , in the current version still be fine .
--------------------------------------------------------------------------------------------------
Tool's associated with guide :
Slide show movie maker
Dvdauthorgui
Besweet
Pgcedit
Virtualdub
Bbmpeg
Ifoedit
Notepad
Special thank's to :
Mwsnap
Saved me having to doodle ..
===============================
What is it you will learn :
1 : Slide show movie maker
a)The basic's of producing a slideshow from jpg's to avi with null audio .
2 : Avi to Mpeg2
a) Setup of bbmpeg
b) Audio conversion
3 : Dvd authoring
a) Menu layout and design ... thinking about what you will require
b) Basic connection's
c) Chapter's
4 : Fix's
a) Fixing some problem's with ifo's , using ifoedit (those that use it)
5 : Connecting the dot's
a) Pgcedit , adding pgc item's , includes all nav command's as used for this project .
6 : Tip's
a) Some useful tip's for both xp , and winme . win98 user's .
b) Mounting iso image's via sheep cd/dvd emulator (it's free)
7) Final wrap up
a) Before I go nutt's ...
=====================================
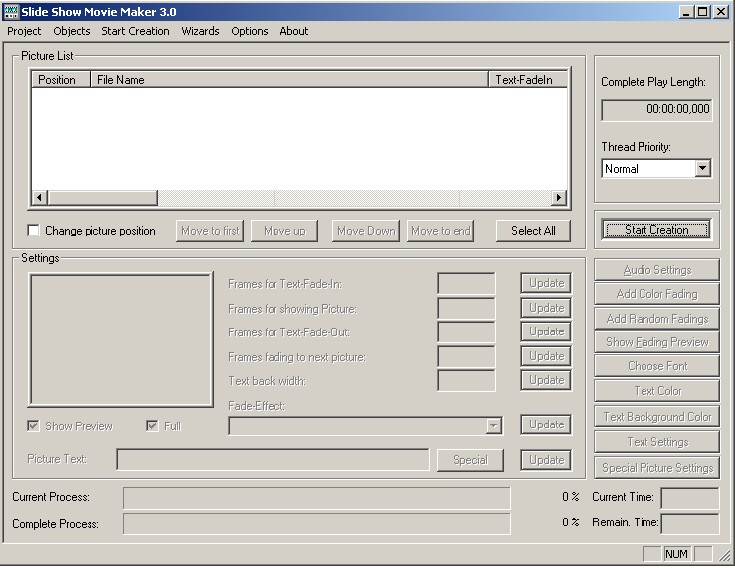
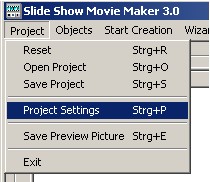
Let's run Slide Show Movie Maker .
The first thing we do is go to Project , Project Setting's .
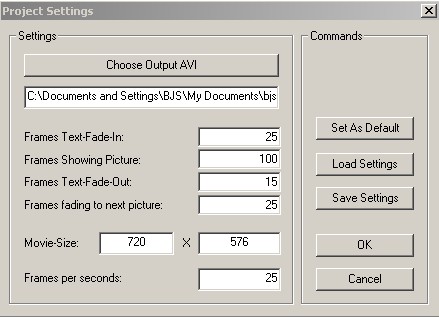
And change some value's .
1 : "Choose Output Avi" , you now choose where it gose , and the name used .
2 : Now "Movie Size" , in this case I want full d1 resolution as for PAL .
3 : Frame's per second , as for pal it is 25fps .
For now leave all other item's alone , these you can toy about with later .
Hit "Set As Default"
Hit "Save Settings" , you will be asked for file name and where to stroe it .
Hit "Ok"
Now back in the main screen , hit F3 , and now locate the picture's you wish to include .
As you can see there are a few option's listed under "Object's" ...
This guide will only cover the basic's , as for everything else , it is up to you to "tinker" with the various fuction's .
Otherwise this guide would be quite extensive , and very long .
==================
Ok , we have all our picture's included for the first "slide show" .
All my picture's have been given short name's just to inform the user watching it , just exactly what it is they are seeing .
To start with , click on your first picture in this slideshow .
Now under the preview window is a button box "Full" , checking this will prevent distortion of original picture height's and width's .
If first picture is highlighted , drag that slider bar over too the right , to the very bottom .
Hold "shift key" , then left click last picture ... this now sellect's all picture's .
I will now setup some of the other fuction's which are to be applied to all picture's included in this slideshow .
First is I'll setup "Fade Effect's"
Then hit update , if you check out your picture's above you will now see this effect applied to all picture's .
You now have these option's .
If you add audio that is not the correct length of the final video output , it will be looped till end .
Colour fading you can add , it will be added to picture list , to remove them , click them in picture list , hit del .
Add random fading's ... something for you to tinker with later , and show fading preview ... handy .
Font is next ... you decide from the preview window what look's ok .
Text colour ... everyone available on your pc ... brilliant (hate old 256) .
Text background colour .. this dose come in handy in some situation's
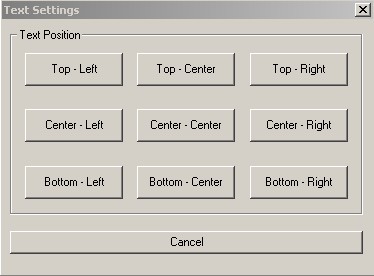
Text setting's ... very handy ... I choose "bottom - center"
Then "Special Picture Settings" , these you should try for yourself .
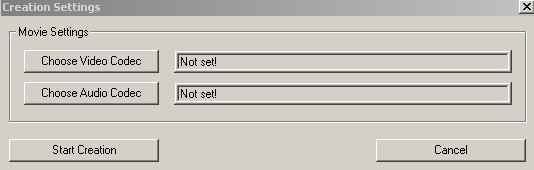
For the basic's , what has been done is ready to go , so hit
Then this appear's
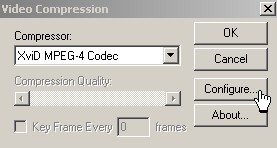
Choose an appropriate compression codec .. some work well , other's dont ... if in doubt go with xvid
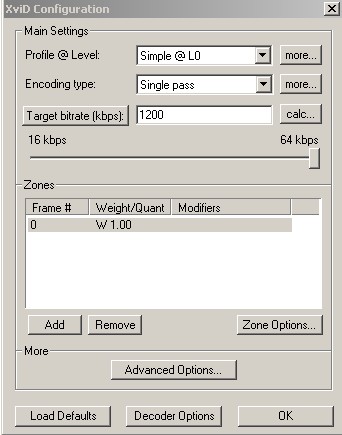
Then configure ... some user's may receive a completely different configuration panel to what I have
Bitrate should be above 1200kpbs for d1 resolution , 2300kpbs would be better and was changed after this snap was taken .
Click ok , then ok again .
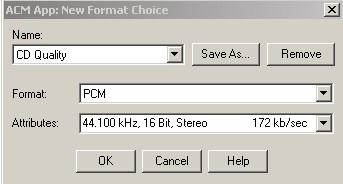
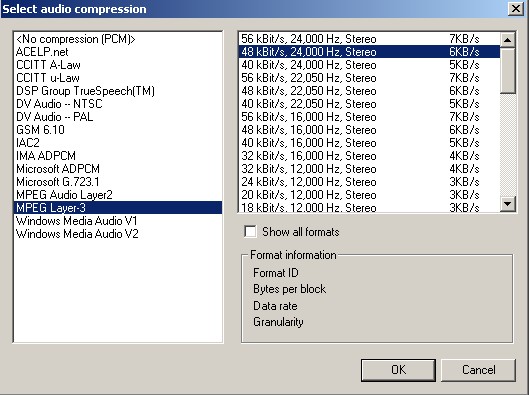
Now for audio , remmember I have not included any in my file .
Cd quality , then go to attribute's and set too
Then hit ok .
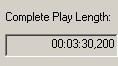
Now hit
And wait ... This is the play length of my movie as it stands now for a 32 picture slideshow
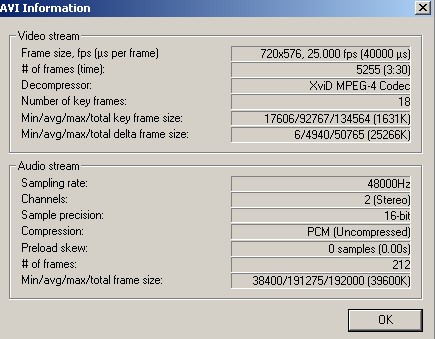
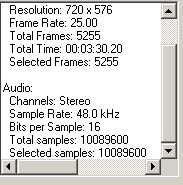
This is what virtualdub reported about this clip
As you can see , by setting up the audio they way I did will cause slide show movie maker to fill the entire clip with null audio , at the required frequency .
Some user's under xp may experience the program crashing at the very end .
This is caused by the null audio .. dont worry , it work's , just close the program when this appear's and your video slideshow will be in the folder you had chosen the output to go .
You should note what vdub has reported as number of frame's = 5255 .
When checking the size of the original output file , it is with the setting's I used = 66.629 mb's .
===============
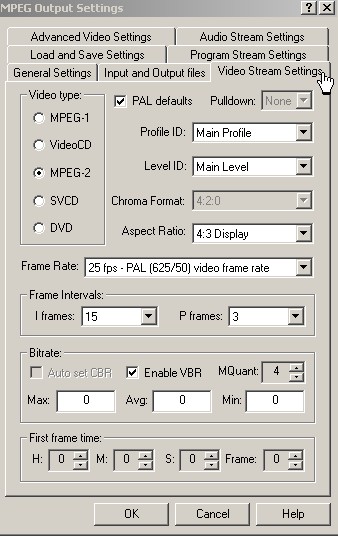
To convert this to mpeg2 as required for dvd , I'll use good old bbmpeg
Open bbmpeg_vfw , then hit
And we get
Hit
Then hit in the new program window that appear's
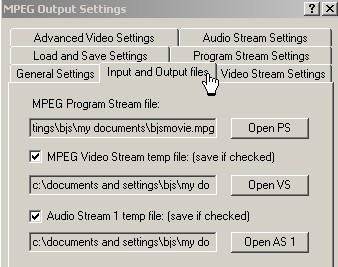
Go here first , and set the output format .. in this case it will be mpeg2
Now here , and check both box's
Finally back here , and uncheck both multiplexer's
Click ok when done .
Then hit
Wait till encoded .
Ps ... if ffdshow is installed
Then this will take a long time ... consider uninstalling ffdshow till all slide show's have been
produced and converted .
If you are frameserving from virtualdub to bbmpeg , it will take only 1/3 of the time as used by ffdshow
Guide for this here : https://forum.videohelp.com/viewtopic.php?t=270071 (vdub frameserving - avi to mpeg1 or 2)
Here are my final file's .
====================
Use Besweet to convert that mp2 (the 5mb movie clip is the audio under xp) , convert to ac3 .
As you can see it has more than halved the audio (using 96kpbs for ac3)
Move the m2v video stream , and this new ac3 audio stream to a new folder .
Delete all other video clip's , stream type's associated with project now .
Repeat these step's and generate you next slideshow (rename clip 1 part's to slide1)
When slide 2 is generated , rename to slide2 , and place in same folder where slide1's video and audio is .
Under no circumstance's should you ever produce ac3 lower than 96kpbs , in most case's when it's played back on the home dvd player , you will not here anything .
===============
PART 2 : Virtualdub and audio recompression
This part of the guide briefly tell's you how to compress the audio in the original avi for those who like myself like to keep backup copies for later use .
1: Open the original avi in virtualdub
2: Go to "audio" , Sellect "full processing , then sellect "compression"
This one give's me very good quality from playback from dvd player that support's xvid , divx playback .
It is also one that should not cause virtualdub to complain .
I could have chosen one near 4kb/s , which would have saved a little more room , seeing's how the audio was null in the first place ... I would not use anything less than 32kb/s 16,000 hz stereo in my project's .
Next we go to "video" , and choose "direct stream copy" .
Now to "file" , then "save as avi" .... I'll name mine Slide1.avi
Choose location for it to be written to , and name it ... dont forget to include the avi extension on the name .
And let it rip .
This original clip size was 66.629mb's , and the newly produced one is now
Burn to cd and enjoy ... remmember this is for backup use later ... or it can also be shared online if you like .
===================
PART 3 : Dealing with our M2V and AC3 to VOB
This information is in another guide I created called commercial removal in the guide's section , and to cover this particular guide I will repeat part of the process here for very specific reason's which should be easy to tell why I have done so .
Why ... you will find out as we go on .
Ok .. on we go :
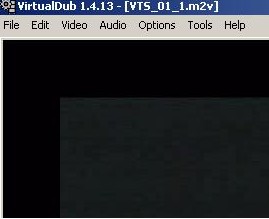
Launch virtualdub/mod .
Now open the m2v video stream .
Here I have the m2v opened in virtualdub .
Open notepad , and now back in vitualdub , move the slider to the first frame of you first chapter point .
Remember , there is no need for the first frame start point , as this is default anyway ... but you must have one for the first picture as well .
Click on that button shown above in here , back in virtualdub , and hold down the right arrow key till the appropriate picture is in view with the text clearly visible .
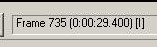
Now look here .
For this guide , you will use the mouse to copy what is in the bracket's , but leave that last digit .
This number is written to notepad now ... first line , hit the number 0 , then behind that , paste .
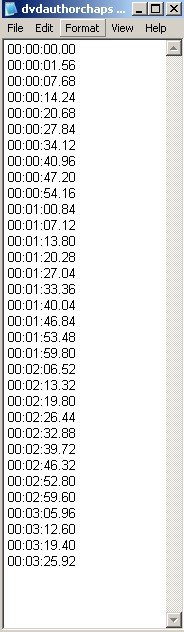
Here is my first slide show chapter list showing what it look's like .
Each picture has it's own
Repeat the process of moving the slider till your next picture is reached (again , next picture with text clearly visible) .
If you go to far , use the arrow key's on your keyboard to go forward or backward's .
Again copy this number to the notepad , placing it under the first like so as we go along ... remmember to add the 0 first ... just like in the above picture .
Ok , once you have all the chapter point's number's of each chapter you wish to introduce into the vob structure , save that text file , I've called mine dvdauthorchaps1 , and close virtualdub .
As mine had 32 pic's , there should be 33 chapter point's only (the first is by default , for dvdauthorgui)
==================
PART 4 : DVD MENU'S
Use the gimp to create a dvd menu background in jpg format .
Size must be for full d1 resolution for pal = 720x576 .
For now , I'll add five thumbnail clip's to the menu (The number of slideshow's ready to go)
Add text for each item , NAME
Add text PLAY ALL ... that will do for now .
The actual thumbnail's will be where the button's are for each item .
So here is my menu background now .
To save time on this guide I have just used a blue box to represent the thumbnail's location's .
You can use mwsnap or vdub to grab these .
Notice I have kept away from the edge of the background ... if not carefull , thing's might not fit on the screen when played back ... something to watch out for .
Ok , that's the menu .
DVDAUTHORGUI :
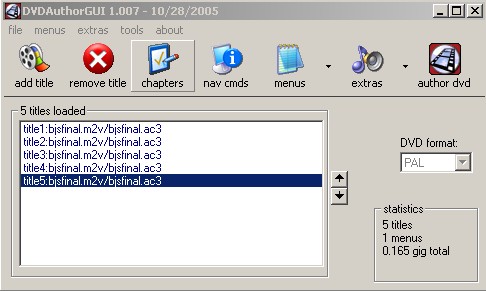
Firstly , choose the project type ... mine is PAL
Next , add title's ... these are you slideshow m2v video and ac3 audio stream's in the correct order .
Now
1: Hit Ctrl + S , then locate your menu background you created , you will be asked for number of frame's , the default is fine .
2: Hit Ctrl + M , now locate that menu m2v that was just created .
When asked for audio , just cancel that as we have none .
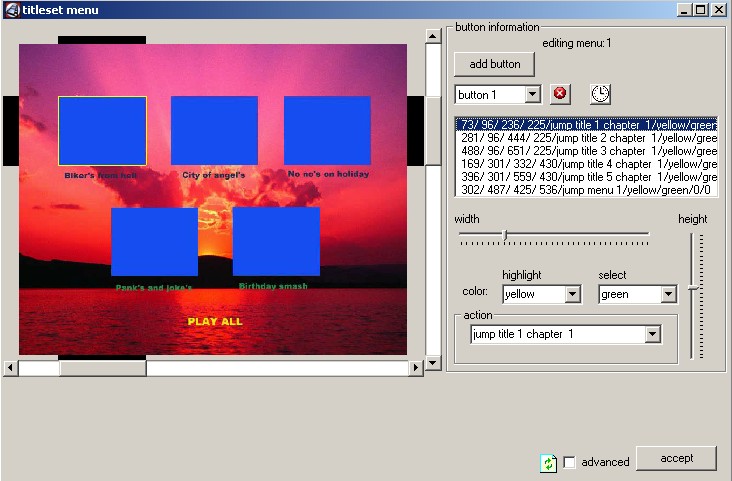
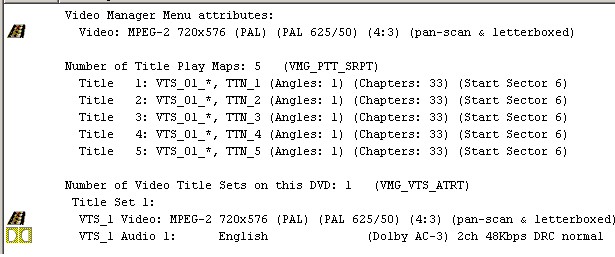
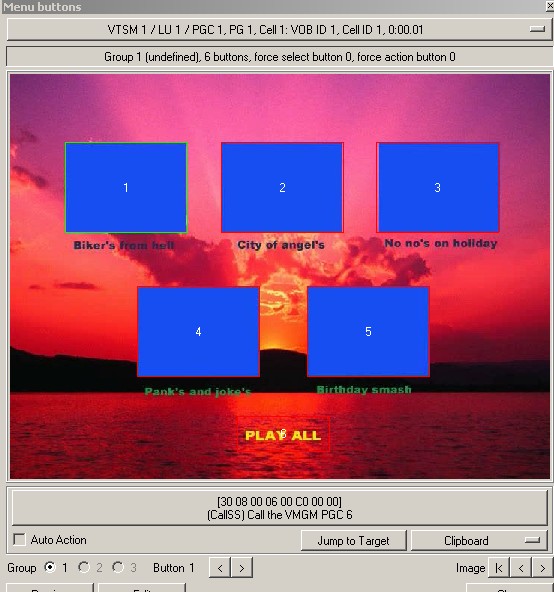
So here is my basic menu , it include's 6 button's (one surrounding the "play all")
Button 1 action is jumptitle 1 chapter 1
Button 2 action is jumptitle 2 chapter 1
Button 3 action is jumptitle 3 chapter 1
Button 4 action is jumptitle 4 chapter 1
Button 5 action is jumptitle 5 chapter 1
Button 6 action is jump menu 1 , just for now .
... Hopefully you get the idea of what I am doing .
As for the final button (play all) , it only has to encompass the text and action is jump menu 1
Click the "accept" button when done
====================
For those interested in trying there hand at creating there own dvd button's .. go here :
https://forum.videohelp.com/viewtopic.php?t=285839 (make your own dvd buttons)
====================
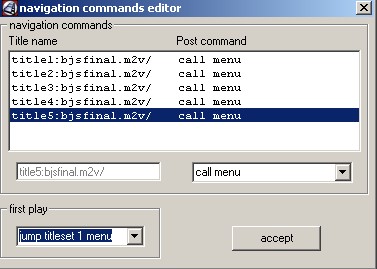
Click on "Nav Commands" ... this is the part dvdauthorgui really count's on
This is how it should be setup for now ... so hit "accept" button .
Just link each title to "call menu" .
Now for them chapter point's ..
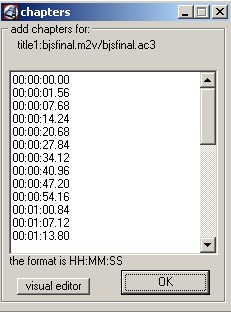
Click on you first title in your list , then hit "chapter's" button , and this appear's .
Stay with this one will allow the maximum number of chapter's
All you need do is open your text file that has the relative chapter point's already .
Simple copy all from the text file , and paste them in this window , then hit "ok"
Check that you have that first one (00:00:00:00) , if not , you must add it to notepad at the start then paste this info in here .
Repeat these step's so you can add the relavent chapter's to each of your title's ...
Don't get them mixed up ... or you might want to kill yourself later ...lol
That's done , you should save the project ... for later use ... save it to "my document's" ... or if you dont need it any longer , just close dvdauthorgui .
For those not sure , save it , you can alway's come back and fixup any goof's you may have created later .
Rule : You cannot have more than 255 cell's in any 1 vob title (like a whole movie) .
Example :
You create 55 slideshow's , each containing around 245 picture's (each picture is where chapter is + 1 which is start point)
These have been individually authored as to the spec's mentioned herein this guide as single , individual title's to seperate folder's , with menu's .
You now create a basic dvd with required menu in dvdauthorgui (this is the master menu) .
How you design this menu is entirely up to you , but you will be using more than 1 (limit on number of buttons per menu)
Author this dvd , using a small demuxed vob , such as dts logo .
Everything (all button's) are connected to this title just to produce the required menu structure for now .
(dvdauthorgui requires "1" title to be available , or nothing will happen)
Copy this folder's project (master menu) to a new location ... if you stuff it up , just delete that folder and start again .
Open this dvd project in in pgcedit (the master menu copy) .
Use the "import vtst title's" from first menu , under "file"
Then click on second title .
Right click , and choose from new menu list "Import menu"
Import menu from folder holding your first actual main slideshow's menu
Right click on third title , and import menu from second slideshow ...
Right click of forth title , and import menu from third slideshow ...
Hopefully you get the drift of this ... I am not going to repeat this 55 time's ...
That's correct ... now go insane and connect menu's , and button's to there required function
(title's , ect ... you may need to add some vmgm's "dummy pgc's" in order to get it working well)
Rule's :
1 : Alway's when asked , say yes to COPY ... in the event of a fatal screw up , you delete this master copy , and start again .
2 : Pay attention to project size ... keep it under 4.3 gigabyte's
3 : You have heard this a few time's by now ... but user's dont listen well ... BURN AT 4X for compliancy for all dvd player's and use only dvd-r .
4 : Alway's playback the dvd project ... to check for problem's , before burning and wasting media .
5 : Alway's use tool's available to test if media is in good working condition ... if more than 3 fail from a 50 pack , take them back asap ... their going to cost you in the end .
================
PGCEDIT + IFOEDIT additional help
As at this moment I an unable to tell if pgcedit run's under other window's os's other than xp .
I think it did , but I am going back atleast 2 year's ago .. I think .
If it dose , you simple run pgcedit , then hit Ctrl + O (as in o for open)
Locate you dvd , and you will greeted with a warning , pgcedit will fix this .
You should save the dvd now ... and reopen it .
IFOEDIT : additional help
Run ifoedit , and hit "open"
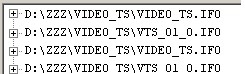
Load the video_ts.ifo of your newly authored dvd , then "open" , and load your vts_01_1.ifo as well .
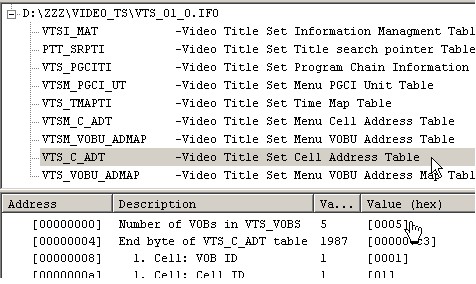
Now click on your vts_01_1.ifo to highlight it first :
Click on the plus symbol in front of the vts_01_1.ifo , so you can see all under it .
Go down and click "vts_c_adt" .
See the line the hand cursor is on , this is the bugger that caused the issue .
If you created a project using 5 title's like I did , then this number will be 165 .
It should be 5 , for five title's ... so double click it , change the number in the new box from 165 to 5 and hit ok
"Change the number to match the actual number of title's you had in your dvdauthorgui project"
================
Go back to the upper window in ifoedit .
Click on your video_ts.ifo , then hit "get vts sectors" , answer yes to all box's that appear .
Click on your vts_01_1.ifo , and repeat "get vts sectors"
You will now have two more item's in this box .
Click on the second last one in list , and check what it report's in lower window
If anything related to video , or audio is incorrect , please correct them now (double click item's to edit)
If you make change's , these must be applied to the last item in the above window (vts_01_1.ifo)
When done .
Click second last item in above window , and hit save , answer yes to overwrite the original .
Click last item in above window list , and hit save , yes to overwrite original .
You can close ifoedit for now .
=====================
Wether you used pgcedit or ifoedit to correct the known issue's , they can now be burnt to dvd and enjoyed by all right now , but without the additional "play all" feature .
You can also now use the remote control to jump forward or backward's between picture's as well .
=====================
PLAY ALL : For pgcedit
For now , and for this type of project I would not recommend using the "new play all title" feature .
This will cause problem's for almost all dvd playback software .. so dont do it .
The way to get around this is to give each title ttn , two set's of "if" command's .
One set used for normal - play slide , then return to menu
The second is designed deliberately for the play all feature , from slide 1 to last slide , return to menu .
This will prevent problem's ... so how to add this ... we already have the play all button in menu , so let's go .
=========================
Open you authored dvd in pgcedit (ctrl + o , as in open)
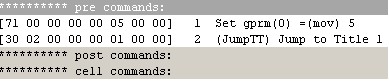
Then go here
Delete all these command's now ... the dvd will still work without these as button's and title's still have there own nav command's .
But now to introduce a play all feature for this project
NOTE :
Take a look in you dvd project folder , and you may , and should only see 2 vob's ... the small one is the menu .
The large one is the title , and is a single vob file .
It is this vob that can not , and should not have more than 255 chapter point's ... this is where the problem occur's .
This is where ifoedit got messed up saying 165 , this is correct for number of chapter point's in my project .. and was covered above in this guide ... it really should have said 5 , as in the number of unique vob id's included during project output ... which is why the number's seen on the TNN's was incorrect before (all the same , when they should be different) .
So now we understand this item a little better than before ... using the "new play all title" feature on such a dvd compilation will cause many problem's , and we want to avoid these problem's like the plague itself ...
Ok , we have cleaned out those command's .. and yes , it still play's fine ... so let's get these little extra's included .
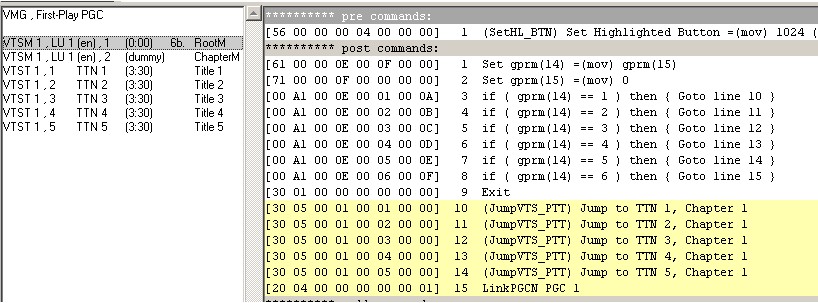
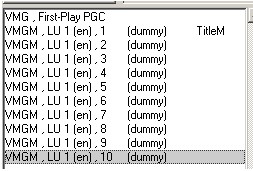
Now add what you see here
That's right , add 10 dummy pgc's , and moving on ...
Now I will show you what command's are used in these VMGM's , starting from TitleM
Now for vmgm 2
Now for vmgm 3
Now for vmgm 4
Now for vmgm 5
Now for vmgm 6
Now for vmgm 7
Now for vmgm 8
Now for vmgm 9
Now and lastly for vmgm 10
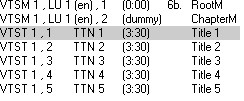
Once those are in we start with title 1 , so go here
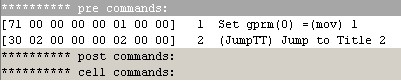
Now for title 1
Now for title 2
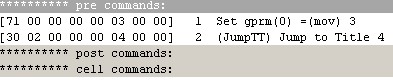
Now for title 3
Now for title 4
Now for the final title , title 5
That's then done ... now for the last item , menu button's .
Left click on the menu item with 6b (this refer's to button's , and the number of)
Right click on it and chose "menu button's"
And we get something like this ... as for my project
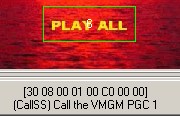
Click on button 1 , as you can see , this is the command I have issued it with .
Button 2 has
Button 3 has
Button 4 has
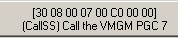
Button 5 has
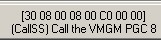
Now for that text button , which use's
That's that , save the dvd , and play it ... it dose everything it has been setup for ...
I have not used the highlighted button feature as I have in previous guide's as this dvd would require many additional item's to allow for that , and would over complicated the idea for newbies .
I simply wanted to show you another manner in which to apply the "play all" feature .
should you use the "play all" feature in pgcedit , when you double click on the new "play all" title to preview the content , it will most likely crash pgcedit , or completely lock it up .
That is why I said work from a copy of the project before ... if you screw up , while you have to start from scratch again ... atleast you have not lost everything .
You bet I backup often ... after this guide ... I am going to need a week's worth of coffee to recover .
==================
Extra's : For Xp
To save on media .. for those who want to beable to test play their dvd's before burning them .
Go to www.softpedia.com - windows - cd/dvd emulation (or it might be cd/dvd tool's)
Look for the one with the sheep logo , it's free , and for those who have a few drive's on their pc's already and might get confused ... it display's the sheep logo on the new cd/dvd drive .
Use folder2iso to create an iso from dvdauthorgui's output folder , the one containing the folder's audio_ts , and video_ts (it hold's dvd content) ... and choose a location for the iso to be written and a name for it as well , and let it rip .
(dont choose the location your dvd project is in ... you been told)
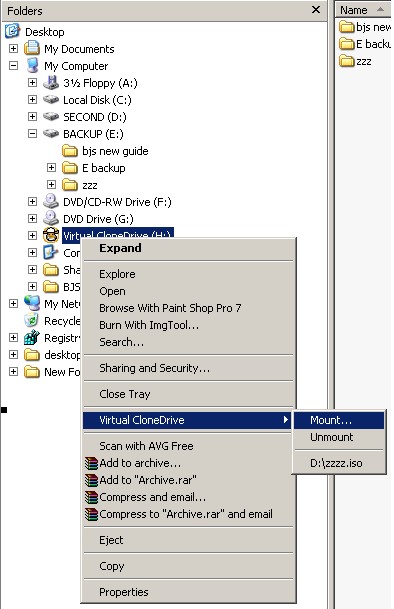
All you need to do is then right click on the sheep cd/dvd drive , and choose "mount" ... locate iso , and go ... play it back in your favourite dvd playback software .
This become's handy when checking menu or playback issue's ... if issue , you can fix these using pgcedit by opening the project dvd that was authored by dvdauthorgui .. and check navigational command's ... dont forget ... button's have them as well .
For Winme / Win98
Pity ...
Did you know you can play test your dvd while you have the video_ts.ifo and vts_01_1.ifo loaded in ifoedit .
All you need is the right mpeg2 filter installed , such as neroshowtime's , or powerdvd's , there are also some freely available one's about .... You should install the ac3_filter package otherwise you may not hear any audio in playback .
The best thing about ifoedit , is it will warn you if there is a problem within the dvd navigation ... while fixing these is simple ... this guide cannot cover this area , as there are simply too many variable's and possible combination's to include .
Ifoedit should tell you what the error is ... making it easy to pin point and correct the error .
All you do is close playback , then search for this item , and edit it to a correct value , save , then try the playback again ... honestly , it is simple once you have been doing this a while .
Pgcedit give's you flash's of colour's to show what's what .
Red is no good , pink is it might but no guarantee , blue is definetly ok , yellow is secondary to blue .
Of course there are is white , and is another seconday to blue and yellow (fancy math's)
=================
Here I have the sheep cd/dvd emulator in action
The one above it is also a cd/dvd emulated drive ... it's from microsoft , work's fine too , but you won't find it at the ms site unless you dig hard for it ...
I also have another 2 hard drive's , plus 2 other dvd burner's via usb2 external box's , not connected at this time ...
Now to see if I can blow up my first thumbdrive from patriot .. 1 gigabyte .
Stupid windows 2000 cant see crap on it , and wants to format it ... hell no , its mine .
=================
It is also possible to modify the timing's of each chapter point in ifoedit , and pgcedit .
255 will freeze at chapter point .. then use remote to go back and forth .
However , as there can be hundred's of these , I highly don't recommend doing so ... unless you is hiding , from neihbour's ... the kid's ... the wife ... or your mum ... lol .
=================
Hopefully , user's will find this guide a reasonably complete method as to the creation of slide show's for what ever purpose they wish to use it for ....
You dont have to use the entire guide ... if you are only interested in performing a simple project , then there is more than enough information within this guide to complete from the simplest of project's ... to the more hard core , drive you nutt's project's ...
Should user's find something not working , which would be rare and more to do with their pc , it would be appreciated if user's use the online "pm" system to ask me for help or further assistance .
After all , I like helping user's get the most out of both their pc's , and freeware program's .
Yes , hold on , that motion menu guide is coming soon ... give me another few day's ... Stupid programer's error cost me a lot of data related to that guide ... will recover later today , and be online in two day's .
Now for my coffee and smoke ... more brain cell's to kill .
Above all , have fun ...
+ Reply to Thread
Results 1 to 1 of 1


 Quote
QuoteSimilar Threads
-
How to join 2 photo slideshows together ?
By fratom in forum Newbie / General discussionsReplies: 4Last Post: 15th Nov 2010, 01:01 -
DVD Slideshows
By Heyjoojoo in forum EditingReplies: 1Last Post: 4th Jul 2010, 02:38 -
Effects to Slideshows?
By blaqlion22 in forum Authoring (DVD)Replies: 3Last Post: 30th May 2009, 08:54 -
Occasional D.O.A. slideshows made with Proshow Gold
By Seeker47 in forum Authoring (DVD)Replies: 2Last Post: 25th Nov 2007, 19:33 -
viewing slideshows on home dvd player
By thaitang in forum Newbie / General discussionsReplies: 2Last Post: 17th Aug 2007, 22:36