


VHS 2 DVD-Video
All VHS source should be interlaced video when capturing. To capture otherwise would be to lose quality. However, should the user decide on the quickest method for transfer of VHS to DVD then I would recommend PowerVCR II Delux 3.0 as the best capturing utility straight to MPEG-2.
The Quick Method
Capture in Cyberlink PowerVCR II
Demux to elementary streams with TMPGEnc
Convert MP2 to WAV with dBpowerAMP
Resample, clean, and normalize audio w/ SonicFoundry Soundforge & Adobe Audition
Convert WAV to Dolby Digital AC3 using Sonic AC3Enc (bundled w/Scenarist)
or
Convert WAV to MP2 using dBpowerAMP
Author with TMPGEnc DVD Author
Burn with Elby CloneDVD
Provisor: Cyberlink PowerVCR II captures progressive MPEG-2. I do not suggest attempting captures of VHS to interlaced MPEG-2. I have had zero success capturing to interlaced MPEG-2 where audio and video remained in sync. An alternate program that allows for capture to progressive MPEG-2 with lesser video quality but a correct audio sampling rate is Intervideo WinDVD Recorder. Simply demux, convert audio to .wav, clean audio, and convert to .ac3 or .mp2. Should the user desire to add transitions or any other editing outside of cutting and pasting to the video, then MPEG-2 should not be used as a transferring format. Please transfer your video to AVI.
The Thorough Method (NTSC Interlaced Only)
PREPARING FOR TRANSER
Install AVISYNTH
Install a DV Codec (Panasonic is RGB and Canopus is YUY2)
Install Convolution3D (YUY2) to system32 folder
&
Install Reinterpolate411 (4:1:1 Colorspacing) to system32 folder
TRANSFERING A/V DATA
Capture Type-2 AVI using ScenalyzerLive to C:\Movie Conversion as capture.avi
WRITING YOUR DIGITAL NOISE REDUCTION AVISYNTH SCRIPT
Verify field order of transfer data by loading in TMPGEnc XPress.
Open Notepad and create your avisynth script, saving the file as Convolution3D.avs
If your A/V data is Bottom Field First, use the following synth script:
LoadPlugin("Convolution3d.dll")
LoadPlugin("Reinterpolate411.dll")
avisource("C:\Movie Conversion\capture0001.avi")
ConverttoYUY2(interlaced=true)
ReInterpolate411()
Trim(x,y) // Do Not Add This Line Until After Loading in VirtualDubMod
crop(8,2,-8,-14)
SeparateFields()
odd=SelectOdd.Convolution3D (0, 32, 128, 16, 64, 10, 0)
evn=SelectEven.Convolution3D (0, 32, 128, 16, 64, 10, 0)
Interleave(evn,odd)
Weave()
DoubleWeave.SelectOdd()
AddBorders(0,8,0,8 ) // To avoid smiley, space added here 8 )
LanczosResize(352,480)
If your A/V data is Top Field First, simply remove the following line from your script:
DoubleWeave.SelectOdd()
Provisor: The above synth script is written for 720x480 input resolution. Using crop and addborders scripts, the resolution is cropped to 704x464 and masked to 704x480 so as to maintain correct aspect ratio when using Lanczos resize to 352x480 Half-D1 resolution. 704x480 is an acceptable Full D1 resolution because it maintains Pixel Aspect Ration, but not the recommended Full D1 resolution because of sacrifice to the Display Aspect Ratio. Although cropping to 704 will sacrifice 16 pixels of DAR, the image will be sharper because PAR is maintained through 2:1 compression. Using 704 to resize to 352 will maintain PAR but sacrifice DAR. Should you desire to retain the 16 pixels of DAR sacrificed by maintaining PAR, then use AddBorders(8,8,8,8 ) to mask back to 720 and use BilinearResize(352,480). The maintained DAR will be a little blurrier compared to maintaining PAR, but more of the original image will be displayed. Maintaining PAR is suggested when considering that horizontal 352 is a resolution below the minimum acceptable 368 resolution for maintaining sharpness. It is suggested in order to maintain as much sharpness as is possible even if DAR must be sacrificed. Therefore, preservation of DAR & PAR can only be accomplished using 720x480 resolution. Using 704x480 maintains PAR but sacrifices DAR. Cropping to 704 and resizing to 352 maintains PAR but sacrifices DAR. Cropping to 704, masking to 720, and resizing to 352 maintains DAR but sacrifices PAR.
Open Convolution3D.avs into VirtualDubMod and find your beginning frame and end frame points. Enter the beginning frame as value 'x' and end frame as value 'y' into the following line:
Trim(344,22665) ++ Trim(32677,47725) ++ Trim(51051,77018) ++ Trim(85055,101699) ++ Trim(107309,154994)
// The values shown are example points only
Provisor: The sole purpose of using VirtualDubMod is to find the Trim points. All frames between trim points will be included in final video. Multiple trim points can be created to leave out unwanted scenes or commercials.
ENCODING & DEMUXING
Open Convolution3D.avs in Cinema Craft Encoder. Use following settings:
Half-D1 Resolution
ES VBR 2-pass MIN: 0 AVG: 3000 MAX: 4000
Full D1 Resolution
ES VBR 2-pass MIN: 0 AVG: 6000 MAX: 8000
Under Video:
Closed GOPs
If Top Field First, uncheck Upper Field First.
If Bottom Field First, check Upper Field First.
Rename Audio to .wav for demuxing purposes.
Under Quality:
Uncheck all boxes.
DC Precision is 10
Block Scanning Order should be ALTERNATE
Flat Part Priority should be 16
Select ENCODE NOW.
Your video and audio should be in elementary streams.
CLEANING THE AUDIO
There are fiveSoundforge filters I create and use to clean the audio.
There are three preset Audition filters I use to clean the audio.
Soundforge
Open your WAV file in Soundforge.
Go to PROCESS --> EQ --> PARAGRAPHIC
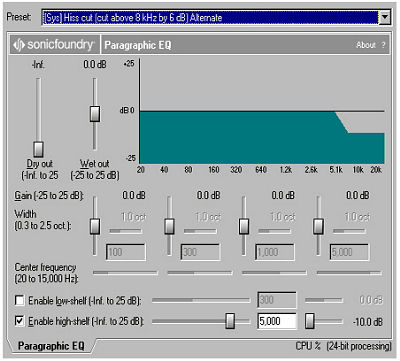
STEP 1 Hiss Cut
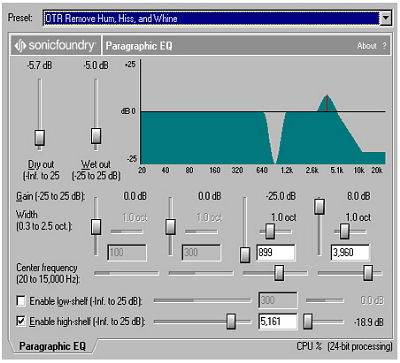
STEP 2 Hum & Whine Cut
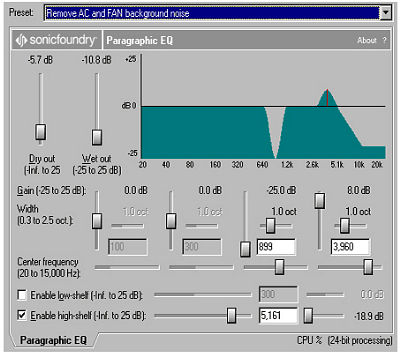
STEP 3 AC & Fan Removal
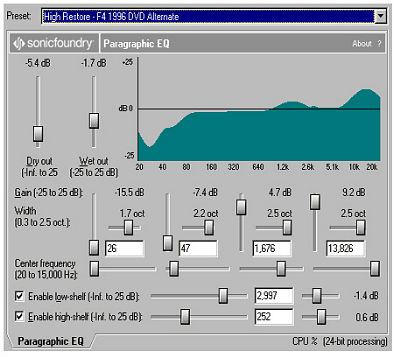
STEP 4 High Restore Compensation (Optional: May Cause Clipping)
Please refer to LordSmurf's Soundforge Guide below for more details.
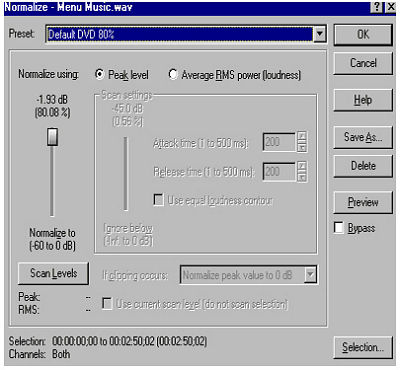
Step 5 Normalize Audio (Go to PROCESS --> NORMALIZE)
Save Your Work!
Adobe Audition
Under EFFECTS --> NOISE REDUCTION I use the following filters:
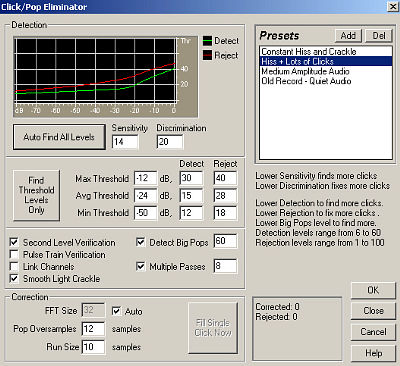
STEP 1 Click/Pop Eliminator
Select entire audio stream, select Hiss + Lots of Clicks, press the Auto Find All Levels button, and press OK.
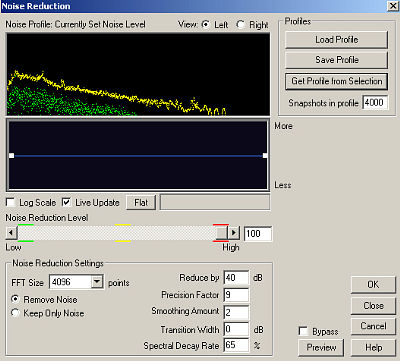
STEP 2 Noise Reduction Filter
The Noise Reduction function can dramatically reduce background and general broadband noise with a minimal reduction in signal quality. It can also remove tape hiss, microphone background noise, 60 cycle hum, or any noise that is constant throughout the duration of your waveform.
The amount of reduction required depends upon the type of background noise, and the allowable loss in the quality of the signal that is to be kept. In general, you should be able to attain increases in Signal to Noise ratios of 5dB to 20dB. (Noise is reduced 21dB and signal 1dB for example).
Before you can perform noise reduction, you must load or get a noise profile first. This is done by pressing the Load Profile or Get Profile from Selection buttons.
Here’s the most common way to use the Noise Reduction function:
1. Record or a piece of music that has tape hiss or other background noise.
2. Select a short range (at least one half second) that contains only the noise that you'd like to reduce.
3. Choose the Effects > Noise Reduction > Noise Reduction option and click on Get Profile from Selection to sample the noise.
4. Click on Close.
5. Select the entire file (or the portion you want to noise-reduce).
6. Go to Effects > Noise Reduction >Noise Reduction again.
7. Click on OK to perform the noise reduction.
Preview
Press the Preview button to audition the current Noise Reduction setting before you apply it to the waveform. The selection is looped until you press the Stop button. Since Previews are dynamic, this gives you the opportunity to make and hear processing adjustments as the selection is continuously played.
STEP 3 Normalize Audio (Go to AMPLIFY --> NORMALIZE)
Save Your Work!
CONVERTING WAV to AC3/MP2
AC3 is the standard for NTSC.
MP2 is the standard for PAL, but does work on most NTSC DVD players.
Do not convert to anything less than 256Kbps! Standard is 384Kbps.
To convert to MP2, I use either dBpowerAMP or Besweet. The conversion is straight forward and should not necessitate a guide for completion.
To convert to AC3 requires very expensive software. I have not had success with any of the freeware softwares though some users vouch for ffmpegGUI. Even this software has bugs, but offers the most compatible AC3 of the freeware programs. I suggest using a professional utility like Sony Acid Pro 4 in the creation of AC3 audio. I extracted the AC3Enc utility from Sonic Scenarist and use this as my AC3 encoder.
AUTHORING YOUR DVD
I don’t make menus to increase compatibility in PS2 and Xbox playback; hence, I use TMPGEnc DVD Author even though movie-only can be done in other authoring softwares like DVD-lab. I add chapter points and write to disk.
BURNING YOUR DVD
For best quality use Pinnacle InstantCopy.
For quickest results, use CloneDVD or DVDShrink (possible loss of PS2 & XBox compatibility).
GUIDES USED (Shout Outs!)
LordSmurf's Guide
Bb’s DV to DVD Guide
FulciLives Digital Noise Guide
Technical Help
+ Reply to Thread
Results 1 to 30 of 34
-
-
Video Restorer

- Jun 2003
- dFAQ.us/lordsmurf


I would be sure to read the full SOUNDFORGE guide:
http://www.digitalfaq.com/restoration/audio/soundforge/soundforge.htm
It explains a bit more.Want my help? Ask here! (not via PM!)
FAQs: Best Blank Discs • Best TBCs • Best VCRs for capture • Restore VHS -
Thanks Lordsmurf for the link. I meant to add hyperlinks but forgot. I don't mean to step on any toes. This is the guide I go by for my conversions at present and it has been wonderful. Please visit all the guides referenced for alternate conversion methods and more information. I hope it is alright I use parts of these guides with a few of my own tweaks to produce this guide for the Newbies learning about video transfer.
Thanks for all your help!!
bb's Guide:
https://www.videohelp.com/guides.php?link=601
FulciLives Guide:
https://www.videohelp.com/guides.php?link=643 -
I also want to thank members
BSR
and
jmmalenko
for helping me resolve my YUY2 issues in the AVISynth Script.
I want to thank moderator
bugster
for helping me with interlace/progressive issues. -
Video Restorer
- Jun 2003
- dFAQ.us/lordsmurf
-
My only point was that some of those SOUNDFORGE settings you've got are more intended for special troubles on really bad audio tapes. Using them on otherwise good sound could really make matters worse rather than better. Using them for "general use" capturing VHS->DVD may be a bad idea.
The most common filters I use are these:
HISS CUT -or- HISS CUT ALT 2 -or- ALT 0
NORMALIZE 80%
then if still not fixed:
HIGH RESTORE (any) ... if needed
and HIGH RESTORE/HISS REMOVAL combo (any) ... if needed
Just remember to not correct audio too much. The less filters, the better off you'll be. Be careful. Even I'm guilty of doing more harm than good sometimes. Easy to get carried away. Can get real bad if the speakers on the computer react different than the ones on the tv/receiver.
All of these filters are essentially frequency carving. You're dumping the part of the signal that is bad. And then compensating the rest of it to make up for what was lost (or never present), essentially rebuilding the quality by shifting things around.
The guide on my site has these as presets download. Easier than making them one by one. I'm about to add another update in a week or so, got some new filters to add to the lot. Check it out sometimes later this month. Some of the new ones have REALLY been helpful too.Want my help? Ask here! (not via PM!)
FAQs: Best Blank Discs • Best TBCs • Best VCRs for capture • Restore VHS -
a couple questions:
What capturing device do you use?
Where do you get the DV Codecs you listed (Panasonic and Canopus)?
Are these DV Codecs just .dll files? If so, where do you put them?
Are there any other encoders other than CCE that you'd recommend?
Thanks,
Brent -
I am capturing via Canopus ADVC-100 Firewire.
I especially like ScenalyzerLive and WinDV for firewire.
Both the Panasonic DV Codec and Canopus DV Codec are downloadable from this site under Tools.
I recommend Virtualdub 1.4.9.3 VCR + SYNC and VirtualVCR for transfering via Audio/Video PCI/AGP Cards. Visit www.doom9.org for these download or in the Tools section.
For ATI cards, stick with Lordsmurf at www.digitalfaq.com
Take a look at bb's DV To DVD guide for other encoding options [ie. Procoder, TMPGEnc, MC Encoder]
I tested CCE and TMPGEnc and the quality was just better using CCE. When using TMPGEnc, I had to use XPress or DVD Source Creator to get the AVISYNTH script to work. TMPGEnc 2.54 did not work for me using the synth script (may be an anomoly on my end.) Procoder does not utilize the synth script (at least I am not aware that it does) and I did not test MC Encoder because CCE did everything I wanted it to.
As FulciLives suggests, should you decide to use XPress or DVD Source Creator for your encode then add the following line to the end of your synth script:
ConverttoRGB(interlaced=true)
Please refer to bb's guide for all PAL Interlace, NTSC Progressive, and PAL Progressive captures.
These guides are a mountain of information that can be used for all types of transfer. I simply posted what works for me. -
Oh yeah...
The Panasonic DV Codec is a .dll that comes with an .inf file. Right click on the .inf and click INSTALL.
The Canopus DV Codec is self-extracting, although I had to place the setup files in a new folder as they would not execute in the folder created in the extraction. -
"The Quick Method
Demux to elementary streams with TMPGEnc"
Why is this step necessary? -
PowerVCR II does not capture 48000hz audio. The audio must be demuxed and then resampled to 48000hz.
Guess what I found out!! The newest version of Intervideo WinDVD Recorder captures to Dolby Digital AC3!! -
Master of Time & Space

- Feb 2004
- Denver, CO United States
-
Originally Posted by LNielsen76 Quick?
And using Scenarist? Why? Why?
If I were writing a manual on VHS>DVDR, it would go something like this:
1) Attach VCR to MPEG capture device.(Put TBC between them if you have one. If you don't have one, get one )
)
2) Start tape and start capture using app that came with the cap device. Select MP2 or AC3 audio.
3) Stop both at end.
4) Author and burn using DVD Movie Factory, use Nero for burning if desired.
Why would VHS capture need to be more complicated than that? -
It doesn't have to be more complicated than you suggest. Thanks for your guide. Are there any MPEG capturing devices and/or MPEG capturing softwares w/ AC3 support you would suggest? DVD MovieFactory is a great utility. Will this allow me the flexibility of other programs such as DVDLab or TMPGEnc DVD Author? What if I need to reencode the video? Will Nero reencode to DVD compliant video (4.7GB)during burn?
You have been a fountain of information on suggested products, methods, and techniques. I salute you.
There are so many ways and methods and products. It may be that there are some that do not know as much as you and would like the option of exploring other softwares and methods.
For your method, I would suggest: Intervideo WinDVD Recorder (w/AC3) support, Load files to DVDLab (demultiplex) or DVDAuthor for a cheaper solution, author (most likely greater than 4.7GB depending on length of stream, burn with DVDShrink.
Awesome! All we spent was $100.00 on WinDVD Recorder.
@Capmaster
Do you know of any free MPE-2 capturing softwares?? -
Why is AC3 preferred? I just use a hauppauge 250 to capture to a dvd-compliant .mpg (mp2 audio... I don't think it will capture to ac3). I then stick this into TMPGEnc DVD Author, create the VIDEO_TS folder, and burn. All I need for this process is the capture program that came with the hauppauge and TMPGEnc DVD Author.
Sometimes I'll use MPEG-VCR to trim the ends of the file and fix any errors in the mpg before putting it into TMPGEnc DVD Author. Why would the mpg need to ever be demultiplexed, unless you are changing the audio? I'm guessing that ac3 uses less compression than mp2, but for VHS isn't a 224 kbps 48kHz mp2 high enough quality? I've never noticed any degradation in audio between my vhs tapes and the corresponding dvd's, although I haven't really looked for it. -
One of my biggest hurdles in the VHS-to-DVD-R journey was cleaning up my hissy audio. I tried Audacity & Goldwave, which didn't seem to do the trick (for me). Then I tried Cool Edit Pro 2.0, and found the "hiss reduction" didn't work well either. However, "Noise Reduction" worked well after much experiments.
I use these tweaks:
NOISE REDUCTION LEVEL = 100
SNAPSHOTS IN PROFILE = 300
FFT SIZE = 8192
REDUCE BY = 40
PRECISION FACTOR = 9
SMOOTHING AMOUNT = 1
TRANSITION WIDTH = 0
I know everybody is different, but with me I can cut 99% of hiss with just about NIL degradation of audio. (Use the "help" button on the Noise Reduction dialog box, and read through each parameter).
BTW, I have problems with ffmpeggui too. It causes stuttering with my encoded output. But now I downsize to D1/2 res (with avisynth), and so I can use the cleaned-up wav file in my authoring.
Quality is great!
(Thanks to FulciLives!) -
AC3 is NTSC DVD Standard and MP2 is PAL DVD Standard. However, MP2 does work on most NTSC Players and really there is no consequence in choosing MP2 over AC3 if your NTSC Player supports MP2 audio.
-
What's the best way to get a wav file to an mp2 (after doing NamPla's noise reduction suggestion)? Can Cool Edit Pro 2.0 save an edited wav as an mp2?
and when I say "best way" I mean "best FREE way". -
The best free way is dBPowerAmp.
Cool Edit Pro (i.e. Adobe Audition) does not save to MP2 as of right now. It would be nice if they provided this support. -
Ok, I thought dBPowerAmp cost $20 (it's listed as trialware), but I went to the website and it does say free so that's awesome. Thanks.
damnit - now you guys got me worrying about the hiss level in my vhs transfers. And once you notice something like that, you can't ignore it. -
I know how you feel.
I kept with the Quick method using Intervideo WinDVD and then I started reading about hiss in audio and noise in video and interlaced vhs standards, etc.
My method went from a one page guide to a multiple page guide and the more I learn, the longer it is gonna get.
The truth cannot be ignored. -
Originally Posted by Capmaster
Even Quicker...
Plug VCR into stand along DVD Burner. Press play, Press record
Done

-
DOAH!!!
I am NO LONGER the most intelligent person alive! -
BUT...Not everybody is transferring new original-copy VHS to DVD! A lot of us (?) are trying to archive old rare movies that are unavailable on DVD, and so the audio hiss problem is a factor that has to be looked at. Otherwise the DVD comes out sub-rate. Hiss doesn't just go away, it increases with each step of the process.
Also with VHS dubs or old original tapes, it is good to "clean up" the video grain (eg with Convolution3D)...so in the end, you have a DVD that looks BETTER than the VHS source.
I don't think you'll get this just dubbing from VCR to DVD recorder!? It depends I guess on what your after...each to their own... -
Video Restorer
- Jun 2003
- dFAQ.us/lordsmurf
-
LSI-based recorders (especially JVC ones) do a good job at clean-up for video. Now audio, that's another story. Hiss can get worse on a recorder, depending on how severe the source was. Ths is why I use my recorder only for high quality sources. Anything that needs works gets the ATI AIW treatment.Originally Posted by NamPlaWant my help? Ask here! (not via PM!)
FAQs: Best Blank Discs • Best TBCs • Best VCRs for capture • Restore VHS -
Thank you, much appreciated.Originally Posted by LNielsen76

You just made my day. -
LNielsen & all,
I tried the AVS script above, but I got an error that Reinterpolate caused some error XYZ.
I thought it was an internal filter, but I guess not. Where can I find it? It was not on warpenterprises. Thanks -
DVWannaB...
I found the Reinterpolate on www.doom9.net using bb's DV Guide.
Here is the link:
http://mywebpages.comcast.net/trbarry/ReInterpolate411.zip
Also, I updated the guide just now. So, you may want to take another look at it before proceeding. A few more insights added. -
Ok, will do. Thanks.
-
Thanks. I am having a challenge opening my AVS script in VDMod. It is bottom-field first *.avi file:Originally Posted by LNielsen76
LoadPlugin("C:\Program Files\GordianKnot\AviSynthPlugins\Convolution3d.dll")
LoadPlugin("C:\Program Files\GordianKnot\AviSynthPlugins\Reinterpolate411.dll")
avisource("D:\2002 Florida\florida0001.avi")
ConverttoYUY2(interlaced=true)
ReInterpolate411()
crop(8,2,-8,-14)
SeparateFields()
odd=SelectOdd.Convolution3D (0, 6, 10, 6, 8, 2.8, 0)
evn=SelectEven.Convolution3D (0, 6, 10, 6, 8, 2.8, 0)
Interleave(evn,odd)
Weave()
DoubleWeave.SelectOdd()
AddBorders(0,8,0,8 )
CovertToRGB(interlaced=true)
Error in VDMod:
Avisynth open error:
Convolution3D supports YV12 color format only
(D:\2002 Florida\firsthalf.avs, line 8 )
What am I doing wrong?[/img] -
GEEZ!!!!!!!!! What a dum-dum I am. Sorry. Fixed it.
-
LNielsen76,Originally Posted by LNielsen76
Are you sure that is correct setting in CCE? I thought it was the opposite. If video is TFF, then you check Upper Field First in CCE Basic. Conversely, BFF video, uncheck Upper Field First. Can you check and re-verify that info? Many thanks.

 Quote
QuoteSimilar Threads
-
VCR buying guide (S-VHS / D-VHS / Professional)
By lordsmurf in forum RestorationReplies: 326Last Post: 2nd Sep 2025, 06:10 -
NTSC VHS Tapes To DVDR
By spliffy in forum Capturing and VCRReplies: 7Last Post: 9th Nov 2010, 17:59 -
What device will enable recording of TV to DVDR and DVD or VHS to DVDR?
By enricomad in forum DVD RippingReplies: 1Last Post: 26th Jun 2008, 18:46 -
VHS to DVD (with DVDr)
By ds_36 in forum Newbie / General discussionsReplies: 7Last Post: 20th Apr 2008, 16:53 -
I need a guide fot adding subtitles to DVDR of series- not movie
By dallylama in forum SubtitleReplies: 4Last Post: 8th Jan 2008, 21:22