


How to convert s/vcd disc images, Avi, Ogm, Mkv to DVD
1. Things you'll need- Mastroska pack, vobsub, divxpro 5.2, isobuster, nero, tmpgenc xpress 3.0,
tmpgenc dvdauthor, virtual dub mod and winrar. You can find links to all of these on the site so just look.
If you can play your video in wmp your good to go.
S/vcd disc images- isobuster
1: First they usually come split into multiple rars so use win rar to extract the image to a folder
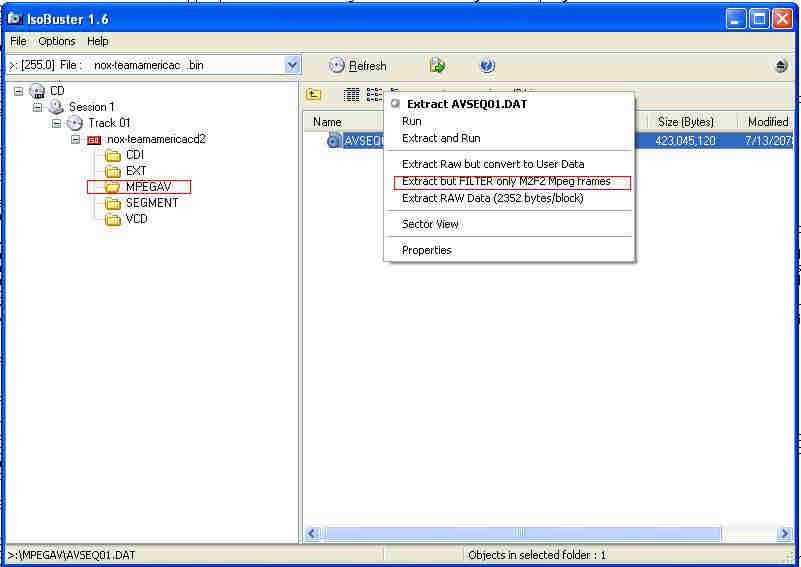
2. Secondly open up the disc image in Isobuster. You should see a series of folders on the right, double click on mpegav
(this folder contains the mpegs on the cd). right click on the video file and click on
"extract but filter only m2f2 mpeg frames" save it somewhere but here's the important part you MUST add .mpg to the end
of the file name if you do not nothing will work.
3. If the disc was a vcd you can probably move directly to authoring, if it's svcd move to encoding.
Ogm, Mkv- virtual dub mod
1. Ok this is where it gets annoying. Most anime fans tend to like theyre anime subtitled with japanese audio but the
standard set up for these files is usually english audio subs off.
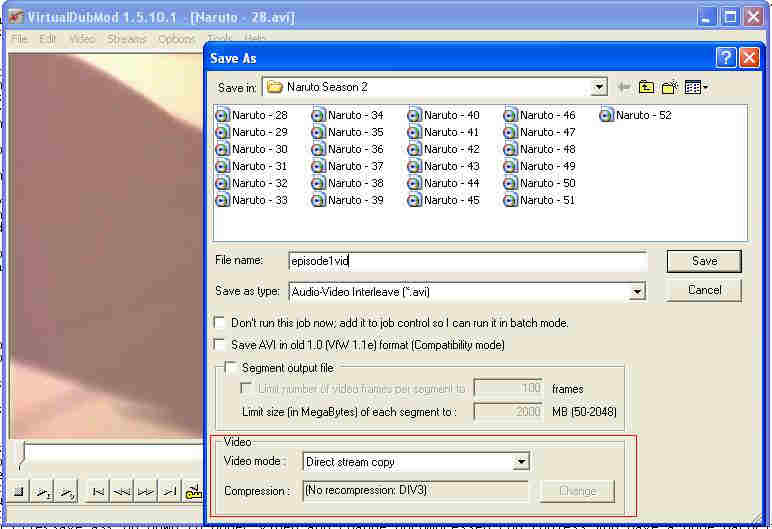
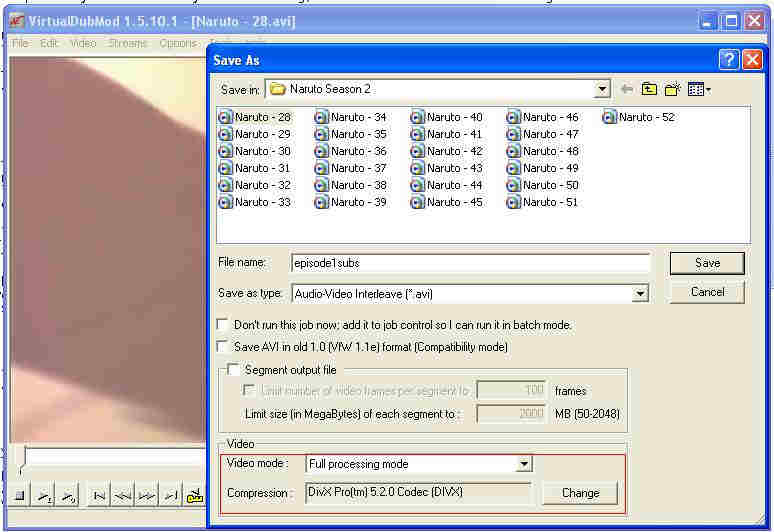
2. Open virtual dub mod click on File3. go to file,save as go down to where it says video< video processing and change it from full processing to direct
stream copy. Choose a path and save this video part as something like episode1vid
4. Go to stream< stream list. These streams are the different audio and subtitle streams housed in the episode. Click on the
audio stream you want (japanese is usually the second one) and click on demux and save it in the same folder as the video
part but name it something like episode1aud. Then click on the subtitle stream (theres usually only one) and click on demux
and save it as the same name as the video part but .srt (ex: episode1vid.srt).
5. Here's where you have a choice if you trust vobsub and tmpgenc you can go straight to encoding from here and the subs should
transfer over automatically. Should is the operative word i've had a lot of trouble with dropped subs so i advise turning the
soft subs into hard subs before encoding.
Hardsubs- divx pro, virtual dub mod
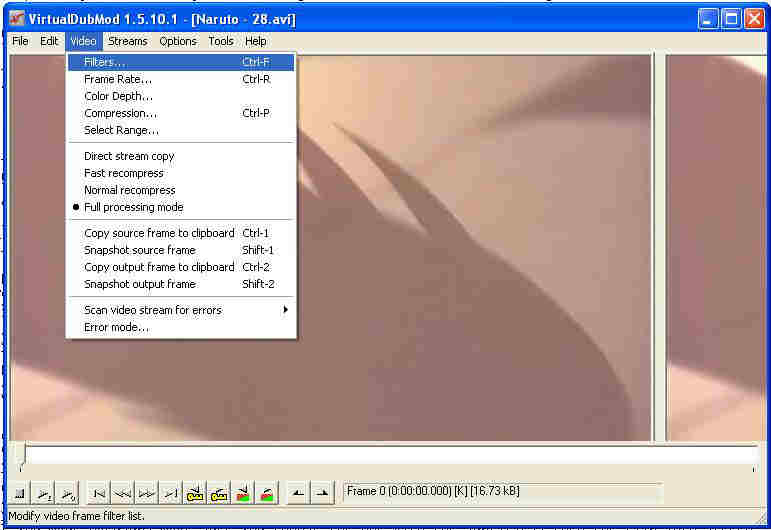
1: ok open up the video file we made (episode1vid) in virtual dub mod go to video make sure it's on full
processing not direct processing then click on filters (also under video).
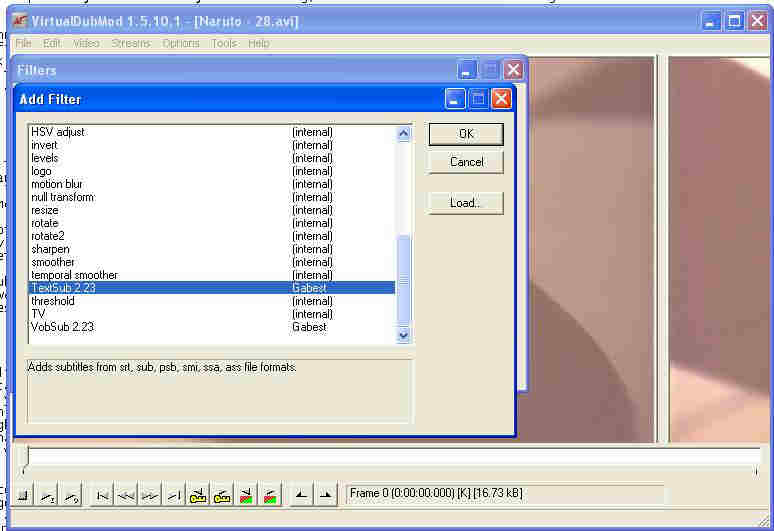
2. Click on add< go down the list till you find the filter called textsub 2.23 (if you dont have this reinstall
vobsub but do a custom install clicking on textsub and vobsub for virtual dub choice).
3. Click on the subtitle file you made earlier (episode1vid.srt) and click ok.
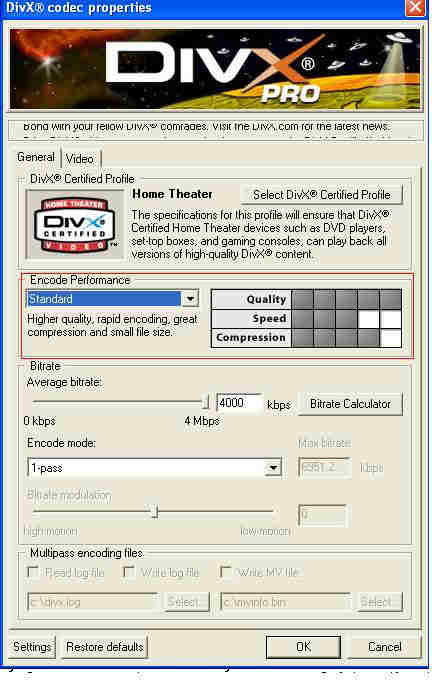
4. Go to fileto divx pro 5.2.0. (you might want to configure divx pro to standard or slow performance to get the best quality).
Choose a path and save (a name to seperate it from the other video file is best something like ep1sub).
5. there ya go you now have a video file with hard subs.
Encoding- tmpgenc 3.0
1. click on start new project, this will take you to the set source page.
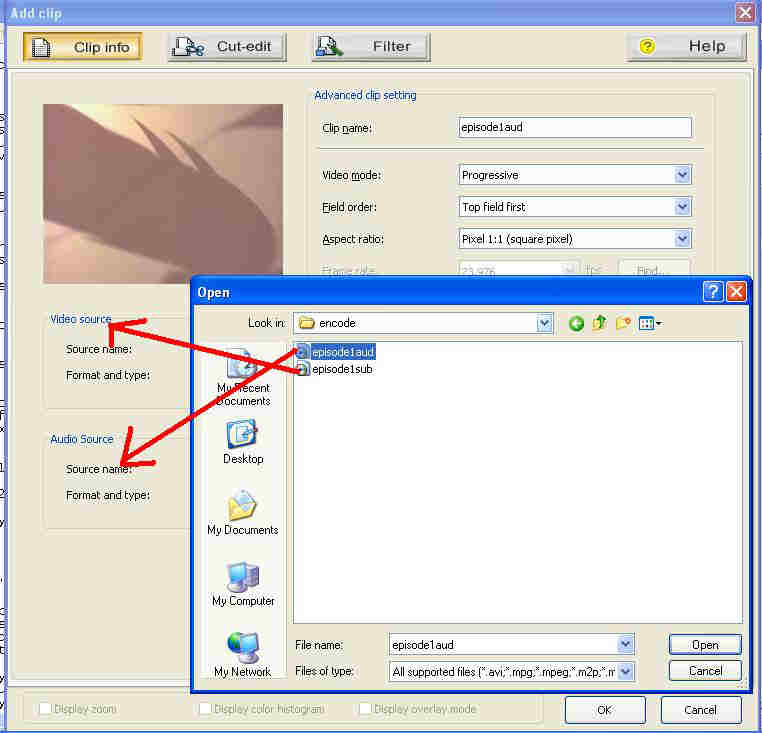
2a. if it's a file that you didnt need to rip the audio out of just click on add file and click on the one you want.
2b. click on the video part (if you made hardsubs make sure you choose the one with the subtitles) then the clip info screen
will pop up go down to audio source and browse and choose the audio you ripped from the show
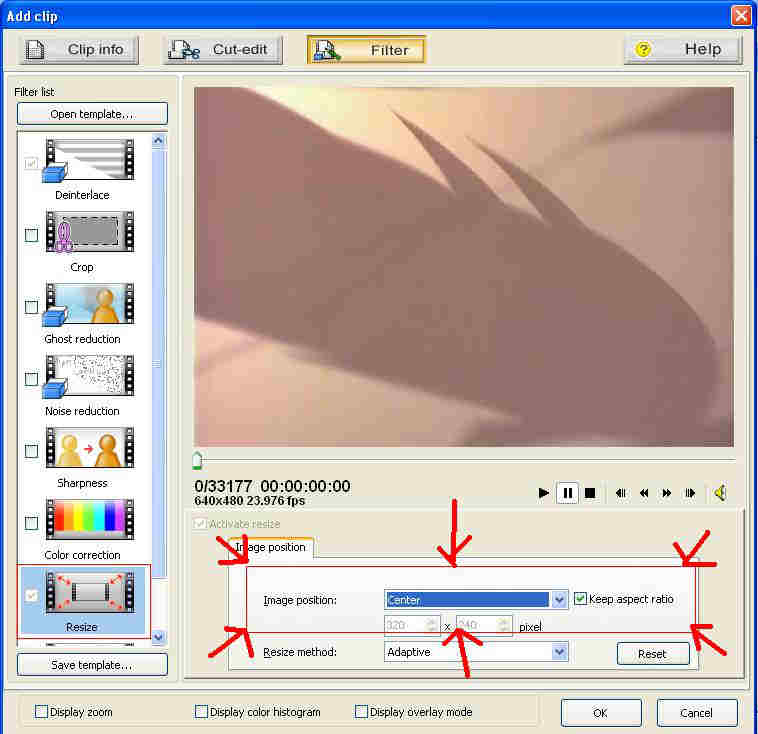
6. A screen will pop up and it'll have a pic of the first screen of your video, look down and make sure the video has both
a video and audio source then click on filters.
7. In filters go down to resize and change image position from full screen to center (not center custom size). For the most
part you wont have to do this but if your show has subtitles trust me you'll need it.
8. After you click on all the files you want included on dvd click on the set output button on the top of the screen.
As a rule of thumb you can usually fit between 3-4 hours on a dvd.
9. After you click on the set output button a window will pop up allowing you to decide which format you want to make.
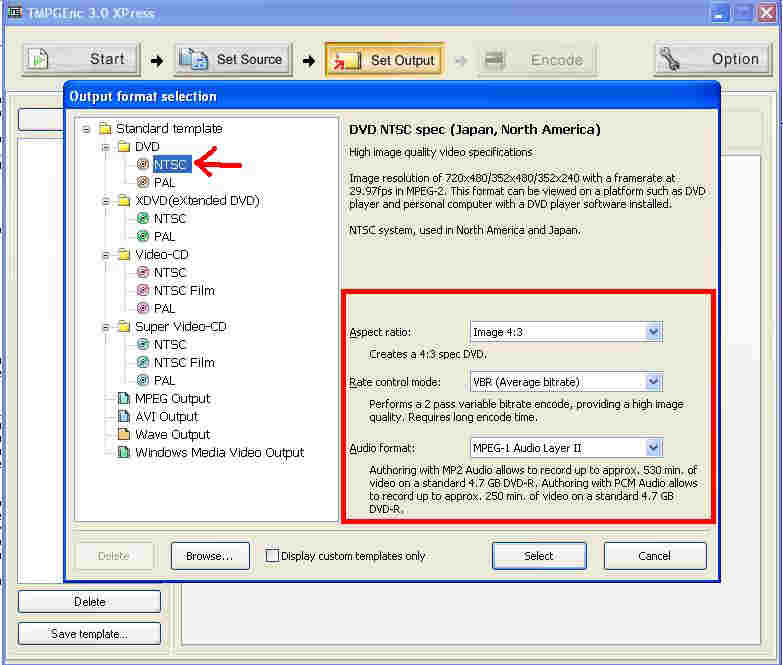
Dvd-
10. If you live in america or japan you'll probably want to make a ntsc dvd/s/vcd (it doesnt matter much these
days cause many players do both but just cause). You'll want the aspect ratio to be 4:3, if you set the
rate control mode to vbr instead of cbr it may take longer but your video quality will be a lot better,
and linear pcm may have better audio quality but i dont notice any difference so switch to mpeg 1 audio
layer to allow more room on the disc.
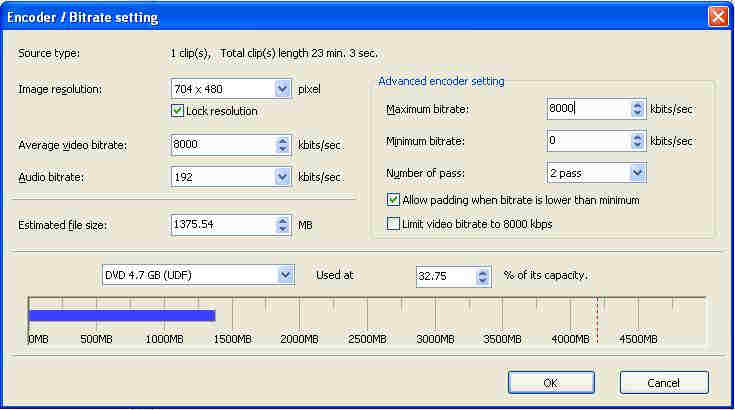
11. once thats done click select, this will take you to the encoder/ bitrate setting, i advise changing the
resolution to 704 x 480 (however if this creates a wonky looking preview during encoding change the
resolution to one of the others till the preview is a normal shape). Change the maximum bitrate to 8000
and change the number of passes to 2. Decide how much of the dvd you want all the files to take up
(I advise no more then ten 24 minute episodes on a dvd).
Vcd- it works pratically the same way i'd avoid it except if you encode the files from a s/vcd disc image as vcd you'll cut your processing time down from 16 hours to 3 and the quality will be the same. On the ogm, avi, mkv files the quality will drop sharply so avoid it.
12. Click ok and this will take you to a screen where you can review your settings click on the encode button at
the top to go to the last step.
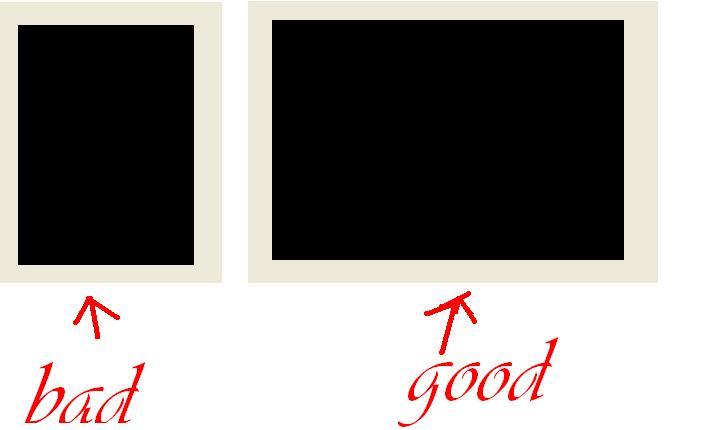
13. Here you'll see a box at the top that represents a preview of the video youre encoding if the box is shaped
weird (say tall and skinny not short and fat) then go back to set output and click on settings by rate
control mode and change image resolution.
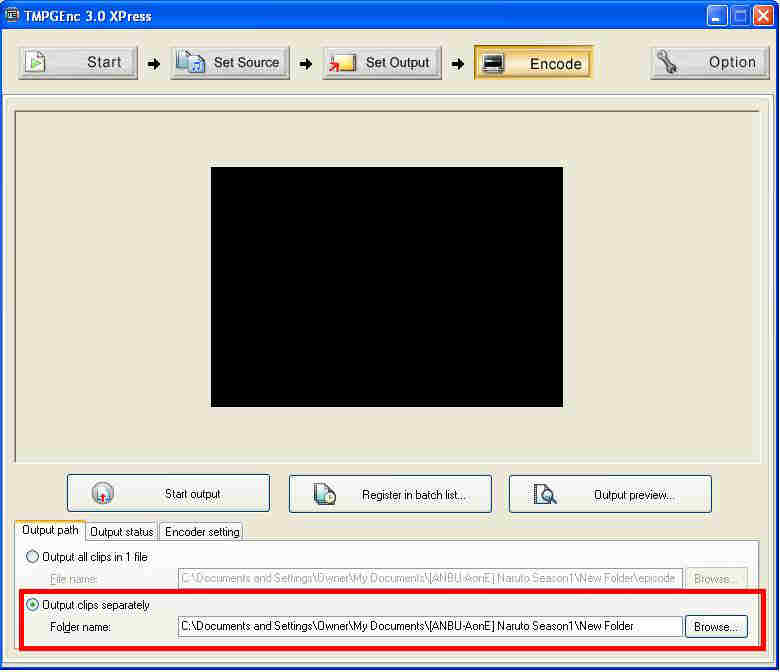
14. once everythings good to go click on output path and click on output files seperately (tmpgenc tends to crash
and if it crashes halfway through you have to start all the way over at least if you output seperately
you only have to start the one it crashed on over again), click start output and youre good to go.
authoring- tmpgenc dvd author
1.click on create new project
2.click on add file
3.find the files you just encoded and add them one at a time
4.after you add one a window pops up click on ok
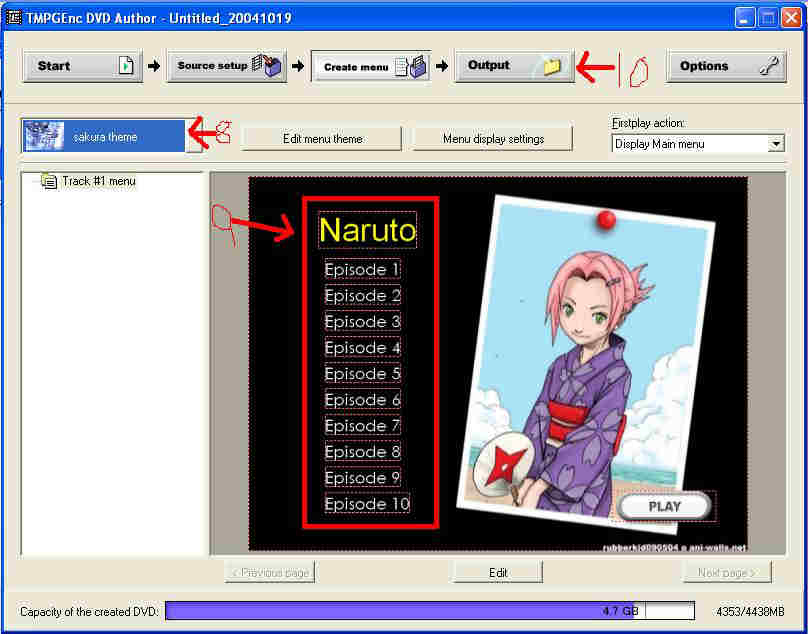
7.click on create menu
8.click on the little tab on the left to choose the menu you like best
(or you can make your own try experimenting by combining wallpapers and theme songs into tmpgenc 3.0)
9. click on any text to change it to what you want
10. After your menu looks like you want click on the output button at the top
11.click begin output and just sit and wait.
burning-
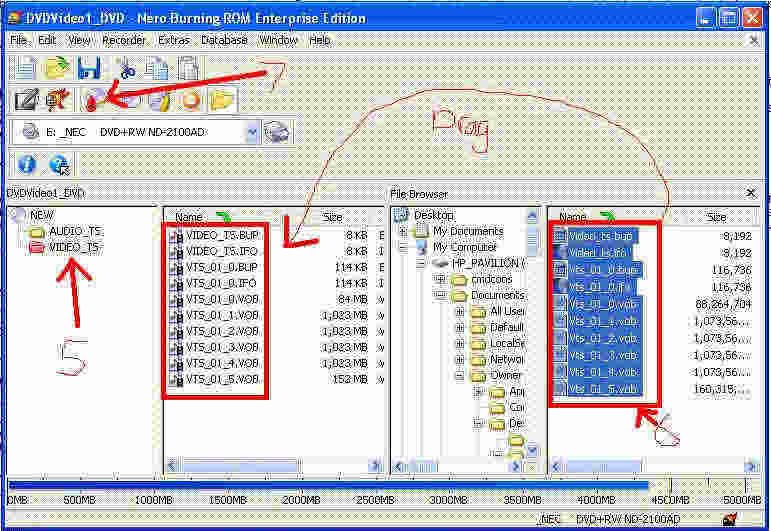
1.Open up nero burning rom
2. click on the left tab and make sure it's set to dvd not cd
3.click on dvd video
4. click on new
5. double click on video ts folder
6. locate your authored files and drag them into the video_ts folder
7. Click on the picture of the cd with a match and your done.
8. if a warning pops up saying it may not be compatable you screwed up
9. once it's done burning pop it in and watch it.
yay first post and first guide done.
+ Reply to Thread
Results 1 to 4 of 4
-
-
Just had a quick glance at your guide and have one question. When hard coding subs with virtualdubMod, why re-encode to divx when you can frameserve directly from vdub to Tmpgenc? Thiswould save this extra step and hopefully preserve quality a bit more by eliminating an extra encode.
-
I'm a MEGA Super Moderator

- Aug 2000
- Sweden


You can upload bigger screenshots than 50kb, the limit is 150 kb...
 ....or make gif or png with limited colors...it looks better than ugly jpg-compressing. The guide looks good except that I would either frameserve or convert to some other lossless format than divx.
-
Yeah i saw the 150 limit after i had allready made all the pictures 50 like the guide said i should. Hmm i've never tried frameserving from virtualdub to tmpgenc so thats why i didnt mention it
 , and really divx doesnt result in that much of a loss if your source is of good quality in the first place (which ogm's and Mkv's usually are) but you guys are right it probably would save a lot of time.


 Quote
QuoteSimilar Threads
-
How to convert MKV to AVI or OGM to AVI using mencoder
By Baldrick in forum User guidesReplies: 75Last Post: 17th Dec 2013, 12:19 -
How to convert matroska MKV to AVI or OGM to AVI
By Baldrick in forum User guidesReplies: 211Last Post: 13th Apr 2012, 01:56 -
Need a Program to convert avi/mkv/ogm to dvd that is free for winxp
By animefanx in forum Newbie / General discussionsReplies: 1Last Post: 30th Aug 2009, 04:22 -
HOW-TO - CONVERT AVI, OGM or MKV to DVD
By Ecko_Blue in forum User guidesReplies: 44Last Post: 19th Sep 2008, 10:10 -
Batch Convert AVI/OGM/MKV to DVD (anime)
By aktee in forum User guidesReplies: 480Last Post: 4th Nov 2007, 19:18