


How to convert multiple avis and author avi to a high quality DVD with AC3 sound
This guide will explain in a barebones manner the way to convert AVI to dvd using avisynth and ulead dvd workshop while maintaining the original aspect ratio, quality and AC3 sound also allowing yo to burn multiple moves to one disc
You will need
Ulead dvd workshop V2 or higher full version
Avisynth https://www.videohelp.com/tools?tool=Avisynth
Avsedit https://www.videohelp.com/tools?tool=AVSEdit
Vfapi converter https://www.videohelp.com/tools?tool=VFAPI_Reader
Readavs http://www.aussievideosearch.com/files/tmpgenc-readavs.zip
Dvd shrink http://www.dvdshrink.org/what.html
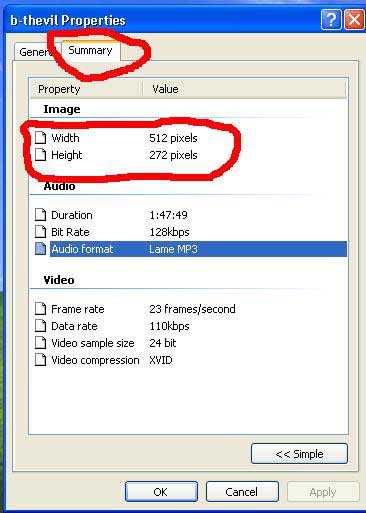
Right click the avi file and go to properties then summary this will give you the aspect ratio
STEP 2
Open avsedit and set up your script
A simple run through for basic conversion open the filters in this order
AVISource("filename")
BicubicResize(target_width,target_height)
AddBorders(left,top,right,bottom)
ConvertToYUY2()
Avisource: highlight filename not the “ just the word filename then go to file open file and open your video it will insert the file path into your script
Bicubic resize: The target width for a pal video would be 720 while the height is 720 divided by the width of the original file which can be found in the file summary shown in step one multiplied by the height of the original file
720/original width * original height = target height
The border function adds black borders to the top and bottom of the screen
The size of the borders is found by 576 minus target height divided by 2
Heres how your sample script should look
AVISource("H:\Documents and Settings\matt\Desktop\b-thevil.avi")
BicubicResize(720,400)
AddBorders(0,88,0,88)
ConvertToYUY2()
Now just save your file
STEP 3
Open vfapi converter and open your avs file you just made (make sure you have read avs installed) then click convert this will set up a dummi avi file
STEP 4
Open Ulead DVD workshop start a project then go to the edit tab and add your video now choose auto add chapters and set a time interval you want chapters to occur and it will create your chapters. you can also add multiple audio tracks and subtitles. double click your video file once it has been added then go to the audio tab if you are using 2 channel audio make sure the convert to disc template box is ticked it will usually be grayed out and auto ticked you may also want to increase the volume as converting to ac3 will reduce the volume. if you are using 6 channel audio DO NOT tick the convert to disc template box or change the volume as this will convert it back to 2 channel audio
STEP 5
Making menus: just follow the wizard and you can add your own backgrounds and music
STEP 6
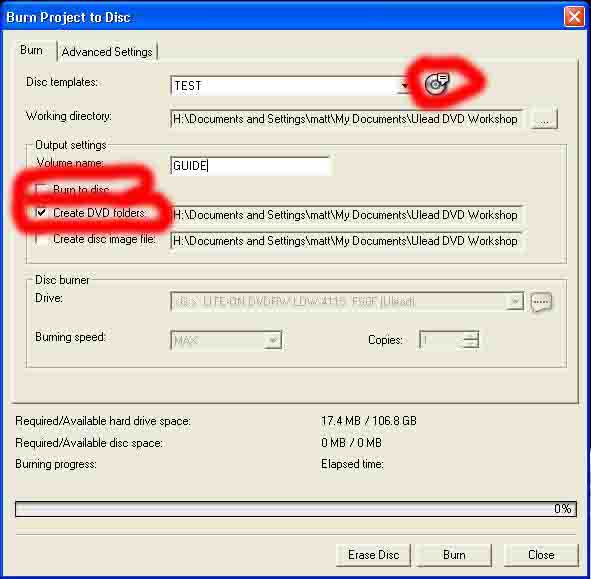
Go to finish and choose burn project
Untick the burn to disk box and choose create dvd folders
Click the little disk next to the disk template box to set up a new template
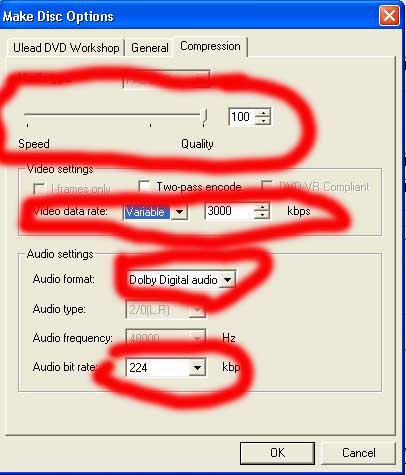
In the compression tab change the quality setting to 100 the video data rate to variable 3000 and tick the two pass encode box for extra quality change the audio format to dolby digital and set the bit rate
at 224 then save your disk template and select it as your template from the disk template drop down menu
now click burn this will take a few hours to burn but is substantially faster than tmpgenc and better quality
STEP 7
Open dvd shrink and select the video ts folder you just burnt now select deep analysis and then backup this will result in a file the perfect size for burning
Enjoy your movie and I should mention on these settings you can fit up to 4.5 hours on a standard dvd at extremely high quality I usually put about 3-4 though
+ Reply to Thread
Results 1 to 2 of 2
 Quote
QuoteSimilar Threads
-
GIVEN UP,Now how to convert Mpeg 2 to a clean AVI with same aspect ratio ??
By mudh in forum Video ConversionReplies: 4Last Post: 11th Oct 2011, 17:04 -
How to convert squashed DVD aspect ratio back to normal??
By EricBalir in forum Video ConversionReplies: 5Last Post: 9th Sep 2011, 23:36 -
how to fix "WARN: unknown mpeg2 aspect ratio 1" in DVD Author GUI
By extent in forum Authoring (DVD)Replies: 10Last Post: 23rd Nov 2009, 08:57 -
16.9 Aspect Ratio with TMPGEnc dvd author 1.6
By GJF in forum Authoring (DVD)Replies: 22Last Post: 24th Jun 2008, 04:57 -
AVI to DVD with different aspect ratio
By germ in forum ffmpegX general discussionReplies: 16Last Post: 7th Apr 2008, 23:50