


Heyas! I am transfering DV to my HD, 1 hour tapes, approx 13 gig AVI files. I want to use TMPG to convert the AVI to MPG so I can burn to DVD. I am only concerned with QUALITY, not disk space or money etc... Can you recommend any setting changes, opinions etc????
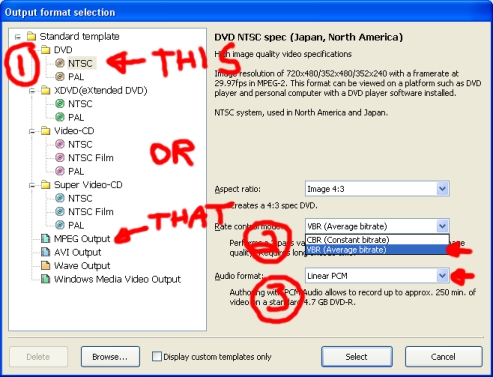
1) If I go with "this", the DVD template then all the following screens apply. If I go with "that" then there are SO many screens to go through. So I guess the first question is does it matter if i use the template or do I need to go through the MPG template??
2) VBR is the way to go ???
3) LPCM, cause its another name for WAV ????
this is the next screen...
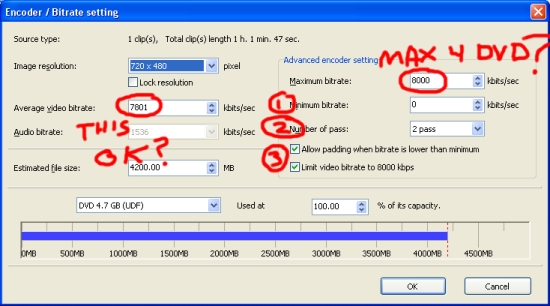
1) leave this at 0?
2) 2 pass is the way to go ????
3) I heard that "padding" is NG and this should be unchecked ???
next screen !!
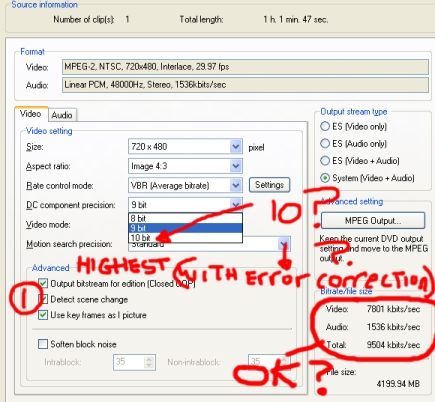
Video mode change to 10??
motion search -- highest (with error correction) ??
1) leave all of these checked ???
Are those bit rate settings good ???
If anyone thinks that I really need to go through the MPG template from the first screen I can make SS of all those windows as well and have someone check the settings too..
I know its alot, and I REALLY REALLY appriciate any all comments or opinions!!!!!!!11 THANKS
+ Reply to Thread
Results 1 to 2 of 2
-
-
Let me tell you this first. I am not GURU. But here are my thoughts and what I do:
- 1. Select the template this way you will be sure that the output video will be DVD compatible. It's now because it's a template it's because they already have selected some default values and those are good for making home DVDs that can have profession quality. So why bother with selecting your own setting and waist your time in learning all the specification for DVD video and Audio. Though you also try XDVD templates but they might output video that might not play very smoothly on your PC (I have not tested it). In short no MPEG Output
- 2. Always always select VBR. No CBR. NO
- 3. Well select LPCM here. Yes, it's another name for WAV. I'll explain "why" little bit latter.
- 4. Some thing more in first screen. Keep aspect ratio same as source. So if your source is 4:3 then keep it 4:3 and if it is 16:9 then keep it 16:9. If it is 1.85:1 or 2.35:1 then select 16:9.
- 5. Now on the second screen.
- 6. First, set Maximum bit rate to 9200 that's high it can get. DVD specification says no more than 9800. But some how TMPGEnc 3.0 Xpress do not let you set it to 9800 it may be because it wants to keep room for audio bit rate. DVD specification says 9800 max for video plus audio. I don't know why it doesn't let you specify. So set to 9200 if you want the best quality in complicated scenes. BUT if you still want to set it to 9800 then do the very last step.
- 7. Do not keep minimum bit rate to 0. Never. I keep around 2500 to 3500.
- 8. Yes, do 2 passes. Do not ask why.
- 9. Now about the 2 check boxes. I always keep the first one (Allow padding..) checked. I don't really know this check box very well. On the other thought, I think if you keep unchecked then it will strictly enforce the minimum bit rate. (I don't really know. It's just a thought). About the second check box. Keep it unchecked. If you keep checked then what's the point of setting maximum bit rate above 8000.
- 10. Now let's talk about Average bit rate. I am not sure how do I explain. Because I do not set it until I have the final audio, sub tittles and other materials that I will include in DVD. I need those stuffs first because I want to know how much space they will take. I also estimate the size of menu because simple menu will take about 10MB (Don't take my words, I learn this from making my own DVDs and seeing how much space the menu takes). On the other hand animated menus and take few hundred MB of space. In other words I do not produce audio and video in one step. First, I get (extract) audio in WAV format in Linear PCM, 48000Hz, Stereo, 1536kbits/sec. I will encode in AC3 using SoftEncode (which not updated any more) but it gives me audio that will play on most DVD players. You can try using Sony's Vegas (I can't afford that), which also (according to other users on VideoHelp.com) produces Dolby certified AC3 audio. I suggest encoding in at 384kbit/sec in AC3 just because your audio probably will come form consumer camcorder or it will be in MP2 or MP3 in first place. So to achieve maximum quality in Audio set it 384kbit/sec. Why AC3. Because AC3 gives best of both worlds. Small size and great quality. Size is comparable to MP2 and Quality is comparable to Uncompressed LPCM. MP2 gives small size but not that quality and Uncompressed LPCM gives quality but it's too big.
- 11. So let's not set average bit rate right now and go to third screen first. We will come back on this screen latter on.
- 12. At this step I would recommend save project using Save command in Option menu.
- 13. On the third screen you have, Set the DC component precision to 10bit. Set Video mode to Progressive regardless of source's Video mode. (Many will disagree with me but this just my personal preference.)
- 14. For the motion search precision I would recommend set according to your source. Here are my personal preferences. If it is family party video then leave it to Standard. If there are some Dance moments then set it to High. And if there are some Sport activities or any other fast moving activity then set it to Highest.
- 15. About the check boxes in Advance box. I really don't know about first check box about closed GOP. Some times I check and sometimes I keep unchecked. I have no Idea what it does. But I keep other two boxes checked. They will help you when you want to create Chapter point when you will author the DVD. Rule of thumb: Always insert chapter at I frame and chapters should be précised according to frame number rather than time. So those two check boxes will help you in that regard.
- 16. Now the point that you have not asked for.
- 17. First off all save the project.
- 18. Here is what I do before I go in Set Output. I set filters in my way when I add clips in to the project. Actually I have saved my filter template and I apply it to every video file in the project when I add in the project. When you add files to project either manually or using wizard when it prompts you Edit Clip screen I do not change any thing is Clip Info screen because I trust the program about the information it found about that particular clip and I take that screen as Info screen. In Cut-Edit screen you know what to do. In Filter screen I set the filters my way. First it already has selected two filters for you and those are Deinterlace and Resize. In Deinterlace filter I change the Interlace method to Interpolation - Animation. Don't ask me why. I do it because I like it's description in help file. In Resize filter I keep Image position to Full screen and keep the box checked. In Resize method I change it to Lanczos - 3. Again don't ask me why. I do it because I like it's description in help file. I also select the Noise reduction filter. In that filter I do not check in Spatial NR setting. In Temporal NR Setting I keep Temporal intensity to 25 and change Noise reduction range to Long (slow). Keep in mind one thing. Never select both Noise reduction and Sharpness filters. Select either one of them and I choose the select Noise Reduction. After setting this filters once I have saved my filters using Save tamplate... and next time when I add another clip to the project I apply filters by clicking Open tamplate... and selecting my saved tamplate.
- 19. I save the project and then go in to the Set Output.
- 20. I think I have explained everything what to setup in Set output screen. So, now it's time for getting some output. I get output in two steps. First on the right hand side in Output steam type I slect ES Audio only. Go to Encode and get your LPCM (WAV) file. (You know what to do here.)
- 21. After you get your Audio encode in AC3 and note its size in MB. You know you can have more than one Audio steams for one Video steam in DVD. So total all the Audio steams' size in MB. Add some thing for menu and then subtract that number from 4800 if you are making a single layer DVD or from 8500 if you are making a dual layer DVD. Now multiply that number by 0.95 and get your final number. Remember that. For a single layer DVD N = (4800 - X) * 0.95, where X is total of all audio steams and menus' size. Note the number N. I multiply by 95% just to be on safe side.
- 22. Now let go back to the second screen. Just select the DVD template from left side click on Settings The number you got here is the number you should enter in your second screen's Estimated file size. Average bit rate will be set automatically for you.
- 23. Click OK to go back to main screen. Now under Output steam type select ES Video Only.
- 24. Now if you want to set the Maximum bit rate to 9800 then do the step 25 and get your Video Steam from that otherwise Go to Encode and get your Video steam. I think this is the maximum quality you can get using this encoder. That's it.
- 25. Do this step ONLY if you want to set the Maximum bit rate to 9800. Select the DVD template from left side and click MPEG output.... And now click on [i]Rate control mode[i/]'s Setting button and set maximum to 9800. This way you don't have to go thru all the screens and you will get almost (because I am not sure) DVD compatible MPEG video. And before you proceed to Encode delete DVD template from left.
 Quote
QuoteSimilar Threads
-
Pegasys released TMPGEnc Video Mastering Works 5 (aka TMPGEnc 5.0 XPress)
By roma_turok in forum Latest Video NewsReplies: 6Last Post: 24th Jun 2011, 16:42 -
TMPGEnc to License x264 Encoder for TMPGEnc 4.0 XPress
By poisondeathray in forum Latest Video NewsReplies: 17Last Post: 28th Jan 2011, 16:07 -
TMPGenc DVD Author 3 will not open file from TMPGenc Xpress 4.0
By artyjeffrey in forum Authoring (DVD)Replies: 4Last Post: 8th Nov 2008, 14:23 -
BIG Problem TMPGENC Xpress V.4.4.1.237 + TMPGEnc DVD Author ver.3.1.2.176
By milindb1 in forum Authoring (DVD)Replies: 1Last Post: 20th Aug 2008, 03:41 -
difference btw.TMPGEnc 4.0 XPress and TMPGEnc DVD Author 3 with DivX Auth??
By geronemo in forum Authoring (DVD)Replies: 5Last Post: 18th Nov 2007, 16:07