


Hi guys, hope you can possibly help me with this problem. When I scan my original DVD movie disc the edge of disc is shiny silver (about 1/8 of an inch) but when my scan comes out this shiny silver edge comes out green in color which prints green on the very edge of my printable DVDR. Adjustments in my Epson CD software will not allow me to adjust the outer diameter size to get rid of it. Why would the scanned copy have a greenish edge on the disc (1/8th inch all the way around the disc) and not be white or gray or black. The green border really looks bad with certain discs and I would really like to get rid of it. I have an Epson RX600 all in one scanner which scans fantastic quality, high resolution pictures but have this little hick up. Can anyone please recommend a solution, I would really appreciate it. Thanks everyone.
+ Reply to Thread
Results 1 to 17 of 17
-
Thank You,
GolfNut -
What you are seeing is the reflection of the edge of the disc

You need a photo editing program. Just crop the scan, save. Then try a label software, like SureThing Label Creator to insert your scanned image. -
lifesajrny thank you for the reply and advice, I will give this a try.
Thank You,
GolfNut -
If you use Import/Picture in the Epson Print Cd software you are able to resize the picture. You are then able to drag the reflective bit you dont need outside the printable area.
Not bothered by small problems...
Spend a night alone with a mosquito -
IooI thank you for the reply and suggestion. Here's what I did. I clicked import, picture and opened my disc to print. This gave me my disc picture surrounded by a box. When I try to resize the disc using my mouse on the sides and top/bottom of the box it only allows me to resize the template itself and not the picture. How do I resize just the picture without effecting the template? Thanks again for your help.
Thank You,
GolfNut -
another easy solution would be to first edit that picture to either cut out the parts you don't want or change their color to white/gray/black - could be easily done with a simple program like Paint Shop Pro and the likes...
With all due respect... and there is respect... -
tkamin thank you for the recommendation. I do have psp but can't figure out how to crop just the round edges. When I click on crop tool it just gives me a square to draw which will not work when I try to crop just the edge of the disc all the way around? Any suggestions for this dummy?
Thank You,
GolfNut -
When you say template what do you mean. The two circles that denote the disc inner and outer dia's ? Or the picture itself ?Originally Posted by golfnut
If i use import/picture i am able to resize the picture thats imported, click on the black boxes and drag the picture to size and position required. You must click on the boxes....
Just a thought when you scan the disk is it only the disk or so you scan the full page ?Not bothered by small problems...
Spend a night alone with a mosquito -
i00i when I scan the disk I draw a box around it (crawling ants) so the disc is scanned inside a box with the edges of the disc just touching the four sides of the box. When I click import/picture it shows the picture of my scan, I then highlight the picture, hit OK, and it opens the picture and places it automatically into the round template (only one template not 2 like you mention) and inside a box which allows me to make sure the disc is centered correctly. When I drag either the sides, top, or bottom of this box it simply drags the picture with it outside the circle template but doesn't resize the picture in any way, hope this helps you so you can help me. Thanks a million.
Thank You,
GolfNut -
try using the special cropping tool which allows you to freehand draw the selection area - then simply draw around the edges.
another option:
draw a circle (empty) with enough thickness to cover the entire edge - make the circle the cirmuference of the disc- and you fixed it! With all due respect... and there is respect...
 -
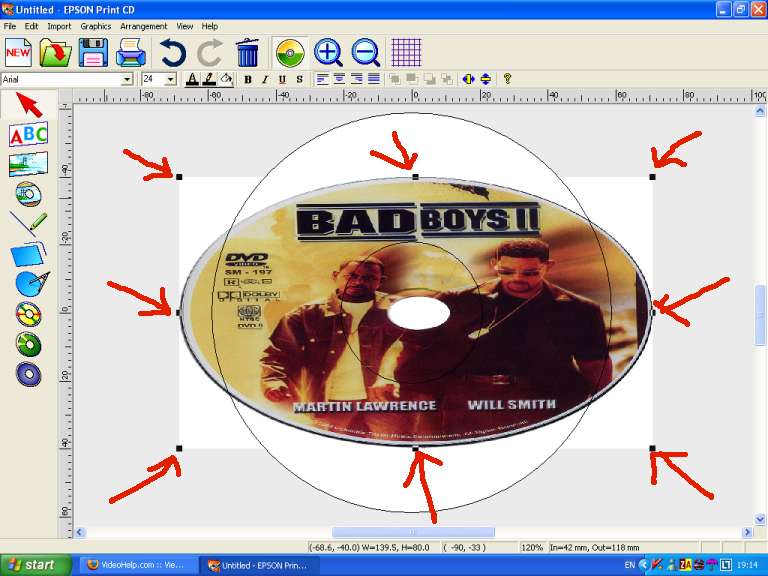
Click on the image of your DVD scan and you will get 8 little black boxes which I have marked with the red arrows in the image. You have to roll your cursor over one of these boxes untill it becomes a cross hair, then drag and click to resize it. You can see I have resized the image by streching it horizontally using the 2 side centre boxes. If you are not over one of the boxes marked with an arrow and you drag and click you will just move the picture, not resize it.
You can then oversize the image so that the bit you don't want on the outside edge is outside the outer limit of the pritable area of the disc.
-
Craig Tucker thank you so very much for going to the trouble of your detailed reply. I think I have it now and want you to know I really appreciate your time and effort in helping me. Have a great day.
Thank You,
GolfNut -

A picture paints a thousand words ...
Nice one CraigNot bothered by small problems...
Spend a night alone with a mosquito -
My pleasureOriginally Posted by golfnut

-
Good job Craig Tucker !
Although not really needed might I add that normally if you hold down the shift key while dragging a corner box, most programs will hold the aspect ratio also so the the image is resized evenly and not stretched or squashed. As in Craigs example the image was stretched sideways while the vertical remained the same size and thus giving it a squashed look. Very good for effects, I do it alot on purpose depending on my works.
In Craigs example you would just resize using the same methode on the top center drag boxes also, so like I said my advice was not needed here for this particaular job although purharps it will be usefull later for a similar job.
Maintaining aspect ratio is helpful when inserting a single item while making a custom image or label and resizing it, like to prevent a tall skinny cheerleader from becomming a short fat one.
Although by NOT maintaining aspect ratio I did take a short fat cheerleader and make her tall and skinny for a DVD I made her. Unfortunatley I could not resize her in the movie, but she liked the disk label and case jacket quite well
-
Oh and that was supposed to be click and drag, not drag and click, but I am sure you realised that.

And overloaded is right holding shift maintains aspect ratio. -
Great info guys, what a group of nice guys to share your expertise with me, I really do appreciate it. Craig I just printed my first disc trying using your advise and it came out perfect. It is so nice to be able to ask for help and get expert advice. Thanks again and you too overloaded for the tip with the shift key.
Thank You,
GolfNut
 Quote
QuoteSimilar Threads
-
Question about scanning OS partition using antivirus/antimalware software
By PartingShot in forum ComputerReplies: 8Last Post: 31st May 2011, 17:07 -
photo scanning vs negative scanning
By lordhutt in forum ComputerReplies: 66Last Post: 7th Nov 2010, 19:09 -
how to copy an original disc
By marlo in forum Newbie / General discussionsReplies: 6Last Post: 24th Feb 2009, 16:26 -
Question about line scanning in Interlaced Camera
By Movie-Maker in forum Newbie / General discussionsReplies: 4Last Post: 29th Aug 2008, 23:23 -
Avia Original Calibration Disc ??
By ofield1 in forum Newbie / General discussionsReplies: 1Last Post: 19th Feb 2008, 13:34