


PUT A CUSTOM WATERMARK ON YOUR VIDEO
This guide will enable you to place a watermark over an existing video. This watermark can be text, or an existing image. Please note that some basic working knowledge of VirtualdubMod would be an advantage, but not a necessity. If you wish to add a watermark, you must re-encode your video, so it is suggested that you would use this guide immediately after acquiring your source, just before you are about to re-encode your output.
Tools Required:
VirtualDubMod
Image manipulation/creation software (Windows Paint will do the job)
Optional - Donald Graft's logo filter (only required for Part 2 of this guide)
PART 1: WATERMARK PRESENT FOR ENTIRE VIDEO
In this part, I'll show you how to place a watermark in your video for the entire duration of the video. If you wish to only have your watermark visible for certain parts of the video, or you wish to configure a number of different watermarks at different time intervals, please see Part 2 at the end of this guide.
1. PREPARE YOUR WATERMARK IMAGE
a) If making a text watermark:
Open up your favourite image manipulation/creation program. Create a new image – I’d suggest a canvas size of 200 (width) x 20 (height) as a good starting point, but you can use whatever you like, just bear in mind how it will look and fit on the screen. Use your image software to paint the background black. Now create the text you wish to appear in the watermark, and place it on the black background, making sure that the text colour is white. Once finished creating your watermark image, save it, but make sure that you save it as either a .BMP or a .TGA file.
b) If you are using an existing image:
Simply open the image, and make sure you save it as a BMP or TGA file.
Please note:
It is imperative that you save your watermark as either a .BMP or a .TGA file, as these are the only file formats virtualdubmod will accept for watermarks.
Some examples of watermark images appear below:
Text:
Existing image:
2. SET UP VIRTUALDUBMOD
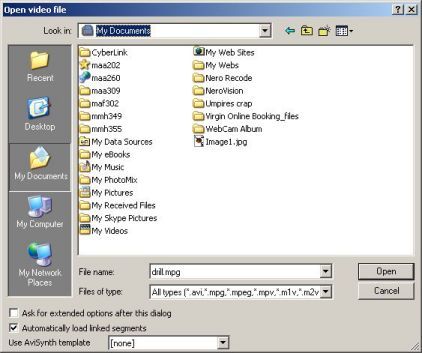
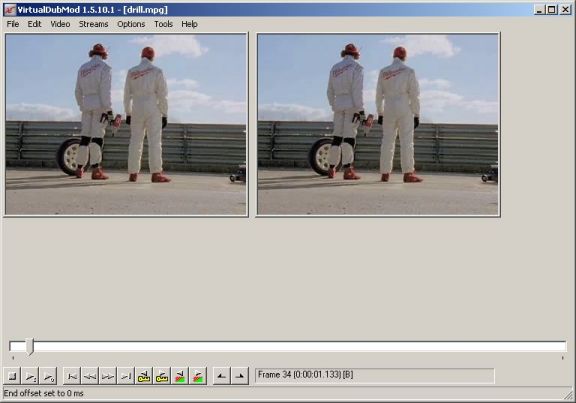
Open Virtualdubmod, go to File > open video file:
Select your source video and press the Open button.
You should now have something similar to the following:
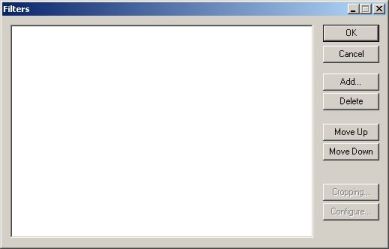
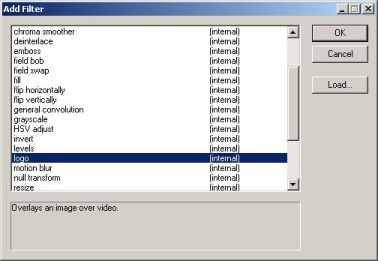
Go to Video > Filters:
Click the Add button, scroll down to the logo filter:
Click OK.
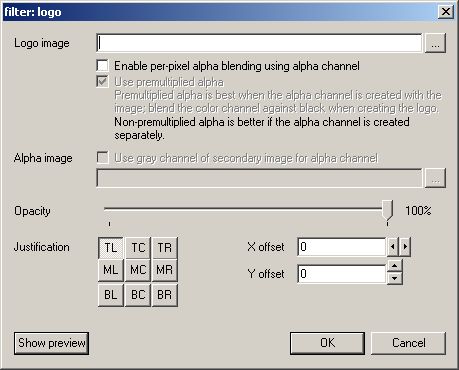
You should now have something similar to the following:
Press the … button to the right of the Logo image field and select your watermark image.
Tick the enable per-pixel alpha blending using alpha channel tickbox.
Leave the Use premultiplied alpha tickbox ticked.
Tick the use gray channel of secondary image for alpha channel tickbox.
Press the … button to the right of the Alpha image field and select your watermark image.
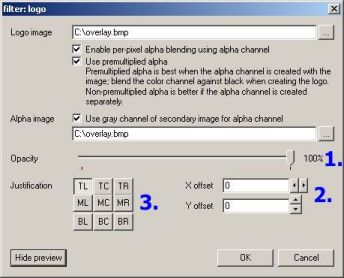
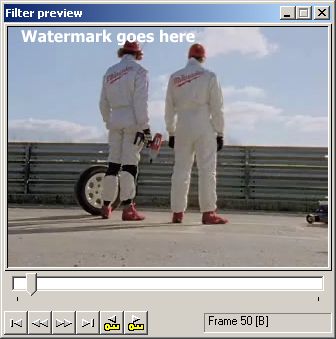
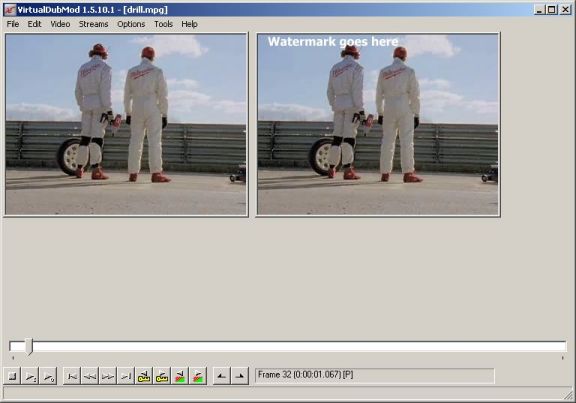
Click the Show Preview button, and you should have something similar to the following:
1. corresponds to the opacity of your watermark, This control how “see-through” your image is. I’d recommend a value of 50% if you wish the background to show through from behind the watermark. Your changes are automatically updated in the preview window, so you can quickly see the results of your actions.
2. corresponds to the manual adjustment of the positioning of the watermark, where X offset is the distance from the left of the video, and Y offset is the distance from the top of the video.
3. corresponds to the preset adjustment of the positioning of the watermark. TL stands for Top Left, MC stands for Middle Centre, BR stands for Bottom Right …… and you get the idea.
Please Note:
If you have used the manual adjustment, this will also affect the presets, so if you change your mind and decide to use a preset instead of manually adjusting the placement of the watermark, make sure you set both the X offset and the Y offset back to 0, otherwise you might get some unexpected results.
Once you are happy with your settings, click OK, and then OK again.
You should now have the following:
Now you can set up your video with any encoding settings you desire as per normal. Once you have selected your compression settings for both video and audio (if required), Go to File > Save As, specify your output filename, and click the Save button, or start the frameserver if you’re frameserving to an MPEG encoder.
Now some examples with opacity set at 50%:
Text:
Image:
PART 2 (OPTIONAL): CUSTOM DURATIONS FOR LOGO(S) / MULTIPLE LOGOS
In this section, you'll be able to set custom durations for one or many watermark logos/text.
Download Donald Graft's logo filter and extract all files in the Zip file into your Virtualdubmod\plugins directory.
Go to Video > Filters.
Click the Add button.
Click the Load button.
Browse to your VirtualdubMod\plugins directory, select the logo.vdf file and press OK. Scroll down through the list of filters until you find logo (1.4), click on it, and press OK.
You will be presented with the following:
I found the help file so descriptive that IMO it would be very beneficial for me just to post the entire contents of it here:
Knock yourselves out !This filter provides the ability to overlay a logo contained in a bitmap file. The position of the bitmap may be specified. Selectable alpha blending allows variable merging with the video, and a transparent color may be selected to obtain a free-floating effect. Animated logos can be created by defining a series of bitmaps. Filter preview is supported.
This filter is ideal for unobtrusively placing a logo on the video as is done on many cable TV channels.
Two test bitmaps and an animated bitmap sequence are provided in the zip file.
How to Make a Static Logo
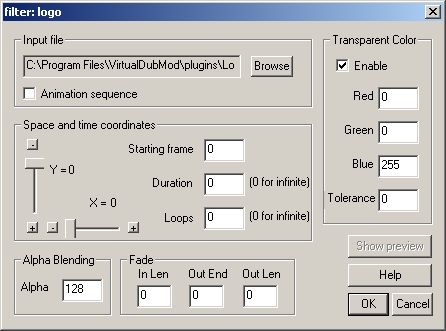
Create a 24-bit-depth windows bitmap file with the desired size and with a transparent color zone if desired. The transparency color may be arbitrarily selected and then configured in the filter configuration.
In the filter configuration dialog box, enter the input file. If the specified bitmap file cannot be found, or if it is not a bitmap file, or if it is of the wrong depth, the output frame will be all black. Set the desired X and Y coordinates, the starting frame and the duration (in frames). Set the desired alpha blend and transparent color.
How to Make an Animated Logo
To make an animated logo, create a series of bitmap files named name0000.bmp, name0001.bmp, name0002.bmp, etc. (you can replace "name" with desired text). Specify the first one as the input file and check the 'Animation sequence' checkbox. Set the duration to be the number of frames to display each bitmap file before moving to the next one. Set the loop count to the number of repetitions desired for the sequence. Set the other parameters as described for static logos.
Note that stepping forward and rewinding will operate correctly, but stepping backward is currently not supported.
A sample sequence is provided that produces a spinning earth. To run it, set the duration to 1, loops to 0, and enable a transparent color of 0/0/0.
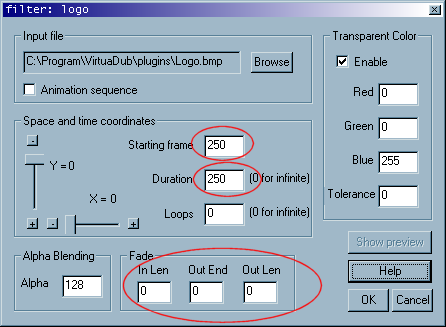
Detailed Option Descriptions
The following options are provided:
Input file: Specifies the full pathname of the bitmap file to be used.
Animation sequence: Check this to enable an animated sequence.
X: This option determines the X offset of the start of the bitmap on the video.
Y: This option determines the Y offset of the start of the bitmap on the video.
Starting frame: The frame number on which to begin displaying the logo.
Duration: For a static bitmap, the number of frames for which to display the logo. For animated bitmaps, the number of frames to display each bitmap before moving to the next bitmap. To display a bitmap for the whole clip length, select 0.
Loops: For static logos, this has no effect. For animated logos, the number of repetitions of the bitmap sequence. To loop forever, select 0.
Alpha: This option determines the blending of the bitmap with the video. For full bitmap and no video, use the value 255. As this value is reduced toward 0, more and more of the video is blended in. An alpha of about 100-128 gives a nice unobtrusive overlay.
Fade: These options allow for the logo to be faded in and/or out. For fade-in, the starting frame number of the fade is determined by the logo starting frame. The length of the fade is determined by the In Len value. For fade-out, the ending frame number of the fade is determined by the Out End value. The length of the fade is determined by the Out Len value. If fade-in and fade-out overlap, fade-out overrides. Even if the logo is otherwise enabled such that it would appear beyond the end of a fade-out if the fade-out were not there, the logo will be suppressed after the fade-out. Finally, if you put silly values in the fade boxes, you will get what you deserve.
Enable transparent color: Check this if you have made a transparent color zone in your bitmap. Then select the transparent color in the Red, Green, and Blue edit boxes. Full video shows in the transparent areas. The tolerance box allows you to specify a 'sloppiness' factor fo the match to the transparent color. As long as the difference between each color channel and the corresponding specified transparent color is not greater than the specified tolerance, then the color will be considered to be transparent. For example, if the tolerance is 10 and the specified transparent color is 37:45:10, then a color 39:44:5 will be considered transparent, while a color 39:56:11 will not be transparent (because one color channel's difference exceeds tolerance).
+ Reply to Thread
Results 1 to 30 of 58
-
If in doubt, Google it.
-
Great guide, besides some of the images are broken (image7 - image12)
And really - plastering logos and stuff all over your encodes is IMO one of the most n00bish things you can do, and should not be taught to minors!
/Mats -
Having issues uploading images ATM - please bear with meOriginally Posted by mats.hogberg
EDIT: Images now uploaded If in doubt, Google it.
 -
I have yet to find a good way to have a watermark appear at intervals throughout the video. For instance, the mark appears in the first few seconds of the vidoe, then disappears...only to reappear at intervals of 10 minutes or so, instead of constantly being displayed. What method would you use to do this? My attempts have resulted in making huge numbers of images, some with mark, some blank, and encoding them as an animation - with the number of blank images being the way I 'time' the appearance.
-
I daresay it's probably very easy (certainly much much easier than what I'm about to describe) in advanced editing software such as premiere. BUT, I don't have Premiere to test on, so I'll do it the free way with VirtualdubModOriginally Posted by magicmycote
I'll use an example where the you have a 10 Minute clip and the watermark is displayed for the first 3 seconds, then at the 5 minute mark for 3 seconds.
You need to do it in sections - open your video in virtualdubmod and set up the watermark you want to display. Using the buttons, set the start point to frame 1 (you can navigate easily through the frames using the multitude of commands on the Edit menu) and end point to the 3 second mark (you can use Edit > Go to ... to specify a timecode if you're spooked by using frame numbers). Go to Video > Compression, and specify a video codec to use, and if you have audio, go to Streams > Stream List, right-click on the audio stream(s) you wish to keep and go to Direct Stream Copy. Then go to File > Save As, and save the first portion out to an AVI file. Call this section part01.avi, or something similar.
To make the watermark "come back" at the 5 minute mark, set the start point to the 5 minute mark (you can use Edit > Go to ... to specify a timecode if you're spooked by using frame numbers) and end point to the 5 Minute 3 second mark (you can use Edit > Go to ... to specify a timecode if you're spooked by using frame numbers). Go to Video > Compression, and specify a video codec to use, and if you have audio, go to Streams > Stream List, right-click on the audio stream(s) you wish to keep and go to Direct Stream Copy. Then go to File > Save As, and save the first portion out to another AVI file. Call this section part03.avi, or something similar.
Now we have to do the "non-watermark" sections. Remove the watermark by going to Video > Filters, select the logo filter you set up and press the Delete button. Press OK. Now set the start point to 1 frame after where you set the first end frame to (in this case, it would be the frame at the 3 second and 1 frame mark), and set the end point to the frame before you set the second start point (in this case, it would be the frame at the 5 minute - 1 frame mark). Go to Video > Compression, and specify a video codec to use, and set audio to Direct Stream Copy and save again. Call this section part02.avi, or something similar.
Repeat for the second section - set the start point to 1 frame after where you set the second end frame to (in this case, it would be the frame at the 5 minute 3 second and 1 frame mark), and set the end point to the last frame of the clip (Ctrl + -> will take you straight to it). Go to Video > Compression, and specify a video codec to use, and set audio to Direct Stream Copy and save again. Call this section part04.avi, or something similar.
Now close all your clips, and reopen VirtualdubMod. Go to File > Open, and open part01.avi, making sure that the "Automatically load linked segments" tickbox is ticked (or you could just open part01.avi on its own, and go to File > Append segment). Either way should automatically load part02.avi - part04.avi. Then you can frameserve to your favorite encoder, or re-encode (aqain) with your codec of choice.
As I mentioned, this isn't a very user-friendly way to do it, and probably requires oodles of hard drive space, but it CAN be done
If in doubt, Google it. -
Donald Graft has a vdub filter which allows you to cycle bitmaps as an animation sequence for a specified number of frames. If you only had 2 images and one was just a colored frame which you could blend out and if you set a large number of frames between changing images it might produce the effect you want. Of course it would be at precise intervals based on the number of frames image 1 is seen and then image 2 is blended out. What I don't know is whether you could make the second image (plain color) just completely transparent. I've not tested this myself but you may want to try it yourself. There is a small text file with the filter which explains how it works. The only link I have dating back to 2000 is a dead one but you probably can find it with a google search on his name and/or vdub filters. My version is called logo v1.1 by Donald Graft.Originally Posted by magicmycote
ps I just noticed that the filter has a tranparent color option so this should work if one image is the selected tranparent color. It's worth a try.
Found a link with updated version 1.4
http://neuron2.net/logo.html
edited in:
Since you must display each image a set number of frames one way to toy with this could be for example to have 1 logo image and nineteen colored frames (same transparent color) then let each image show for 30 seconds then the real logo would only show for 30 seconds once every 10 minutes. Choose the variation that suits your needs. -
I hate logos.
Hello. -
Yes, Donald Grafts logo filter is really cool -
 you can set fade in/fade out values for the logo to appear for just a certain amount of frames, along with an over all alpha value. The transparent color can be specified to a specific RGB value. By adding this filter several times, you can have logos coming and going all over the movie (God forbid!)
/Mats -
^^ Well I'll just go and rewrite the guide then, shall I .....
 If in doubt, Google it.
 -
I wouldn't say that - It's a good guide for the std VirtualDub logo filter!
/Mats -
I might have a play with this other logo filter and integrate it into the guide as a "Part 2" to my guide I thinkOriginally Posted by mats.hogberg
If in doubt, Google it.
-
Part 2 added to the guide
If in doubt, Google it. -
gosh, jim... you should autoban yourself for at least a year for this guide!!
Isn't station logos bigger and longer every year not enough? Like there is not enough music videos already on the net with such idiotic logos as someone's freaking head popping up in the corner on 25% of the screen, or even more idiotic "thoughtful messages" scrolling at the bottom...
// Images removed.
// -- moderator lordsmurf
EDIT:
do you work for MPAA or some broadcasters association by any chance?
You are in breach of the forum rules and are being issued with a formal warning. This is the USER GUIDE forum. Do not ruin others' guides by filling the page with your smileys or images. The commentary is also out-of-line. Start a new topic in the general forum about why you hate watermarks. DO NOT HIJACK POSTS, ESPECIALLY HOW-TO GUIDES.
OT regular or not, that was not cool. Common sense says "if my images screw up the post, fix it". Don't just leave it up there as a mess somebody else has to clean up.
/ Moderator lordsmurf -
Says he that just put a fricking scroll bar in my guide because of his imagesOriginally Posted by DereX888
// Images removed.
// -- moderator lordsmurfIf in doubt, Google it. -
Nice job on the guide.
I just want to say that all this can easily be done (and much more) in Wax2 wich is also Free. You can also animate the logo if you want.
But if you only want a simple logo and don't want to learn a complicated but powerfull advanced editor, then this guide is very useful.Got my retirement plans all set. Looks like I only have to work another 5 years after I die........ -
// Images removed.
// -- moderator lordsmurf
EDIT:

(the rest of the angry mob are the future logoed video users)
-
Peaceful protests are fine.
Duly noted
If in doubt, Google it. -
Just curious,would you be able to load the filter again so it shows a logo in the middle of the clip for a few seconds and then so it has an ending logo?
I think,therefore i am a hamster. -
I quote myself...Originally Posted by mats.hogberg
/Mats -
As mats rightfully says, "God forbid!" ......Originally Posted by johns0
Seriously, I don't see why not.If in doubt, Google it. -
I think logos are a good idea in that they can be used as beginning and end credits and introductions where needed.
I think,therefore i am a hamster. -
Another good use for this, is to make scorebugs. Say you're editing sports videos you shot and want to add a nice scorebug to keep the the viewer informed of the score, you can easily create the scorebug in an image editor.
I use this stuff a lot in sports videos, but I like to animate mine. I also like to flash players pictures after a great play.Got my retirement plans all set. Looks like I only have to work another 5 years after I die........ -
how come when i pressed save as avi, i got this message:
Cannot start filter 'logo': Failure reading image file'''': The system cannot find the path specified
any advice? -
Because the image file isn't there? Or it's sunday?
Sorry, crystal ball in for overhaul this weekend...
/Mats -
the link for Donald Graft's logo filter isn't working anymore
-
What about this}?
/Mats -
just downloaded it, thank you!Originally Posted by mats.hogberg
-
i have 2 images, one i named logo1.bmp, the other is logo2.bmp
how come when i set the duration for the first image, VirtualMod crashed? -
Sorry, crystal ball still in the shop...
Does it work with the sample images (rotating earth) that's included with the filter IIRC?
/Mats -
can i ask how many bmp files we can add because it seems like after a certain number of bmp files, my logo seems like it's staying the same


 Quote
Quote
Centrum Gemini 340
Samsung DVD HR757
NEC AD-5170A 1.1
ASUS P4P800-E
SB Audigy 2")


Similar Threads
-
How Do I Put Watermark/Logo on Video?
By iqbal88 in forum EditingReplies: 7Last Post: 11th Mar 2012, 18:17 -
Adding watermark to video
By Shaorin in forum Newbie / General discussionsReplies: 2Last Post: 29th Nov 2010, 09:08 -
Custom Video Converstion Help 720p to custom 720p
By powerplyer in forum Video ConversionReplies: 5Last Post: 4th Jun 2009, 14:14 -
Add Watermark To Video?
By johngomez0468 in forum SubtitleReplies: 5Last Post: 29th Jan 2008, 16:48 -
How Do I Put A Custom, Created Slow Motion Clip Back In? (Virtualdub)
By WishMaker in forum EditingReplies: 8Last Post: 24th Oct 2007, 11:14