


Thanks! This works good and easy yes, and now I have the sound merged into the video!
I decided first to get all the video's together. The video's are cut in a 3min. interval (looprecording got activated). And it seems there's a 50 frame overlap. So the timestamps are giving me quite an advantage here just looking to the time and edit the video's together on the point where the secconds change. Instead of looking into a 50 frame range to the right followup frames.
After this I will go aply this mask to remove the timestamp of the whole video at once
Unfortunatelly it also seems that because of this looprecording setting, also recordings got errased (and probably overwriten)
Some SD-cards seem to have plenty of free space. Not sure, but hope I still can retrieve some not overwriten files here...
+ Reply to Thread
Results 61 to 90 of 172
-
-
-
The last days I was bussy editing al the video's together that were cut by the loop-recording function. Got some issues with it because some cuts generated glitches on single frames and they were visible on playback. So I needed to remove al these single frames manually. Then I got some other problems here. But figured out it was because I was working in a 50fps timeline and was converting it to 60fps. But seems I'm finally finished editing now.
So now it was time to start removing the timestamps.
I've started with some night recordding video. But I've noticed that the timestamp is still "bleeding through" a bit. Still better then having a much bigger and incorrect timestamp ofcourse. I could still trimm this away while editing since it is mainly the most lower part of the timestamp.
But I was wondering if I could tweak the settings a bit more to get more rid of this too?
I have uploaded a video here
https://www.youtube.com/watch?v=aP-lpIXPzG4
I can also upload it with wetransfer or so? -
Yeap, always post an original video, on YouTube it's not original anymore.Originally Posted by Rockel83

EDIT:
I see it's 20 mins long at uTube, cut it to few mins with MKVToolNixLast edited by VoodooFX; 7th Jun 2022 at 18:21.
-
Thanks!
I've just uploaded the orriginal file here
https://we.tl/t-GHHJY6ieNg -
Too big to download for me now, cut it to few mins with MKVToolNix.Originally Posted by Rockel83
At Output tab there are options how to split your file, you can select "After output size", set ~300M, upload only the first part. -
Ok! I will

Do you prefer to have a part of the file with or without timestamp? -
With timestamp!
-
Wow! This program works easy and fast!

This is the first part of the sample:
https://we.tl/t-5eJOKNmyW1 -
That video is without timestamp.
-
Oh yes! Got confused here haha
https://we.tl/t-sBt4lszAy5 -
But your video is 50 FPS here, do you have original 60 FPS video of it?
-
Yes ofcourse, this is a part of the orriginal recording:
https://we.tl/t-XlC9lQFCpN -
That's not a good test clip. There hardly anything behind the timestamp but black. You could just overlay a black box and get good results for most of the clip. Something with stuff moving behind the timestamp would be better.
-
But your edited video is converted to 50fps from 60fps, and video colors are "damaged" so mask is not right anymore [I guess by lossy re-encode].Originally Posted by Rockel83
Edit your video properly then there will be no problems. How did you edited it? -
How do you mean "colors are damaged"?
I had edited everything perfectly fitting and without anny more "cutting glitches" in the frames. But seemed I was working in a different time line (50fps). Export to 60fps still gave visible problems. Seemed because I was working in a 50fps timeline. So probably was not seeing every frame correctly from the 60fps video. I decided to leave it like this, because it took me quite some work and time to edit everything together. Not realizing that it probably could give some problems removing the timestamp later...
I've started over editing and combining everything again today, but this time in a 60fps timeline. Going through hell another time haha
I'm using "Pinnacle Studio Ultimate 24" for editing btw. Only merged the belonging video's together on the right frames and erased some "glitching" frames in between. But it was just a single frame, about 50 frames before the automatic cut.
Besides that I've left the video as orriginal as possible.Last edited by Rockel83; 8th Jun 2022 at 13:26.
-
Why not edit in Avisynth? Cutting there is simple with Trim():
Here we remove 50 frames from second video and join both videos:
[in Avisynth frames are counted from 0]
Code:v1=LWLibAvVideoSource("D:\video001.mkv") v2=LWLibAvVideoSource("D:\video002.mkv").Trim(50,999999) v1++v2
Not if you used lossy compression between edits, do it in lossless.Originally Posted by Rockel83
Last edited by VoodooFX; 8th Jun 2022 at 17:47. Reason: Corrected Trim
-
This should work with audio:
Do you know that there is preview in AvsPmod?Code:# Here we import first video/audio part: v1 = LWLibAvVideoSource("D:\video001.mkv") a1 = LWLibavAudioSource("D:\video001.mkv") # Here we import second video/audio part: v2 = LWLibAvVideoSource("D:\video002.mkv") a2 = LWLibavAudioSource("D:\video002.mkv") # Here we combine video/audio of the first part together, and fix glitched 2105th frame: o1 = AudioDub(v1, a1).FreezeFrame(2105, 2105, 2104) # Here we combine video/audio of the second part together, and remove 50 frames from the start: o2 = AudioDub(v2, a2).Trim(50,999999) # Here we join both edited parts: o1++o2Last edited by VoodooFX; 8th Jun 2022 at 17:47. Reason: Corrected Trim
-
Because I don't know how to work with this program (yet) how to trim etc. it looks quite complicated to work with and I already having some hard time understanding other things at the moment.
I've used Pinnacle for quite some time now. And I know my way around it a bit now. I know how to use specefic actions there and how to use specific tools. For me it actually works pretty well for editing, however it's not perfect. I can just easily select the matching and overlapping frame and choose where to re-connect. This is verry usefull here since the cut videos having overlapping frames. And it's verry convenient and easy to select, split and remove the "glitched" frames.
With Avisynth I would not know to do all of these things. And it would probably take me a lot of time to get used and familiar with it.
I was using the following settings for export after editing:Not if you used lossy compression between edits, do it in lossless.
[Attachment 65273 - Click to enlarge]
But this was when I still edited on the 50fps timeline. Now I've started over on a 60fps timeline.
Maybe I should use the "same as timeline" option here however. Since all the used files come from the same camera and have the same layout...Last edited by Rockel83; 8th Jun 2022 at 18:03.
-
How "Trim(50,999999)" can be more complicated in comparison what you are doing there in Pinnacle, just change frame numbers where you want to cut.Originally Posted by Rockel83
Or "FreezeFrame(2105, 2105, 2104)", where first two numbers is glitched frame, replaced with a previous frame [third number there].
If you don't understand something then ask.
Probably. And look if there is lossless preset, or you will be damaging your video again.Originally Posted by Rockel83
Last edited by VoodooFX; 8th Jun 2022 at 18:26.
-
Thanks!Originally Posted by VoodooFX
Oh, this actually sounds logical so far
In Pinnacle I get 2 preview screen next to each other. Which makes it actually verry easy to spot the matching frame. It trims both files then so they're matching at the precise point. Works quite nice and easy. But I should give your option a try too. Avisynth looks like a usefull and powerfull program. I should get deeper into it
I'm just finished editing all the video's again. But this time imported the videos on a timeline with matching resolution and fps settings. So imported the 60fps videos on a 60fps timeline. In the export screen I've sellected "same as timeline" option this time. (exported to the same resolution and 60fps too ofcourse)Originally Posted by VoodooFX
I've uploaded 2 sample here. 1 of the orriginal and 1 of the edited and combine video's. I'm not sure if there're some big differences in color this time? How did you spot it in the other video's? Was it that obvious?
This time colors seems to be quite matching to me? At least it's hard to tell for me if there's anny difference.
https://we.tl/t-wfLBNk4hbK
[Attachment 65279 - Click to enlarge]
The 1st is from the orriginal video, the 2nd from the edited video.Last edited by Rockel83; 8th Jun 2022 at 22:53.
-
In Avisynth you can stack endless previews next to each other, vertically, horizontally, whatever you like, and open countless tabs.Originally Posted by Rockel83
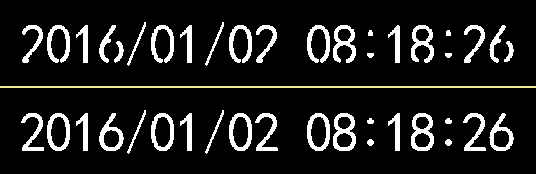
Timecode at parts is not yellow anymore, same in your new example too, it's obvious to the naked eye, even more obvious when a mask for yellow can't mask it anymore.Originally Posted by Rockel83
No need for samples, keep video lossless between edits! If not lossless then quality of your video is degraded [always], that means the various artifacts, degraded colors not suitable for a next edit, ect...
Btw, in Avisynth, you wouldn't need to bother about it as you would be doing everything in one go.Last edited by VoodooFX; 8th Jun 2022 at 23:21.
-
Btw, in your new edit FPS is still not 60, it is 59.940 FPS now. Looks like Pinnacle is more complicated...

How it looks on the masks [Your "lossy damaged" vs Original]:
Last edited by VoodooFX; 9th Jun 2022 at 00:02.
-
Yes, the difference between both seems to be quite big. I also tried the mask on both the orrigiginal and the last exported video. And, however I was hoping that I was converting without anny loss this time, I still see a lot of "bleeding" of the timeline. It looks like your image above indeed.
It looks a bit discouraging and difficult achieving this with Avisynth. But maybe I should give it a try if you say it gives me losseless results.
What is the easiest way to do so?
Let's say I have 2 video's that belong together, but which are cut. At the cut the first video contains some overlapping frames at the end. And the seccond video contains some overlapping frames at the beginning of the cut. But I don't know where this actual cut is. The only thing I found out in Pinnacle that it always was precisely 50 frames (50fpstimeline) or 59 frames (60fps timeline) counted togeher. But the actual middle and matching frame was always different at every recording.
Example: at some recordings I had to decrease 23 frames, and increase 36 frames in the seccond video to get to the precise matching frames (59 frames in total). In another recording it took me 43 frames in the first video and 16 frames in the seccond to achieve the same (59 frames in total again).
But in Pinnacle I could easely do this when having 2 screens together, starting both at 0 frames (actual end point and actual starting point) And from there I could decrease or increase frames to get to the "sweet spot".
What is the best way of achieving this in Avisynth? -
Open both clips in a separate Avisynth script.What is the best way of achieving this in Avisynth?
Open both scripts in different instances Avspmod or another viewer.
Look at the frame numbers where the clips should be matched.
Write a third script in which you load both scripts, trim each and append them.users currently on my ignore list: deadrats, Stears555, marcorocchini -
And when I have about 11 clips that are split but belong together? Can I use 11 scrips then at once? To export them to one single video? And I can also remove the timestamp in the same export?
-
You would do the same you did with two clips iteratively and at the end you would end up with one script that trims and appends all the clips, you could also extend that script to either delogo them separately or after they are combined.
users currently on my ignore list: deadrats, Stears555, marcorocchini -
A NLE is better designed for editing IMO, that's it's purpose. When you have many edits (imagine 1000's of edits, some non linear, not in order) - avisynth becomes way more tedious. But 11 clips is rather "easy" and simple editing IMO, easily "doable"
One way as pointed out in avspmod, you can use tabs to check the framenumbers .
Or another way some people use is trim editor in avspmod . So you would combine your clips A+B+C+D... on a single timeline. You can either keep or delete marked selections (include or exclude). By default the home and end key mark in/out selections (you can remap the hotkeys) and they are highlighted in the timeline. It's a basic visual way of editing . So if you use "delete" type editing, it would be like "ripple editing" in a NLE -
I actually completely lost it now...
- I made myself a testfolder. And put 3 cut, but belonging together files here to test it out.
- Made a script file for every clip, using the folowing script:
- And opened all of the 3 scripts in AvsPmod.Code:v = LWLibAvVideoSource("D:\testtt\Pachacamac E.mp4") xEnd = v.Trim(v.FrameCount,-1).loop(60) xStart = v.Trim(0,-1).loop(60) xStart + v + xEnd InpaintDelogo(Loc="4,990,-1380,-4", DynMask=3, DynTune=140, DynColor=$FFB900, DynColorTol=50, Dyn3Seq=52, DynInflate=3) Trim(60, FrameCount - 61)
- This opens the seperate scripts and clips in 3 seperate tabs
From here I don't know what to do.
* The timestamp is gone on playback now, because of the script ofcourse. But the timestamp was actually convenient looking for the maching frame. I used the last frame before jumping to a new seccond, and on the next clip the first frame of that seccond.
* Can I put to playback screens next to each other to find the "sweet spot" of the matching frames?
* Should I first make a script to paste all the belonging video's together, export it to a new (combined clip) and export this clip after again, but this time for deleting the timeline? (which is the easiest I gues).
* Or should I make 1 script that cuts, removes frames, combines the video's and removes the timestamp on 1 single export?
What is this trim editor about? It sounds more convenient then working in seperate tabs?Originally Posted by poisondeathray
Edit:
I think I should first combine and prepare the clips and eport the to one single clip, before removing the timestamp.
But then I should need another script then the one I've tried above. This way I would also not have the timestamp removed and will be able to match the clips on the changing seccond frames.
Edit 2:
I was also looking for a lossless export option in Pinnacle Studio.
It should be the easiest way for me so far I guess, since I've already prepared the video's here for export and Avisynth is still a bit of hocus-pocus for me at the moment.
[Attachment 65291 - Click to enlarge]
So the lossless degrading should be in the used export codec?
When I select "same as timeline" it automatically selects H264 (left printscreen). It also automatically selects 20MBit/s on the Peak Bitrate slider here. When I increase this, also file size increases. But I don't know if it's keeping the orriginal recordings intact then. When I select all the orrigiginal clips the size together is almost the same then (1.36GB from the orriginal files to 1,48GB on the export screen with peak bitrate set to 20MBit/s).
On the right printscreen, there are shown the other export options I have. Annyone anny idea which I could use best for (close) lossless export?
btw. the 59,94fs is the highest framerate in my HD timeline settings. I only have the options of 1920x1080 50P and 60P/ 60I here, which on 60P gives me 59,94fps.Last edited by Rockel83; 9th Jun 2022 at 14:42.
-
First just try to join few clips, script example there, encode them, look if everything is ok.
EDIT:
Just tested, all looks OK [wasn't sure about the script as I never edit audio with AvS].
EDIT2:
All job you'll do in one script[tab], use other tabs just to preview some video files to get frame numbers where to cut or what frame to fix.
First make a script to join all clips with edits, then on very end we add delogo filter.
[Later, when you successfully joined edits, I'll write an example with delogo]Last edited by VoodooFX; 9th Jun 2022 at 16:52. Reason: fixed link to example

 Quote
Quote
Similar Threads
-
Keeping timestamp of edited / converted Video
By keyboard in forum Newbie / General discussionsReplies: 5Last Post: 30th Apr 2024, 00:10 -
Difference between lossless and lossy changing fps (timestamp vs encoding)
By precipizio in forum Blu-ray RippingReplies: 4Last Post: 23rd Feb 2022, 09:24 -
ffmpeg "Missing key frame while searching for timestamp" message
By the_steve_randolph in forum Newbie / General discussionsReplies: 0Last Post: 19th Aug 2021, 14:38 -
How to fix a timestamp overlap?
By WoundedPear in forum Newbie / General discussionsReplies: 2Last Post: 2nd May 2020, 03:00 -
Polaroid CUBE timestamp flaw?
By terrypin in forum Newbie / General discussionsReplies: 6Last Post: 9th Jun 2017, 16:17