


Long time lurker, first time poster.
Basically looking for some advice or guidance on how a look was achieved for an anime remaster I've seen online, apparently using AviSynth / VapourSynth.
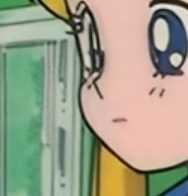
Essentially, this is what the source material looks like:
https://www.reddit.com/r/sailormoon/comments/o8u2y8/most_dont_realize_that_dynit_italy...did_their_own/
This is the filtered look that I am trying to replicate.
https://www.reddit.com/r/sailormoon/comments/qvp4wy/heres_a_clip_of_ep_5_of_the_dic_dub_hd_edit_ive/
https://www.reddit.com/r/sailormoon/comments/qr3npd/thought_id_give_an_update_on_how_the_dic_dub_hd/
https://www.reddit.com/r/sailormoon/comments/qvr88o/just_for_fun_i_did_a_little_clover...y_dub_hd_edit/
I've spent the last few days experimenting with various AS/VS filters, and still can't come close. There are already a few threads on Sailor Moon on here with different suggested filters, but this is the first I've been genuinely impressed with - even if it looks a little over-done in places.
Obviously there's some fairly extreme colour correction going on, but the upscaling of the footage itself just looks so...clean and sharp, without wiping away any details. I can see from downloading the footage and looking at frame-by-frame, there's obviously been a line darkner applied over the source material. But no matter what upscaling or resizing filters I try (nnedi3, waifu2x, anime4kcpp, AWarpSharp, Hysteria, LSFmod, various temporal and spatial filters etc), in any order, it never looks close to this.
Trawling (stalking) through the user's comments, they mention using AviSynth and VapourSynth to do the remastering - but haven't given any details when asked specifically how. Hence the challenge to reverse engineer it! I'm not necessarily looking to apply the same processing to Sailor Moon itself, but would love to know to achieve this sort of upscale and cleanup to try on other series.
Happy to provide a raw clip from the DVD if it helps - I own a physical copy of the box-set. Just wanted to see if anything jumped out to someone here from looking at the filtered footage first.
+ Reply to Thread
Results 1 to 26 of 26
-
-
VSGAN with BSRGAN model, vsDPIR and may be RealESRGAN could probably all be used (there are probably others).
(I'surprised Waifu2x doesn't work, I would have suspected that it should work.)
If you share a short (not reencoded, just remuxed) sample of your source there are probably a few ways that work.users currently on my ignore list: deadrats, Stears555, marcorocchini -
This definitely does look like an AI upscale of some kind. Probably some pre- or post-processing, but it had that ESRGAN look to it.
-
That salior moon source looks pretty nice, and it hasn't even been resotred. You can always do some noise reduction and colour correcting to make it look better. Also, the look you are trying to achieve isn't the best as there is quite a lot of haloing present in most of the scenes.
Can you upload the video source you are working with onto videohelp -
Similar look?
[Attachment 61906 - Click to enlarge] -
Thanks guys. Clip from the DVD here:
https://mega.nz/file/BThAQZwL#3DyXWS-sHROjNPugaaj5Gx7CxLyt-nGwCMj4_VyNCMk
This is straight from the DVD, minus the audio tracks.
I tried playing around with a few different ESRGAN models via Cupscale, but again couldn't find any that came close to this. Any suggested go-to models? Downloading the demo of Topaz, it does look close to this, so I suspect that's what they might have used.
Agreed - it's a little too over-sharpened to the point that it needs to be de-halo'd. I'm just trying to get an idea of how I can get to something like this as a starting point.Originally Posted by s-mp
-
Similar but not quite. I followed some of your previous suggestions in other threads - it was good advice.Originally Posted by jagabo
It's the clean line-work that I'm trying to replicate. Every combo of AS/VS resizing and sharpening filters I've tried blows away the neat, dark lines. -
Something like ESRGAN "digital frames" series models ?
v2.1
[Attachment 61915 - Click to enlarge] -
That looks pretty close!! Do you have a link? I can’t see it on the usual wiki page of ESRGAN models.
-
They used to be on there...
The DigitalFrames series is trained by NKMD
https://nmkd.de/shared/ESRGAN/Models/Art/4x_DigitalFrames_2.1_Final.pth -
Here are a few examples using Vapoursynth:
(note that additional sharening, denoising, line darkening is still possible)
resized to 1920x1280:
using stepped resize using NNEDI3 + aWarpSharp:
Code:# Step 1: current: 720x480, target: 1328x880 # resizing using NNEDI3CL clip = edi_rpow2.nnedi3cl_rpow2(clip=clip, rfactor=2) # 1440x960 # sharpening using AWarpSharp2 clip = core.warp.AWarpSharp2(clip=clip, depth=5) # Step 2: current: 1440x960, target: 1920x1280 # resizing using NNEDI3CL clip = edi_rpow2.nnedi3cl_rpow2(clip=clip, rfactor=2) # 2880x1920 # adjusting resizing clip = core.fmtc.resample(clip=clip, w=1920, h=1280, kernel="lanczos", interlaced=False, interlacedd=False)

using Waifu2x:
Code:# resizing using Waifu2x clip = core.w2xc.Waifu2x(clip=clip, scale=4, noise=3) # 2880x1920 # adjusting resizing clip = core.fmtc.resample(clip=clip, w=1920, h=1280, kernel="lanczos", interlaced=False, interlacedd=False)

using Anime4KCPP:
Code:clip = core.std.AddBorders(clip=clip, left=0, right=16, top=0, bottom=0) # add borders to archive mod 32 (vsAnime4KCPP) - 736x480 # adjusting color space from YUV420P8 to YUV444P8 for vsAnime4KCPP clip = core.resize.Bicubic(clip=clip, format=vs.YUV444P8, range_s="limited") # resizing using Anime4KCPP # Zoomfactor: 3 clip = core.anime4kcpp.Anime4KCPP(src=clip, zoomFactor=3, ACNet=1, GPUMode=1, HDN=1, HDNLevel=3) # 2208x1440 clip = core.std.CropRel(clip=clip, left=0, right=48, top=0, bottom=0) # removing borders (vsAnime4KCPP) - 2160x1440 # adjusting resizing clip = core.fmtc.resample(clip=clip, w=1920, h=1280, kernel="lanczos", interlaced=False, interlacedd=False)

using SRMD:
Code:# adjusting color space from YUV420P8 to RGBS for vsSRMD clip = core.resize.Bicubic(clip=clip, format=vs.RGBS, matrix_in_s="470bg", range_s="limited") # resizing using srmd # Zoomfactor: 3 clip = core.srmdnv.SRMD(clip=clip, scale=3, noise=5, tta=True) # 2160x1440 # adjusting resizing clip = core.fmtc.resample(clip=clip, w=1920, h=1280, kernel="lanczos", interlaced=False, interlacedd=False)

using RealSR:
Code:# resizing using RealSR # target zoom factor: 3 adjusted to 4 clip = core.rsnv.RealSR(clip=clip, scale=4, tta=True) # 2880x1920 # adjusting resizing clip = core.fmtc.resample(clip=clip, w=1920, h=1280, kernel="lanczos", interlaced=False, interlacedd=False)

using VSGAN with BSRGAN:
using VSGAN + DigiFrames mentioned by poisendeathray:Code:# resizing using VSGAN vsgan = VSGAN("cuda") model = "I:/Hybrid/64bit/vsgan_models/4x_BSRGAN.pth" vsgan.load_model(model) clip = vsgan.run(clip=clip) # 2880x1920 # adjusting resizing clip = core.fmtc.resample(clip=clip, w=1920, h=1280, kernel="lanczos", interlaced=False, interlacedd=False)
Code:from vsgan import VSGAN # adjusting color space from YUV420P8 to RGB24 for vsVSGAN clip = core.resize.Bicubic(clip=clip, format=vs.RGB24, matrix_in_s="470bg", range_s="limited") # resizing using VSGAN vsgan = VSGAN("cuda") model = "I:/Hybrid/64bit/vsgan_models/4x_DigitalFrames_2.1_Final.pth" vsgan.load_model(model) clip = vsgan.run(clip=clip) # 2880x1920 # adjusting resizing clip = core.fmtc.resample(clip=clip, w=1920, h=1280, kernel="lanczos", interlaced=False, interlacedd=False)
using RealESRGAN:
Code:# resizing using RealESRGAN clip = RealESRGAN(clip=clip, scale=4, anime=True, device_type="cuda", device_index=0, fp16=True) # 2880x1920 # adjusting resizing clip = core.fmtc.resample(clip=clip, w=1920, h=1280, kernel="lanczos", interlaced=False, interlacedd=False)

Nor resized just DPIR:
Code:from vsdpir import DPIR # adjusting color space from YUV420P8 to RGBS for vsDPIRDenoise clip = core.resize.Bicubic(clip=clip, format=vs.RGBS, matrix_in_s="470bg", range_s="limited") # denoising using DPIRDenoise clip = DPIR(clip=clip, strength=5.000, device_index=0)

Cu Selur
Ps.: I would also use something like DeSpot() or similar to get rid of the scratch&noise.Last edited by Selur; 20th Nov 2021 at 04:18.
users currently on my ignore list: deadrats, Stears555, marcorocchini -
Why the Spline16? Why not nnedi3_rpow2 (last example)
Last edited by rrats; 20th Nov 2021 at 04:10.
-
Spline16 is the default resize adjuster in Hybrid, any other fmtconv resizer could be used and the target was 1920x... which isn't evenly dividable by 720. So resize adjustments need to be made.Why the Spline16?
What's wrong with edi_rpow2.nnedi3cl_rpow2 from https://github.com/Selur/VapoursynthScriptsInHybrid/blob/master/edi_rpow2.py which uses the gpu?Why not nnedi3_rpow2?users currently on my ignore list: deadrats, Stears555, marcorocchini -
Sorry, I've updated my comment
-
Ahh, okay, didn't want to add the resize, forgot I had resizing turned on.

-> updated screenshot&codeusers currently on my ignore list: deadrats, Stears555, marcorocchini -
Toei uses their own remastering process called "FORS Master Process" for all their HD remaster(upscale) releases. For the most part it looks decent, no grains, clean lines. But you would know that it's an upscale just by looking at it because the images are still blurry.
If you're to remaster Sailor Moon yourself, it would be better to use AI upscale, like with Selur's comparison. The choice of which one to use still requires more testing, but that should be the right path to go. The bigger challenge though, is to color correct the show, which itself is a whole new territory and takes a lot of time and researches.
There are basically two approaches of color correction now, the first one is the old way of like white balance + RGB curve correction. The newer or more ideal way is to color match the frame to a reference, such as the original cel, this will gives you the most accurate and consistent color. -
That first sample on reddit looks horribly warpsharpened. Like, really really bad, sorry.
The other two are not as bad but still.
I like Selur's first example best (stepped resize using NNEDI3 + aWarpSharp) because it doesn't look fake, just slightly enhanced. -
My attempt. It may not look very sharp, but it's close to original
-
This is fantastic - thank you for the comparison!!Originally Posted by Selur
-
Looks great - how did you achieve these results?Originally Posted by s-mp
-
DigitalFrames is a particular ESRGAN model.Originally Posted by s-mp
-
2x_LD-Anime_Skr_v1.0 and some colour correction in resolveOriginally Posted by lonelysenshi
-
I can't seem to find it anywhere, can you link it to meOriginally Posted by SaurusX
-
a few posts before,.. -> https://forum.videohelp.com/threads/403809-Anime-re-mastering-how-to-achieve-a-particu...ok#post2637756I can't seem to find it anywhere, can you link it to meusers currently on my ignore list: deadrats, Stears555, marcorocchini
-
Thank you Selue, I have totally missed that post
 Quote
Quote
Similar Threads
-
Mastering VHS Video
By SF01 in forum Newbie / General discussionsReplies: 64Last Post: 7th Dec 2023, 12:54 -
How to achieve this?
By joeltheyap in forum Newbie / General discussionsReplies: 1Last Post: 16th Jan 2020, 00:30 -
Free Mastering
By smartel in forum AudioReplies: 0Last Post: 21st Apr 2019, 07:59 -
How do I achieve the cinematic look for videos?
By hello0 in forum Newbie / General discussionsReplies: 18Last Post: 12th Nov 2018, 20:09 -
How can I achieve this smooth transition?????????
By brandon_768 in forum EditingReplies: 6Last Post: 21st Nov 2016, 17:52