


I know others have posted their procedures, BUT they do not work on all machines Sony or Not.
My Version of making those JACKET_P pictures WITHOUT the high priced authoring programs.
Tools used: TMPGEnc 3.0 Xpress
HexEdit Ver. 1.2
There are about as many approaches to making Jacket pictures for DVD’s JACKET_P folder as there are grains of sand in the Sahara. Unfortunately most don’t work except for special cases and there doesn’t seem to be any repeatability. That is, unless you are willing to shell out multi-bucks for Scenarist or similar high end software. Even owners of those editors seem to have trouble coming up with the right approach.
I have a Sony CX875P 300 disk changer which uses these pictures in it’s index of CD’s and DVD’s. While the changer controls do allow one to add a still from the running DVD to this index, I’ve found the same image applied thru the JACKET_P folder gives a much sharper and clearer image.
Anyone who has been through this routine knows there are 3 images of 3 differing sizes in the folder. And these vary slightly between PAL and NTSC format. This information is posted in several hundred forums on the net, so I won’t repeat it. At first, I thought the CX875P was using the “Medium” size picture, BUT by trying the three different size images from three different commercial DVD’s, I discovered my changer actually uses the “Small” image. This is 96 x 64 pixels in NTSC format.
I set about trying to decipher what was strange about these images. Inserting them in different editors and/or analysis programs led to confusing variations in the supposed structure.
Several things, however, seemed to be fairly static.
All had:
MPEG 2 Video streams only, with no sound track
Only a single Frame, (one editor reported 6 frames in the largest image (720x480))
Bitrates varied from 4587.2kbps to 9800kbps (don’t think this is critical so I always use 8000)
VBR with max and min at the same rate as above.
Non-interlaced
Profile Level = MP@ML
DC component precision of 10 bits
No apparent GOP, but be sure GOP header is present. (checkbox in GOP tab)
I tried different versions of TMPGEnc but 3.0 Xpress seemed to be the easiest to work with.
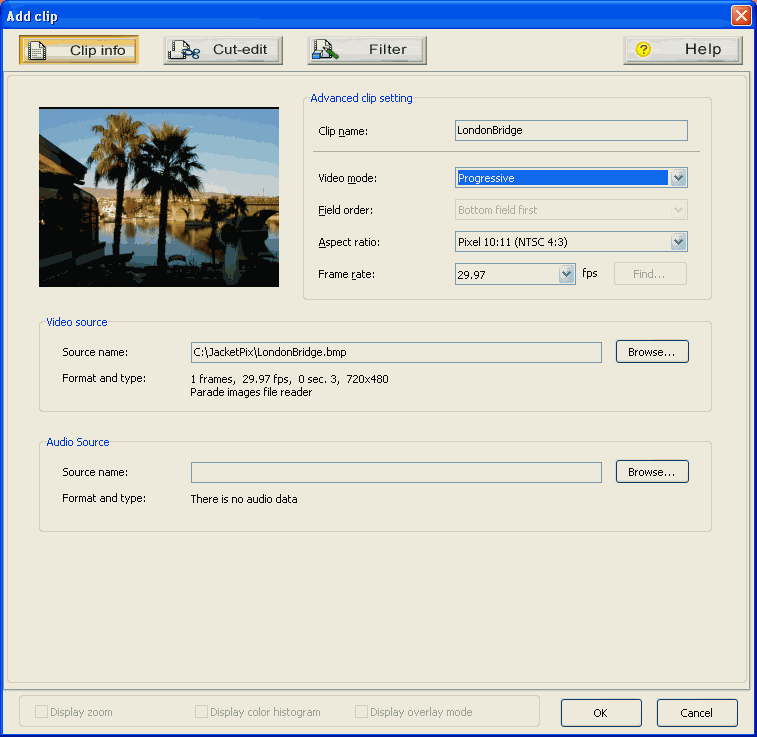
So using TMPGEnc 3.0 I created the three required files from a BMP image, by setting each of the above specs, as follows:
Stream Type = System, Video Only
Settings as indicated below
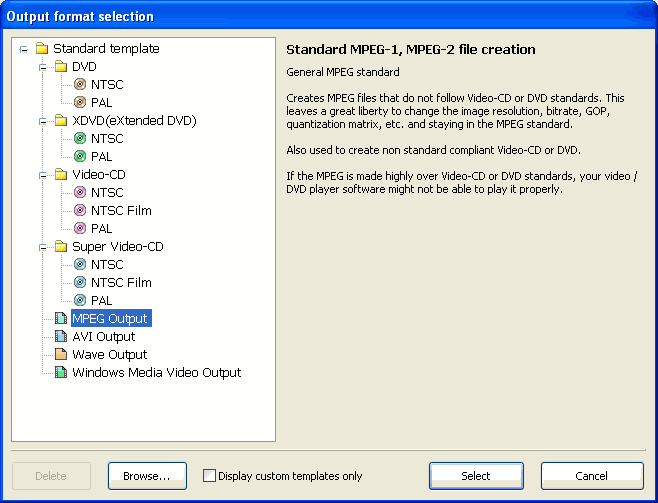
Then Click OK and select MPEG in the following dialog box.
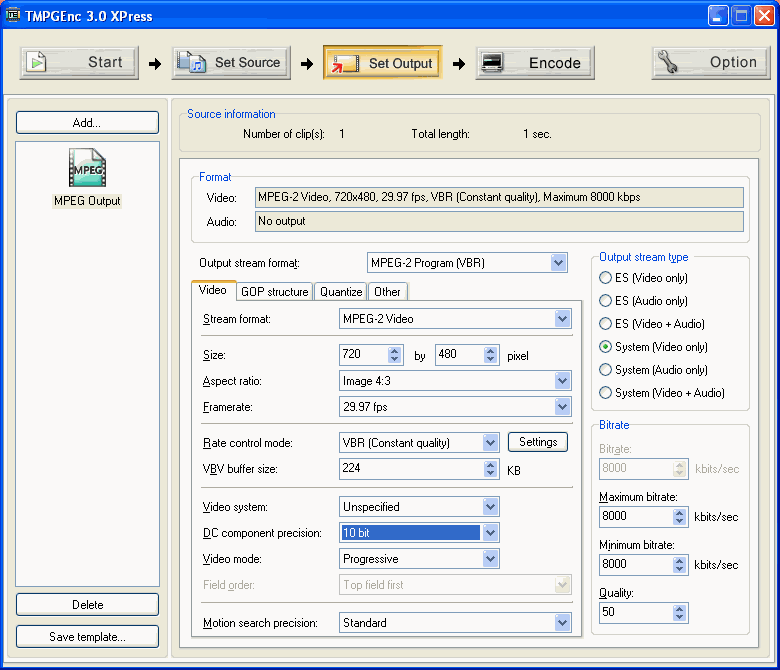
Then make all settings as follows. This is where you will change the output size for each of the three different images
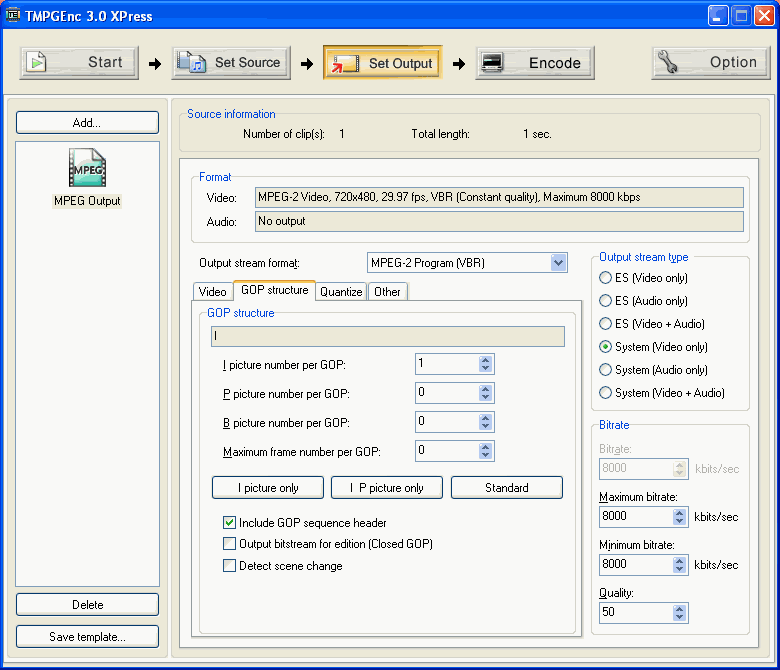
Then select the GOP tab and choose the I Picture Only button, and be sure the Include GOP sequence header box is checked.
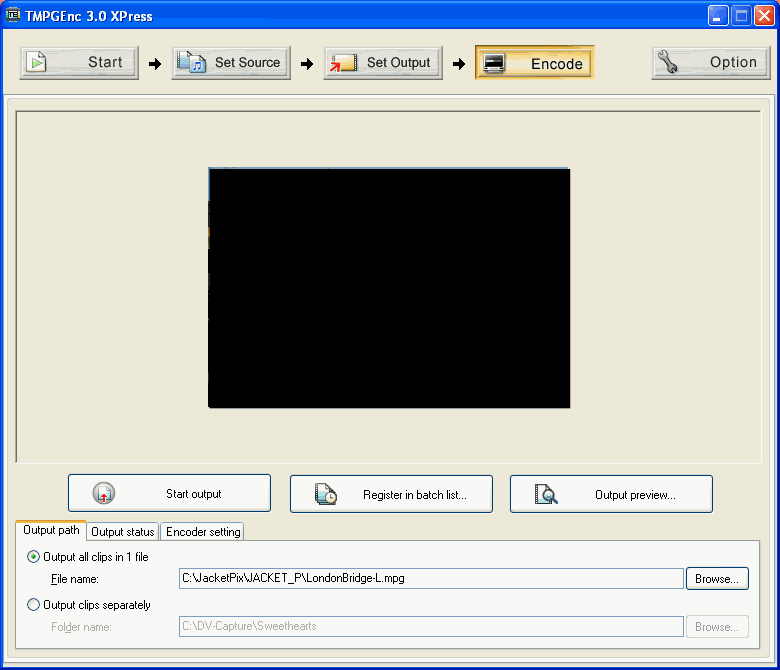
Set the output file name for each different picture here. The name at this point is unimportant, because you MUST change it to agree with the JACKET_P folder names when you are ready to burn your DVD.
Now all that is left is to Click the Start button and make each size picture, by changing the sizes where indicated above.
Then change the filename to:
J00___5L.MP2 for the 720 x 480 picture
J00___5M.MP2 for the 176 x 112 picture
J00___5S.MP2 for the 96 x 64 picture
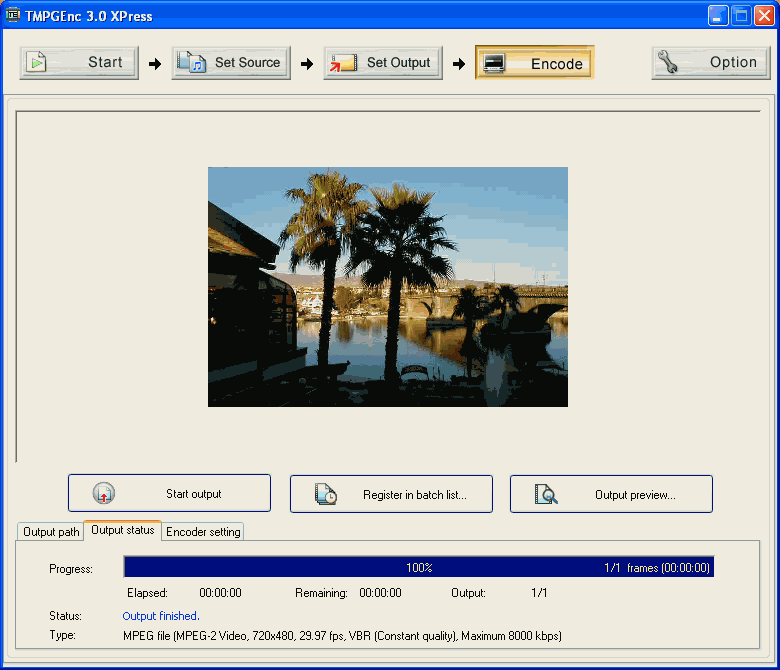
This is what you see after clicking on the Start Output
And then get ready to insert them into your JACKET_P folder along with the VIDEO_TS folder on your DVD.
PAL format requires similar changes.
NOTE: Nero 6 almost has the ability to produce these images, but is incapable of setting the small size, which was most important for me. It cannot go below 128 pixels in width.
However I needed Nero 6 to be able to produce the DVD’s with the added JACKET_P folder which other programs don’t allow.
HOLD EVERYTHING GUYS!!!
You are not quite finished yet. This is where the major differences appear. These images will not show, at least not on my CX875P quite yet.
An examination of the images using HexEdit revealed a substantial difference between the images created above and images found on commercial DVDs.
BUT, the differences are mostly cosmetic, and can be fixed rather easily. If you open any one of your images in HexEdit you will see there is a large header of 800h to 900h bytes that is mostly hex FF (255 for non hex addicts). Comparison to a commercial jacket picture reveals no such header, so do the following:
Your new file should start with what you see above.
You will find that the two paragraphs shown above at 800h and 810h are identical to the first two paragraphs of a commercial jacket picture, which appear at 000h and 010h. Further, removing this “junk” doesn’t affect the ability to “play” this image on any player.
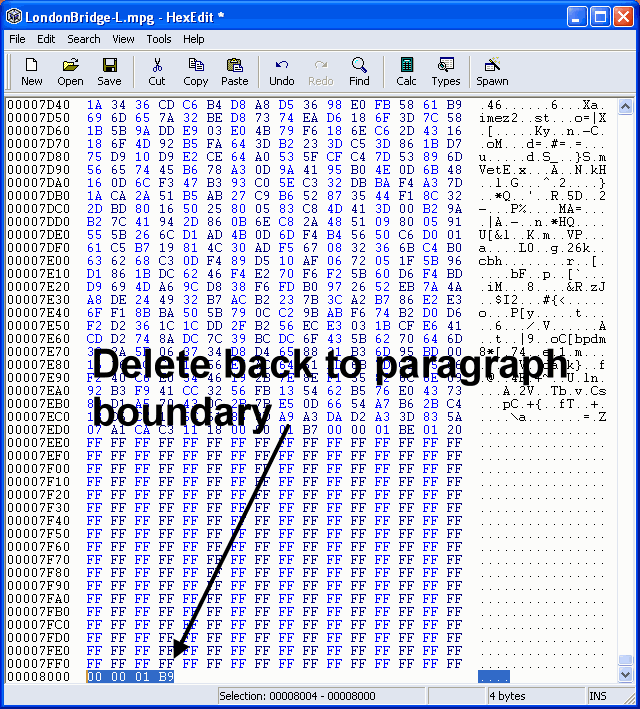
One thing more that we discovered. In the past we have done a lot of assembly language programming so have kind of a second sight related to hex files. ALL the commercial jacket images, without exception, always ended on a paragraph boundary.
TMPGEnc and other programs, for some reason, add all kinds of space after the end of the graphics, which isn’t necessary, for this purpose.
We find the paragraph boundary closest to the end of the graphics, where the ending hex offset is xxxFF and delete everything after that point as below.
Make these changes to all three of your Jacket Pictures and you only need burn your DVD and look for the images to appear on your Sony.
Since I only have the CX875P (couldn’t afford any more after this one) I don’t know if this “new” Jacket Picture version will work with other Sony players. But all I have made this way work great, and are much smaller in size than the commercial versions.
If this proves to be a good approach, maybe the Authors of TMPGEnc could work this into their nice DVD author program.
I don’t know why this approach works, I only know it does, at least for my changer, where all the other “systems” I’ve tried didn’t.
I would be interested in hearing any success stories. Failures are a way of life.......
+ Reply to Thread
Results 1 to 15 of 15
-
-
ok i liked your instructions. i finally was able to make jacket_p folders.
i used your instructions but i did not do the hex edit edit.
only tmpg express.
so far no problems out of 10 dvds . i have the sony dvp-cx985v(400 disc)
again thank you
there is also an app called TitleWriter1.5 Text
http://forum.digital-digest.com/showthread.php?s=0b7540ddbaaf68e4cc3567afd2c9d195&threadid=34895
it lets u do dvd text for players like mine. and sometimes u just want text not jacket_p. its much faster.
again thank you
crazydrve -
crazydrive
Thanks for the information. I know about Titlewriter and use it all the time. I'm surprised you don't have to use the Hex Edit. If I forget to do it, my Sony 875 (the 300 disk) won't recognize the pictures.
I always make a DVD-RW or DVD+RW disk first to test my burn, then if it looks good, copy it to a DVD-R disk. Have made around 200 disks so far.

-
maybe the newer version of sony mega dvd 400 disc player. doesnt need it.
the only thing i dont like is it wont load automatically.
i have to press load on the dvd player. no big deal.
thanks again.
crazydrve -
crazydrve,
Maybe if you try doing the Hex Edit part, you may not have to press the load button. Mine always come up without any action from me, and the pictures will not show unless I remove the "junk" with hex edit. All that stuff that is deleted is nothing but blank space in the file and just makes the files larger than they need to be. You also will not find that blank space on a commercial version of any similar picture file.
I'm sure there is different firmware in your machine. These pictures work in any Sony player I have. When I press the Stop button, the large picture will display on the screen, even though there may not be an Index like the changers have.

-
everything works fine once i load it. but even on my originals i have to press load.
its no big deal.
but it would be nice to have it load automatically
thanks
crazydrve -
btw the large picture does dislplay when i press stop.
-
Noticed that you are using Titlewriter 1.53 - you might want to upgrade to newest ver. 1.71. There are a considerable number of bugfixes involved especially if you are playing with dvd after titlewriter.
Titlewriter Files are Located At:
http://www.dvdshrink.info/titlewriter/
Playing with adding jacket_p to titlewriter -- hitting compatability probs across multiple changers (haven't given up yet), can't seem to find a method that works on majority of players.
FAllenAngel -
actually i just put that down to let others know.
i am using 1.71
thanks for the info.
and i hope u can get jacket p working ... that would be awesome
also is the text supposed to load automaitically becuase on my dvd
sony dv985 (400 disc model) i have to press load which is no big deal
thanks again. -
FallenAngel
Good luck on including the Picture_P folder. I struggled with it for over 2 months before I was able to get it to work on my one changer.
I did notice a large variation in the file structure of commercial made pictures but didn't see any common ground other than what I put into the instructions. One editor reported that the large picture had between 4 and 6 frames depending on the DVD, and if you increase the number of frames in just that one picture, the physical size of the file will be about what large commercial pictures are. But my changer works fine with the smaller size large picture.
I also noticed that different commercial pictures had different I frame layouts in the file header, and some didn't show any I frame layout at all???
Be glad to offer any help possible. I would like to do it, also, but have too many other hot programming projects going to switch gears.
8) -
when u edit with hexedit to delete all the lines with FF in it.
i am not sure what your mean by edit it. -
crazydrve,
This is a little hard to explain easily. The word ‘edit’ means to change, and in this case the change is to remove or delete the first part of the file. And I mean ALL bytes from the very first byte to the last FF just before the part where you see the ‘encoded by TMPGe…etc’. Not just the FF’s.
To do this with hex edit you first put your cursor at the very first byte of the file, then you must select all these bytes by holding down the shift key and using the Arrow or Cursor keys, run across the row, then down the column until they are all colored blue (or whatever color you may have changed your system to). Then you simply hit the Del key on the keyboard. If you just opened HexEdit, you must hit the “Insert” key to put HexEdit into “Edit” mode so you can delete what you selected, otherwise nothing will happen when you hit the Del key.
Then hit Ctrl + S to save the file. Ctrl + End to jump to the end of the file, and using the Shift key and arrow keys select the last 4 bytes, hit Del to get rid of them, then do the Ctrl + S again to save the file.
You are now finished with this picture, and do the same with the other two pictures.
All files have a “header” which is the first 100 hex (256 decimal) bytes. This contains information about the file, like the type of file, the size of the file, passwords or encryption keys to unlock the file and any other special information.
For some reason the files created by TMPGe actually have two headers, the normal one at the very beginning and a second header 800 hex bytes later, just before the actual picture graphics.
Commercial pictures in the JACKET_P folder do not have the first 800 bytes, so it stands to reason to remove these.
Hope this helps, if not I’ll try again.
Are you doing this with PAL or NTSC pictures? I haven’t looked at PAL pictures to see if they are different than the NTSC ones.
8) -
Anyone know if any software dvd players support showing of Jacket_P folder or DVD-Text? I tried WinDVD and Media Player, but they just say Unknown DVD and Unknown Artist. They don't even list the chapter titles that I entered. They just say Chapter 1, etc...
-
Only Ifoedits player for dvd_text. Shows all under info button and volume name under dvd_text.
-
Thanks for this tutorial. Helped alot.
I have to add a couple things from my experience. If you own a Sony DVP-CX995V 400 disc changer, it has to be burned on +R/+RW media or the Jacket Pictures WILL NOT WORK. It almost drove me crazy figuring that out.
Otherwise, I make my files either manually like above but with TMPEGENC 2.5+, or with DVD-LAB Pro 2 (PRO-EXT). Pro Extentions actually uses TMPEGENC for you to encode the MP2 files. Then I do the hex edits just like above with 'xvi32 hex editor'.
Then I use FallenAngel's wonderful DVD-TEXT tool (thank you), and my DVDs all have good labeling now, whether it looses memory or not which I haven't had happen anyway.
That's what works for me and I thought I'd share that for other coaster makers out there.

 Quote
QuoteSimilar Threads
-
Upgrading my system: Best approach?
By lamerc in forum ComputerReplies: 20Last Post: 17th May 2011, 05:52 -
2000 DV's Capturing Per Year - Best Approach Help
By ilw in forum Capturing and VCRReplies: 2Last Post: 29th Dec 2010, 14:13 -
Mp4 demuxing: Graphedit Approach
By Krelmaneck in forum Video ConversionReplies: 6Last Post: 28th Aug 2010, 04:44 -
Best Quality approach for xfer of home video
By ironman. in forum Newbie / General discussionsReplies: 1Last Post: 13th Feb 2010, 12:45 -
vhs avi to dvd, what is the best approach
By bati in forum Video ConversionReplies: 6Last Post: 11th Nov 2007, 23:37