This guide describes the creation of an image CD according VCD 2.0 with high resolution pictures and sound comments by using TMPGEnc and VCDEasy. The description is a kind of combination of the guide from Baldrick describing the generation of still picture VCD with VCDEasy and the guide from Mikk describing the inclusion of background music on a still picture VCD.
I will give some tricks to make the generation of such a CD a little bit easier.
A Restriction
1 There are DVD-Players on the market not be able to play such kind of CDs correct:
- Mikk mentioned that Pioneer DV-444S is not capable to play such VCDs.
- I recognized that Mustek DVD-V 562 plays the sound not correct. This device erases the screen during playing the sound and stops after five seconds.
But my Cyberhome DVD CH 505 plays this VCD correct.
2 It is not recommended to play continuous background music for several pictures. The sound will be always interrupted for a short time when a new photo is loaded.
B Start situation
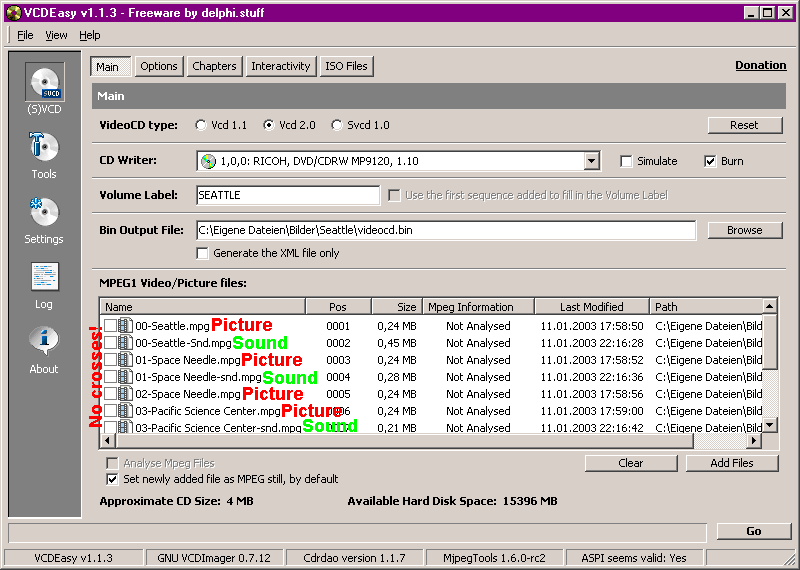
You have prepared several picture files with a corresponding audio file containing the sound comment of the picture. I recommend to name these files in such a way that the alphabetic order of the file names corresponds with the sequence order of your planned slide show. At this sequence the audio file has to follow directly the corresponding picture file. I recommend to define the file names with a starting two or three digit number.
Additionally TMPGEnc and VCDEasy are downloaded and installed.
C Converting sound comments
In the first step the audio files have to be converted into system audio stream files according MPEG1 Audio-Layer II:
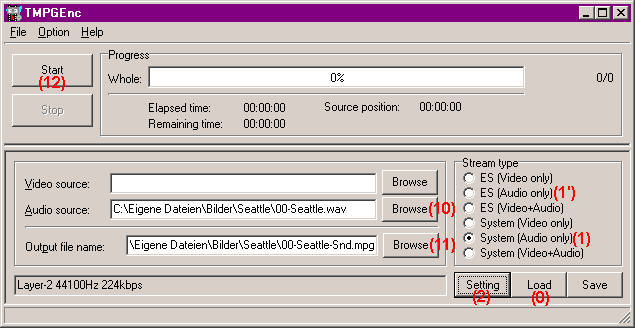
1 Open TMPEGEnc and select Stream type 'System (Audio only)'.
If you have a newer version of TMPGEnc (2.57 or higher) then this mode is unfortunately not more offered. At this case I can provide a MPEG setting template that activates this option again after loading (0)(works at least for TMPGEnc 2.59).
Alternatively you can also solve this problem with a work-around by generating first an elementary audio stream that will be converted afterwards into a system audio stream. Therefore you have to select first the stream type 'ES (Audio only)' instead 1'.
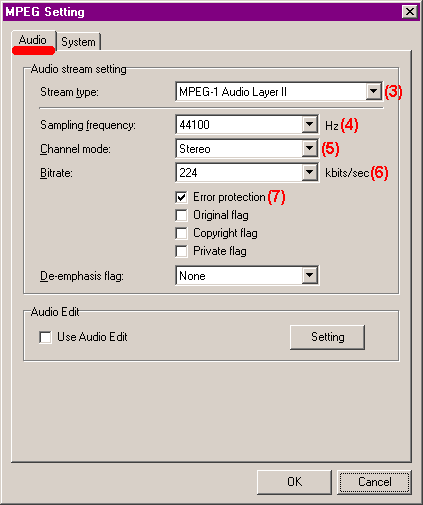
2 Before converting the first picture you should verify your setting.
3 Choose in 'Audio' tab the stream type 'MPEG-1 Audio Layer II' and the sampling frequency 44100 Hz (4).
5/6 As Mikk already described choose either mono with 64, 128 or 192 Kbit/s or one of the other channel modes with 128, 192, 224 or 384 Kbit/s. Other formats will be not supported during the VCD generation.
7 For compatibility reason check also 'Error protection'.
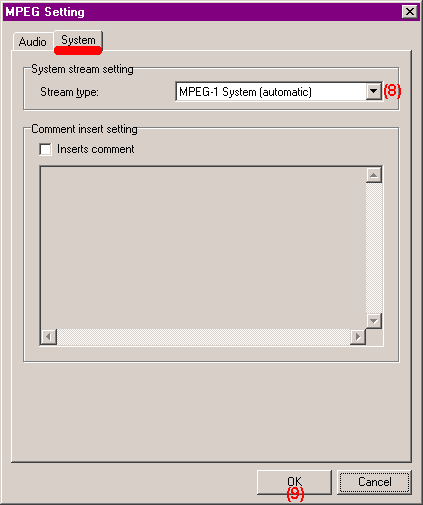
8 In system tab choose the stream type 'MPEG-1 System (automatic)'. If you are using the above mentioned work-around then this tab is not offered and you have to make this adjustment later 8').
9 Confirm your setting by pressing 'OK'.
10 Back in the main window of TMPEGEnc select in 'Audio source' your sound file.
11 Further you can define in 'Output file name' the location and name of your MPEG stream file. The standard extension of this file is mpg. If you use the work-around the file extension is mp2.
12 Now press the 'Start' button and your sound file will be converted.
Repeat now step 10 to 12 for all of our sound comment files.
If you used the work-around you have now to convert the obtained mp2 files into a mpg file:
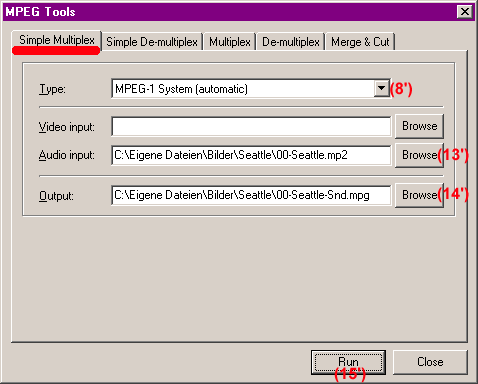
Select in the 'File'- menu 'MPEG-Tools...' to convert all the elementary audio streams (*.mp2) into system audio streams.
8' Choose in 'Simple Multiplex' tab the Type 'MPEG-1 System (automatic)'.
13' In 'Audio input' select your elementary stream file (*.mp2)
14' In 'Output' you can choose the location and name of system stream file. The standard file extension is .mpg.
15' Press the 'Run' button for the file conversion
Now you have to repeat step 13' to 15' for all mp2-files.
The mp2 files created during the work-around are now no more needed.
D Converting pictures
Due to the fact that this conversion is already described several times I will show this step not very detailed:
1 Open VCDEasy and select on the 'Tools'-side the 'MPEG Stills' tab. There you choose 'VCD 2.0' as MPEG Still type.
2 Select your TV System (NTSC in Japan and US, PAL in the most other countries)
3 Select high resolution to obtain the maximum possible resolution on your TV.
4 Typically you should select the Aspect Ratio Correction of 4:3 if your sources are pictures from a digital camera or PC with an aspect ratio of 4:3
5 Choose the TV cropping value dependent on your TV. To determine the optimum value I added a test picture what you should convert with aspect ratio correction 4:3 and 0% cropping. Then you can test on your TV which frame you can see and select the according cropping value. The picture helps you also to improve the adjustment of your TV (e.g. contrast). Especially if the horizontal lines are flashing on your TV you should verify if you are using a RGB connection and digital scan on your TV (if available).
6 I recommend the maximum MPEG Size (Quality). Normally you have enough space on your CD even for a big slide show.
7 Select now your picture files or the directory with these files.
8 Press the 'Generate' button to convert your image files.
E Author the VideoCD
After all necessary mpeg-files are generated you can start to author the VideoCD.
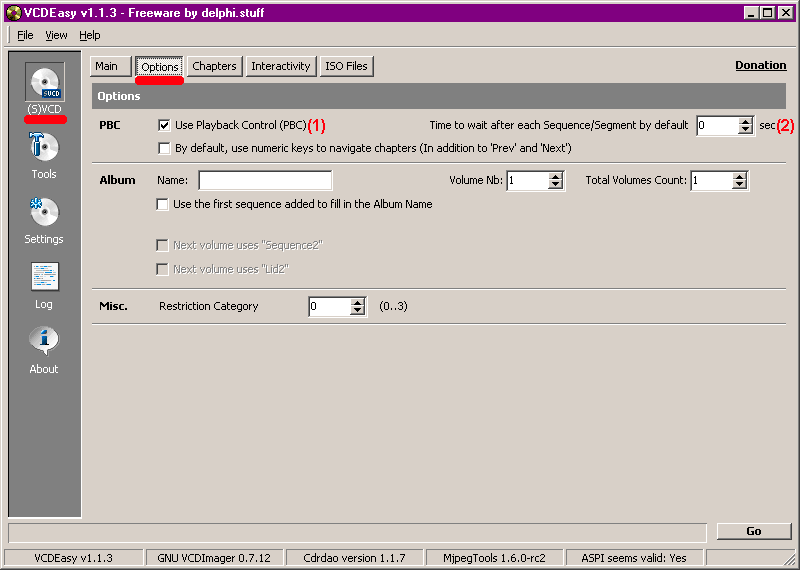
1 Select on the '(S)VCD'-side of VCDEasy the 'Option' tab. There enable the 'Use Playback Control (PCB)' option.
2 Choose a default waiting time for each picture and sound comment. If you do not want additional pauses I recommend to erase this value. You can change the waiting time later individually for each picture.
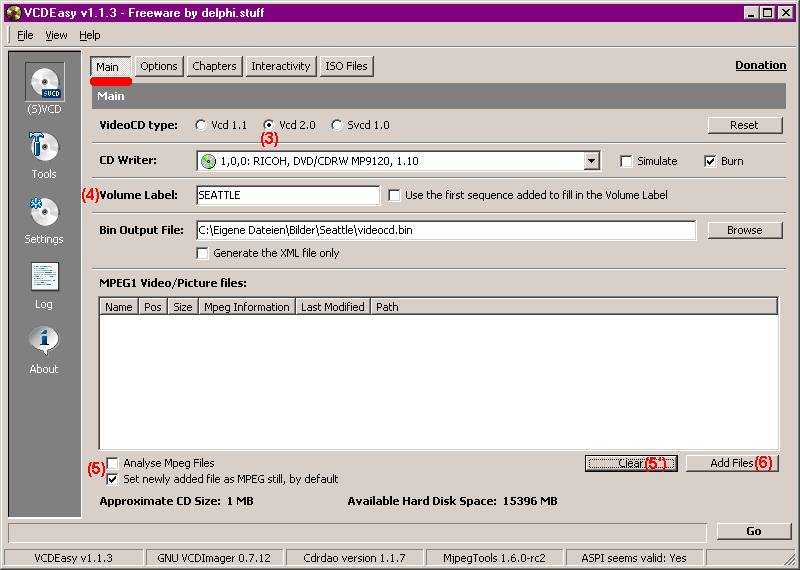
3 Select in 'Main' tab the Video CD type 'Vcd 2.0'.
4 Choose the volume name of your new CD.
5 Disable 'Analyse MPEG files' and enable 'Set newly added files as MPEG stills as default'. This is the main key to force VCDEasy to integrate system audio streams on the VideoCD. If you cannot make these two selections then you should clear the Video/Picture file list above by pressing the 'Clear' button 5').
6 Add now the MPEG-files you have created before.
Verify that inside of the MPEG Video/Picture list every sound comment file follows the corresponding picture file. Further you should check that all of these files are defined as a segment indicated by an empty square at the start of each line in the list.
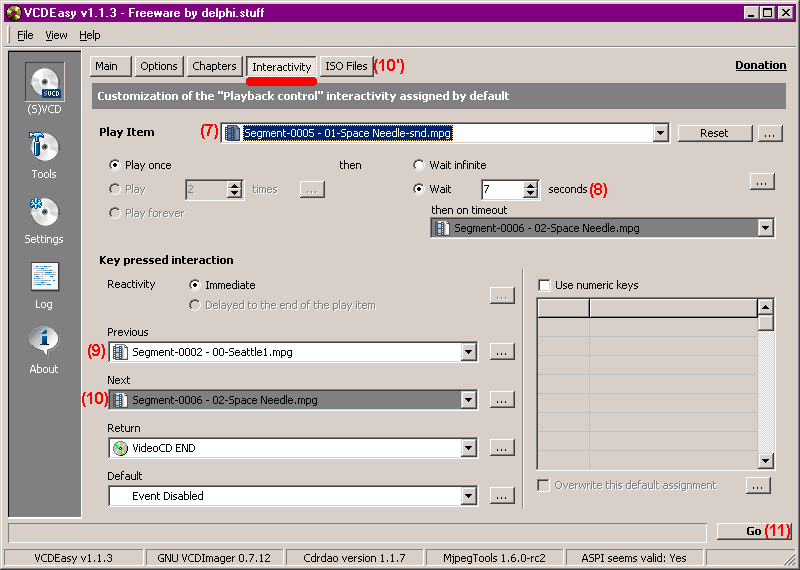
7 In 'Interactivity' tab you can now define the behaviour of the DVD-player for every picture. Therefore you have to select the corresponding play item.
8 You can specify for each file an individual playing time. Typically a waiting time will be added after a sound file if you wish a longer show time of the corresponding picture than the sound comment. For a picture file you have to choose no waiting time if the sound comment should start immediately after showing the picture. But if a picture has no sound then you should adjust a waiting time.
9/10 If you want to jump between pictures with the Previous and Next key of your DVD-player then I recommend to make sure that in these fields always picture files are selected instead of sound files. Otherwise you may have the wrong sound comment to a picture after a jump.
You may repeat step 7 to 10 for each MPEG file.
10' Optionally you can add some ISO-Files to your CD. I store for example the origin picture and sound files together with a small slide show program that allows you to watch the CD alternatively also on a PC.
11 If you are ready with all your adjustments then press the 'Go' button and wait until the CD is ready. There will be two warnings for each sound mpeg file because VCDEasy have to make padding on the fly. You can ignore these warnings.
I hope you are successful with this description and enjoy the result.
Jürgen
+ Reply to Thread
Results 1 to 9 of 9
-
-
As mentioned, audio only segment play items don't work all that well on stand-alone players.
You can test your player for this function with the Official VCDHelp.com Demo Video-CD.
The alternative of course is to make a SVCD and use a video clip. 480x480/576 look reasonably good for still images.
Another alternative is to make an XVCD and use a video clip. The Demo VCD linked to above also contains XVCD tests clips at 704x480/576 resolution.
Regards.Michael Tam
w: Morsels of Evidence -
I can't get this to work.
I've been trying for over eight hours and have ruined a full pack of blank CD-Rs.
Is there any other procedure available?
I don't want to make a video clip with music. The still MPEGs I made are about 250kb in size, the audio files are about 6mb each. Making a video clip from these sources results in a huge file with a poor image.
If anybody has been successful in doing this, please could you copy and paste your XML? -
dear juergen,
can you repost the helpfull photo "Cropping value test" https://www.videohelp.com/forum/images/guides/139526/Test.gif, for testing the percentage of tv crop area.
It is unavailable at the moment.
Vielen Dank im Voraus.
Grüße
sopron -
Maybe this will do: http://www.cornucopiadm.com/goodies/SafeAreasGuide-PAL.gif I made it PAL, since it looks like you live in Italy.
Note also that my recent guide on VCDStills_w_Audio may make your job easier/more compatible.
Scott -

Thanks a lot, Juergen + Cornucopia !
I'll read the Cornucopia's webpage: it seems to be very helpfull.
Respects & Regards!
...und nochmals, Grüße an München, meine zweite Heimat!
sopron -
Dear friends,
how can I crop jpeg-files (about 12%) for viewing on home analog TV set, without affecting the resolution's value of 3264x2448? what application I must use? with Acdsee I can "only" reduce 3264x2448 down to 640x480: this is nonsense!
It is easy to make with "photo to dvd" (i.e jpeg joined & encoded to m2v) software, but I don't know how to **crop** the single images (i.e single jpeg to be viewed on the home dvd player with TV set witch crop 12%)...
please, help me.
Thanks a lot in advance.
Bye! -
Hi friends,
problem has been resolved by using the helpfull Image Cropper 0.91b!
Similar Threads
-
How to create AVI with 5.1 sound for Xbox 360
By thoughton in forum MacReplies: 25Last Post: 22nd Dec 2011, 04:11 -
How to create a BluRay from odd format videos and not distort the picture?
By Peterk312 in forum Video ConversionReplies: 5Last Post: 16th Jul 2011, 20:49 -
Is It Possible To Create A Custom Color From A Picture, For Text In Paint?
By V Bot in forum ComputerReplies: 10Last Post: 1st May 2011, 22:00 -
Combining a single picture with an mp3 to create video file
By mark1111 in forum Newbie / General discussionsReplies: 2Last Post: 7th May 2009, 04:13 -
Avisynth Picture in Picture Script Slows Down Video and Lacks Sound
By OpNash in forum EditingReplies: 2Last Post: 26th Nov 2008, 20:00




 Quote
Quote