I am working on a project that is going to be a mastered to DVD-9. I am using Scenarist to author this Disc, I know all about setting the layer break, and Parallel and Oposite track paths. What I really need to know is how I am going to give this to my mastering facility.
How do I go about mastering the DVD to DLT? My Mastering facility is asking me for 2 seperate DLT tapes one for each layer. How do I go about doing this? Can I just render the DVD to two seperate DVD-Rs? I have premastered the disc a couple of times, and I can't see where the layer change is.
Any Help would be appreciated!
Thanks!
+ Reply to Thread
Results 1 to 4 of 4
-
-
Yes, you can just output to 2 seperate dvd-r disks, and give it to the replication house. This should be a fairly easy procedure for the facility to take your disks and transfer them to DLT. Its fairly common to do.
Or get a used Quantum 4000 or other if you plan on doing this more often. -
Great. Thanks, But How do I seperate the 2 layers onto 2 seperate DVD-Rs (or DLTs for that matter)? How Do I find the seperation, and know which VOB files to put on which disc? When I render in Scenarist I just have a 7 gb VIDEO_TS folder. Am I doing something wrong in the setup?
thanks -
Here you go,
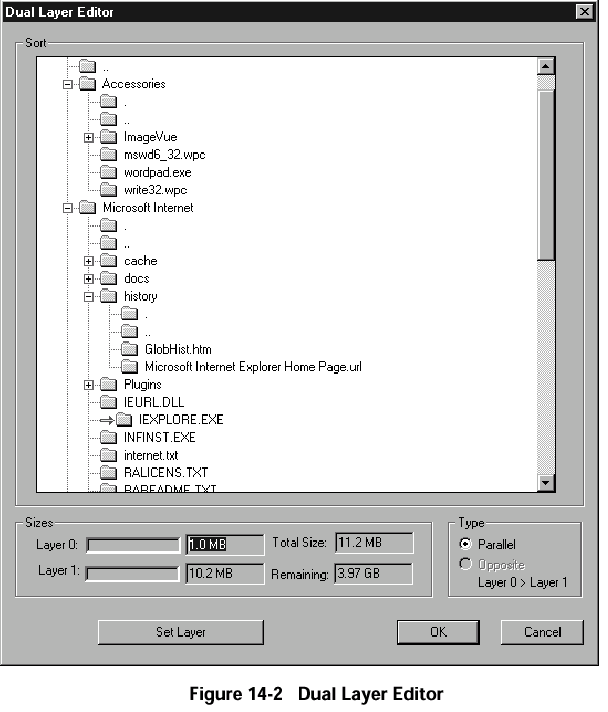
Scenarist enables you to set the point in a dual-layer DVD disc image
where it will split into the Layer 0 and Layer 1 layers.
1. Click the Dual Layer Editor button.
The Dual Layer Editor appears. The Sort area displays the files that will be included in the disc image file in the order in which they will appear.
2. Select the file that you want to be the first file to play on Layer 1.
3. Click the Set Layer Break button.
An arrow symbol points to the file you selected. Bar indicators display
the amount of space the discimage will use in each layer.1
4. To rearrange files, simply drag them from one location to another.
5. To view the layer break arrow when it is not showing within the Sort
area, click the Show Layer Break button.
6. To delete a layer break, click the No Layer Break button.

And some more:
Setting the Track Path
You can select a Parallel or Opposite track path in the Dual Layer Editor’s
Type area. The track path is the direction in which a DVD player drive
head reads the disc. The track path can spiral outward from the area near
the center hole to the edge of the disc, or from the edge toward the hole.
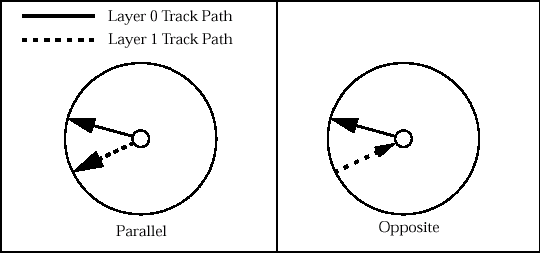
The drive head always reads Layer 0 from the inside out. If the drive head
reads both layers from the inside out, the track path is parallel. If the drive head reads Layer 1 from the outside in, the track path is opposite. Figure 14-3 illustrates the two track path types.

Figure 14-3 Parallel and opposite track paths
A decision to use a parallel or opposite track path for a dual-layer disc
depends on the amount of material you are putting on the DVD and how you want to arrange it. There are two factors that may influence your decision:
• Playback between layers is always non-seamless; there is always a
pause when the DVD player drive head transitions from Layer 0 to
Layer 1. With a parallel track path, however, when the drive head
reaches the end of Layer 0, it has to move all the way back to where it
started before it begins to read Layer 1.
• An opposite track path has the constraint that Layer 1 can be no larger
than Layer 0. If Layer 1 contains more information than Layer 0, Scenar-ist alerts you to that fact during premastering. You could then delete
some files or open the Dual Layer Editor and select a Parallel track path.
Similar Threads
-
Best IDE Burner for burning Dual Layer or Single Layer Discs for Duplicator
By Konfusion in forum DVD & Blu-ray WritersReplies: 7Last Post: 18th Nov 2011, 04:16 -
Dual Layer problem. Layer break issue...
By papegoja in forum DVD RippingReplies: 23Last Post: 9th Jun 2010, 23:52 -
Dual layer disc error (2nd layer not burning properly - AVCHD)
By hhhgamewmx7 in forum Authoring (DVD)Replies: 7Last Post: 24th Aug 2008, 10:00 -
dual layer DVD-R in single layer burner?
By snafubaby in forum MediaReplies: 5Last Post: 4th Oct 2007, 14:39 -
Help on Dual Layer DVD
By mn072065 in forum DVD RippingReplies: 9Last Post: 16th May 2007, 10:36


 Quote
Quote