


I have allot of video clips of a dark skinned person showing from the waist up with a constant dark background. It is hard to see the see the detail of the person's skin... as if there is not enough light. Is there a easy batch way to improve all the clips such the person's detail is easier to see?
I played around with the filters on Adobe Prem Pro but only acheived marginal results. I have lots of these clips to correct so a batch solution would be great.
+ Reply to Thread
Results 1 to 15 of 15
-
-
You probably need a gamma adjustment. And a program that works in YUV not RGB. If you post a small clip someone will take a look at it. Also, keep in mind that the gamma on computer monitors is very different than televisions. Dark details that are nearly all black on a computer may look fine on TV.
-
I have a 3 second clip but it is not small --- 12mb. Tried to compress it with avidemux but get an error "file can not be opened." The avi plays alright in Media Player.Originally Posted by jagabo
Any suggestions? How small does it need to be to post? -
http://www.godanddeaf.org/c/uvs080529-002-05-1.zipOriginally Posted by jagabo
-
That's a tough one. Here's a slight improvement I did with AviSynth:

The top image is the original, the center is the the following adjustments in AviSynth:
ColorYUV(off_y=-12)
ColorYUV(cont_y=50)
ColorYUV(gamma_y=85)
The bottom image is this script:
ColorYUV(cont_y=100)
ColorYUV(gamma_y=100)
All images were saved via VirtualDub so they have been through the usual rec601 contrast stretch for computer display. -
BobAchgill, like you, I have problems seeing (photo/video) images on my monitor--everything is very dark. The only thing I can see on your image is the white tie-shirt. But the picture demo is actually fine.
The problem lies with the gamma set up on the monitor. Ever since I purhcased this new 19" widescreen monitor, I have never been able to obtain the same level of gamma as my older generation 15" monitor. I never had to adjust it, it was factory perfect. But these newer generation montiors are different, and they have different LUT levels than your graphics card originally contain, so the gamma curve is off.
For me, if I want to alter the gamma (so I can see true images) I have to load a utility. What that does for me is load in a new set of values into the gamma tables and instantly I can see the difference. The next thing is the fine-tuning or adjusting the gamma scale on that utility. In the ver I'm using, it goes from from 1.40 to 3.08 tics, though still too bright/glary for me. But because 1.40 is the lowest I can go in that utility, I set it to that value. Its still too bright for me, like when I have notepad or browser window open, etc. The white is too just too strong or glary for me, even in daylight when its very cloudy. And at evening and night time hours, its too much and I have go into the graphic cards setup and lower the brightness further. That's the only way I can get it lower. But the gamma utility that I use is helpful when I'm working with images and/or video. With its loaded, I can see your images and they look fine.
And, on my computer at work, its perfect. That computer has a perfect graphics card with a 17" monitor--by Dell, I know. I suspect that the majority of members here prob suffer similarily but found alternative measures and just live with it.
The problem is not windows specific either. I am using both Windows 98 and XP, connected to a KVM switch box, each computer have different graphics card: WIN98 and ATI Rage Fury Pro, XP w/ ATI Radeon HD-3450, and both show the same exact problem--too bright/glary. So its definately the monitors' fault.
-vhelp 4975
:P *~*!*~*!~* HaPpY HoLiDaY *~*!*~*!~*
-
Free Flying Soul

- Feb 2002
- United States


I did this with MSU's color enhancement virtualdub filter, from here
http://compression.ru/video/color_enhancement/index_en.html
Obviously, it does introduce alot of noise, so that will have to be addressed.

-
I've opened this on both a Mac and PC laptop an can see moderate detail in the dark areas. Trick is to open in a video player that is calibrated properly. I'm using default settings in Quicktime player (Mac) and Windows Media Player (Vista Laptop). Monitors are using default "movie" display profiles. Result looks similar on both monitors.
Even so it can use gamma/contrast improvement but I have to warn you to test playback on a TV or you may make it too bright.
I'll check this in Vegas when I get home.Recommends: Kiva.org - Loans that change lives.
http://www.kiva.org/about -
[quote="liquid217"]I did this with MSU's color enhancement virtualdub filter, from here
http://compression.ru/video/color_enhancement/index_en.html
Obviously, it does introduce alot of noise, so that will have to be addressed.
That looks much better than the original. Thanks!
Although I ran into a small problem with the MSU filter. I tried to run the MSU color enhancement using the jobs menu so I could batch all 1700 of my clips but the MSU filter is not saving my selected parameters to the settings file.
This is the only line it puts in the .vcf ...
VirtualDub.video.filters.Add("MSUColorEnhancement 1.0b");
All I can think of is to get a key stroke program that also supports mouse movement to physically script opening each file and running the encoding of each .avi Got any other ideas how to batch 1700 clips using the MSU filter? I am new to VirtualDub so I amy be missing some feature that would provide a work-a-round.
I added some smoothing and this is what the result looks like (see below). I used the following filter settings...
What filter will help me get rid of the lines on the fingers?
Code:MSUColorEnhancement 1.0b Checked source image has very bright and very dark regions (HDR) image Slider Brighten dark region: 2 Slider Reduce bright region: 4 Slider Correct colors: 14 Checked Auto levels VirtualDub.video.filters.Add("smoother"); VirtualDub.video.filters.instance[1].Config(1900,1);

-
Donald Graft's Smart Deinterlace. But whether or not you should get rid of them depends on what your final output will be. If you're making DVDs you don't want to deinterlace. And again, beware of judging the image on a computer monitor. Computer monitors have very different gamma curves, brightness, and contrast compared to televisions. If you expect you video to be watch on TV adjust for TV, not for the computer monitor.Originally Posted by BobAchgill
Pretty much everything you're doing with the MSU color filter can be done with the Levels, HSV, and Gradation Curves filters -- which save their states properly for batch processing.
Consider Neat Video for noise reduction.
-
Wow! Yours looks sooo great.Originally Posted by jagabo
Mine must be lacking on the Neat settings and/or Gradation Curve settings. I used the Filter and Sharpness preset for Neat and did not know what to set on gradation curves. Here's mine...
-
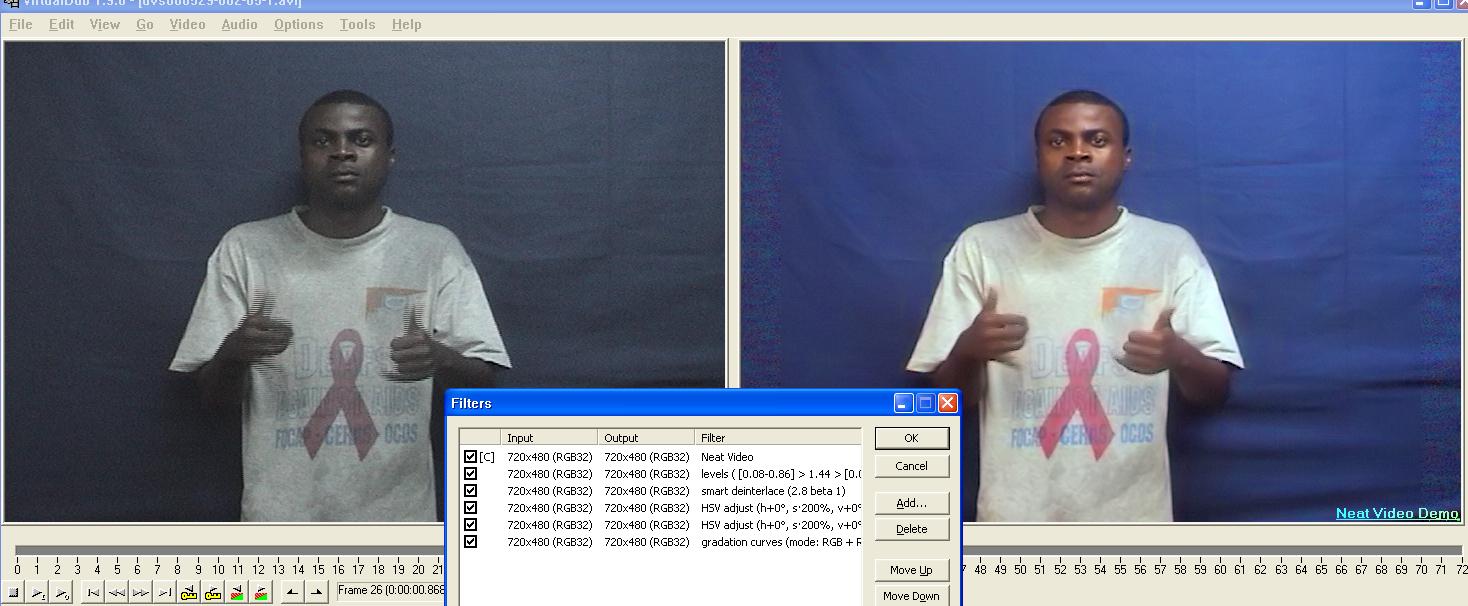
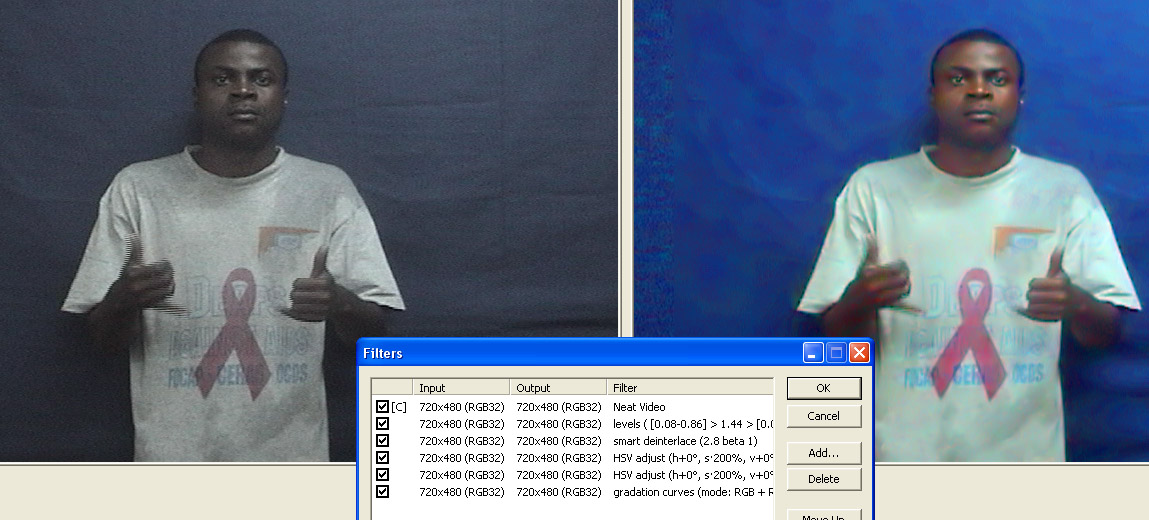
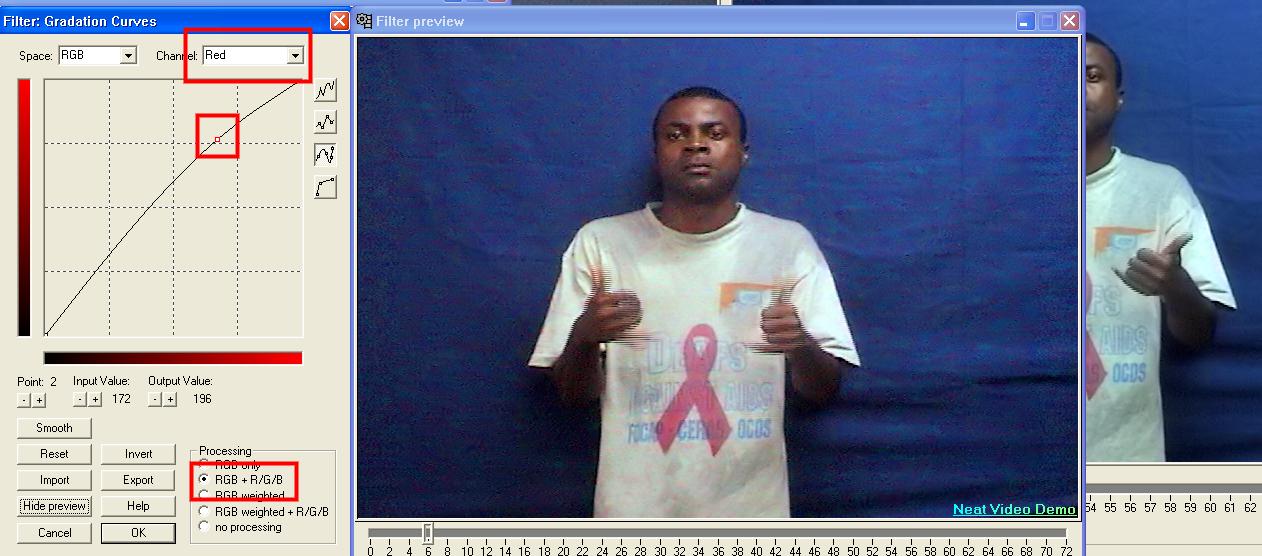
I used Gradation Curves to correct the white balance. Assuming the t-shirt should have been grayish but appeared too green, I bumped up the red a little bit:
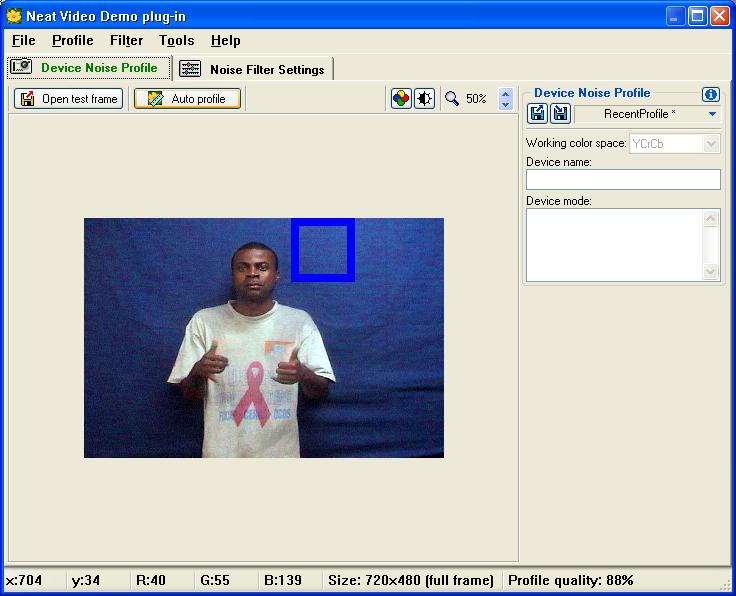
Neat Video was configured by using the Auto Profiler. Move the box (or make a box by rubberbanding) on a "flat" section of the image and press Auto Profile. Neat Video will look at the noise in that area and use it as a guide for de-noising them image. You may find Neat Video works better at the end of the chain rather than the start (because the other filters in this example increase the noise).
-
Thank you! now all looks wonderful especially considering the quality of the original. Thanks for being patient with me to walk me though the use of the different filters.
I have two wrap up observations...
The Neat filter (demo version) complains when in job mode. Apparently the demo version does not want to cleanly support processing multiple files in a job. It issues this message between processing each file...
All the settings are kept ... I just need to babysit the process and hit ENTER each time the message pops up.This feature is not supported in Demo edition of Neat Video plug-in.
And second...
I will use the video BOTH on the computer AND on TV... but these are not parallel paths. So it is not as easy as making two versions.Originally Posted by jagabo
First the video will be played as an imbedded video file in a VB.Net application as an flv format. From there I will screen capture the application window containing the embedded video and play this new video BOTH on TV and computer.
After all the steps mentioned above will the TV version look bad because it is not interleaved? -
Relative to the original video there will be only half as much temporal resolution (deinterlacing reduces the video from 60 different pictures per second to 30 different pictures per second). So motions will not be quite as smooth as the original DV viewed on TV. But both the computer and TV will show this same degree of jerkiness in the deinterlaced video.Originally Posted by BobAchgill
If you adjust the brightness, contrast, and colors to look good on a computer monitor the video will look washed out on a TV. -
Thank you so much jagabo. Now we can begin turning those 1700 clips into the first hand sign dictionary for the Cameroon Sign Language and make reading primers, too, to assist CSL deaf in learning to read. When they are ready I will post them on this Google Map at the Cameroon location.
http://maps.google.com/maps/ms?ie=UTF&msa=0&msid=104146364946925521280.00045e63af59650a8f637
What would be a good codec to use for archival purposes of the 1700 filtered clips? Sure, I will also save the original DV clips.
Bob
www.GodandDeaf.org/hhr
 Quote
Quote
Similar Threads
-
What is best way to improve soft SD channel detail on LCD TV ?
By DBenz in forum DVB / IPTVReplies: 8Last Post: 28th Mar 2011, 12:23 -
brightening dark MPEG-2 skin tones without brightening anything else
By rch15 in forum EditingReplies: 4Last Post: 18th Aug 2008, 02:53 -
enhancing detail from video for a customer in trouble
By devdev in forum Newbie / General discussionsReplies: 1Last Post: 7th Jul 2008, 16:29 -
Highlight detail lost when transcoding to DV
By dbx in forum Camcorders (DV/HDV/AVCHD/HD)Replies: 31Last Post: 10th Feb 2008, 12:50 -
Enhancing video detail/quality
By azinkin in forum Camcorders (DV/HDV/AVCHD/HD)Replies: 1Last Post: 14th Jun 2007, 09:16