


DiVX (AVI) to (S)VCD using DVD2SVCD
- By: LeeBear -
ver. 1.0
Hello, this is my first time at writing a guide so please excuse any errors. I decide to write this guide because alot of people seem to be asking how they can convert there DiVX (avi) movies into a SVCD so they can watch on there DVD Player. This guide will go through the entire process I used to put the movie "Spider-man" onto a 2 disc SVCD. I will try to explain each step and why it was done, but I will assume you have a general understanding of encoding and are familiar with the programs used in this guide. Some steps are optional and I will try to make a note of them. Note this is not a just a guide to get a DiVX movie to SVCD, but to make it look as professional as possible by adding chapters etc.
The following programs were using in this guide:* Other versions of Cinema Craft Encoder or TMPGEnc may be used but the encoder settings will not be explained in this guide... not yet anyways.
- DVD2SVCD 1.09 build 3
VirtualDub 1.4.9
VCDEasy 1.1.1
Cinema Craft Encoder SP 2.5 *
Photo/Paint Program (ie. Photoshop, Photopaint, etc)
1) Preparing the AVI files
One often overlooked process when making a SVCD from a DiVX source is to make sure the DiVX has no errors or sync problems; If you don't fix errors in the AVI file your encoded MPEG will most likely have sync problems or other errors in it. In this step we will also split the AVI into 2 parts (or 3 if the movie is long).
a)"Open Video File" up your AVI movie in VirtualDub. If your movie came on more then 1 AVI file (like mine did) you want to load both parts into VirtualDub. Do this by going into "File -> Append AVI segment" and choose the second file of the movie. If you get message that says "VBR audio stream detected" don't worry it'll be fixed when we split the movie a bit later on. Note: You will not be able to join a AVI that uses VBR for audio directly. To get around this you have to resave the file with an uncompressed wav for the audio stream. Step d shows you how to set that up.
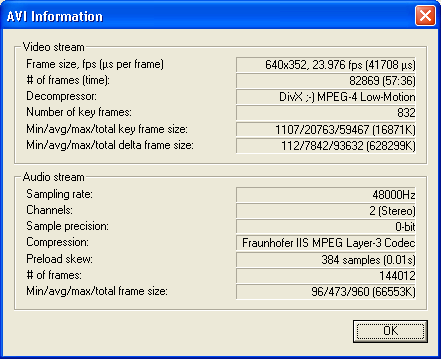
b) Once the movie is loaded you want to get some information about the AVI file. To do this click on "File -> File Information"a window will pop up that looks like this:
The important things we want to take note of are the "Frame size" and the "fps". You may want to write the frame size dimension down somewhere you'll be using it later on. Take a look at the "fps" if it's not a standard rate you may have problems later on. Standard rates would be 23.976, 25, and 29.97. A common problem is the frame rate might be close but not exactly the same as one of the standard rates. For example 23.973 fps, it may not seem like it'll matter but if you don't fix the problem the audio and video will slowly go out of sync when you encode. Why would an AVI file have a slightly off frame rate? That's a good question, the answer is usually because the person who encoded the AVI probably noticed the movie was out of sync. Instead of stretching the audio to match the video (the proper way to fix the problem) the person adjusted the framerate. This is not a problem when playing back on your computer because your computer handle pretty much any frame rate but DVD players rely on standards. There are guides on this site that will help you fix problems like this so I will not explain the steps here. This particular "Spider-man" AVI file has a standard frame rate so I am able to go to the next step.
c) Now we want to make sure there's no bad frames in the video stream. Once again bad frames can cause sync issues and need to be fixed. There are guides around that explains how to fix these problems if your AVI does contain bad frames. To check for bad frames click on "Video -> Scan video stream for errors" This process will take several minutes. If there's bad frames fix them... if not move on.
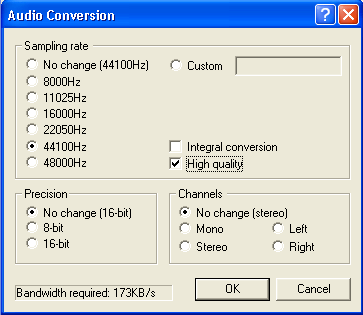
d) First make sure video is set for direct stream copy (we do not want to re encoded when we split). Do this by clicking "Video -> Direct stream copy". Next make sure audio is set for avi and full processing mode. Do this by clicking "Audio -> AVI audio", then "Audio -> Full processing mode". Next click on "Audio -> Conversion" a window that looks like this should appear:
For "Sampling rate" choose 44100Hz or 48000Hz depending on which rate you will be encoding to later in DVD2SVCD. Also check "High quality" to get a better conversion. The next step is to click on "Audio -> Compression", we want an uncompress audio so we would choose "(PCM) ". This will also get rid of the audio sync issue because of the VBR error from step (a) when we save the avi file later.
e) We are ready to find where we want to split the movie. I know DVD2SVCD can automatically split the movie but it does it by file size so often times the movie will get split during an action scene etc. which I do not like so we are going to find a scene change near the middle of the movie and split it manually. Now we want to find a good spot
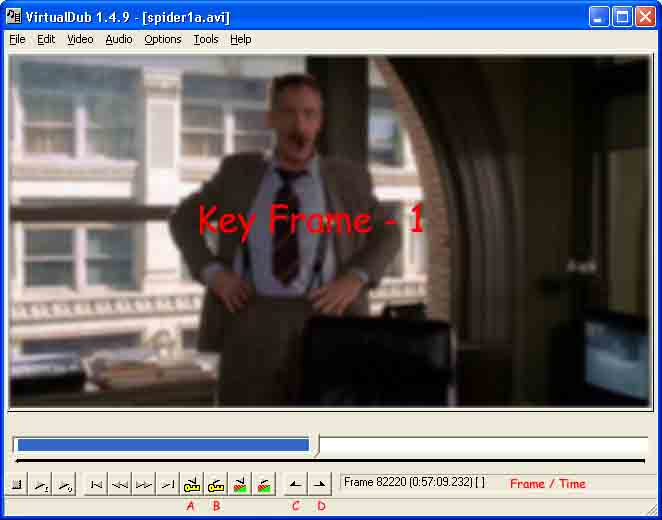
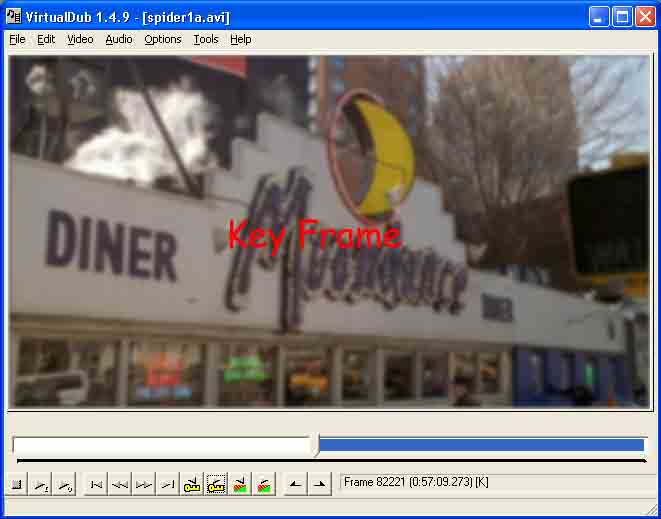
to split the movie. Since my movie is about 121 minutes long and I want to put it on 2 CD's I'll want to split the movie at a scene change around 60 minutes. To do this drag the trackbar underneath the video window to a spot a few minutes before the 60 minute mark. Now use the "Next Key Frame" and "Previous Key Frame" button to find the exact location of a scene change. These buttons are Marked B, and A respectively in the pictures below. Note: If the AVI was encoded properly every scene change should start with a Key Frame, but remember NOT every Key Frame is a scene change. An easy way to check if the Key Frame occurs at a scene change is to goto the Key Frame then press the "left arrow key" on the keyboard to bring it back a frame and see if scene has changed. For example in my movie the scene changes from inside the office building to outside of a diner so that's would be a scene change.
So now we have found a good place to split the movie. We want the first part of the movie to contain all the frames from 0 to our Scene Change Key Frame (less 1 frame). To do this we set the beginning and end of selection. Set the "selection start" to frame 0 by dragging the trackbar to the far left until the Frame says 0. Then click the "Set selection start" button (C in the picture). To set the "selection end" move the trackbar until we get the our Key Frame (-1). In my example that would be Frame 82220. Now click the "Set Selection end" button (D in the picture). The blue bar where the trackbar is shows you which part has been selected. Now we save the first part of the movie. Click on "File -> Save as AVI", and give it a name like "part1.avi" or in my case I used "spider1a.avi". It may take a few minutes to save the file. Once the first part is saved we want to save the last half of the movie. Do the same thing as before except your "Start of selection" point will be the Scene Change Key Frame and the "End of selection" point will be the last frame of the AVI. Just remember to use a different file name when you save... I called the second part "spider2a.avi". Now that we have the 2 AVI files split where we want we can finally move onto the next step of actually encoding the file :=) You may first want to play the AVI files with Media Player to make sure nothing has gone wrong and that each part ends at where you wanted it to.
2) DVD2SVCD.... more then just for DVD's
I am going to use DVD2SVCD in AVI mode since it automates most of the dirty work. I'm going to assume you're familiar with this program and have it set up already. I'll also go through each of the important tabs and explain what most of the settings are for. The pictures will show the settings I used, but remember this may not necessarily be the best setting.
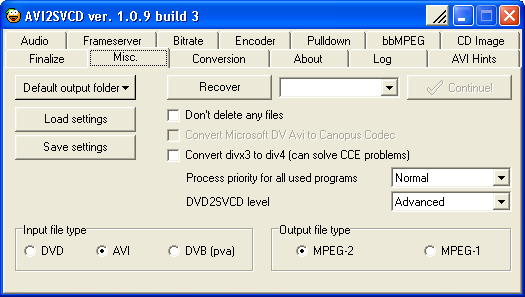
a) Misc
Make sure that "Input file type" is set to "AVI" or else you won't be able to load the AVI movie later on.
"Output file type" is set to "MPEG-2" since I'm making a SVCD, if you're making a regular VCD choose "MPEG-1" instead.
"DVD2SVCD level" set it to "Advanced" or else some of the options in the other tab won't show up.
Check convert "divx3 to divx4" if your movie is in divx3 format and if you are using CCE to encode.
b) Conversion
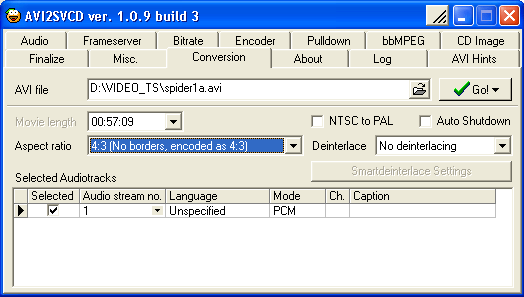
"AVI file" load the first part of your movie here in my case it's "spider1a.avi"
"Selected Audiotracks" there should only be on track and it should be checked automatically.
Check "NTSC to PAL" if you want your MPEG to be in PAL (25 fps). Maybe useful for people in Europe but I think most PAL DVD players also play back NTSC so is there a point in checking this???
"Deinterlace": should be set to "No deinterlacing" unless your movie is interlace which it shouldn't be.
"Aspect Ratio": There's 3 different settings the easy way to explain is with pictures and a table. My avi file has a resolution of 640x352 approximately 16:9 ratio. The table will show how it would look on a normal TV (4:3) and a widescreen (16:9) with each setting.
Normal 4:3 TV Widescreen 16:9 TV 4:3 (No borders, encoded as 4:3) 16:9 (borders added, encoded as 4:3)
*Anamorphic (no borders, encoded as 16:9)
**
*Note: This is how it would look on a 16:9 TV in full screen mode. All 16:9 TV's have a zoom or theatre mode to crop out the black bars so if the TV was in this mode it wi'll look like the 4:3(No borders, encoded as 4:3) picture, not distorted.
** Note: this is what it 'should' look like on a 4:3 TV but in reality almost all DVD players ignore the anamorphic tag when playing back VCDs or SVCDs so the black bars are not added and your picture will look like the 4:3 (No borders, encoded as 4:3) picture, stretched.
I my opinion the best mode for AVI's that are in widescreen mode is to use the 16:9 (borders added, encoded as 4:3), this will give you the best compatibility with TV's and players. Note: I actually choose 4:3 (No borders, encoded as 4:3) in my settings because I will be manually adding the letterboxing later on to give me the same effect as doing a 4:3 (borders added, encoded as 4:3). I choose this method because sometimes DVD2SVCD doesn't always letterbox correctly.
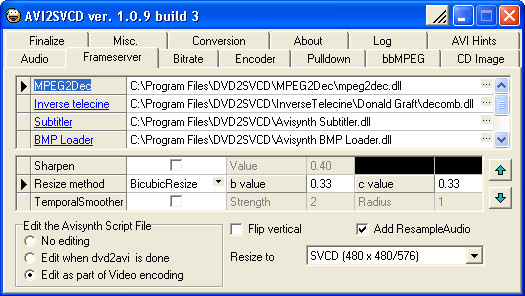
c) Frameserver
This is where we set the frameserver to resize our movie and add any special filters that may help improve the final MPEG.
"Resize to": The first thing to decide is what size we want our MPEG to be, since I'm making a SVCD I'll choose that option. Other options include DVD, CVD, and VCD. At low bitrates the DVD resolution of 720x480 is pretty much out of the question. Some people may decide to use CVD resolution but I find that on a Widescreen HDTV that I watch on, diagonals are noticabley jaggie to the point where it's annoying. VCD resolution might be a good choice if quality isn't important and you want to fit a short movie (80-90 minutes) onto one CD.
"Resize Method": When resizing I generally use Bicubic Resize. It's a bit slower then the other methods but the quality is better especially
when resizing in both directions. There are other guides that can explain what the variables b and c do. I usually use a value of (0.33, 0.33) other values to try are (0, 0.6) setting a c value too high tends to sharpen too much so be careful.
The other filters, like Sharpen and TemporalSmoother I don't really use. DVD's and DiVX are generally fairly noise free so Smoothing isn't necessary. If your AVI contains alot of noise you may want to turn some of these filters on.
"Add ResampleAudio": Check this if you are using CCE and have an AMD Athlon processor. If not then it's not necessary. It's only used to fix a bug with CCE and Athlon processors.
"Flip vertical": some AVI codecs tend to flip the movie upside down... cough cough *Microsoft*. If you find after you encode your MPEG is upside down you need to check this.
"Edit the Avisynth Script File": I checked "Edit as part of Video encoding" because I am going to manually letterbox the video like I decide in step 2b. You can just choose "No editing" if you will not be manually letterboxing.
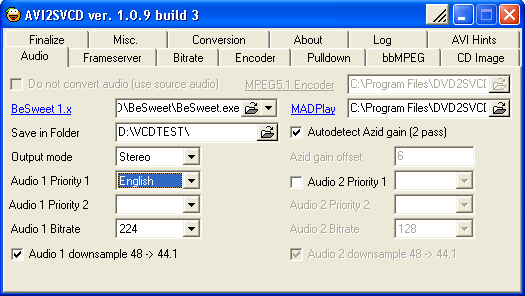
d) Audio
There's not much to set for audio since we only have one audio track.
"Audio 1 Bitrate": I choose 224 kps, if audio isn't as important to you, you can give the video more bits to play with by using a lower rate like 192. I wouldn't suggest using anything lower or the audio may not sound too great.
"Audio 1 downsample 48 -> 44.1": If your DVD player doesn't handle SVCD or VCD with 48 K rate then check this. Also check this if you want a compliant (S)VCD rate.
"Autodetct Azid gain (2 pass)" This basically normalizes the audio, I usually keep this checked.
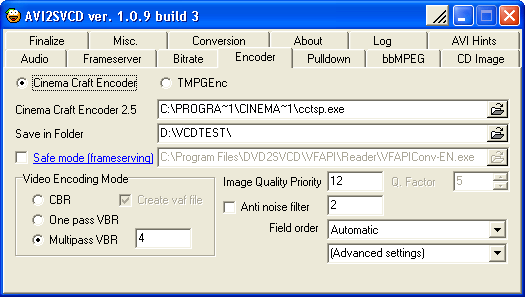
e) Encoder
For the encoder I'm using Cinema Craft Encoder 2.5. If you're using a different version of CCE or TMPG you will have different settings. This guide will not cover the other encoder settings so you're on your own if you use those ones.
"Safe mode (frameserving)": you need to check this if you're using CCE other then version 2.5 or else you'll get a crash when encoding. This will slow down encoding a bit so if you're using CCE 2.5 don't check this.
"Video Encoding Mode": I'm sure everyone knows the difference
between CBR and VBR, if not go read the newbie guide. I use a mulipass setting of 4. Any higher won't give you much better bitrate allocation so it's not really worth the extra time. You can also use a setting of 3 if you are impatient.
"Image Quality Priority": This affects what the encoder will give bit priority too, scenes with lots of moving parts or more static scenes. Values range from 0 to 100. A low value means more priority to complex scenes, so there will be less artifacts (looks like flies along the edges of objects) during action scenes, but on flat static scenes you'll get contour noises, (remember contour maps in geography class? looks like rings around objects). If you are encoding at a very high bit rate this setting doesn't have too much of an effect since there's plenty of bits to go around, but when trying to cram movies onto 2 CD's it can make a big difference in the final output quality. Generally I use a value from 5 to 25, 5 for high action movies and 25 for slow drama's or talkies. Some values to try are 5, 7, 12, 17, 22, 25.
"Anti noise filter": Since DVD's and DiVX's are generally fairly noise free I keep this unchecked. It makes encoding a bit quicker too if it's unchecked. If your movie has a bit of noise you may want to check this and use a fairly low value 2-7. If you set the value too high you may get a jerky looking encode.
"Field order": Just leave it at automatic.
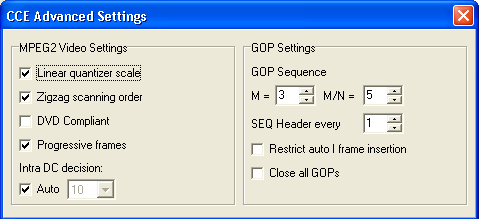
"(Advance settings)":
"Linear quantizer scale": Keep this unchecked for a slightly better quality. You should only ever check this if you're encoding MPEG1 (thanks Adam for the info).
"Zigzag scaning order": For progressive images this gives better quality. Check this if your AVI is progressive (most likely).
"DVD Compliant": Since we're not making a DVD don't check this
"Progressive frames": General rule is if the source is progressive make your SVCD progressive. If it's interlaced make your SVCD interlaced. If in VirtuaDub your picture looked like there were horizontal lines (interlace lines) running across the screen then your movie is most likely interlaced.
"Intra DC decision": Just keep this to Auto.
"GOP Settings": Don't touch this unless you know what you're doing or you may make your MPEG not readable by normal DVD players.
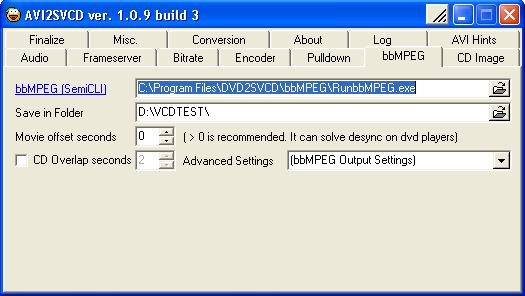
f) bbMPEG
Not much to set here.
"Movie offset seconds": I set this to 0 since I don't have sync problems on my dvd players if you have a sync problems set this to 2. On my player if it's set to 2 I tend to lose 2 seconds off the start of the movie.
"CD Overlap seconds": No need to check this since we've split the movie manually remember.
"Advance Settings": Change things in there at your own risk. Bad things can happen, so unless you know what you're doing keep away.
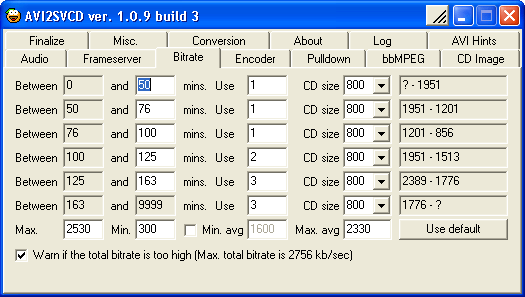
g) Bitrate
This is pretty self explanatory. Since we are split the movie into parts manually you may one to set the first three settings to use 1 CD, if you forget to DVD2SVCD will split your already split part if it goes over 76 minutes. I also set all the CD size to 800 because well who uses 74 minute CDs anymoreNow the important settings:
"Max": this is the maximum bitrate the video stream can be. Don't set it higher then your DVD player can handle. 2530 seems to be about the max my and most players can handle.
"Min": set this to 300. Any lower and some DVD Players will not play it.
"Min. avg": I keep this unchecked since the average is going to be determined by the movie length anyways.
"Max. avg": there has to be at least a 200 difference between the average and the max or else CCE may have problems. That's why it's set to 2330.
Check "warn if total bitrate is too high" if your player can't handle high bitrates.
h) Finally we encode...
We can ignore the other tabs thy don't really do anything, except for the "CD Image" tab. Since we're going to author the CD manually with VCD Easy we can check "Don't make image". All our settings are done now and we're ready to encode. Goto the "Conversion" tab and click "Go -> start conversion". DVD2SVCD will start to work now.
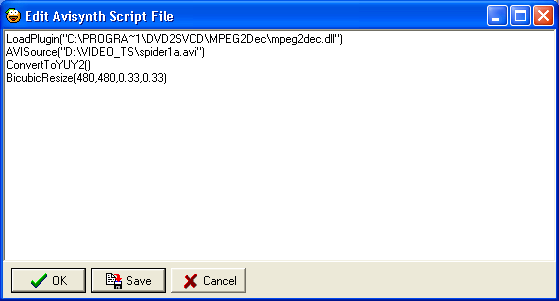
Optional: It'll take a few minutes to encode the audio, after it's done a window will pop up that looks like this (there will be no pop up if you choose not to edit AVIsynth script in DVD2SVCD):
This is were we edit the script to do the manual letterboxing for our movie. The DVD2SVCD Q&A has a good explaination on how this is done so I won't try to explain how I got my values. Look at question 62 there. For my movie I edit the script to look like this:
Once the script has been edited (don't forget to double check for spelling) click "Save" then click "OK" and let the encoding continue. A few hours later you will have your MPEG file ready to author or burn.
Optional: If your player doesn't play back SVCD without the header trick, like mine. You will have to load up TMPG, click on "File -> MPEG Tools", click on the "Simple Multiplex" tab. Load up your newly created mpg file, change the "Type" to "MPEG-1 Video CD". Click "Run".
3) Authoring and burning using VCDEasy and your favourite recording program
Now that the first half of our movie is encoded we can author our (X)(S)VCD to make it look more professional. If you do not care about this step you can just burn your MPEG file with Nero or another CD Recording program. I like to make my discs look more professional so I like to add a message prompting the viewer to switch disc and I will also try to add chapters and entrypoints so the disc can be navigated more easily. To do this I'll be authoring with VCD Easy. You will also need some other paint or photo editing program to make the change disc message.
a) Making the change disc still
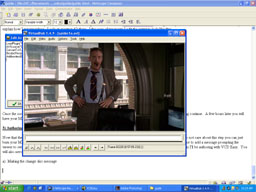
I'm going to make my change disc image so that when you are watching the movie it will look like the change disc message appears over the last frame. First we want to capture an image of the last frame of the first part of the movie, right where we split it. There are many ways to do this, I just loaded up the AVI of the first part of the movie, moved the slider to the last frame (with a picture). And just hit the "Print Screen" button on the keyboard to capture the screen to the clipboard. Then I loaded up my photo editing program (Photoshop) and pasted the screen capture so it's ready for editing. I'll assume you're familar with whatever editing program you choose to use so I'll just outline the steps briefly:
Screen capture pasted into Photo Editing Program.
Resolution: 1024x768
Crop around movie frame and resize till horizontal width is 640 pixels.
Resolution: 640x352Add black borders at top an bottom until we get a horizontal resolution of 480 pixels. In my particular example I had to add 64 pixels boder at the top and bottom.
I got this number by (480-352)/2=64
Resolution: 640x480Now add your change disc message using the text overlay tool in your paint program.
Save the picture as an uncompress bitmap.
Resolution: 640x480
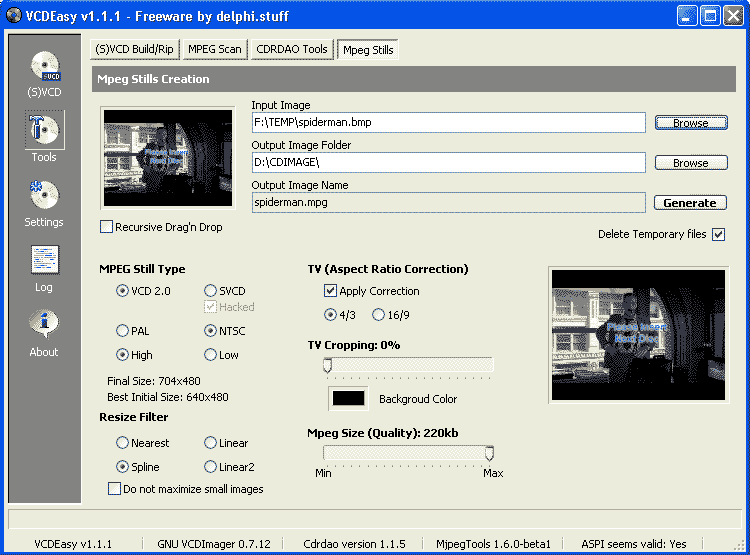
Once we have the change disc picture created we can make our MPEG still using VCDEasy. Load up VCDEasy, click on the "Tools" then the "MPEG Stills" tab. Change your settings to look like this:
Of course your "Input Image" would be whatever you saved your picture as in the previous step. All the other settings should be the same as how I have it except in the "MPEG Still Type" you should check "SVCD" if you're making a true SVCD. I used "VCD 2.0" because my player doesn't play back SVCD without the header trick. Once everything is set up hit "Generate" to make your MPEG Still.
b) Adding chapters and making the image
Now we're ready to add chapters. Click on "(S)VCD) on the left side, click the "Main" tab.
Click "Add Files" and add the first part of the encoded movie and the change disc MPEG still you made from the previous step.
"VideCD type": Choose "SVCD 1.0" if you're making a SVCD, choose "VCD 2.0" if you're making a VCD or if you had to use the header trick like I did. I don't think there's ever a reason to choose VCD 1.1, maybe for really old players ???
"CD Writer": I'll be using a different program to write the image so I choose "No CD Writer Selected"
"Volume Label": Just put the name of the movie in here.
"Bin Output File": The name of the CD Image that VCDEasy will create.
Now we click the "Chapters" tab. We skipped the "Options" tab because there's really nothing that needs to be changed there so I won't bother. You will get a screen that looks like this:
There's not many options here but it's an important part to make professional looking chapters. To add a chapter type the timecode into the "Create a Chapter at" field and then hit okay. You will have to do this for each chapter you want. How did I know what timecode to put in? Good question. This is the probably the slowest and most boring process. Remember in step "1e)" where we found a good scene change spot to split the movie using Virtual Dub? Well to find good spots to insert a chapter point in the movie we do the same thing but instead of splitting the movie we just write down the timecode where these scene changes happen. The time code is shown at the bottom right of the VirtualDub window. So load up the first part of the movie in VirtualDub. And go through the movie and write down 10-12 good places to insert a chapter... the best spots are scene changes like I have said. Note: when you put in the timecode in VCDEasy the actual chapter entry may not be exactly the same ie. you put in 0:03:30.292 and you get 0:03:30:293 don't worry about VCDEasy just finds the closes I frame it can put the entrypoint at.
Once you have all the chapter points manually inputted. We're almost ready to make the image. You may first want to goto the "Interactivity" tab and make it so that the disc change image stays on the screen for more then 2 seconds (default). This is pretty easy to do, once, you're in the "Interactivity" tab change he "Play Item" so that "Segment - 0002" is selected. Now change the wait time to "Wait Infinite" that's it.
Now that everything is set click "GO" and VCDEasy will make your image file now (in bin, cue format). Once it's done you can burn the image using CDR Win, Fireburner, Nero, etc. That's it! A DiVX movie converted so you can watch it on your DVD Player! Of course you'll still have to do the same thing fot the second part of the movie
Try StreamFab Downloader and download from Netflix, Amazon, Youtube! Or Try DVDFab and copy Blu-rays! or rip iTunes movies!
+ Reply to Thread
Results 1 to 30 of 126
Thread
-
-
Argh, the codes a bit messed up when I upload it. It will be fixed later when I have time.
-LeeBear -
Great guide, I just have one minor correction to make. You got linear and non-linear mixed up. Its true that it will probably be difficult to see any difference between the two in your encodes but the fact is that non-linear is always better. Its just an update to linear quantization that was implemented in mpeg2. There is no reason to ever opt for linear quantization, its just required for mpeg1 encoding.
You should always leave this option unchecked. -
Thanks adam, I updated the guide with the correction to linear quantizer scale.
I also fixed the formatting of the guide although the tables are still a be messed up. Don't know how to fix that unfortunately
Maybe someone should write a guide on how to write a guide
-LeeBear -
Great guide Leebear, i wish someone had written something like this 4 months ago when i started doing this, maybe saved me a lot of hours, with CCE crashes, avi errors and the like, but i suppose its better to learn the hard way.
You are patient aren't you, must of took a while to do that, plus you do what i do with the chapter points, i do the same thing in DVD2AVI when the source is DVD.
Good work, we need more people on here like you, willing to help others, you probably answered about 20 posts in that guide

-
I'm a MEGA Super Moderator

- Aug 2000
- Sweden


I fixed the tables a bit, removed all linebreaks because if you have a linebreak within the table /table phpbb will add a br and thats why they were so far away from the text.
Very nice guide btw. -
how about adding subtitles???????
is there an easy way with your guide ????? -
Lot of work gone into that. Great for the scene!
Props to you leebear! -
Check Edit as part of Video-encoding and use a script like thisOriginally Posted by offel
LoadPlugin("C:\Program Files\DVD2SVCD\MPEG2Dec\MPEG2DEC.dll")
LoadPlugin("C:\PROGRA~1\DVD2SVCD\Avisynth\textsub.vdf")
AviSource("C:\My Downloads\YOUR FILE.avi")
BicubicResize(480,254,0,0,6)
AddBorders(0,113,0,113)
TextSub("\PROGRA~1\DVD2SVCD\Avisynth\YOUR SUBFILE.srt")
In this example your subs will be placed in the letterbox. If you put the syntax above AddBorders, they will be placed in the moviescreen.
TextSub("\PROGRA~1\DVD2SVCD\Avisynth\YOUR SUBFILE.srt")
AddBorders(0,113,0,113)
Note this: Use size 18 for your subs if you place the subs in the moviescreen, for the letterbox use size 10. -
Ok I give up - where do i find info to correct out of sync audio due to the fact that a divx file is encoded at 20fps to create a vcd/svcd
-
Thanks for the feedback guys. And thanks for fixing the tables Baldrick.
jklye: Your 20 fps AVI isn't one where the person who encoded it had a sync problem and changed the framerate. It sounds like the person choose to encoded at 20 fps to keep the file size down a common practice by novice DiVX encoders. You should be able to convert to SVCD without doing anything to the AVI and the audio should be in sync (if the audio in the AVI was in sync). The only thing is your encoding my/will look jerky because the only way the encoder can convert from 20 fps to 29.97 fps is to duplicate/repeat certain frames. It's probably not the solution you want to hear.
-LeeBear -
Originally Posted by vadeluma
thanks i'll give it a try!!!!!
:P -
Hi LeeBear. I decided to make a VCD (because my DVD doesn't play SVCD Panasonic RV 31) My DivX was frame size 640X400 23,976 fps DivX MPEG 4 Low Motion, audio rate 44100 Hz. So everything went OK and script worked until CCI encoding for about 6 hours or so. than it stopped and that’s it When I tried to start encoding again it calculated about another 12 hours to encode part 1 ( about 1 hour) of the move. I checked the created files I found the sound file but no MPEG file. The second try crashed the CCI all together. I don'r understand what went wrong. Here is the log file
--------------------------------------------------------
- 9/10/2002 3:21:45 AM
- AVI to SVCD Conversion
- AVI2VCD ver. 1.0.9 build 3
--------------------------------------------------------
Initializing
Initializing finished.
--------------------------------------------------------
- 9/10/2002 3:21:50 AM
- Free on drive D: 14592.23 mb
- AUDIO Extraction
--------------------------------------------------------
Audio extraction finished.
--------------------------------------------------------
- 9/10/2002 3:23:52 AM
- Free on drive D: 14025.97 mb
- AUDIO conversion
--------------------------------------------------------
Converting Audio to MP2. Filename: D:\Program Files\DVD2SVCD\Movie\Extracted_audio_1.wav
Executing BeSweet. Commandline:
"D:\Program Files\DVD2SVCD\BeSweet\BeSweet.exe" -core( -input "D:\Program Files\DVD2SVCD\Movie\Extracted_audio_1.wav" -output "D:\PROGRA~1\DVD2SVCD\Movie\Encoded_audio_1.mp2" -logfile "D:\PROGRA~1\DVD2SVCD\Movie\Encoded_audio_1.log" ) -ota( -g max ) -2lame( -e -b 224 -m s )
Audio conversion of D:\Program Files\DVD2SVCD\Movie\Extracted_audio_1.wav finished.
Audio conversion finished.
--------------------------------------------------------
- 9/10/2002 3:35:00 AM
- Free on drive D: 14502.31 mb
- Video Encoding using Cinema Craft
--------------------------------------------------------
- Editing AVS script file
Executing Cinema Craft Encoder.
StreamSectors: 834285788
AudioSectors: 95718588
VideoPAPO: 11440800
ScanOffsetBytes: 0
SeqAligningBytes: 0
DVDBytes: 0
VideoEndHeader: 4
SubtitleSectors: 0
EmptySectors: 238.00
PictureSectors: 0.00
PureMPEGStream: 727126396.00
Seconds: 3372.91
CalcMPEGStream: 727126396.00
Frames: 80701
CDSize: 800.00
Cut point 796.00
Variable Settings:
Frames: 80701
Anti Noise Filter: Off
Passes: 4
Image Quality: 5
VAF file creation: On
Video Encoding Mode: Multipass VBR
Min. bitrate: 300
Max. bitrate: 2530
Avg. Bitrate: 1724
Aspect Ratio: 16:9 (borders added, encoded as 4:3)
---AVS Begin---
LoadPlugin("D:\PROGRA~1\DVD2SVCD\MPEG2Dec\mpeg2dec.dll")
AVISource("D:\SAVING~1\part1.avi")
ConvertToYUY2()
BicubicResize(480,360,0.33,0.33)
AddBorders(0,60,0,60)
ResampleAudio(44100)
----AVS End----
I don't understand what is AVS Any suggestions please. -
Art: There doesn't seem to be anything wrong with your logfile. The stopping and crashing of CCE could be caused by many things. CCE is very intensive on your CPU, mememory, etc. so an unstable computer can cause it to crash. If you haven't already read the CCE Q&A at Doom9 I suggest you do, there's some info there that may help you... most notably CRC patch (don't know if we can discuss that here).
http://forum.doom9.org/showthread.php?s=c0da1942647c4a81d476d547357dd7d2&threadid=16976
Now your next question about what AVS is. AVS is AVIsynth, a scripting language and frame server. What it does is basically provides a processed AVI file for CCE or another encoder. When I say processed I mean resized, sharpen, or any other filters you set. of course all this is done on the fly (in real time) so it's actually called frameserving. Why would you want to do this why not just drag the AVI file and let CCE encode it? Well CCE doesn't resize so if you just used the AVI file your MPEG would be 640x400 (in your particular case). By using the AVS each frame of your AVI will be resize, filtered, even overlayed with sub title texts if you wanted, so what CCE see's and encodes will be a 480x480 AVI with text. Hope that helps explain what AVS is.
-LeeBear -
Thanks LeeBear for your quick response. Just one more question. How long does it take approximately to convert the 1 hour DivX to MPEG for VCD? My comp is Pentium 3 550 MHz ? Thank you again.
-
Art: The time it takes to encode varies on the type of filters you use. On my computer a 90 minute movie takes about 6-7 hours to encode using 4 pass VBR SVCD. This is using a AMD XP1700+. I would guess on your system it'll take about 3 times as long, but since you're making a VCD instead of a SVCD it should be faster (MPEG1 is quicker to encode then MPEG2). If I had to guess I'd say it'll take about 5-7 hours on your computer. You can cut an hour off the time if you use a 3 pass instead of a 4 pass VBR. The extra bit of quality the 4th pass gives might not be worth the time on a slower system.
-LeeBear -
I have been around quite some time........and this is the first time I feel the need to respond to a guide with just one word: "impressive"
The Dutchman -
One more thing I noticed, not really a correction as much as a suggestion. In regards to your multipass setting of 4 passes. This actually means 5 pass vbr because the 1st pass is actually the creation of the .vaf file. Now whether or not you think this is too many passes is up to you but according to the CCE manual it is one too many as theoretical quality maxes out between 3 and 4 passes.
I think setting this to 3 passes (actually 4) will speed things up quite a bit without any noticable, or even unnoticable, quality degragation. -
Thanks LeeBear for this guide. I have divided the move into three parts in order to put into 3 cd s The creation of first 2 VCD s were successful (although computer spend a lot of time on it about 12 hours for each cd) And imagine how disappointed I was when the last one gave a problem. The process goes as usual and here is the log file.
--------------------------------------------------------
- 9/15/2002 10:04:58 AM
- AVI to SVCD Conversion
- AVI2VCD ver. 1.0.9 build 3
--------------------------------------------------------
Initializing
Initializing finished.
--------------------------------------------------------
- 9/15/2002 10:05:02 AM
- Free on drive D: 11220.06 mb
- AUDIO Extraction
--------------------------------------------------------
Audio extraction finished.
--------------------------------------------------------
- 9/15/2002 10:06:42 AM
- Free on drive D: 10769.57 mb
- AUDIO conversion
--------------------------------------------------------
Converting Audio to MP2. Filename: D:\Program Files\DVD2SVCD\Movie\Extracted_audio_1.wav
Executing BeSweet. Commandline:
"D:\Program Files\DVD2SVCD\BeSweet\BeSweet.exe" -core( -input "D:\Program Files\DVD2SVCD\Movie\Extracted_audio_1.wav" -output "D:\PROGRA~1\DVD2SVCD\Movie\Encoded_audio_1.mp2" -logfile "D:\PROGRA~1\DVD2SVCD\Movie\Encoded_audio_1.log" ) -ota( -g max ) -2lame( -e -b 224 -m s )
Audio conversion of D:\Program Files\DVD2SVCD\Movie\Extracted_audio_1.wav finished.
Audio conversion finished.
--------------------------------------------------------
- 9/15/2002 10:15:20 AM
- Free on drive D: 11220.05 mb
- Video Encoding using Cinema Craft
--------------------------------------------------------
- Editing AVS script file
Executing Cinema Craft Encoder.
StreamSectors: 834285788
AudioSectors: 76215580
VideoPAPO: 11742912
ScanOffsetBytes: 0
SeqAligningBytes: 0
DVDBytes: 0
VideoEndHeader: 4
SubtitleSectors: 0
EmptySectors: 238.00
PictureSectors: 0.00
PureMPEGStream: 746327292.00
Seconds: 2685.64
CalcMPEGStream: 746327292.00
Frames: 64223
CDSize: 800.00
Cut point 796.00
Variable Settings:
Frames: 64223
Anti Noise Filter: Off
Passes: 3
Image Quality: 5
VAF file creation: On
Video Encoding Mode: Multipass VBR
Min. bitrate: 300
Max. bitrate: 2530
Avg. Bitrate: 2223
Aspect Ratio: 16:9 (borders added, encoded as 4:3)
---AVS Begin---
LoadPlugin("D:\PROGRA~1\DVD2SVCD\MPEG2Dec\mpeg2dec.dll")
AVISource("D:\SAVING~1\part3.avi")
ConvertToYUY2()
BicubicResize(480,412,0.33,0.33)
AddBorders(0,34,0,34)
----AVS End----
Closing program
CCE Max Speed: 0.740
Video Encoding finished.
--------------------------------------------------------
- 9/15/2002 2:57:41 PM
- Free on drive D: 11220.01 mb
- Converting Pictures from ES to PS
--------------------------------------------------------
Saving bbMPEG settings: D:\Program Files\DVD2SVCD\bbMPEG\default.ini
--------------------------------------------------------
- 9/15/2002 2:57:46 PM
- Free on drive D: 11220.01 mb
- Converting Pictures from ES to PS
--------------------------------------------------------
Saving bbMPEG settings: D:\Program Files\DVD2SVCD\bbMPEG\default.ini
--------------------------------------------------------
- 9/15/2002 2:57:50 PM
- Free on drive D: 11220.01 mb
- Multiplexing and cutting
--------------------------------------------------------
Saving bbMPEG settings: D:\Program Files\DVD2SVCD\bbMPEG\default.ini
Offset in Seconds: 0
Executing bbMPEG.
Variable Settings:
Movie offset: 0 seconds
Cut point: 796 mb
Executing RunbbMPEG. Commandline:
"D:\Program Files\DVD2SVCD\bbMPEG\RunbbMPEG.exe" "D:\VCD Test\bbMPEG_Muxed_File.mpg"
Multiplexing and cutting finished.
CD-Image creation finished.
--------------------------------------------------------
- 9/15/2002 2:59:53 PM
- Free on drive D: 10775.44 mb
- SVCD Creation finished!
--------------------------------------------------------
But when I checked the file size it was about 455 MB instead of 800. Most of the move is simple black screen with audio, and while playing in win media player I get a message “ AVISource failed to decompress frame 16153 (error-100) “ message “ on that black screen. I double-checked the AVI file for bad frames with virtualdub, but it seems to be OK, no error messages at all. I tried another time, the same results. I can’t understand what’s the problem. Please any suggestions. Thank you in advance. -
Hi Lee Bear,
I followed your instruction to convert AVI to SVCD. For some reason on my DVD2SVCD, the convert Divx3 to Div4 check box on the Misc tab is grayed out and I cannot check it. I think this is causing CCE to fail during the video encoding process. Please advise what I should do. Thank you -
Art: Are you sure you don't have a bad frame? Error -100 usually means a bad frame. When you scanned the video stream for errors in VirtualDub if an error is found you won't get a pop up or anything telling you, it'll just be display in the status bar at the bottom of the window after the scan is complete.
hungp: if the DiVX3 to DiVX4 is grayed out then it's most likely you don't have the DiVX4 codec install. Download the Nimo Codec pack in the Tools section of the website that should solve your problem.
-LeeBear -
Thank you LeeBear for response. So How to fix the bad frames. Is there any link to explain how to do that .
-
ALLRIGHT I RIP MY FIRST MOVIE WITH DVDSVCD EVERYTHING IS GREAT EXCEPT FOR ONE THING WHEN I PLAY MY VIDEO FILES I'VE GOT AT THE BOTTOM RIGHT CORNER THE LOGO OF CINEMA CRAFT ENCODER CAN SOMEONE TELL ME WHAT TO DO TO GET THAT LOGO UT OF THERE.

-
You have the trial version of CCE. To get the full version (without the logo) you will need to buy the software.
The Dutchman -
Guest
COMPUTER64FRE76: post a new topic in the dvd to vcd,svcd conversion forum instead....this is about avi to vcd/svcd.
-
TEST i think you do not know how to read because if you read the top of the conversion guide it say avi (divx) so may be you should by some readind glasses.
XZARKAD i would like to thank you for the information and i will get the full version of cce.
thank you for your help.
-
After trying to fix my DivX file with DivFix I still don't have good results. In VirtualDub status panel I am getting message " 7 frames bad, 353 frames!! good but undecodable" Please help. What can be done in such cases? Is there any solution?
-
Art: Bad frames are probably the most difficult thing to deal with. There really isn't any elegant way to fix it short of cutting out the bad frames. For most DiVX movies the source of the bad frames is usually a transmission error while downloading the file (one bad bit can cause this). There's an article on DiVX Digest that may give you some help with the bad frames.
http://www.divx-digest.com/articles/index.html#edit
That's about the best soltuion I can think of.
-LeeBear -
Everything worked great for me except when I played the SVCD on my standalone I was not able to skip to the different chapters except the 1st one which starts the movie. I am pretty sure I added them all correctly in Vcdeasy.
-
A very impressive guide LeeBear.
But i have problems...
I know maybe u can't help me because i use TMPGEnc and Nero (newest versions).I followed your guide in detail as long as it comes to cinemacraft parameters..
But my problem is that audio is out of sync 1-2 seconds when i play it on my standalone dvd player.(i have tested a svcd sample and it works fine) but in the computer the sync is perfect.
When i scan for frame errors in the whole movie, virtual dub finds some, but i got cd1 in perfect audio sync, it's only cd2 that goes out of sync.Must i cut out the bad parts to get it right(its difficult to do isn't it ? Or is something else ?? Have no errors in the log file so i cant give you more info there.


 Quote
Quote


Similar Threads
-
My DivX DVD Player can't play my avi DivX/xvid video
By Baldrick in forum DVD & Blu-ray PlayersReplies: 32Last Post: 6th Mar 2015, 09:11 -
best avi (divx/xvid) to cd-r (vcd) converter
By waefwaeefwaefw in forum Newbie / General discussionsReplies: 8Last Post: 15th Sep 2008, 12:36 -
avi to DivX using divX converter pro
By Deaf Raiders in forum Video ConversionReplies: 3Last Post: 19th Dec 2007, 12:28 -
Convert this avi to DivX avi (GSpot Screenshot included)
By indiannawaf in forum Newbie / General discussionsReplies: 13Last Post: 22nd Aug 2007, 10:26 -
AVI,DivX,XviD to DVD with switchable subs using DVD2SVCD
By Baldrick in forum User guidesReplies: 18Last Post: 6th Jul 2007, 16:08