


Ok, that was a stupid mistake haha
I wasn't aware InpaintDelogo.avsi was still a txt file. It's a .avsi file now.
What required plugins are missing? I have 3 files in the plugin64 folder:
- AvsInPaint.dll
- InpaintDelogo.avsi
- LSMASHSource.dll
AvsPmod is now mentioning something about a missing function "mt_expand" in line 1520 of InPaintDelogo.avsi
Try StreamFab Downloader and download from Netflix, Amazon, Youtube! Or Try DVDFab and copy Blu-rays! or rip iTunes movies!
+ Reply to Thread
Results 31 to 60 of 172
Thread
-
-
All required plugins are mentioned at https://github.com/Purfview/InpaintDelogo
PS:
Get ffmpeg too: https://github.com/GyanD/codexffmpeg/releasesLast edited by VoodooFX; 29th May 2022 at 08:32.
-
Given the color of the timestamp it should be pretty easy to build a dynamic mask in AviSynth:
Code:hsm = MaskHS(StartHue=140, EndHue=170, MinSat=20, MaxSat=80) # build mask of orange pixels hsm = hsm.Crop(20,1000,-1390,-16).AddBorders(20,1000,1390,16).mt_expand() # restrict the mask to the timestamp area
[Attachment 65073 - Click to enlarge]
A new mask is built for every frame. The only problem you might have is when there is other orange stuff in that area. -
So, after having:
- AvsInPaint.dll
- InpaintDelogo.avsi
- LSMASHSource.dll
I also need to install (put them into the plugin folder) the following?:
- MaskTools2 ( https://github.com/pinterf/masktools ).
- RgTools ( https://github.com/pinterf/RgTools ).
- GRunT ( https://github.com/pinterf/GRunT ).
- RequestLinear ( https://github.com/pinterf/TIVTC ).
- ClipBlend ( http://avisynth.nl/index.php/ClipBlend ).
- RT_Stats ( http://avisynth.nl/index.php/RT_Stats ).
- FrameSel ( http://avisynth.nl/index.php/FrameSel ).
- GrainFactory3 ( http://avisynth.nl/index.php/GrainFactory3 ).
- vsTEdgeMask ( https://github.com/Asd-g/AviSynth-vsTEdgeMask ).
This mask looks good to, but I actually don't know how to use this code (yet). It seems I'm actually having a hard time getting AviSynth working at the moment. It's completely new for meOriginally Posted by jagabo

-
Yes.Originally Posted by jagabo
-
Ok thanks, thought only the first plugins where necessary. Going to install them now

I was actually looking for directions on Youtube on how to install it. But it's actually impressive to see what this program is capable of
https://www.youtube.com/watch?v=OulrI4yaz64
I should spend more time and learn more from it!Last edited by Rockel83; 29th May 2022 at 14:26.
-
Oh wow! This is so cool! I finally got it working in AvsPmod!

It takes some time starting up and to get results in AVSmeter. First I thought it wasn't even responding. Playback in AVSPmod looks like slowmo. But guess it's not that strange because it's generating an overlay/mask on every frame.
But I've noticed in "slow mo" that sometimes the last digit is getting hrough. Probably not that noticeable on normall speed, but could I improve this somehow?
[Attachment 65083 - Click to enlarge]
But thanks a lot for your time and effort!
How do I export/save a recording with the applied mask now? -
Remove that "version()" from script.
It's slow because inpainting is slow, it's probably 100 times slower than mask generation.
If you want to preview a mask then add Show=4 parameter [Show=0 to disable mask preview].
In the last frames a last digit mask gets borked because its duration is shorter than 52 frames [Dyn3Seq=52], later I'll show you how to correct it.
Share a video sample where it "is getting hrough" [by PM if you want].Last edited by VoodooFX; 29th May 2022 at 16:16.
-
Well, it's no problem being slow, as long as it does it's job (which it seems to do).
When saved and playbacked it probably will run at the normall 100% speed. So no problem then.
Talking about saving, how do I save this with the aplied mask? Don't see an option for doing so in AvsPmod
-
You can encode with ffmpeg.
What you want to save if you said that you are not getting a proper mask?Last edited by VoodooFX; 30th May 2022 at 00:15.
-
Now I got why you've a bad mask, because DynColorTol should be 40 instead of 30.
And to get not broken mask on the last frames we repeat the last frame 60 times, then after inpainting we remove those 60 frames:
This script should be universal for all videos done on your camera with same settings, just replace video filename accordingly.v = LWLibAvVideoSource("D:\Pachacamac E.MP4")
x = v.Trim(v.FrameCount,-1).loop(60)
v+x
InpaintDelogo(Loc="4,990,-1380,-4", DynMask=3, DynTune=150, DynColor=$FFB900, DynColorTol=40, Dyn3Seq=52, DynInflate=2)
Trim(0, FrameCount - 61)Last edited by VoodooFX; 30th May 2022 at 03:42. Reason: Removed: Show=4
-
Removed "Show=4" from the script in the above post.
Did you figured out how to use ffmpeg? -
What's actually the difference between DynColorTol 30 and 40? What does the difference do?
Thanks! This script (with show=4 removed) seems to cover up the timestamp even better! Only saw a tiny spot in the start. The bigger spots at the end are gone now! I'm happy with the result so far. It's probably even not noticeable on normall speed.
I'm still figuring out how to use ffmpeg though. I Notice it's command line based. And I'm struggeling a bit with it. Found the command options so far, but they're a lot hahaCode:v = LWLibAvVideoSource("D:\Pachacamac E.MP4") x = v.Trim(v.FrameCount,-1).loop(60) v+x InpaintDelogo(Loc="4,990,-1380,-4", DynMask=3, DynTune=150, DynColor=$FFB900, DynColorTol=40, Dyn3Seq=52, DynInflate=2) Trim(0, FrameCount - 61)
Do I need to adjust something here? Or is the output standard the same as the input, with the difference of the applied mask?
For example, when the input video has a specific resolution, framerate, quality etc. Will the output video have the same resolution, framerate, quality then? Or do I need to configure something first? -
About the simplest ffmpeg command line is:
That will get you a mp4 file with avc video and aac audio. A simple drag/drop batch file:Code:ffmpeg -i input.avs output.mp4
Code:Start /b /low "ffmpeg" "G:\program files\ffmpeg64\bin\ffmpeg.exe" ^ -i %1 ^ -c:v libx264 -preset slow -crf 18 -g 50 ^ -profile:v high -level:v 4.2 -colorspace bt709 -color_range tv ^ -acodec aac -b:a 192K ^ "%~dpn1.avc.mkv" pause -
Thanks! I've managed to generate an output file, and the results look really good on normal speed!
I've only noticed that I don't have anny sound on the output file.
Did I do annything wrong or am I missing something?
I've also noticed that there's a big difference in file size between the orriginal and the output file. The output file is about 1/3 of the size.
I would like to keep the quality as close to that of the orriginal, and I'm not sure if this is the case now. Because I think 1/3 is actually a big difference.
[Attachment 65108 - Click to enlarge]
https://www.youtube.com/watch?v=ZdQOwsBf_kQ
https://www.youtube.com/watch?v=oMf2t9cG6T8
(there should be some sounds around 1:00) -
You probably didn't include the audio in your AviSynth script.
Code:a = LWLibAvAudioSource("D:\Pachacamac E.MP4") # get audio v = LWLibAvVideoSource("D:\Pachacamac E.MP4") # get video AudioDub(v,a) # join audio and video into a single stream -
DynColorTol is color tolerance, allowed color difference of a DynColor value [pixels outside that difference - doesn't get into a mask], so more laxed thresholding settings = bigger mask, bigger mask = worse inpaiting, so you want to get a small mask as possible when covering a timestamp completely.Originally Posted by Rockel83
With those InpaintDelogo parameters we are mixing DynTune & DynColor masks and then temporally averaging that mix with Dyn3Seq, then expanding it by few pixels with DynInflate to cover possible artifacts/color bleeds.
If you are proficient with Avisynth like @jagabo and you think that you can produce a better mask than InpaintDelogo then you can build your own external mask and supply it to InpaintDelogo with DynMask=1 & mask parameters.
If you open InpaintDelogo.avsi with Notepad, there at top you'll find the help about all parameters.
You can't "cover" anything with Show=4, it's to see a preview of a mask.
If you got some spot not covered, then some setting needs to be laxed, only you can know as you didn't shared a video sample, maybe try to bump up DynColorTol to 50 and see if that spot disappears.
Try AvsPmod > Tools > Script Encoder (CLI) > Run.Originally Posted by Rockel83
Your audio doesn't need to be re-compressed as you don't edit it.
Use MKVToolNix to mux in ["merge"] audio from a original file with new encoded video.
Resolution, framerate should be same. CRF setting adjust quality, CRF in the range of 19 - 21 should produce good quality [lower CRF = more quality, but bigger files], 17 - 19 range produce very good quality, make two encodes with different CRF, compare, if you don't see a difference then use higher.Originally Posted by Rockel83
Use MediaInfo if you want to share/see info about video file.Originally Posted by Rockel83
Last edited by VoodooFX; 30th May 2022 at 15:00.
-
Thanks for explaining things!
But isn't there a way to get the audio in the encoded video right away? So I will have the same exact audio in the new video with the removed timestamp? It's kind of rebuilding the video, applying the mask to every single frame if I'm correct? So I suppose there could be a way to copy/ rebuild the audio into the same new video? Well at least I hope haha.
The default settings of my camera split up recordings to, besides turning on the timestamp. But there are a few frames overlapping. I think I should get some delays in sound when I put these video's together again. So having the exact sound in new encoded video should be verry helpfull.
I've tried to apply the mask to another video. And I think it looks good too!
Only in the beginning (the verry first frames) one of the last digits of the timestamp gets through. Could I improve this adjusting something?
Orriginal:
https://www.youtube.com/watch?v=pIigLP5u6DQ
Output:
https://www.youtube.com/watch?v=qOo76c9LdV4
Here are the orriginal files:
https://we.tl/t-Ak7PcUMjMZ -
Is there an easy way of getting Hue/Sat values from RGB/YUV color value?Originally Posted by jagabo
Btw, your posted script didn't produce same result as in screenshot. -
Not without re-ecoding audio, re-encoding degrades quality, and there is no reason to do that as you don't edit audio, so muxing in an original audio later is the right way to do this.Originally Posted by Rockel83
Ah, that's why you get a mask artifact on the first second, camera splits footage but doesn't restart a timestamp, so a last digit's duration at start can be shorter than "52" frames...Originally Posted by Rockel83
I'll post updated script later, now I must go...Last edited by VoodooFX; 30th May 2022 at 20:11.
-
ffmpeg can mux the original audio while compressing the video from your script. Assuming a source mp4 video has the same base name as the AVS script and is in the same folder, for exampleOriginally Posted by Rockel83
My Video.mp4
My Video.AVS
-i "%~dpnx1" imports the avs scriptCode:"G:\program files\ffmpeg64\bin\ffmpeg.exe" -y ^ -i "%~dpnx1" ^ -i "%~dpn1.mp4" ^ -map 0:v -map 1:a ^ -c:v libx264 -preset slow -crf 18 -g 50 ^ -acodec aac -b:a 192K ^ -colorspace bt709 -color_range tv ^ "%~dpn1.avc+aac.mp4" pause
-i "%~dpn1.mp4" imports the audio and video from the mp4 file
-map 0:v -map 1:a keeps the video from the first import, the audio from the second import -
I usually crop the frame down to the area of interest then use Histogram(mode="color2"):Originally Posted by VoodooFX
Code:ImageSource("gtyq1Vs.jpeg", start=0, end=23, fps=23.976) ConvertToYV24(matrix="rec709") Crop(20,1000,-1390,-16) Histogram(mode="color2")
[Attachment 65113 - Click to enlarge]
Then I estimate the hue and saturation values knowing:
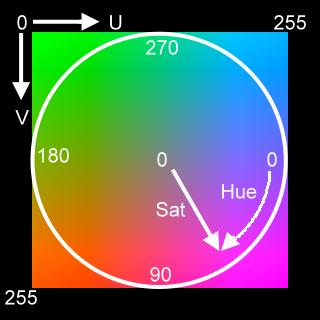
Hue is the angle around the circle, Saturation is the distance from the center.
Then I fine tune the variables to get the mask I want:
Code:ImageSource("gtyq1Vs.jpeg", start=0, end=23, fps=23.976) ConvertToYV24(matrix="rec709") Crop(20,1000,-1390,-16) MaskHS(StartHue=140, EndHue=170, MinSat=20, MaxSat=80)
[Attachment 65114 - Click to enlarge]
Then massage the mask with mt_expand(), mt_inpand(), Blur(), etc. Interleaving the image and mask, or overlaying the mask onto the image.
Code:ImageSource("gtyq1Vs.jpeg", start=0, end=23, fps=23.976) ConvertToYV24(matrix="rec709") Crop(20,1000,-1390,-16) hsm = MaskHS(StartHue=140, EndHue=170, MinSat=20, MaxSat=80) Overlay(last, hsm.Invert(), mask=hsm)
[Attachment 65115 - Click to enlarge]
Probably a color format/matrix issue. I only had the one PNG image (the before image from post #12) to use as a source and converted it to YV24 assuming rec.709 colors before MaskHS().Originally Posted by VoodooFX
Last edited by jagabo; 30th May 2022 at 17:50.
-
Well actually the sound quality is already quite bad, because the camera was in a woterproof housing. But maybe it could be helpfull to match soundtracks of orriginal files as having a reference point. Is there a way to try out, to get the actual sound encoded into the video?Not without re-ecoding audio, re-encoding degrades quality, and there is no reason to do that as you don't edit audio, so muxing in an original audio later is the right way to do this.
You were refering to this. can I alternatively encode a video (to remove the timestamp) and after use the orriginal video with this program to merge the sound to the newly created video. And save it as newly encoded videopart, without timestamp but with the sound of the orriginal file?Use MKVToolNix to mux in ["merge"] audio from a original file with new encoded video.
I was looking for a way to try and play around with this. There was no vallue of this in the script and I could not find anny settings so far in ffmpeg. So I asume it uses a standard vallue? Can I adjust this stard vallue?Resolution, framerate should be same. CRF setting adjust quality, CRF in the range of 19 - 21 should produce good quality [lower CRF = more quality, but bigger files], 17 - 19 range produce very good quality, make two encodes with different CRF, compare, if you don't see a difference then use higher.
Some search on the internet teached me that adding "-crf 17" to the command applies this setting. In my case:
Code:ffmpeg -i pachacamac.avs -crf 17 pachacamac.mp4
I've tried this. I've included this into the script, maybe I did something wrong, but it didn't gave me anny sound so far.You probably didn't include the audio in your AviSynth script.
Code:a = LWLibAvAudioSource("D:\Pachacamac E.MP4") # get audio v = LWLibAvVideoSource("D:\Pachacamac E.MP4") # get video AudioDub(v,a) # join audio and video into a single stream -
Here is updated script:
v = LWLibAvVideoSource("D:\testtt\Pachacamac E.mp4")
xEnd = v.Trim(v.FrameCount,-1).loop(60)
xStart = v.Trim(0,-1).loop(60)
xStart + v + xEnd
InpaintDelogo(Loc="4,990,-1380,-4", DynMask=3, DynTune=140, DynColor=$FFB900, DynColorTol=50, Dyn3Seq=52, DynInflate=3)
Trim(60, FrameCount - 61)That is exactly what MKVToolNix does, but looks like you can do audio without re-encoding like jagabo wrote there.Originally Posted by Rockel83
That's too hardcore for the newbies, they need ~one click solution to everything...Originally Posted by jagabo
Last edited by VoodooFX; 30th May 2022 at 21:07.
-
Thanks! I've actually read it a couple of times and stared to it some time. But I can't figure out how to use this.Originally Posted by jagabo
It's also a script right? But it looks verry diffrent from the script I got from VoodooFX. Missing the InpaintDelogo, DynMask, DynTune aspects etc.
It looks more like the "drag/drop batch file" you've mentioned in a previous post.
But I didn't understood how to use it yet.That will get you a mp4 file with avc video and aac audio. A simple drag/drop batch file:
Code:Start /b /low "ffmpeg" "G:\program files\ffmpeg64\bin\ffmpeg.exe" ^ -i %1 ^ -c:v libx264 -preset slow -crf 18 -g 50 ^ -profile:v high -level:v 4.2 -colorspace bt709 -color_range tv ^ -acodec aac -b:a 192K ^ "%~dpn1.avc.mkv" pause
This looks interesting too. Could I somehow try this mask on my videos to see the results too? I'm verry curious to itOriginally Posted by jagabo
-
Thanks! I need to figure out how to use this. But things are geting quite complex and confusing nowOriginally Posted by VoodooFX
I'm sorry. I feel verry clumpsy not seeming to understanding a lot of things you guys write down here. I'm trying to understand but it's clear I'm missing some basic knowledge here.Originally Posted by VoodooFX
I appreciate all your help and effort btw! (both of you)
-
I don't know InpaintDelogo() and whether it can take a user supplied video as the mask. VoodooFX should know...Originally Posted by Rockel83
-
@jagabo
In some post above I explained to him how to supply an external mask to InpaintDelogo.
Btw, your last batch script example re-encodes audio.
@Rockel83
That mask is just an example, it's not ready for you to use, and it can't offer anything better for InpaintDelogo.
Open Notepad and paste there a batch script, save it to Desktop as "AutoEncode.bat", now you can drag and drop your video/avs file[s] on it to do auto encode.Last edited by VoodooFX; 30th May 2022 at 20:08.
-
Oops, you're right. I copied and pasted and forgot to change to "-acodec copy":Originally Posted by VoodooFX
Code:"G:\program files\ffmpeg64\bin\ffmpeg.exe" -y ^ -i "%~dpnx1" ^ -i "%~dpn1.mp4" ^ -map 0:v -map 1:a ^ -c:v libx264 -preset slow -crf 18 -g 50 ^ -acodec copy ^ -colorspace bt709 -color_range tv ^ "%~dpn1.avc+aac.mp4" pause -
Put it in a batch file. You will have to change the path to ffmpeg.exe. Start Notepad, copy the text from the post, paste it into Notepad, Save it as ffEncode.BAT -- be sure to specify the .BAT extension when you save. Then drag/drop an AVS script onto the batch file.Originally Posted by Rockel83
Note that VoodooFX pointed out an error in the original post (it was reencoding the audio). I fixed the error in the above code segment. It now copies the audio from the source mp4 file to the destination mp4 file.
 Quote
Quote
Similar Threads
-
Difference between lossless and lossy changing fps (timestamp vs encoding)
By precipizio in forum Blu-ray RippingReplies: 4Last Post: 23rd Feb 2022, 09:24 -
Keeping timestamp of edited / converted Video
By keyboard in forum Newbie / General discussionsReplies: 4Last Post: 29th Sep 2021, 06:57 -
ffmpeg "Missing key frame while searching for timestamp" message
By the_steve_randolph in forum Newbie / General discussionsReplies: 0Last Post: 19th Aug 2021, 14:38 -
How to fix a timestamp overlap?
By WoundedPear in forum Newbie / General discussionsReplies: 2Last Post: 2nd May 2020, 03:00 -
Polaroid CUBE timestamp flaw?
By terrypin in forum Newbie / General discussionsReplies: 6Last Post: 9th Jun 2017, 16:17