


Yeah I can see that, mainly with the first one. I suspect the moral of the story is not to use PointResize, unless you're after a particular effect. Even the Avisynth wiki says it'll look "blocky". Does it still happen if you upscale with something else?
It might be something different, but I couldn't really guess as to what without a sample of the original source to play with. If you're converting to YV24 before resizing, maybe try it the other way around (assuming the source isn't YV24) but it's still there for the fix1 and fix2 versions. It's just not as obvious.
What's the exact CropResize syntax you used for the upscaled screenshot? I just want to try it to see if it has anything to do with zero displaying mas a negative.
+ Reply to Thread
Results 31 to 60 of 135
-
-
For old style games some people like to see the raw "blocky" pixels, so far, PointResize it's the only one I know that does this.Originally Posted by hello_hello

With other things non related with raster graphics it shows screen tearing, I usually do this (PointResize+Bilinear) to counter the effects.Originally Posted by hello_hello
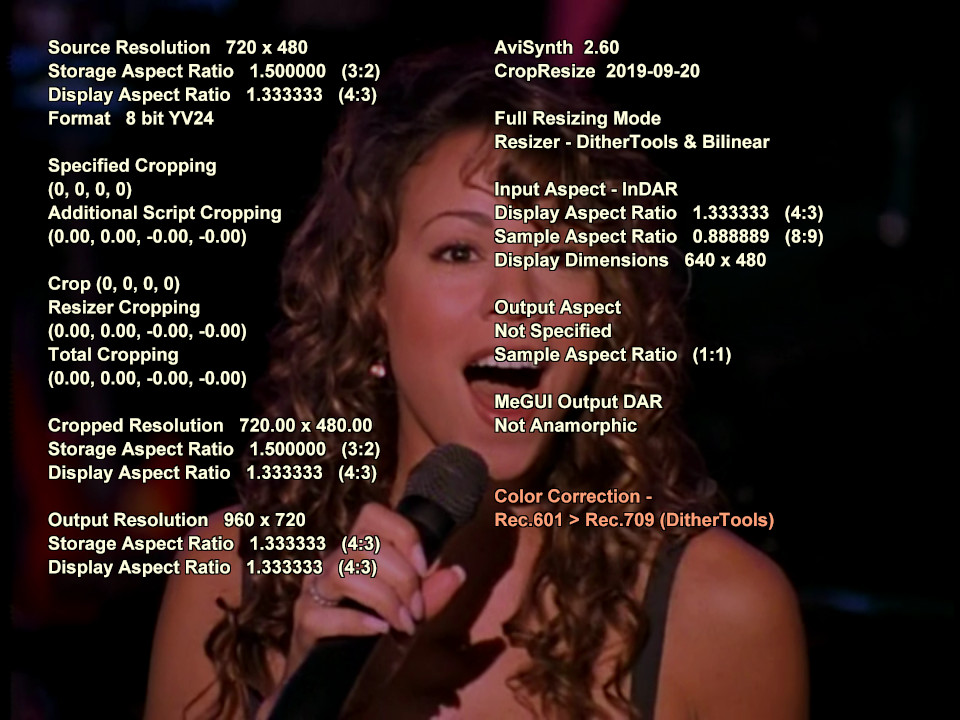
The source is RGB32, to encode it I use ConvertToYV24(matrix="Rec601") for non HD and ConvertToYV24(matrix="Rec709") for HD. I use YV24 because not every plugins accept RGB or YUY2, I did play with ColorMatrix(mode="Rec.601->Rec.709") for a while but it creates a bunch of green screen issues or color shifts.Originally Posted by hello_hello
I'll try other modes and see what happens.
I can't sent you the source because it's RAW and over 2 GiB, but you can generate it with mame, I record it with the command:
Code:mame64 -aviwrite some_name.avi rom_name
I use this one:Originally Posted by hello_hello
Code:CropResize(0,720, 0,0,0,0, InDAR=4.0/3.0, ColorCorrect=2, Resizer="PointResize", Info=true)
-
Just a little bit of the source where you can see the problem would do. I'm not sure I'm enthusiastic enough to download roms and emulators etc.Originally Posted by amaipaipai

Still no negative zeros here. You're not using one of the old MT versions of Avisynth are you, or just the standard version? It's odd.... not the end of the world, but it's odd....Originally Posted by amaipaipai
-
No problem!Originally Posted by hello_hello
Sample attached.
Yes, I'm using a 2.60_MT version, do you recommend a standard 2.60?Originally Posted by hello_hello
Thank you. -
Byuu did a video today talking about the same thing I do when upscaling video or scanned materials.
https://www.youtube.com/watch?v=H6u7Nk6_L50
I scan something to a really big size, (8k, 16k) then shrink it back to normal size to smooth everything out with a bilinear resizer:

I apply the same for videos, it doesn't work with all but it get a pretty decent result. I upscale with pointresize to blow everything out, include noise and compression blocks, then shrink back to normal size with BilinearResize, samples attached. -
I would have assumed you'd be better of with Avisynth+ these days, in respect to multithreading, but I don't know for sure. My PC's a bit old and x264 keeps the CPU pretty busy, so I haven't bothered thinking about Avisynth multithreading. If a script is really slow, I just run two encodes at a time. When I eventually upgrade the PC I'll start to think about it.Originally Posted by amaipaipai
I'll have to check out your samples a bit later, but in the mean time if you'd care to try this....
The only change is the "negative zero" workaround is no longer Avisynth+ specific.Last edited by hello_hello; 23rd Sep 2019 at 04:45.
-
Yeah, my PC it's old too, but it get the job doneOriginally Posted by hello_hello

I've ran some tests, and after some struggle to make Avisynth+ to run, this are the results using your test script.Originally Posted by hello_hello
AVS260_MTCode:CropResize(0,720, 0,0,0,0, InDAR=4.0/3.0, ColorCorrect=2, Resizer="BilinearResize", Info=true)
AVS260

AVSPLUS

Either showing a negative zero or not, the result it's exact the same, no changes. I would not care too much about it since all the calculations are working as expected.
Also, try this upscale and see if you like it:
nnedi3_rpow2Code:nnedi3_rpow2(2,cshift="Spline64Resize", fwidth=tw, fheight=th) Sharpen(-0.4) FluxSmoothST(temporal_threshold=7, spatial_threshold=7, chroma=false, opt=2)

Last edited by amaipaipai; 23rd Sep 2019 at 06:29.
-
amaipaipaim
The game sample you posted is a bit too short. The movement comes and goes before my brain can lock onto anything.
I had a look at your PointResize upscales and they look a bit blocky, but that could be from the source and not the upscaling.
I was going to mention nnedi3_rpow2, as it seems to be the standard for upscaling video, if you're into that sort of thing. I upscale animation as I think it can be improved in the process, but I'm not sure I've seen a video upscale that blew me away, and I've never managed to upscale one myself where I thought the upscaling improved the quality much. However....
I haven't played with it a lot, but maybe give this resizing function a try. http://avisynth.nl/index.php/Nnedi3_resize16
It has a few dependencies, but the gist of it is for upscaling, it upscales with nnedi3 and then resizes to the desired output dimensions in 16 bit with DitherTools. It takes care of the chroma shift and the default settings should be fine.
The main advantage however, is you can use it with CropResize. The disadvantage is, if you color convert with CropResize using DitherTools, there'll be two conversions to 16 bit and back, although that probably won't hurt much except encoding speed.
Using your Mariah Carey video as an example, is the source progressive or interlaced? If it's interlaced I'd de-interlace with QTGMC first, and if it's progressive I'd run QTGMC in progressive mode first to clean it up a bit. It should do a much better job than FluxSmooth, and based on your upscaled sample, which I assume wasn't cropped, if it's a DVD it's likely the input aspect ratio is ITU (or 15:11 for mpeg4 which is pretty much the same as ITU) rather than an exact 4:3. Most 4:3 DVDs are ITU/mpeg4. Taking a guess at the cropping that'd be required to remove the crud from the sides (I can't tell how much to crop from the upscaled version) maybe give something like this a try.
QTGMC(InputType=1, EzDenoise=1) # for a progressive source, or QTGMC(EzDenoise=1) for interlaced
CropResize(960,720, 12,0,-10,0, InDAR=15.0/11.0, ColorCorrect=2, Resizer="nnedi3_resize16")
GradFun3() # some extra dithering from DitherTools to prevent banding when encoding if you think it needs it.
For a 15:11 input DAR, you should end up with something like this:

Whether you use 15:11 or 4:3 as the InDAR I'd still be cropping the crud, and maybe try a second encode without nnedi3_resize16, while resizing to a SD resolution such as 640x480 or 704x528 etc. I'd be interested to learn how much difference the 720p upscaling makes when you compare it to a standard definition encode while they're both running fullscreen on your TV or monitor, assuming QTGMC had a go at it first each time.
By the way, I can't wrap my head around the screenshots of the three Avisynth versions. The only way they'd make sense to me is if the first two were both 2.60 MT, because that'd mean the "negative zero" fix works for Avisynth+ as expected, but not for 2.6 MT. I can't think of a reason why the "fix" would cause 2.60 to do something it wasn't doing before, given it's something it's supposed to prevent. Not that it's the end of the world. It makes no difference to the script's cropping or resizing, only how zero is sometimes displayed when Info=true.Last edited by hello_hello; 23rd Sep 2019 at 12:06.
-
I'm uploading a new one.Originally Posted by hello_hello
Yes, the problem it's the source, old VHS 240p/480p material. Either way, it does a pretty good job upscaling from a low quality source.Originally Posted by hello_hello
Yeah, I don't expect any miracles with this, any decent quality upscaling is good enough for me.Originally Posted by hello_hello
Thanks, I'll give that a try.Originally Posted by hello_hello
The original it's interlaced from a DVD (NTSC), deinterlaced with yadif at the time and converted to a final H264/MP4, this was used to upscale. None of the videos I have here I had the intention to upscale, the AR for it it's 3:2 but I scale it to 4:3 anyway. I never care to crop it or do any hard work on it because it was just a file that I use as a test material while a repair something.Originally Posted by hello_hello
I'll give this a second try with QTGMC.
Don't know if this can help, this are the hashes from the avisynth dll's I've used:Originally Posted by hello_hello
AVS260_MT
AVS260Code:Name: avisynth.dll Size: 1860096 bytes (1816 KiB) SHA1: E293AE94D59C4B0AEF29E94B0D54353DFA7CB6B8 Name: devil.dll Size: 719872 bytes (703 KiB) SHA1: F1252382FEB6A31A384A840E41E623B72BB3D000
Maybe you are using a more recent AVS260 than I, I'm using this tool to fast switch between different versions of Avisynth, the version I have here it's older than the link above. I'm holding on AVS+ for a while and see how it goes.Code:Name: avisynth.dll Size: 1748992 bytes (1708 KiB) SHA1: 0BB1972AB0B9127222892622C6272C46DC02F9DD Name: devil.dll Size: 719872 bytes (703 KiB) SHA1: F1252382FEB6A31A384A840E41E623B72BB3D000
-
Sorry, I've sent you the wrong sample, that one it's already upscaled, here is the correct one.
-
This is a new sample I got from a japanese DVD.
29.976 fps (NTSC) 4:3
TurnWhite.avs
Code:# https://jeanbruenn.info/2010/12/29/avisynth-color-correction-improvement/ function turnWhite(clip v, int "threshold") { threshold = default(threshold, 235) v.converttorgb() grayscale() converttoyv12() conditionalfilter(last, blankclip( v, pixel_type="YV12", color_yuv=$FF8080 ), v, "averageluma()", ">", string(threshold))It might need some filters to remove this color noises around the Ruy neck, I don't know how to handle animeCode:video = mpeg2source("D:\DVD\SF\VTS_01_3.d2v", cpu=6) audio = NicAC3Source("D:\DVD\SF\VTS_01_3 T80 2_0ch 448Kbps DELAY -197ms.ac3").Delay(-0.197) import("turnwhite.avs") #Detect audio channels channels = Audiochannels(audio) #Try apply DolbySurround Downmix II daudio=ConvertAudioToFloat(audio) fl = (channels>=1) ? GetChannel(daudio, 1) : 0 fr = (channels>=2) ? GetChannel(daudio, 2) : 0 c = (channels>=3) ? GetChannel(daudio, 3) : 0 sl = (channels>=5) ? GetChannel(daudio, 5).Amplify(1.2) : 0 sr = (channels==6) ? GetChannel(daudio, 6).Amplify(1.2) : 0 sr = (channels==5) ? GetChannel(daudio, 5).Amplify(0.9): sr ssl = (channels>=5) ? MixAudio(sl, sr, 0.2818, 0.1627).Amplify(-1.0) : 0 fl_c = (channels>=5) ? MixAudio(fl, c, 0.3254, 0.2301) : 0 ssr = (channels>=5) ? MixAudio(sl, sr, 0.1627, 0.2818) : 0 fr_c = (channels>=5) ? MixAudio(fr, c, 0.3254, 0.2301) : 0 l = (channels>=5) ? MixAudio(ssl, fl_c, 1.0, 1.0) : 0 r = (channels>=5) ? MixAudio(ssr, fr_c, 1.0, 1.0) : 0 audio = (channels>=5) ? MergeChannels(l, r) : audio #Remove possible LFE channel l_ch = (channels==3) ? GetChannel(audio, 1) : 0 r_ch = (channels==3) ? GetChannel(audio, 2) : 0 audio = (channels==3) ? MergeChannels(l_ch, r_ch) : audio #Correct audio bits audio = (Audiobits(audio)==16) ? audio : audio.ConvertAudioTo16bit() # Mux AV AudioDub(video, audio) AssumeTFF() # IVTC A2 = last A2 = A2.QTGMC(Preset="Very Slow", ediThreads=2, FPSDivisor=2) TFM(mChroma=true,clip2 = A2) TDecimate(cycleR=1,cycle=5) Undot() CropResize(0,720, 0,0,0,0, InDAR=4.0/3.0, ColorCorrect=2, Resizer="BilinearResize", Info=false) Histogram("levels") ConvertToYV12() GradFun3() turnWhite()
The upscale quality it's good enough.

-
You might as well make the quality worth upscaling. Without having the source to work with though, your last sample could use some noise filtering, line darkening, a de-rainbow filter, sharpening, and possibly some light deblocking.Originally Posted by amaipaipai
I'm not even close to an expert on encoding animation, but taken from your sample...
Crop(16, 76, -264, -88)

It's a still picture, so I didn't experiment with noise filtering.
Crop(16, 76, -264, -88)
DFMDeRainbow()
TTempSmooth()
FastLineDarken(Thinning=0)
MergeChroma(AwarpSharp(Depth=5),AwarpSharp(Depth=1 0))
FastLineDarken(Thinning=0)
CSMod(strength=150)
GradFun3()

I'll have a play with the sample from the game later. I have to spend time in the real world for a while.....Last edited by hello_hello; 24th Sep 2019 at 05:18.
-
It looks amazing!Originally Posted by hello_hello
I'm new to avisynth, I'm still learning
I'll work with your settings latter and see how it goes, I'm still doing some work with it.
Me too!Originally Posted by hello_hello
I have work to do!
This is the sample from Mariah using your suggestions, 4:3 cropped, I did try 'nnedi3_resize16' but it crashes everything and when it works it's really slow, it works fine as stand alone thou:
Thank you!Code:SetMemoryMax(1024) # http://avisynth.nl/index.php/AviSynth+#MT_Notes SetFilterMTMode("mpeg2source", 3) SetFilterMTMode("WavSource", 3) video = mpeg2source("D:\DVD\Mariah\VTS_02_1.d2v", cpu=6) audio = WavSource("D:\DVD\Mariah\VTS_02_1 Ta0 48K 16bit 2ch.wav") #Detect audio channels channels = Audiochannels(audio) #Try apply DolbySurround Downmix II daudio=ConvertAudioToFloat(audio) fl = (channels>=1) ? GetChannel(daudio, 1) : 0 fr = (channels>=2) ? GetChannel(daudio, 2) : 0 c = (channels>=3) ? GetChannel(daudio, 3) : 0 sl = (channels>=5) ? GetChannel(daudio, 5).Amplify(1.2) : 0 sr = (channels==6) ? GetChannel(daudio, 6).Amplify(1.2) : 0 sr = (channels==5) ? GetChannel(daudio, 5).Amplify(0.9): sr ssl = (channels>=5) ? MixAudio(sl, sr, 0.2818, 0.1627).Amplify(-1.0) : 0 fl_c = (channels>=5) ? MixAudio(fl, c, 0.3254, 0.2301) : 0 ssr = (channels>=5) ? MixAudio(sl, sr, 0.1627, 0.2818) : 0 fr_c = (channels>=5) ? MixAudio(fr, c, 0.3254, 0.2301) : 0 l = (channels>=5) ? MixAudio(ssl, fl_c, 1.0, 1.0) : 0 r = (channels>=5) ? MixAudio(ssr, fr_c, 1.0, 1.0) : 0 audio = (channels>=5) ? MergeChannels(l, r) : audio #Remove possible LFE channel l_ch = (channels==3) ? GetChannel(audio, 1) : 0 r_ch = (channels==3) ? GetChannel(audio, 2) : 0 audio = (channels==3) ? MergeChannels(l_ch, r_ch) : audio #Correct audio bits #audio = (Audiobits(audio)==16) ? audio : audio.ConvertAudioTo24bit() audio = (Audiobits(audio)==16) ? audio : audio.ConvertAudioTo16bit() #Sample of correct resample audio = (Audiorate(audio)==48000) ? audio : audio.SSRC(48000) video = video.WhiteBalance(r1=193, g1=167, b1=165, r2=56, g2=49, b2=48) video = video.ConvertToYV12(matrix="Rec709") video = video.GradFun3() video = video.Sharpen(-0.2) # Mux AV AudioDub(video, audio) # Top Field Source AssumeTFF() # IVTC # --- # https://forum.videohelp.com/threads/390975-QTGMC-and-TDecimate-as-a-custom-IVTC-script A2 = last A2 = A2.QTGMC(Preset="Very Slow", ediThreads=2, FPSDivisor=2, EzDenoise=1) TFM(mChroma=true,clip2 = A2) TDecimate(cycleR=1,cycle=5) # --- Undot() trim(817,6529).Fadeout(60) CropResize(0,720, 8,0,-8,0, InDAR=4.0/3.0, ColorCorrect=2, Resizer="BilinearResize", Info=false) #import("histogram.avs") #HistogramRGBLevels() #HistogramCMYLevels() #HistogramRGBParade() -
I don't know..... I haven't seen the original so I could be talking crap, but I really can't see what you would have gained by upscaling. If you'd care to upload a sample of the source I wouldn't mind having a look. Is it really telecined rather than interlaced? I'm not seeing particularly jerky motion, but is TIVTC definitely the right tool for that one?Originally Posted by amaipaipai
PS. It's probably just me, but I'm a bit OCD when it comes to the display aspect ratio being less than 4:3. I'd probably do this to make it 4:3 and let the script crop a few pixels top and bottom as necessary.
CropResize(960,720, 8,0,-8,0, InDAR=4.0/3.0)
Although I still think this is probably more likely to be correct, and the script won't have to crop anything from the top or bottom.
CropResize(960,720, 8,0,-8,0, InDAR=15.0/11.0)
Gradfun3() should always be the last video filter in the chain, with maybe the exception of Trim(), as long as Trim's not doing fades. It should definitely follow noise removal, but any filtering at all will probably make any previous dithering and/or debanding pretty pointless.Last edited by hello_hello; 24th Sep 2019 at 08:17.
-
I can't say I came up with anything clever for the PointResize problem. The closest was something similar to your fix, but it also softens the picture.
ConvertToYV24()
Dither_convert_8_to_16()
Dither_resize16(960,720, kernelv="bilinear", kernelh="point")
DitherPost()
Personally I think I prefer PointResize on it's own, despite the dancing lines. It looks low-tech, which is not out of place, and it's nice and sharp. -
I have no intention to upscale any DVD's, I'm just doing it for the sake of test and learning.Originally Posted by hello_hello
My only gain it's to study and learn how people do it.

Yes, the source is telecined, I'm uploading a small sample so you can mess with, the sample is a direct copy from the source with no processing.
Thank you for the info!Originally Posted by hello_hello
-
The closest I could get was 'fix2', all we have to do it's to increase sharpen to have a perfect 1:1 PointResize.Originally Posted by hello_hello
-
By the way, where can I found "CSMod"?
I've located the author and the post related to it, but the author upload it to a baidu server that requires you to sign in, to install an app and to inform your cellphone number. -
Yes it is telecined. I thought I saw a couple of odd frames so I wondered if it was err.... odd, but what I saw appears to be in the source or it's just motion blur and I over-thought it, or it might be because it's a re-encode.Originally Posted by amaipaipai
You're seriously torturing the video though aren't you? At least going by how it displays on my PC. I just assumed that's how it is.
This is how my encode of No-scripts.mp4 looks when upscaled to 1080p on playback. I encoded it at 696x522, because that's roughly the width after I cropped and it's 4:3, although normally I'd resize to 640x480.
This is from New_sample.mp4 (post #43). Forgetting the difference in display aspect ratio (I used InDAR=15.0/11.0, and slightly different cropping) is all the dark stuff visible on your PC or is it displaying the same for me? I'm guessing it's the latter, as if I do a full range to limited range conversion using the media player, the dark areas appear to have been clipped. The detail is gone.
This is the version of CSMod I've been using.
https://pastebin.com/PvetHdzF
According to the site you linked to there's a newer one, but it appears not to be on pastebin.
There's also a version for sharpening in 16 bit (the stacked 16bit hack DitherTools uses) here.
https://pastebin.com/AJAXrWdW
CSMod lists RemoveGrain + Repair as requirements, but use RGTools instead. I have MSharpen 0.9 in my plugins folder. I guess I couldn't find version 1.0
This is probably the original ContraSharpen script. I haven't used it in quite a while because it's not in my plugins folder for some reason, but it might be worth a look. Chances are it's faster and might do just as good a job for animation. https://pastebin.com/Kw5M0NWpLast edited by hello_hello; 25th Sep 2019 at 08:52.
-
Maybe it's because the DVD is crap, a bad conversion, who knows? This DVD looks bad here also.Originally Posted by hello_hello
I've Michael Jackson, Madonna, Elvis Presley among other with way, way better quality.
Maybe we are pushing it a little, but if you look at the version at Youtube, our version looks good!Originally Posted by hello_hello
https://www.youtube.com/watch?v=zrgOxi7U_NI
I can't see the middle tones with this, the black it's way too black on my display.Originally Posted by hello_hello
In general I use Full Range to give some space for adjustment on any modern display, I avoid this however when I need to use the material for publishing when we need more saturation and black levels.
Thank you!Originally Posted by hello_hello
I'll try that latter with the anime scene. -
Yeah but the luminance levels of the YouTube version look okay.Originally Posted by amaipaipai
I don't know which one your referring to as far as the middle tones go. The second screenshot was from your encode, and the third one is your encode again with the luminance levels reduced to limited range to show the blacks are clipped and there's no detail.Originally Posted by amaipaipai
It doesn't make sense to me to change the levels. Pretty much all video is limited range, and TVs normally expect a limited range input which they expand to full range themselves. If you give a full range input to a TV that's expecting limited range, it'll expand the levels and the picture will look too dark.
PCs are traditionally full range, which means PC monitors traditionally expect a full range input. Normally the media player or video card will expand the limited range video levels to full range on playback, otherwise the picture will look washed out, but I think you're asking for trouble by not using the standard limited range for video.
It could be that my player or video card is expanding the levels of your full range encode when it shouldn't be, which is why it looks too dark on my PC and the blacks are crushed, but that's why I asked if it looks the same as my screenshots when you watch it on your PC, or whether it looks like the original.Last edited by hello_hello; 25th Sep 2019 at 18:01.
-
They might have a better source than this DVD.Originally Posted by hello_hello
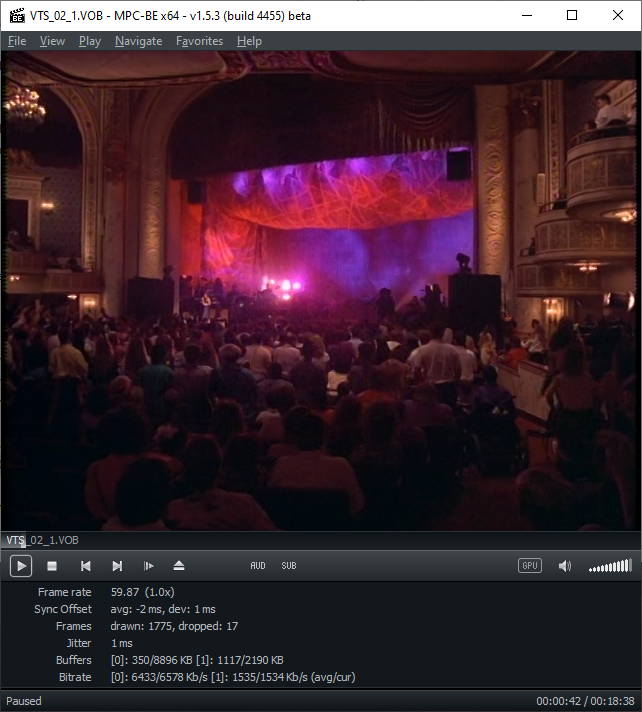
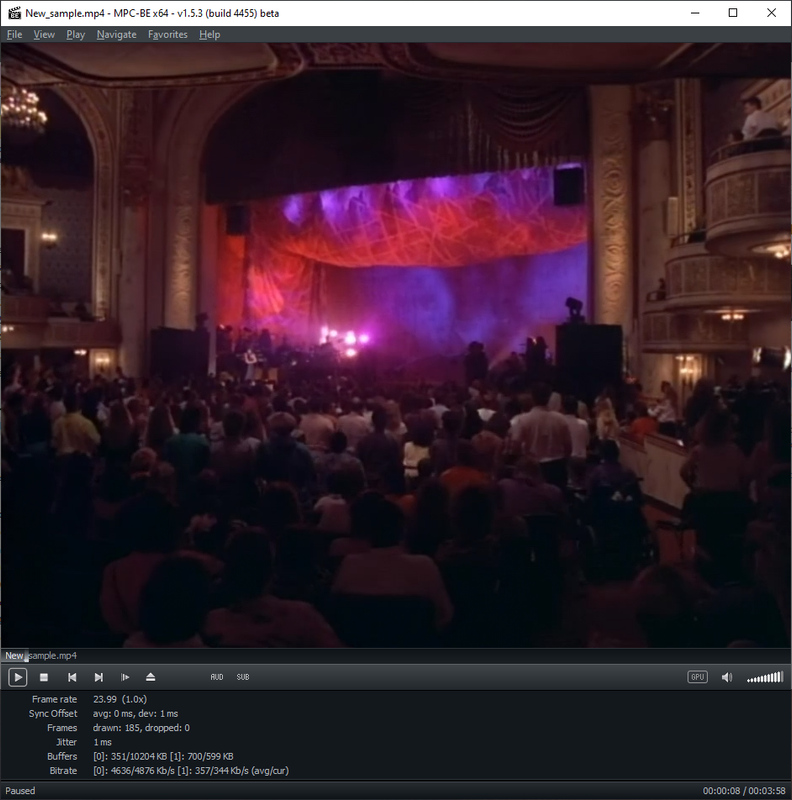
Strange, I see your screenshots way too dark over here, this are the screenshots from the same scene on my player:Originally Posted by hello_hello
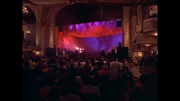
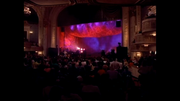
Direct from VOB, darker:
New_sample.mp4, lighter:
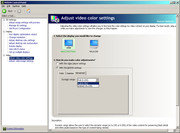
My player settings:


My default VGA settings (4:4:4 Full RGB) and the settings available:Originally Posted by hello_hello

My display is a Sony Bravia KDL-55W802A, it support 12-bit color (HDMI only) and 4:4:4 RGB or YUV (HDMI only).
Video for publishing I use standard YUV 4:2:0 limited range, for internal use like this I rather prefer 4:2:2 full range. Compressing an already compressed color with this setup It look terrible on my setup, it's like to compress a MP3 twice, so if the compression it's bad from the source the 4:2:2 compression will keep it that way and not make it worse, so I think.
Changing limited to full range in fact makes the picture a bit washed out and I do it for a very specific reason, the source material looks over saturated and too dark on my setup if the color range it's limited, I can't see the middle tones like dark gray for instance, it show black level too black and white too white with no middle ground. To make matters worse, the display it's calibrated so with a limited range everything looks way too saturated and I have to cut down all my adjustments, with full range color, it give me a more neutral look and I have room to adjust color saturation, brightness if necessary.
Maybe on a standard setup a limited range should look better, I did some tests on all the TV's I have at home and full range allow me to saturate the colors and other settings the way I like it, limited range on the other hand already comes saturated by somebody else, just like loudness war with music, it already comes too loud.
I can share another test with limited range if you like it.
-
Hold your horses, I'm about to deliver the Street Fighter demo anytime soon!
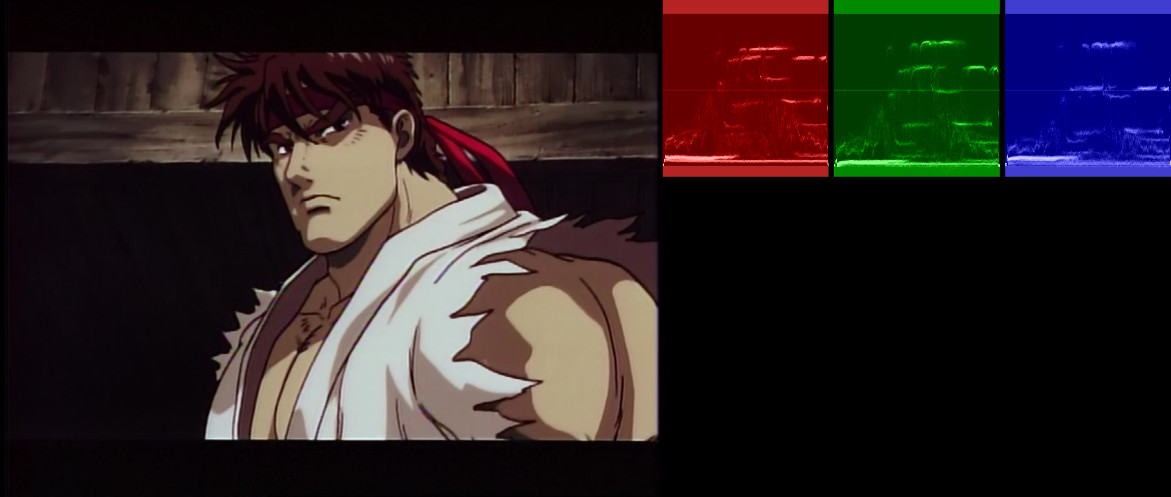
Code:avs [info]: 852x720p 1:1 @ 60000/1001 fps (cfr) x264 [info]: using SAR=1/1 x264 [info]: using cpu capabilities: MMX2 SSE2Fast SSSE3 SSE4.2 AVX XOP FMA3 BMI1 x264 [info]: profile High, level 3.2, 4:2:0, 8-bit [0.1%] 9/9186 frames, 0.02 fps, 11639.35 kb/s, eta 132:10:33

-
The script it's the same as the previous ones, just add your anime filter:
The upscaled version looks better than the original, thank you for that script, it works like a charm!Code:SetMemoryMax(1024) # http://avisynth.nl/index.php/AviSynth+#MT_Notes SetFilterMTMode("mpeg2source", 3) SetFilterMTMode("NicAC3Source", 3) # SOURCE video = mpeg2source("D:\DVD\SF\VTS_01_3.d2v", cpu=6) audio = NicAC3Source("D:\DVD\SF\VTS_01_3 T80 2_0ch 448Kbps DELAY -197ms.ac3").DelayAudio(0.197) # Try apply DolbySurround Downmix II import("DSDII.avs") video = video.Undot() # Mux AV AudioDub(video, audio) # IVTC # --- # https://forum.videohelp.com/threads/390975-QTGMC-and-TDecimate-as-a-custom-IVTC-script A2 = last A2 = A2.QTGMC(Preset="Very Slow", ediThreads=2, FPSDivisor=2, EzDenoise=1) TFM(mChroma=true,clip2 = A2) TDecimate(cycleR=1,cycle=5) # --- Trim(52348,56940) MergeChroma(AwarpSharp(Depth=5),AwarpSharp(Depth=10)) CropResize(0,720, 8,0,-8,0, InDAR=40.0/33.0, ColorCorrect=2, Resizer="BilinearResize", Info=false) # Anime filtering / corrections import("anime_filter.avs") # Debanding GradFun3() -
amaipaipai,
This turned into quite an essay. Sorry about that.
On displaying full range video...
It is borked on my PC. I expended a video to full range with ColorYUV(Levels="TV->PC"). ColorYUV can change the luma and chroma levels or just the luma, which will make the colors look more or less saturated. I encoded it as full range and it looked terrible on playback, even when I tried MadVR as the renderer, which correctly identified it as full range. I suspect it's the Nvidia drivers. I haven't updated them in years. I've seen that sort of thing with Nvidia drivers and limited range video before, but I never play full range video so I hadn't noticed the full range problem with these drivers. That aside....
Different connection types are typically a particular range by default.
VGA is always full range. I'm pretty sure DVI is supposed to be full range. HDMI is generally limited range by default.
With my old drivers and XP I can choose between RGB and YCbCr444 for the desktop output settings. That effects Windows itself (programs and images etc) but not video levels directly. Where it gets tricky, is my video card has a VGA and DVI out. The DVI out is connected to my monitor's (or TV's) input via HDMI. When I choose YCbCr444 for the output, both the TV and monitor no longer let me select full or limited range for the input. The option is greyed out and fixed at a particular range (I haven't checked properly for which one it is yet, but I'm pretty sure it's fixed at limited range). When the input is RGB the monitor and TV both let me choose the HDMI input levels, but I'm pretty sure the potential to combine DVI out with HDMI in, is why PC's let you select either full or limited range for the "desktop" YCbCr444 output these days (for my TV the setting is called "HDMI black level" and for some stupid reason "normal" means a full range input, not limited range as you'd expect for a TV).
For my drivers, the settings for "desktop" adjust the type of output. For yours, you can also adjust the output levels for Windows itself. Under "video" is where I set the output levels for video, independently of the desktop. I suspect you'll have something similar under your "video" section. I've played with the "video" options on Win7 in the past, but can't remember exactly how they interact with the desktop choices (assuming you have levels settings for both). If they're set correctly though, and there's no video enhancing crap enabled, all limited range video should display the same, as should all full range video. For me, I can safely set both the video card and media player to output full range. That way video on YouTube etc displays correctly, but video played with MPC-HC isn't expanded to full range twice. It's odd that your original vob file and encoded sample display differently. If they're both limited range that shouldn't happen. Likewise if you expand the levels to full range and encode as full range, it should display the same as the original vob files on playback, assuming there's no output/input levels mismatch between the PC and the display.
For me, the desktop setup is:

The video setup is:
One way I check that limited range video is displaying correctly is to open a video with encoded black bars (they need to be encoded). If you adjust either the output or input levels and the picture and borders both get darker, that's probably how it should display. If the picture gets darker but the borders don't, you can assume that's wrong. Likewise if the picture and borders both get lighter, it was probably correct in the first place. That's another way you can check. When you save a screenshot with a media player (File/Save Image for MPC-HC), it's saved as full range because images such as bmp and jpegs are full range. If you open the image and it looks different to how the video was displaying in the player, something is probably wrong.
Unfortunately it's impossible to show the effect completely using screenshots, because "Print Screen" assumes the image is full range and has no idea what the monitor is actually displaying, so the 3rd "limited in" screenshot is simulated with a pixel shader, but this is all the same limited range video. The point I'm trying to make is as long as the input/output levels match, it should display exactly the same as if it were expanded to full range and encoded as full range, at least on a PC. Hardware players might just assume video is limited range.
Limited range out, full range in.
The borders are slightly grey because the display expects full range and doesn't expand the levels.

Full range out, full range in (the PC expands the levels).
or
limited range out, limited range in (the display expands the levels).
The borders are black either way.
Full range out, limited range in
The PC expands the levels and the display expands the levels (expecting a limited range input). The borders can't be blacker than black though, so they don't change, but the picture looks darker.

Your sample is looking better, but once again without seeing the original I'm guessing....
Are you using noise filtering? There seems to be a fair bit of blurring where there's movement. That may be in the source and CPU=6 for DGDecode might be contributing.
Where the "camera" is panning vs where it's not.

There also a few places where there's either halos, or where the chroma doesn't meet the lines.
Possible haloing between his shirt and the bag

Possibly the chroma could be sharper

I noticed one place where something happens I don't understand, but step through the frames starting around 2860 and look what's happening to her face. Is the source like that? It seems a bit odd.
I went through some old MeGUI log files and DeHalo_alpha() seems to be my go-to for de-haloing, although any de-haloing will probably blur to some extent.
For where the chroma doesn't meet the lines, try increasing the chroma sharpening. Something like:
MergeChroma(AwarpSharp(Depth=5),AwarpSharp(Depth=2 0)) # should be Depth=20 if the forum mangles it
I'm using AwarpSharp2(MT) and it'll accept either AwarpSharp() or AwarpSharp2() as the function name, but it appears the two functions can produce different results with the same settings. I've been careless it seems, and used them interchangeably. I'm a bit disappointed with myself for that. Something to be aware of...
http://avisynth.nl/index.php/AWarpSharp2
https://github.com/jpsdr/aWarpSharpMT/releases
I like MCTD() for animation when it needs serious denoising. There's a link to the mod version at the bottom of this page.
http://avisynth.nl/index.php/MCTemporalDenoise
And you might want to try AnimeIVTC. It has lots of wacky options for animation.
http://avisynth.nl/index.php/AnimeIVTC
To give you an idea, he's a script I dug out of the log files. Because I'm using Avisynth 2.6 and some of the functions are dog slow, I used MP_Pipeline to split the script so it's not all a single process, and I tend to do what I can before upscaling animation to help with speed, but naturally you should play around. I'm not saying this would work perfectly for your source. I'm just offering some more ideas for you to try.
Code:MP_Pipeline(""" LoadPlugin("C:\Program Files\MeGUI\tools\dgindex\DGDecode.dll") DGDecode_mpeg2source("D:\0104 Requiem For A Reality Show.d2v") AnimeIVTC(mode=1,precision=3) MCTD() FastLineDarken(Thinning=0) MergeChroma(AwarpSharp(Depth=5),AwarpSharp(Depth=20)) CropResize(960,720,8,2,-6,-2,InDAR=15.0/11.0,Resizer="Resize8") FastLineDarken(Thinning=0) ### prefetch: 16, 0 ### ### """) MAA() # Anti-Aliasing, but probably not necessary this time DeHalo_alpha() CSMod(strength=150) GradFun3()Last edited by hello_hello; 27th Sep 2019 at 11:00.
-
No problem, it's all ways nice to have a chat.Originally Posted by hello_hello
Over here all settings match for 4:4:4 Full RGB for video card and display, no video enhancements of any kind. I've noticed that PS3 did the exact same thing, while in limited configuration everything look over saturated while full range give a more neutral look.Originally Posted by hello_hello
This link has some details about this differences and setup, it also might explain all this discrepancy:Originally Posted by hello_hello
https://pcmonitors.info/articles/correcting-hdmi-colour-on-nvidia-and-amd-gpus/
I'm using your script:Originally Posted by hello_hello
Code:DFMDeRainbow() TTempSmooth() FastLineDarkenMOD2(Thinning=0) MergeChroma(AwarpSharp(Depth=5),AwarpSharp(Depth=10)) FastLineDarkenMOD2(Thinning=0) CSMod(strength=150) GradFun3()
This halos are in the original source, maybe because they are the very first press and came with that mistakes.Originally Posted by hello_hello
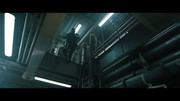
Yes, the source it's like that, here is a screen shot from the source, notice the halos on the screen:Originally Posted by hello_hello
Thank you, I'll have a run with it as soon I finish the encoding, right now it will take about two days to finish a 3 minute video. I'm testing this 60fps IVTC:Originally Posted by hello_hello
It looks amazing but it's super, super slow.Code:# http://forum.doom9.org/showthread.php?t=174684 J=ChangeFPS(60000,1001) A=QTGMC( Preset="Slow",sourcematch=3, Sharpness=2.2, lossless=2 ).selecteven() B=QTGMC( Preset="Slow",sourcematch=3, Sharpness=2.2, lossless=2 ).selectodd() C=Tfm(field=1,mode=0,cthresh=2,mthresh=2,clip2=A,micmatching=0,chroma=true,display=false) D=Tfm(field=0,mode=4,cthresh=2,mthresh=2,clip2=B,micmatching=0,chroma=true,display=false) Interleave(C,D) ### Gibbs Noise Block ### Edge=MT_Edge("prewitt",ThY1=20,ThY2=40).RemoveGrain(17) Mask=MT_Logic(Edge.MT_Expand().MT_Expand().MT_Expand().MT_Expand(),Edge.MT_Inflate().MT_Inpand(),"xor") MT_Merge(Minblur(),Mask,Luma=True)Last edited by amaipaipai; 29th Sep 2019 at 10:34.
-
After all this time it took 4 days to finish, using this:
ivtc60fps.avs
Code:# http://forum.doom9.org/showthread.php?t=174684 J=ChangeFPS(60000,1001) A=QTGMC( Preset="Slow",sourcematch=3, Sharpness=2.2, lossless=2 ).selecteven() B=QTGMC( Preset="Slow",sourcematch=3, Sharpness=2.2, lossless=2 ).selectodd() C=Tfm(field=1,mode=0,cthresh=2,mthresh=2,clip2=A,micmatching=0,chroma=true,display=false) D=Tfm(field=0,mode=4,cthresh=2,mthresh=2,clip2=B,micmatching=0,chroma=true,display=false) Interleave(C,D) ### Gibbs Noise Block ### Edge=MT_Edge("prewitt",ThY1=20,ThY2=40).RemoveGrain(17) Mask=MT_Logic(Edge.MT_Expand().MT_Expand().MT_Expand().MT_Expand(),Edge.MT_Inflate().MT_Inpand(),"xor") MT_Merge(Minblur(),Mask,Luma=True)I didn't see any improvements to justify a 4 day rendering of a 3 minute video, the sample is test_4days.mp4.Code:SetMemoryMax(1024) # http://avisynth.nl/index.php/AviSynth+#MT_Notes SetFilterMTMode("mpeg2source", 3) SetFilterMTMode("NicAC3Source", 3) # SOURCE video = mpeg2source("D:\DVD\SF\VTS_01_3.d2v", cpu=6) audio = NicAC3Source("D:\DVD\SF\VTS_01_3 T80 2_0ch 448Kbps DELAY -197ms.ac3").DelayAudio(0.197) # Try apply DolbySurround Downmix II import("DSDII.avs") video = video.Undot() # Mux AV AudioDub(video, audio) # IVTC 60fps import ("ivtc60fps.avs") Trim(52348,56940) MergeChroma(AwarpSharp(Depth=5),AwarpSharp(Depth=10)) CropResize(0,720, 8,0,-8,0, InDAR=40.0/33.0, ColorCorrect=2, Resizer="BilinearResize", Info=false) # Debanding GradFun3()
The next two samples uses a different script, it takes less time and it looks good enough to my taste, maybe someone with more time could tweak this to get an even better result. In this one I did try to color correct the material but it requires something more sophisticated to deal with it in a scene by scene correction, it can be manually done but I don't have too much time to handle it. Another change was to use "Resize8", it looks great.
Using "AwarpSharp(Depth=50)" removed most of the halos on the screen and make the lines a little more thin. There is a oscillating noise on the left/right sides of the screen, the cause it's "MergeChroma", to fix it all I had to do it's to move it before CropResize.
anime_filter.avs
Code:DFMDeRainbow() TTempSmooth() FastLineDarkenMOD2(Thinning=0) MergeChroma(AwarpSharp(Depth=50),AwarpSharp(Depth=20)) FastLineDarkenMOD2(Thinning=0) CSMod(strength=150) GradFun3()
The sample for this this script it's test1.mp4.Code:SetMemoryMax(1024) # http://avisynth.nl/index.php/AviSynth+#MT_Notes SetFilterMTMode("mpeg2source", 3) SetFilterMTMode("NicAC3Source", 3) # SOURCE video = mpeg2source("D:\DVD\SF\VTS_01_3.d2v", cpu=6) audio = NicAC3Source("D:\DVD\SF\VTS_01_3 T80 2_0ch 448Kbps DELAY -197ms.ac3").DelayAudio(0.197) # Try apply DolbySurround Downmix II import("DSDII.avs") video = video.WhiteBalance(r1=193, g1=167, b1=165, r2=56, g2=49, b2=48) video = video.Undot() # Mux AV AudioDub(video, audio) # IVTC TFM().Decimate() Trim(52348,56940) CropResize(0,720, 8,0,-8,0, InDAR=40.0/33.0, ColorCorrect=2, Resizer="Resize8", Info=false) # Anime filtering / corrections import("anime_filter.avs") import("histogram.avs") #HistogramRGBLevels() #HistogramCMYLevels() HistogramRGBParade()
test2.mp4 uses the exact same scripts, the only difference it's that I use a different IVTC:
Code:# https://forum.videohelp.com/threads/390975-QTGMC-and-TDecimate-as-a-custom-IVTC-script A2 = last A2 = A2.QTGMC(Preset="Very Slow", ediThreads=2, FPSDivisor=2, EzDenoise=1) TFM(mChroma=true,clip2 = A2) TDecimate(cycleR=1,cycle=5)
Last edited by amaipaipai; 29th Sep 2019 at 20:16.
-
I wouldn't call it a discrepancy as such, it's just how it works. I didn't read the whole page, but I've been using an Nvidia card for quite a while and I know when the levels are displaying correctly (at least when it's limited range, given displaying full range video appears broken at the moment). And for me, the behaviour is different depending on which output the monitor is connected to (both the outputs on my card can be VGA, or DVI with an adaptor). When the CRT is connected to the first output and the HDMI monitor is connected to the second, I have to set the video output to full range for the monitor every time I boot the PC. When they're connected the other way around, the full range setting is remembered for the monitor between reboots.Originally Posted by amaipaipai
For the encode that took days to finish.....Originally Posted by amaipaipai
Be wary of any advice from Katie. She's a bit touched in the head. Mostly she ignores my posts because I don't always agree with her, which is probably why she's still suggesting a script that de-interlaces the video with QTGMC twice. Katie loves to boss filters around because she knows better, often with dubious results. But anyway.... this should be faster as it only de-interlaces with QTGMC once.
J=ChangeFPS(60000,1001) doesn't seem to be doing anything, although encoding at 60fps just seems to give you a bunch of duplicate frames.
I still don't really understand what you're doing with the samples. Obviously you're changing things with WhiteBalance(), but I've not used it before. Is that converting to full range because I can't see any other filters in your script doing it. And I'm confused because the histograms in your encoded sample seem to be indicating limited range, even though the video appears to be full range.Code:A = Last B = A.QTGMC(Preset="Slow",sourcematch=3, Sharpness=2.2, lossless=2) C = B.SelectEven() D = B.SelectOdd() E = A.Tfm(field=1,mode=0,cthresh=2,mthresh=2,clip2=C,micmatching=0,chroma=true,display=false) F = A.Tfm(field=0,mode=4,cthresh=2,mthresh=2,clip2=D,micmatching=0,chroma=true,display=false) Interleave(E, F)
Anyway, I can't view full range video properly so the best I can do is convert it to limited range with Avisynth and check it out from there. Once I do that, it displays as I'd expect it to. Not too dark or washed out, aside from maybe a contrast boost or something like that? I haven't seen the original.
When it comes to full vs limited range, I guess what I'm trying to understand is this.
Scenario 1: You take a limited range video, expand it to full range and encode it that way, then display it as full range on playback.
Scenario 2: You take a limited range video, encode it as limited range and expand it to full range on playback
If the only difference is one is expanded to full range before it's encoded and the other is expanded to full range after it's encoded, why would they display differently?
FFVideoSource("D:\test2.mp4)
ColorYUV(Levels="PC->TV")
TurnRight().Histogram().TurnLeft()

Last edited by hello_hello; 30th Sep 2019 at 13:13.
-
Originally Posted by hello_hello
The samples are just tests so we can exchange ideas and see what works or not with your resize script.Originally Posted by hello_hello
No, it has nothing to do with full range neither it's converting it to full range, I did try however to color correct the whole scene, but if you fix one scene you need to color correct the other ones. As you can see in the scripts, the color range are treated as is, that is why you see the histograms showing a limited range. The encoding format are just there to be used with my setup, it only works here.Originally Posted by hello_hello
This are the samples from the source:Originally Posted by hello_hello
Limited

Full

Over here, a limited range it's too dark, I can't see the guy darken shirt on the right among other things for example. With full range I can see details impossible to see with a limited range, encoding a limited range source with full range, it display full range on playback just like the image above. -
How are you viewing them as full and limited range? Changing the levels of the video, or changing the setting in your player or video card etc?
I'm still not sure I get it. The way your "Full" screenshot displays for me it can't be correct, because the black borders above and below the picture are grey, not black. I don't know if that's what you're seeing when you watch the actual video, or when you look at the screenshot above, but the histogram even shows the blacks are way above what they should be. According to IrfanView (it tells you the color where you click on the image) the borders in the "full" screenshot are roughly RGB(20,20,20), so nowhere near black. See the attached pic. IrfanView will say the same thing regardless of the PC's output levels or the monitor's input levels, so I'm confident the pics are displaying as they should for me.
The picture in the "limited" screenshot may look dark to you, but the borders are black.... well... to be exact they're not completely black. According to IrfanView they're roughly RGB(5,5,5), so they're very close. The "limited" screenshot looks much the same as the screenshot I posted of your sample after I converted the levels back to limited range (which I don't understand if you didn't convert the levels to full range when you encoded it).
I still don't understand what's happening, because I don't recall any of your previous full range samples having grey borders. I assumed you'd converted the levels to full range before you encoded them. The only way I can see those screenshots the way I assume you must be seeing them, is to change my monitor's setting to expect a limited range input. That way the "limited" screenshot looks way too dark and the "full" screenshot looks about right (because the levels should have been expanded for the screenshots as jpgs are full range), but that's not how they should display. I'm confused.....Last edited by hello_hello; 1st Oct 2019 at 12:23.
 Quote
Quote
GIGABYTE AM3+ ATX GA-990FXA-UD5 R5
AMD FX-8350 Vishera
Seasonic White Snow 1050W
Asus essence STX II
Corsair Vengeance 16GB (2x8GB) 1866MHz DDR3 CL10 Red CMZ16GX3M2A1866C10R
Be quiet Shadow Rock 2
15TB Raid 0 HDD")
Similar Threads
-
CropResize script - updated version with sub-pixel cropping
By hello_hello in forum Video ConversionReplies: 14Last Post: 17th Mar 2018, 13:09 -
CropResize Script
By hello_hello in forum Video ConversionReplies: 43Last Post: 8th Mar 2017, 02:14 -
resizing videos while accounting for cropping and aspect ratio
By vhelp in forum Video ConversionReplies: 40Last Post: 11th Dec 2016, 00:10 -
Convert from .ts to .mp4 while cropping black bars & little quality loss?
By nobodyhome in forum Video ConversionReplies: 3Last Post: 31st May 2016, 11:49 -
What's the difference from resizing to 640x480 before cropping and after?
By CZbwoi in forum RestorationReplies: 23Last Post: 3rd May 2016, 14:11