


CropResize - A cropping & resizing script (Avisynth & VapourSynth versions)
From the version dated 2023-09-28 there's a native VapourSynth flavour of CropResize.
Quite a few changes have been introduced in the version dated 2025-06-16, so if you've used the function in the past the Changes text file would be worth reading. The main change to note for the Avisynth version of CropResize is Avisynth+ 3.7.1 is now a minimum requirement.
The main change for the version dated 2025-12-20 is the inclusion of a new function, CombineClips, that uses CropResize to automatically append videos. See post #137 for usage examples.
CropResize 2025-12-20.zip
The purpose of the script
The main goal of CropResize is to crop and resize without having to worry about calculating aspect error or distorting the picture. Rather than distort the picture as traditional resizing does when the input and output aspect ratios don't match, the script crops or adds borders instead. CropResize can apply sub-pixel cropping when required. Despite the numerous options, basic usage is fairly straightforward.
The pictures in post #2 illustrate CropResize usage.
+ Reply to Thread
Results 1 to 30 of 137
-
Last edited by hello_hello; 20th Dec 2025 at 22:54.
-
The easiest way to demonstrate CropResize is with some pictures
Some of these examples also demonstrate using the wrapper functions supplied with CropResize to easily
enable the default cropping preview or set Info=true, and some also use the abbreviated function name of CR().
The (home made) PAL 16:9 source used for the following examples
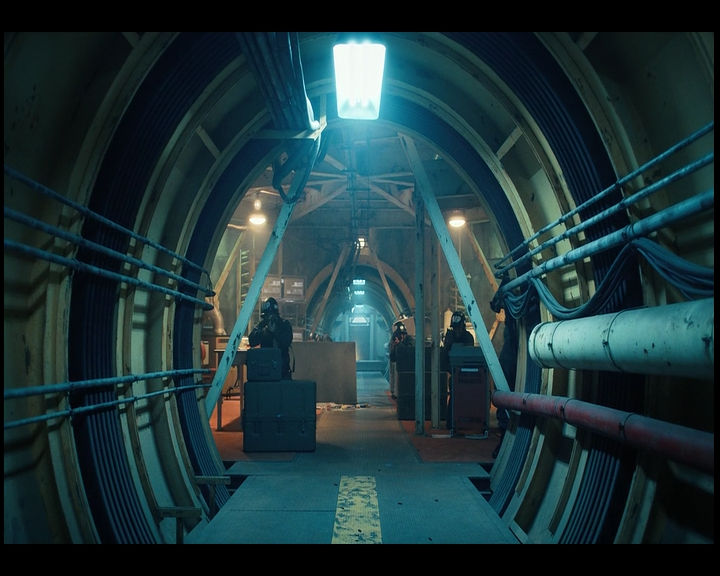
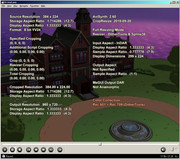
Basic usage
Simply specify a width (or height) and the desired cropping (or enable auto-cropping), along with the input display
aspect ratio if the source is anamorphic, and let CropResize take care of the rest, here resizing to "square pixel" dimensions.
The abbreviated function name CR() can be used instead of CropResize() if the wrapper functions script is loaded.
CropResize(832,0, 4,32,-6,-32, InDAR=16.0/9.0, Info=true)
or
CR(832,0, 4,32,-6,-32, InDAR=16.0/9.0, Info=true)
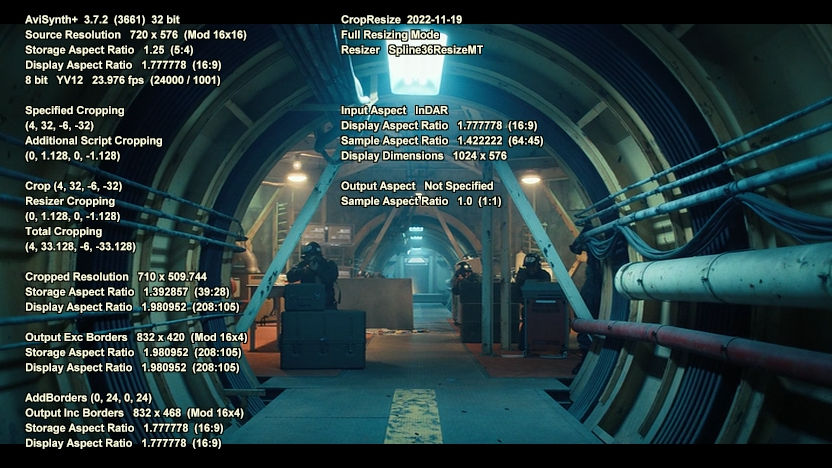
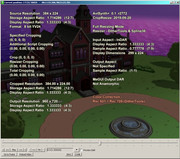
Cropping according to the output dimensions
When specifying both an output width and height, and borders aren't enabled, the script crops accordingly to prevent
aspect error (although specifying an OutDAR takes precedence over the cropping and output display aspect ratio).
Simply to demonstrate, here 16:9 output dimensions are specified.
CropResize(832,468, 4,32,-6,-32, InDAR=16.0/9.0, Info=true)

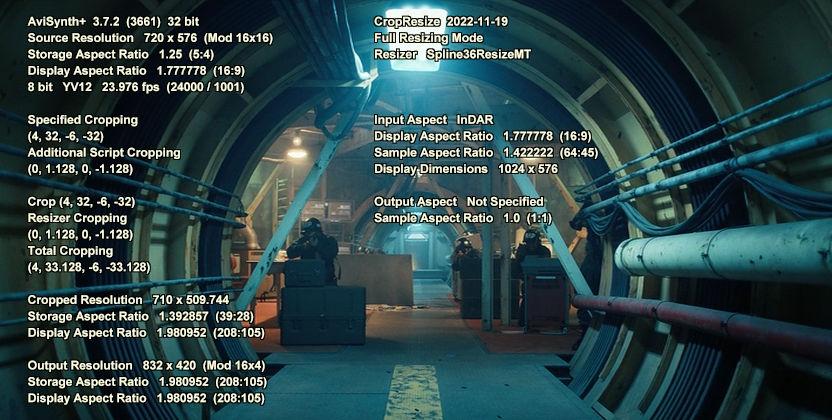
Adding borders according to the output dimensions
When specifying both an output width and height, and borders are enabled, the script adds pillarbox or letterbox
borders as required instead of cropping picture (a small amount of extra cropping may still be applied to prevent
aspect error). As for the previous example, 16:9 output dimensions are specified.
CropResize(832,468, 4,32,-6,-32, InDAR=16.0/9.0, Borders=true, Info=true)
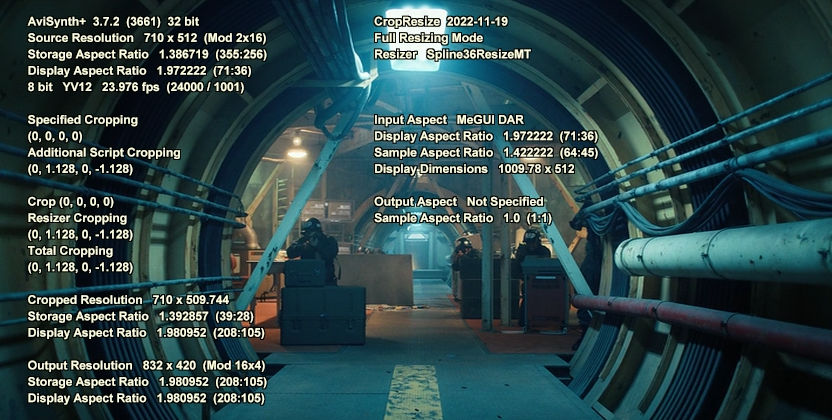
MeGUI support
MeGUI was used to crop the source, adding it's global DAR variables and cropping to the script.
CropResize then takes care of the resizing and any extra cropping required to prevent aspect error.
global MeGUI_darx = 71
global MeGUI_dary = 36
Crop(4,32,-6,-32)
CropResize(832,0, Info=true)
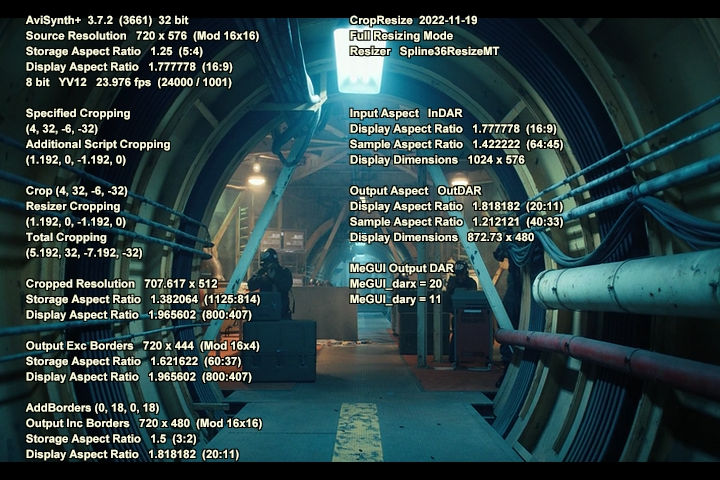
Specifying an output display aspect ratio and adding borders
Cropping and resizing to NTSC dimensions with an mpeg4 display aspect ratio of 20:11 (including the added borders).
CropResize(720,480, 4,32,-6,-32, InDAR=16.0/9.0, OutDAR=20.0/11.0, Borders=true, Info=true)
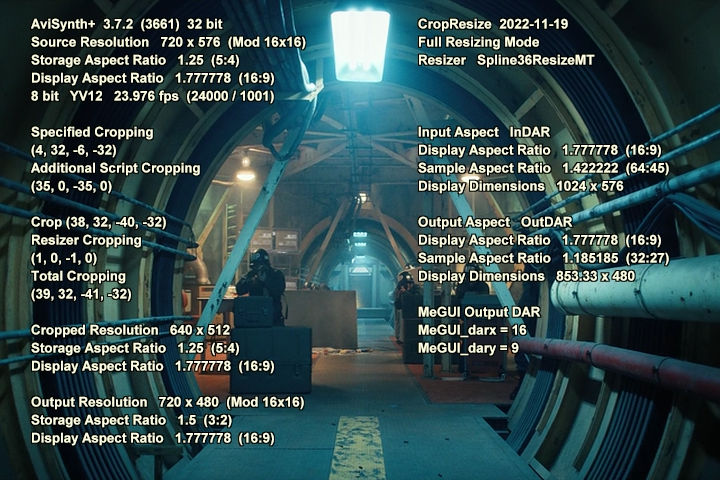
Cropping according to the output display aspect ratio
When an output display aspect ratio is specified and borders aren't enabled, the script adjusts the
cropping to crop to that display aspect ratio and resizes to the specified width and height.
Here the picture is cropped to 16:9 and resized to NTSC 720x480 dimensions.
Exactly the same result can be achieved with the appropriate output sample (pixel) aspect ratio instead of
a display aspect ratio. In this case it'd be 32:37.
CropResize(720,480, 4,32,-6,-32, InDAR=16.0/9.0, OutDAR=16.0/9.0, Info=true)
or
CropResize(720,480, 4,32,-6,-32, InDAR=16.0/9.0, OutSAR=32.0/27.0, Info=true)
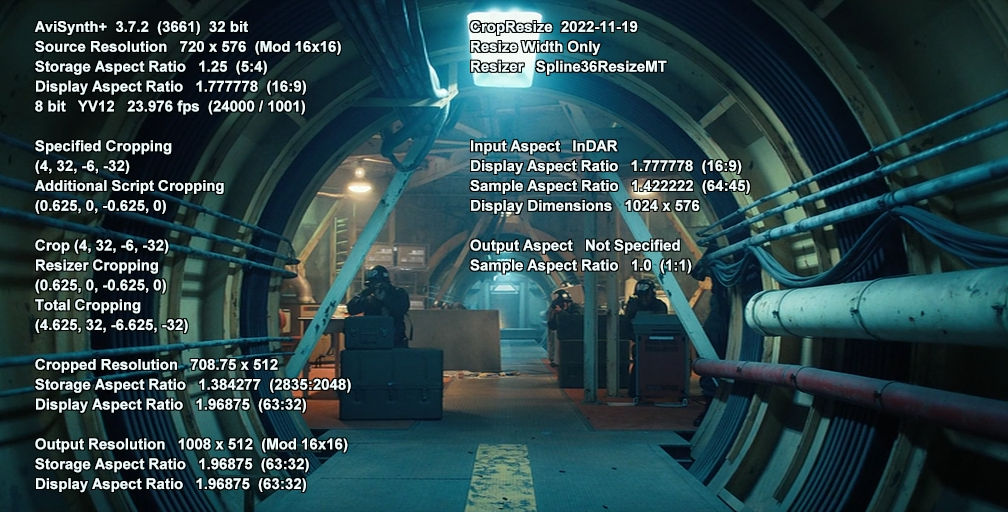
Resize Width Only
For the purists, there's a "Resize Width Only" mode, preventing height resizing.
It's mainly intended for anamorphic sources and supports anamorphic input/output,
but here there's no output display aspect ratio specified, so the script is automatically
cropping and resizing the width to "square pixel" dimensions.
The function name is preceded with "i" to set Info=true
iCR(0,0, 4,32,-6,-32, InDAR=16.0/9.0, ResizeWO=true)
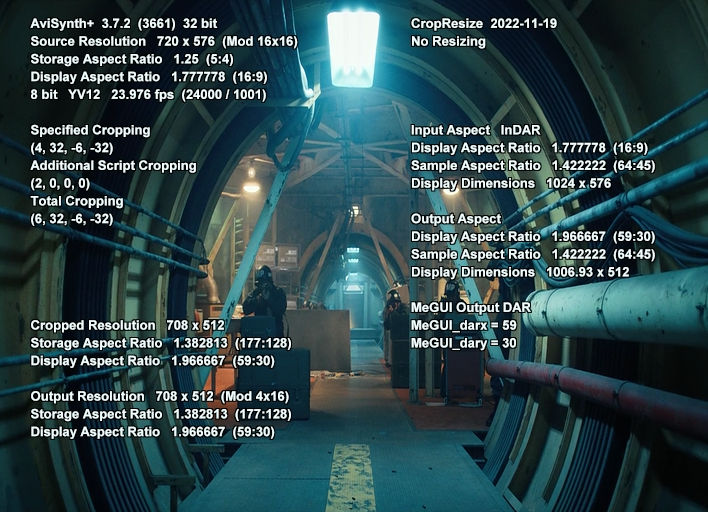
No Resizing
Resizing can also be disabled completely so the function only crops (it can still add borders though).
CropResize(0,0, 4,32,-6,-32, InDAR=16.0/9.0, NoResize=true, Info=true)
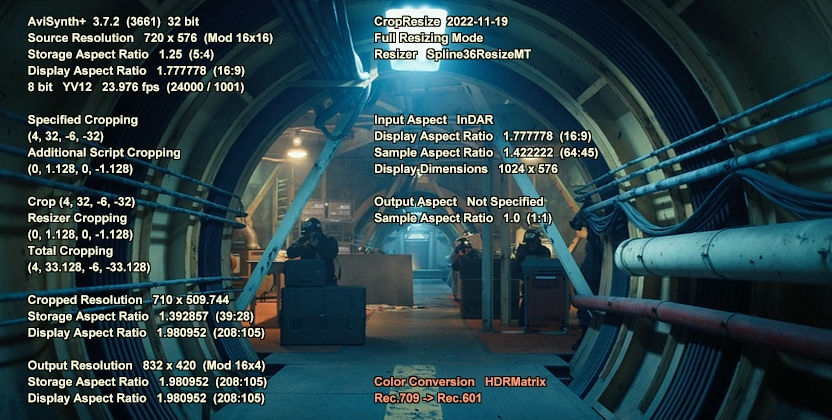
Color conversion
Probably a bit hard to see the difference here, but in addition to automatic color correction,
the ColorMode argument permits specifying a color conversion.
CropResize(832,0, 4,32,-6,-32, InDAR=16.0/9.0, ColorConvert="HDRMatrix", ColorMode="709-601", Info=true)
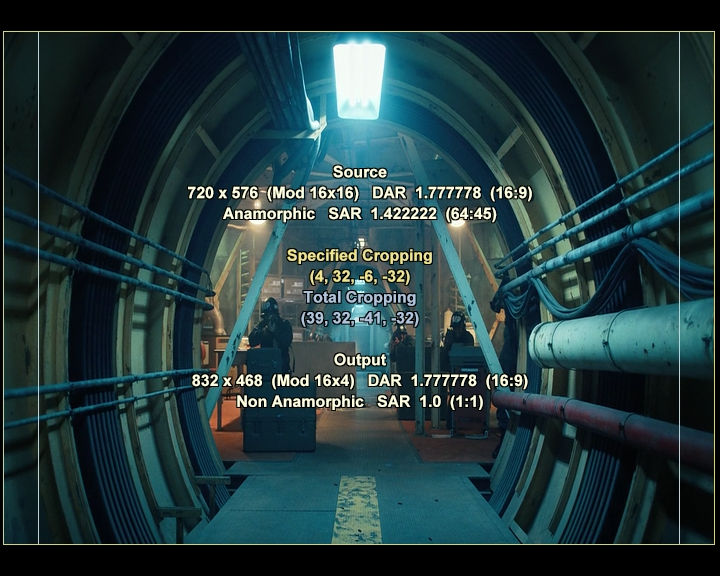
Cropping previews
Output dimensions of 16:9 are specified without borders enabled (832x468) but the specified cropping
is not enough to crop the picture to 16:9, so the script must crop extra from the sides.
The yellow lines show the cropping specified by the user.
The blue lines show any additional cropping applied by the script to prevent aspect error.
The default cropping preview can be enabled by preceding the function name with "p".
pCropResize(832,468, 4,32,-6,-32, InDAR=16.0/9.0)
or
pCR(832,468, 4,32,-6,-32, InDAR=16.0/9.0)
or
CropResize(832,468, 4,32,-6,-32, InDAR=16.0/9.0, CPreview=1)
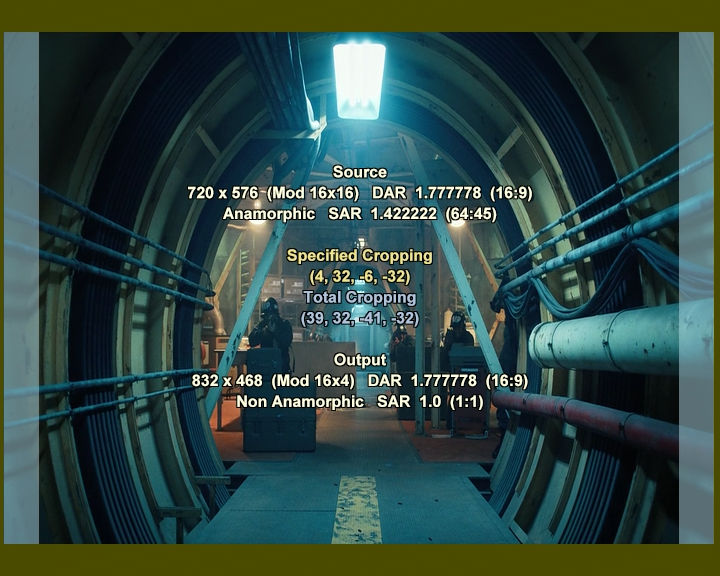
Also note: Preceding the function name with "pi" enables both the default cropping preview and sets Info=true,
assuming the wrapper functions script is loaded.
CropResize(832,468, 4,32,-6,-32, InDAR=16.0/9.0, CPreview=2)
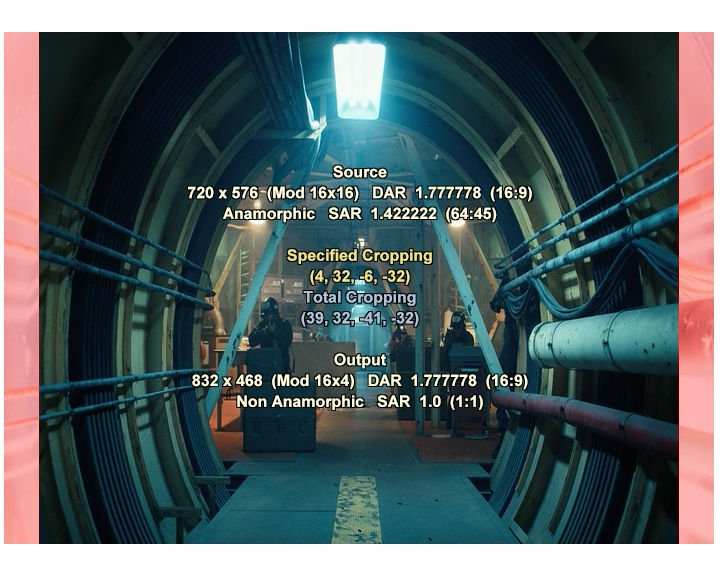
CropResize(832,468, 4,32,-6,-32, InDAR=16.0/9.0, CPreview=3)
An AvsPmod style preview.
FrostyBorders
CropDAR used to force a cropping of 4:3, with 16:9 output dimensions to demonstrate adding FrostyBorders.
CR(832,468, 4,32,-6,-32, CropDAR=4.0/3.0, InDAR=16.0/9.0, Frosty=true)
Last edited by hello_hello; 19th Nov 2022 at 08:25.
-
There's a new version of CropResize (2019-08-08). The link in the opening post has been updated.
The changes are aimed at making the script's behaviour more predictable, although there's not a lot of them. The cropping and resizing functionality remains the same. There's a list of changes in the zip file. -
Another update. I've added back automatic color conversion when upscaling/downsaling between SD, HD and UHD. It's disabled by default, but it can be enabled by default so there's no need to use the ColorCorrect argument. Details in the help file.
ColorCorrect=0 is disabled, ColorCorrect=1 converts with the ColorMatrix plugin, and ColorCorrect=2 converts with DitherTools. Currently only 8 bit video is supported for color conversion.
I don't think there's a 64 bit version of ColorMatrix with Rec.2020 support, but the included 32 bit version has it. It supports YV12 & YUY2.
DitherTools supports Rec.2020 and YV12, YV16, YV24, YV411, and Y8.
The new version is dated 2019-08-10. The link in the opening post has been updated. -
I was hoping I'd uploaded the last version, aside from maybe updating the color correction to support all native Avisyth+ bitdepths, but a bug managed to slip past the keeper.
Fixed an incorrect output display aspect ratio calculation when NoResize=true and an input sample aspect ratio was specified. The script was still cropping correctly, but the output display aspect ratio calculation was wrong.
New version in the opening post dated 2019-08-12. -
Unfortunately I've had to upload a new version of CropResize sooner than I'd planned. The new version in the opening post is dated 2019-08-17.
While doing some testing for (hopefully) the upcoming version with the ColorCorrect option supporting Avisynth+ native bitdepths (greater than 8 bit), I discovered the version of ColorMatrix that was included in the zip file doesn't convert UHD colorimetry correctly (Rec.2020). As a result, the new version of the script will output an error if ColorCorrect=1, the source or destination resolution is UHD, and the script needs to color correct due to upscaling or downscaling. If you have DitherTools, ColorCorrect=2 can be used instead.
For the record, ColorMatrix seemed to be getting "Rec.709->Rec.2020" conversions right, but no other conversions involving Rec.2020 are correct (they don't match HDRTools & DitherTools).
ColorMatrix is still fine for conversions between HD and SD colorimetry. The standsrd version without Rec.2020 support has been around for years.Last edited by hello_hello; 16th Aug 2019 at 18:28.
-
Hey, nice script you got there, do you mind to help me out with some questions.
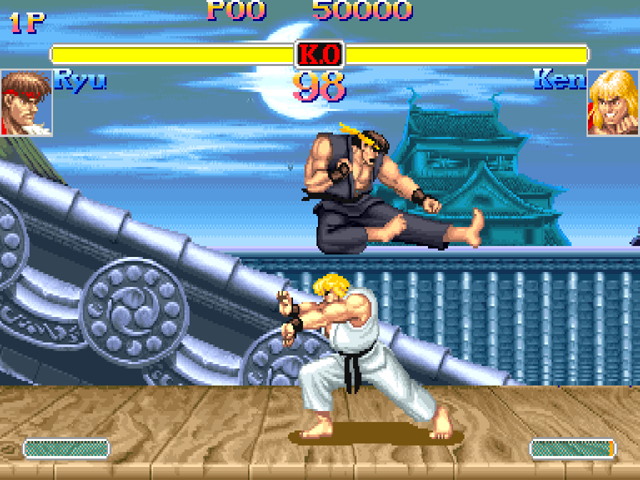
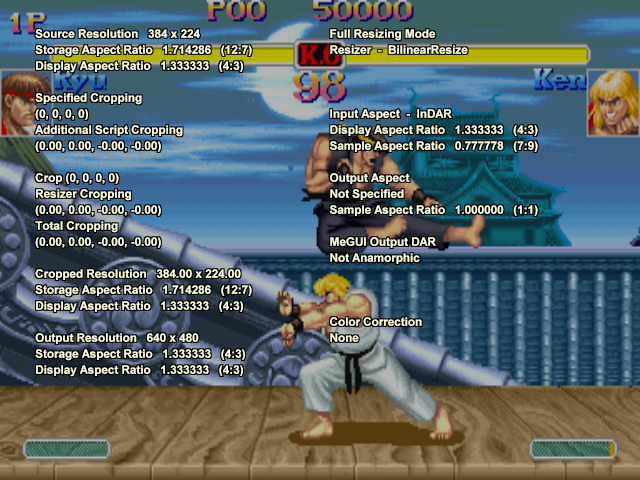
This is the source that I'm using with your script:
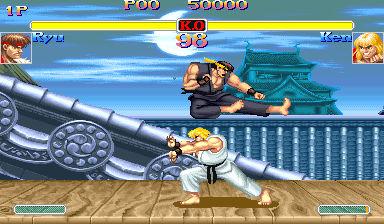
This is the script:
And it return this:Code:ImageSource("ssf-source.png") CropResize(0,480, 0,0,0,0, InDAR=12.0/7.0, Info=true)
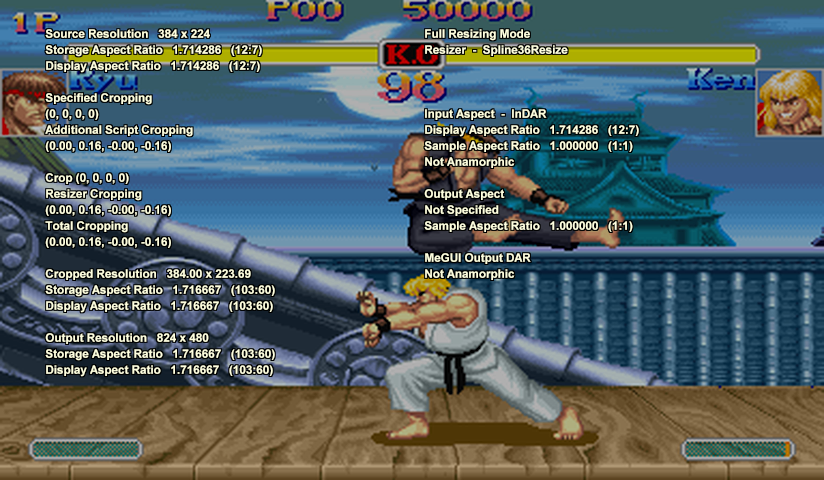
It tries to resize keeping the AR 12:7 but if I try to force a resize it to a 4:3 resolution like 640x480, the result still looks stretched horizontally and cropped:
Code:CropResize(640,480, 0,0,0,0, InDAR=12.0/7.0, OutDAR=4.0/3.0, Info=true)
I'm looking to get something like this:
What do I have to do to make your script to resize like that with the correct proportions?
Now I use a spreadsheet to calculate the Horizontal or Vertical resolution manually + jagabo's script, your script it's all in one solution, very handy. Arcade resolutions are a pain in the butt, specially CAPCOM's, this guy cover this matter in great detail.
https://www.youtube.com/watch?v=LHfPA4n0TRo
Thank you. -
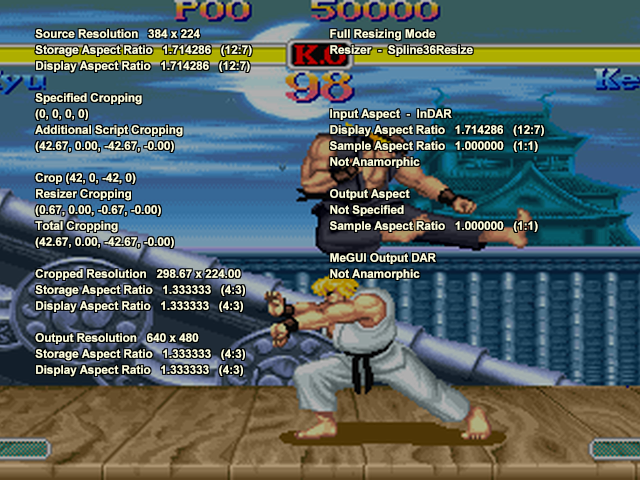
Got the script working:
To make it work I set InDAR with desired DAR 4:3 instead of SAR 12:7.
Thank you for your hard work man, very handy tool, it saved me hours of work, I don't need to change different scripts or use a spreadsheet to calculate anything anymore, it's all there, all we need to do it's to type in the numbers and it renders in real time including the color matrix, everything, beautiful work!Code:CropResize(0,480, 0,0,0,0, InDAR=4.0/3.0, Info=true)
Thank you! -
Thanks, and yes, that was the idea. I'm a bit anal about not messing with the aspect ratio, but I was tired of having to use a resize calculator and adjust the cropping manually all the time.Originally Posted by amaipaipai

There is an input sample aspect ratio option. It's InSAR, as opposed to InDAR, so you can specify either, but....
So you know, the video you linked to possibly makes it sound more complicated than it is. Each game has to display as 4:3, no matter what the storage aspect ratio (resolution), and the game in your screenshot has a resolution of 384x242. To determine the (input) sample/pixel aspect ratio:
storage height × display aspect ratio = display width
display width / storage width = sample aspect ratio
Doing it in a single equation: 224 × (4 / 3) / 384 = 0.777778 or (7:9)
So InSAR=7.0/9.0 is the same as InDAR=4.0/3.0 for that one. If the resolution changes the sample/pixel aspect ratio probably will too, so it'd be simplest to use InDAR=4.0/3.0 all the time and let the script do the math.
The 12:7 aspect ratio he refers to is the resolution (storage aspect ratio), although it'd be easy to think he was referring to a sample/pixel aspect ratio. I did at first.
By the way... keep an eye out for the new version of CropResize with additional color conversion options. It'll also convert with HDRTools, support all the native AVisynth+ bitdepths.
Edit: I planned to include AVSResize as a color conversion option too, but decided against it to keep things as simple as possible, plus it's not compatible with XP.Last edited by hello_hello; 3rd Sep 2019 at 22:32.
-
I'll look forward to it.
Thanks!Last edited by amaipaipai; 23rd Aug 2019 at 04:19.
-
There's an updated version of CropResize in the opening post, dated 2019-09-02. With any luck that'll be it for quite a while, as the script's color correction (converting the colorimetry when upscaling/downscaling) was the only thing left to sort.
Under "ColorCorrect" in the help file, there's a mini essay on my current understanding of color conversion, when to convert and how to do it.
There's now four conversion choices.
1. ColorMatrix
2. DitherTools
3. HDRTools (170m for SD)
4. HDRTools (470bg for SD)
DitherTools can no longer be used for Rec.2020 conversions, but if it's converting the colors, DitherTools will do the resizing too (when a compatible resizer is specified). Only standard dynamic range is supported. I don't think HDR to SDR conversions can be done automatically, I've almost no experience with HDR, and I've no interest in HDR anyway.
Some other changes -
- Avisynth 2.5.8 is no longer supported. As it turns out, the script was already using a couple of functions not available in Avisynth 2.5.8.
- Added a PicDim argument for adjusting how much the picture is dimmed when Info=true. The default is -75. The range is -255 to 0.
- Tweaked Info=true. The displayed info scales a little better with resolution. The source color format and bitdepth are now displayed.
I also noticed an Avisynth+ oddity that causes negative zero (such as a right or bottom cropping of zero) to be displayed with the negative sign under some circumstances. I added a workaround to prevent zero from displaying as a negative, because it was annoying me.
For anyone interested, Avisynth+ displays this as 0
zz = float(-0)
subtitle(string(zz))
but displays this as -0
zz = float(0)
subtitle(string(-zz))
Avisynth 2.6 doesn't display the negative sign either way.
In case I did a stupid, there's still a link for the 2019-08-17 version in the opening post, but the new version should be fine.Last edited by hello_hello; 3rd Sep 2019 at 22:47.
-
It works like a charm.
THANK YOU! -
This isn't an update to the script itself, as it's exactly the same as the version dated 2019-09-02, but I've update the help file a little. There's no longer any optional plugins included with the script, but there's still links for them at the top of the help file. Including plugins in the zip file was only supposed to be a temporary thing as they'll become outdated.
Even though the script itself is unchanged, I've updated the version to 2019-09-10. There's a new link in the opening post. -
-
Is possible to make the script to print out the script name + version (or release date) at the bottom of the screen with "info"? It makes easy to have control of what release version/date we are using.
Thank you again, amazing script! -
Hello,
I added PAR and DAR macros and made some other related changes.
%source_dar%
%target_dar%
%source_par_x%
%source_par_y%
%target_par_x%
%target_par_y%
You would put the scripts in the auto load folder, if it was a single script file I could include it in the staxrip distribution.Code:CropResize(%target_width%, %target_height%, \ %crop_left%, %crop_top%, -%crop_right%, -%crop_bottom%, \ InDAR=%source_dar%, OutDAR=%target_dar%, Info=true)
https://www.dropbox.com/sh/4ctl2y928xkak4f/AAADEZj_hFpGQaNOdd3yqcAHa?dl=0
https://1drv.ms/f/s!ArwKS_ZUR01gySQIE1QCL2i9F_uR -
That's a good idea. I was somewhat hoping I was done with updates for a while, but if, or whenever, there's a new version, I'll add that.Originally Posted by amaipaipai
I'm not 100% sure I follow. It looks like you've given me some motivation to install something else other than XP so I can check it out with StaxRip though. Hopefully sometime next week.Originally Posted by stax76
Only the "CropResize.avsi" script is required.
The "CropResize Resizer Functions.avsi" script just contains wrapper functions for some Avisynth & external resizers, so the user can configure their various options that way. It seemed more practical than trying to add arguments for various resizers to the CropResize function itself, and less restricting. If the user wishes to use BicubicResize (for example) with specific settings it's easy enough to make a copy of the CR_Bicubic() wrapper function while specifying different defaults and giving it a unique name. Once that's done you can use BicubicResize and the new defaults with
Resizer="CR_Bicubic2"
or whatever you call it.
The "CropResize Wrapper Functions.avsi" script just contains wrapper functions to act as shortcuts for enabling a cropping preview, setting Info=true or enabling an alternative default resizer, because I'm lazy when it comes to typing.
ie pCropResize() enables the default cropping preview and pCropResizeX() does the same while enabling the alternative default resizer. None of that's required to use CropResize() though, which is why I kept them as separate avsi files.
If you think it's a good idea I could create a StaxRip version for you without the stuff that probably wouldn't be used. The function for specifying options globally, MeGUI DAR support etc... whatever you think isn't needed for StaxRip, or anything you'd like me to add for StaxRip. You could check out the options and let me know what to change, or you could do it yourself, but I imagine it'd be easier for me.Last edited by hello_hello; 12th Sep 2019 at 09:21.
-
Thanks!Originally Posted by hello_hello
-
@hello_hello
For StaxRip Win 10 is ideal but Win 7 probably works too, one issue I'm aware is the TaskDialog API which StaxRip uses a lot has broken support for very high DPI like 288 DPI, it's out of my control. I hope there won't be more issue like this and Win 7 can be supported for many more years.
A single file version would be fantastic and a default preset. -
stax76,
The way CropResize currently is, a single file version would simply require copying the contents of the "CropResize Wrapper Functions" and "CropResize Resizer Functions" scripts and pasting them into the bottom of the main CropResize script. Or at the top. There's no reason why they need to be separate scripts. I did it that way so the wrapper functions wouldn't have to be loaded for anyone not interested in using them, plus the idea behind the "CropResize Resizer Functions" was to make it easy for the user to change any default options for each resizer wrapper, and without having to modify the main CropResize script. If you don't need the wrapper functions, just ignore the other two scripts.
I'm not sure what a "default preset" would involve.
For a non-anamorphic source, the default OutWidth and OutHeight are the source width and height, after any cropping, and reduced for mod4 if necessary, so if a source was 1278x718 (before or after cropping), a CropResize() output would be the same as CropResize(1276,716) and something like an extra pixel would be cropped from the height so as to resize to 1276x716 without aspect error. If there's no cropping for a non-anamorphic source and it's mod4, the script won't do anything if you don't specify a different OutWidth or OutHeight. Or make Mod=2 the default so it won't do anything for a mod2 non-anamorphic source either.
For an anamorphic source it's pretty much the same principle, but the width is resized for "square pixel" dimensions. For an NTSC 16:9 DVD source, the default of CropResize(InDAR=16.0/9.0) would be the same as CropResize(852,480,InDAR=16.0/9.0).
You can specify zero for either (or both) the OutWidth and OutHeight, so that way the script can crop without needing to type the argument names and the defaults would still work as I explained.
ie CropResize(0,0, 2,0,-2,-4)
If anything, you might want to set a default OutWidth, and let the script take care of the rest. ie CropResize(1280), but I'm not sure if there's a need for that. If you specify just an OutWidth, then the height is resized accordingly. Or you can specify just an OutHeight and the width is resized accordingly.
Cheers.Last edited by hello_hello; 12th Sep 2019 at 13:39.
-
I have only a moderate interest in video processing, so I'm not sure about good defaults. Maybe it's not so important because the user must know what he is doing. Next StaxRip build has it included, feature requests on the issue tracker are welcome but I don't always work on staxrip.
-
Every time I say I'm done updating.....
I assume nobody is using the global GCropResize function, given nobody's complained about it not working and the last version broke it.
I'll update the link in the opening post shorty. The new version is dated 2019-09-20.
Changes:
- Fiddled with Info=true again. The Avisynth and CropResize versions are now displayed.
For an anamorphic source and/or output, the source and/or output "display dimensions" are included (right column). The height is the source/output height. The width is the source/output width, as it would be when resized to "square pixel" dimensions on playback. If necessary, "display width" is rounded to an integer (a whole pixel).
- Avisynth Neo probably didn't work correctly with CropResize. Added a check for Neo, although the script doesn't do anything "Neo specific". It now assumes Avisynth+ is being used when Neo is detected.
- The GCropResize function was completely broken after the last update. If GCropResize was used, an error message displayed (due to a typo).
I should have an old PC running Win7 or Win10 next week, and I intend to play around with AVSResize. If AVSResize for color correction offers an advantage, I'll probably add it as an option in the near future. I haven't been able to do it until now because AVSResize doesn't play with XP.
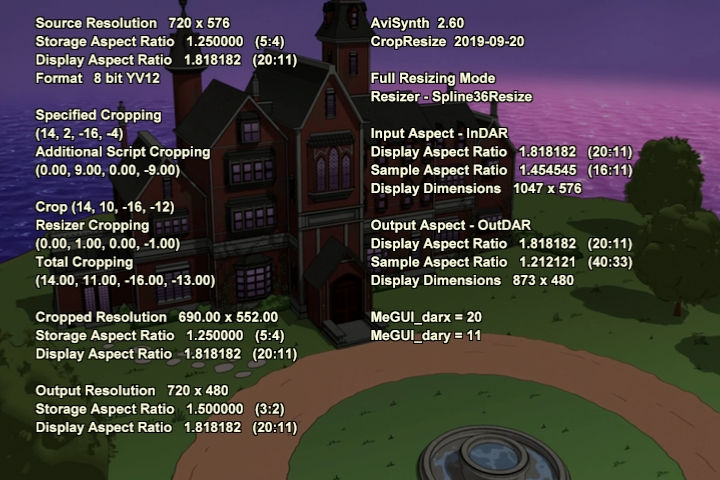
Info=true:
Last edited by hello_hello; 19th Sep 2019 at 22:33.
-
Thank you for the update!
-
If anyone has downloaded the 2019-09-20 version before reading this, or before the 21st, please download it again. I haven't change the version date but I somehow broke Info=true, despite being positive I checked it before uploading the script. Sigh....
Last edited by hello_hello; 20th Sep 2019 at 04:25.
-
Working like a charm!
-
I'm glad it's working, but now I'm confused. I noticed the screenshot in your earlier post showed the negative sign for right and bottom cropping of zero. After a bit of investigating I discovered Avisynth+ was doing that, but not Avisynth 2.6, so I added a workaround for Avisynth+.
I can't seem to convince Avisynth 2.6 to do the same, yet it appears you're not using Avisynth+ as I assumed. I've created an input that matches yours, but it's still fine. I'd like to discover the cause, so if you don't know what it might be, could I get you to upload a short sample of the source and the exact CropResize syntax you're using?
Thanks.
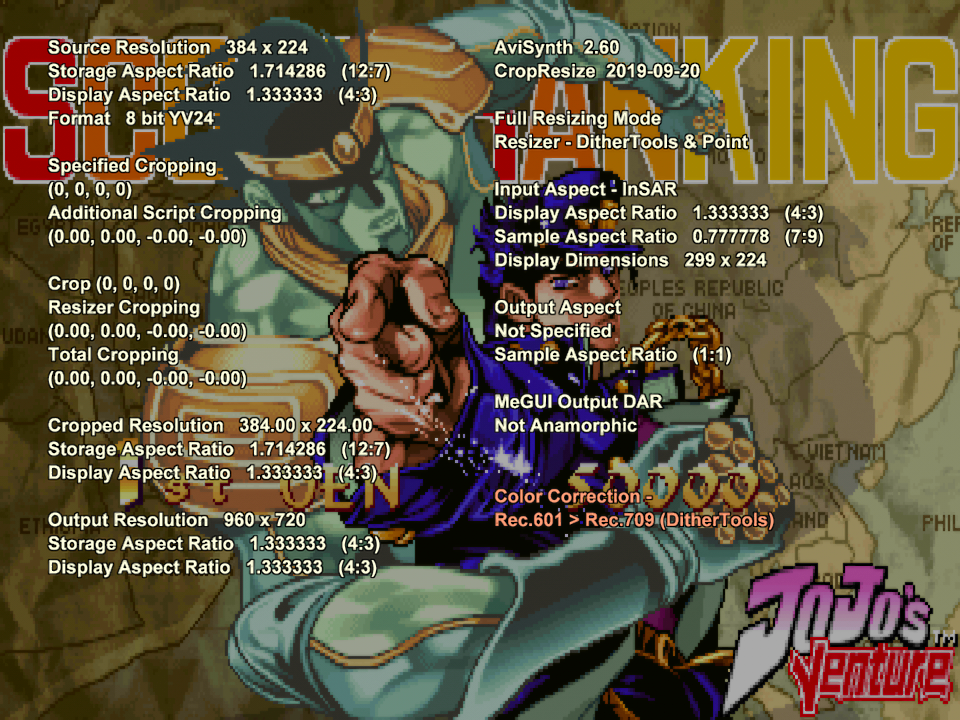
Thumbnail 1 is Avisynth 2.60 (obviously).
Thumbnail 2 is Avisynth+.
Thumbnail 3 is Avisynth+ with the "negative zero" workaround disabled. I can't imagine it'd make any difference to Avisynth 2.6 as the workaround is bypassed unless Avisynth+ is used. It doesn't make any difference to Avisynth 2.6 for me. Mysterious....
I'm using the standard Avisynth 2.6 (installed) and MeGUI's portable Avisynth+ (running XP).

-
This is not a problem with the script, but I've noticed that when using 'PointResize' lines run across the image when upscale. I came up with two fixes that works as standalone avisynth script, don't know if this is the best option but it get rid of that lines.
fix 1
Fix 2Code:PointResize(width*4, height*4) BilinearResize(960, 720)
Is possible to apply the fix to the script?Code:PointResize(width*4, height*4) BilinearResize(960, 720) Sharpen(0.4)
I've run some tests and overall, it's doing a great job. -
Listening to Mariah Carey makes me want to punch something....

Maybe I'm going blind but I can't see any lines. All I can see is the blocky PointResize upscaling which looks like it's being softened by Bilinear resizing, but I can't see lines running across the picture as such. I might have to get you to point out what I can't see.
So you've no idea why CropResize is displaying zero as negative for some of the cropping? -
Sorry, I got whatever I had handy to run tests.Originally Posted by hello_hello
It looks like invisible lines around the corners/border of the character, it doesn't show up with static image. As the motion start you can see like something running around the character border, maybe this is some kind of noise artifact from upscale, I don't know how to call it.Originally Posted by hello_hello
Sorry, no.Originally Posted by hello_hello
But it doesn't affect anything, all the test that I ran so far are precise like a clock.
 Quote
Quote

GIGABYTE AM3+ ATX GA-990FXA-UD5 R5
AMD FX-8350 Vishera
Seasonic White Snow 1050W
Asus essence STX II
Corsair Vengeance 16GB (2x8GB) 1866MHz DDR3 CL10 Red CMZ16GX3M2A1866C10R
Be quiet Shadow Rock 2
15TB Raid 0 HDD")
Similar Threads
-
CropResize script - updated version with sub-pixel cropping
By hello_hello in forum Video ConversionReplies: 14Last Post: 17th Mar 2018, 13:09 -
CropResize Script
By hello_hello in forum Video ConversionReplies: 43Last Post: 8th Mar 2017, 02:14 -
resizing videos while accounting for cropping and aspect ratio
By vhelp in forum Video ConversionReplies: 40Last Post: 11th Dec 2016, 00:10 -
Convert from .ts to .mp4 while cropping black bars & little quality loss?
By nobodyhome in forum Video ConversionReplies: 3Last Post: 31st May 2016, 11:49 -
What's the difference from resizing to 640x480 before cropping and after?
By CZbwoi in forum RestorationReplies: 23Last Post: 3rd May 2016, 14:11