


Note that Tweak's cont is similar to ColorYUV's gain_y (except the scale is different). And Tweak's bright is similar to ColorYUV's off_y. Similarly, Tweak's sat is similar to ColorYUV's cont_u and cont_v (except the scale is different).
Try StreamFab Downloader and download from Netflix, Amazon, Youtube! Or Try DVDFab and copy Blu-rays! or rip iTunes movies!
+ Reply to Thread
Results 61 to 85 of 85
Thread
-
-
For the relationship between YUV and RGB see "RGB Colors Cube in the YCbCr Space" at
https://software.intel.com/en-us/node/503873 -
Yea the saturation seems to need adjustment for some of the bright outside scenes where its producing some coloring issues.
so far, modifying the levels code to the following seems pretty good for levels:
Code:ColorYUV(gain_y=-20, gamma_y=05, off_y=-2) # white balance darks, brights darks = ColorYUV(off_u=4, off_v=9) brights = ColorYUV(off_u=18, off_v=3) Overlay(darks, brights, mask=ColorYUV(cont_y=50))
-
Now you're being disingenuous. The point I was making was that you can't take settings meant for a completely different video and apply them randomly wherever you like just because you think they 'look' good. Here's what you said about the settings you worked out for this PAL movie.Originally Posted by autephex

And you can see from the pics I provided that they don't work well for that Cabin clip. It could very well be true that different parts of the film require different filtering. So, you decide on a one-size-fits-all approach, or you go through the entire film several times adjusting things every time they change. Video restoration isn't easy but it's remarkable what can be accomplished using AviSynth alone, once you learn your way around it a little bit. Good luck.Originally Posted by autephex
-
I wasn't being disingenuous - I was being directly and openly honest about my lack of fully understanding how all of this works. I'm not sure how many times I need to state that I am new to all of this and I don't know what I am doing.
You seem to be yet another one of these posters that can't be bothered to actually read what they are replying to before offering their "help" - and you seem more concerned with making it clear how little I know and how much you do know. It must be something about the nature of video work that attracts your personality type, but its extremely off-putting to even think about asking for help when you constantly get replies such as yours.
Regarding using settings for a completely different video - its not a completely different video. Its the same video, but the first was converted to NTSC. That and the resulting slight drop in quality is the difference between them. So the coloring and levels are generally the same, which is why I would try applying the same settings before tweaking.Last edited by autephex; 30th Dec 2018 at 10:02.
-
I guess we can argue about the meaning of "completely", but the fact that the video was converted from PAL to NTSC via an analog stage makes it different than the other. You must evaluate it based on its properties, not the earlier video's properties.Originally Posted by autephex
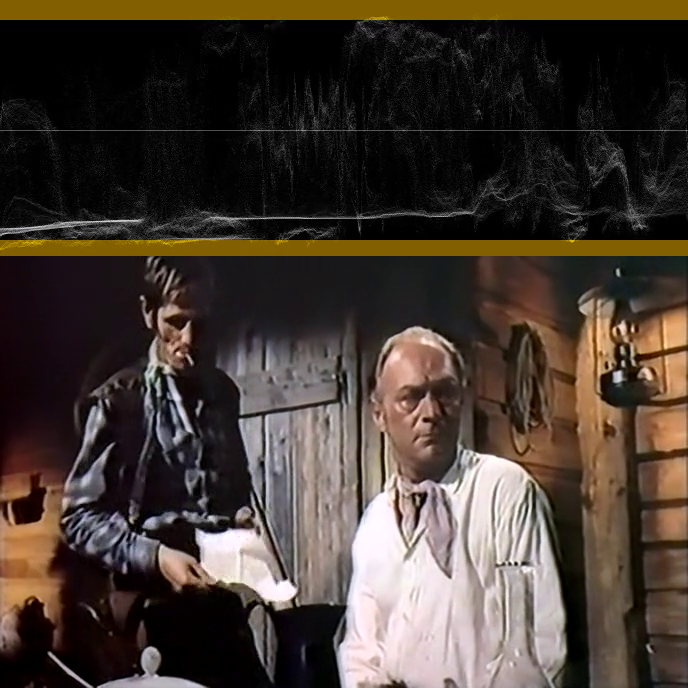
You need to learn how to read the results of Histogram() (the default is really a waveform monitor, not a histogram).
https://forum.videohelp.com/threads/340804-colorspace-conversation-elaboration#post2121568
In general, you don't want significant parts of the waveform graph to appear in the brown areas at the bottom and top of the graph. Not every frame will have full black or full white, but in general, you want the brightest parts of your video to just touch the upper bar (or right bar if your displaying the default vertical waveform), and the darkest parts to just touch the bottom bar (or left bar with the default vertical waveform).
I suspect you may have a calibration issue too. Try viewing the video in this post:
https://forum.videohelp.com/threads/374734-Superblacks-and-superwhites-question#post2414529
it should look like the second image in that post, not the first. The 235 and above bars should all be the same shade of white (and the same as the background around them). The bars 15 and below should all be the same shade of black and the background around them. That is, you should not be able to actually see those bars. You should be able to see almost all the other bars. On many monitors the 20 and maybe 25 bars may not be visible.
What you see when opening the MPG file with VirtualDub should be the same as what you see when playing the MPG file in a media player. -
I'll look into your suggestions jagabo, and work on learning Histogram
Regarding video differences, I initially thought the video was probably converted to NTSC using an analog method such as a DVD recorder, but upon further reflection I don't know if this was actually the case. If it was converted to NTSC by an online DVD seller, which is the most likely scenario, it was probably done on the computer using software to convert digitally. -
In case its not clear, what the situation is the original recording of this movie was made on a PAL DVD recorder of an unknown VHS tape. This is the PAL copy I now have.
At some point, someone converted this PAL recording to NTSC. Its not a case of a new transfer of the same tape. Its a NTSC conversion of the same original PAL DVD, probably using computer software to do so.
I know its the exact same DVD recording because both discs contain the same original DVD recorder menu/play button and screens in the recording itself, also including the date & timestamp.
So unless someone recorded the original PAL DVD into an analog NTSC recorder, then I wouldn't think the colors/levels would be much different. Although there is some difference - the NTSC seems to be a bit lighter and perhaps some noise removal was applied during the conversion. Or maybe they did record into a new dvd recorder which applied its own filters.Last edited by autephex; 30th Dec 2018 at 12:38.
-
You may be right about it being a digital PAL to NTSC conversion. Nevertheless the PAL video has illegal blacks below Y=16 which were crushed when the video was converted to NTSC.
[Attachment 47689 - Click to enlarge]
Both videos have illegal brights above 235. Normally you would want to raise the black level and lower the white level to bring those into compliance. Your ColorYUV(gain_y=-20, gamma_y=05, off_y=-2) from post #63 brings the whites down makes that black crush worse. The following white balance adjustments don't effect the Y levels.
In my original "fix" for the levels:
I increased the gamma because I new that blacks had been crushed. Increasing the gamma was to bring out some dark detail -- not in the crushed areas (it's not retrievable there) but in the near black areas, to try to make up for some of the lost detail.Code:# adjust levels ColorYUV(gain_y=-20, gamma_y=50, off_y=-2)
-
Ok, I will try to learn some more about what you've pointed out here. I don't know anything about compliant levels so a lot of learning to do still.
-
The levels issue is really a mess. Designers of digital video back in the 1980s decided to provide numerical headroom and footroom to accommodate limitations of the analog conversion process. So they made 16 equal to "black" and 235 equal to "white." In the purely digital domain of modern computing there's no real reason to throw away the extra range, but the international standard persists. Which programmers of which processing and playback programs follow which standard has varied dismally.
-
The waveform monitor (Histogram()) shows the illegal areas in brown. Everything below Y=16 represents negative intensities. Your monitor would have to suck light out of your eyeballs to display it. Above Y=235 would produce RGB values greater than 255 -- which monitors can't do. In practice modern devices simply clamp the illegal colors. But some older devices would produce very bad errors (like bright spots where there should be black, dark spots where there should be white.
You normally want to keep out of the illegal areas. A little at the edges of the frame or some overshoots from sharpening filters are OK. But any part of the picture where you want to be able to see detail should stay out of the illegal areas. -
Still playing with settings, but so far using Histogram() and Histogram(levels) along with your VaryTweak & VaryColorYUV scripts, I've worked out the following for adjusting levels to stay within the Histogram legal areas... but still looks washed out and color problems which I'm going to try and figure out next.
These settings probably still need some adjusting also
Also tried out AutoAdjust() & Autolevels() and they produce decent results for an automatic script, but not quite right on.Code:ColorYUV(gain_y=-40, gamma_y=30, off_y=0) Tweak(hue=5, bright=5, cont=.9, sat=1.0)
And adding the below seems to help correct some of the coloring, slightly modified settings from original script... shifts away from the green tint:
Code:# white balance darks, brights darks = ColorYUV(off_u=2, off_v=7) brights = ColorYUV(off_u=-2, off_v=1) Overlay(darks, brights, mask=ColorYUV(cont_y=50))
Last edited by autephex; 1st Jan 2019 at 18:10.
-
If you think it's washed out you could stand to lower the black level a bit more. Or use less gamma adjustment. Which clip/shot were you using as a reference? Keep in mind that you don't care what happens to the black borders so you can crop them to analyze only the part of the image you care about. You can always replace the borders with perfect black (with AddBorders) later if necessary.Originally Posted by autephex
-
Yeah I've been cropping out the black prior to all processing. I've only been working on the "cabin" clip for consistency, but some scenes like outdoor shots look a bit too dark so I will need to either adjust for that, or will have to do scene-by-scene settings.
One thing I am still having problems with is getting the whites to be pure white like you did a very good job of on the NTSC video. In the cabin clip, you really got the whites nailed (along with the other colors as well) - like the guy's white shirt.
Getting the whites corrected may help with the outdoor shots as far as looking too dark goes, because there tends to be a lot of white in those shots.
I ended up with the following settings for now.
Code:ColorYUV(gain_y=-50, gamma_y=15, off_y=0, gain_u=5, off_u=2.0, cont_u=5) Tweak(hue=5, bright=3, cont=1, sat=.9) # white balance darks, brights darks = ColorYUV(off_u=2, off_v=7) brights = ColorYUV(off_u=-2, off_v=1) Overlay(darks, brights, mask=ColorYUV(cont_y=50))
-
Looking a bit closer between the NTSC vs PAL video, appears that whatever was done in the NTSC conversion included correcting some of the color errors I'm having trouble with, which would help explain my troubles in getting the whites to be pure white without the yellowish color spots...
-
Part of the reason you're having problems with white balance is that your initial levels adjustments put the white level much lower than my adjustments. Since Overlay() is set to use the video itself as the alpha mask (mask=ColorYUV(cont_y=50) you're not getting as strong a correction of the brights.
my mask:
[Attachment 47709 - Click to enlarge]
your mask:
[Attachment 47710 - Click to enlarge]
The brightest parts of the mask are near the top of the waveform graph in my mask, much lower in yours. Changing your mask to something like: ColorYUV(cont_y=50, gain_y=50) would get your mask (with your current levels adjustment) closer to mine.
Further, my white balance adjustments were made after the fix for the droop in the V channel. -
Have a good handle on Histogram now & I'll try putting my head around using Overlay() correctly next.
I have been putting your fix for the droop before the balance adjustments to see if it helps, I just haven't been posting about it because so far I couldn't tell any difference, but probably because it needs adjustment also. -
So going by just the Histogram data and thinking about using the Overlay(), I ended up basically reverting back to your original settings for the NTSC video, and it produced a better improvement on the whites. I still can't figure out what the color issue is I am seeing, kind of like glowing spots/areas similar to contrast or saturation error. In this cabin clip, its mostly noticeable on the white shirt.
The levels are still reaching a bit into the illegal areas with the current settings
Code:# fix droop of V channel at left ramp = GreyRamp().BilinearResize(width, height) Overlay(last, ColorYUV(off_v=-12), mask=ramp) #adjust levels ColorYUV(gain_y=-20, gamma_y=50, off_y=-2) SmoothTweak(contrast=1.06, saturation=.9) # white balance darks, brights darks = ColorYUV(off_u=4, off_v=9) brights = ColorYUV(off_u=18, off_v=3) Overlay(darks, brights, mask=ColorYUV(cont_y=50))
Applying Autolevels() after all of this doesn't look too bad either -
Part of the reason I was trying settings to lower the gamma more and such is because of these other scenes I've been trying to adjust for, which I haven't posted any clips of yet. These are outdoor scenes where the bright areas of the picture are already super blasted out, and the current filter settings make pinkish colors appear in those bright areas, as well as other problems.
Looks like I'll have to do alternate settings for at least these scenes, where most of the movie seems to work ok under the generalized settings.
Here a couple clips that demonstrate well what I'm talking about with some outdoor scenes. The facedown clip shows the pinkish colors happening on a lot on the right side of the frame, on the ground. You can see this in the original clip, and it becomes very bad after filtering, but with some changes to levels and hue it can be dialed back, which is why I was posting some settings which weren't working as well for the other scenes
I just looked back at the NTSC video and it looks the same in these areas, so it needs adjustment in either source. -
Using your ColorYUV() and Tweak() settings in post #75 I was able to get the colors fairly close to my original:
Code:Mpeg2Source("cabin.d2v", CPU2="ooooxx", Info=3) TFM(d2v="cabin.d2v") # fix droop of V channel at left ramp = GreyRamp().BilinearResize(width, height) Overlay(last, ColorYUV(off_v=-12), mask=ramp) # your adjustments from post #75 ColorYUV(gain_y=-50, gamma_y=15, off_y=0, gain_u=5, off_u=2.0, cont_u=5) Tweak(hue=5, bright=3, cont=1, sat=.9, coring=false) # new white balance darks, brights darks = ColorYUV(off_v=9) brights = ColorYUV(off_u=10, off_v=-1) Overlay(darks, brights, mask=ColorYUV(cont_y=50, gain_y=50)) # get your white levels up close to mine ColorYUV(gain_y=45)
[Attachment 47747 - Click to enlarge]
A little more tweaking could get closer.
I'll look at the new clips later. -
Perhaps HDRAGC would help, used directly to recover some details in the shadows, or after Invert() to recover some details in the highlights.Part of the reason I was trying settings to lower the gamma more and such is because of these other scenes I've been trying to adjust for, which I haven't posted any clips of yet. These are outdoor scenes where the bright areas of the picture are already super blasted out, and the current filter settings make pinkish colors appear in those bright areas, as well as other problems.
The AutoExpose() function (see here) applies both treatments at once; SGradation (same post) may be worth trying too. -
One thing you can do with blow out shots is an inverse gamma stretch.
A source frame with superbrights and blown out brights:
[Attachment 47781 - Click to enlarge]
After a gain adjustments to bring the superbrights down to legal levels:
ColorYUV(gain_y=-20)
[Attachment 47782 - Click to enlarge]
You can now see more details in the bright areas, the building on the left, for example.
With an inverse gamma adjustment:
ColorYUV(gain_y=-20)
ColorYUV(levels="TV->PC").Invert().ColorYUV(gamma_y=50).Invert().Color YUV(levels="PC->TV")
[Attachment 47783 - Click to enlarge]
That brings a little more detail out in the bright areas. Again, in the build on the left, and the sky.Last edited by jagabo; 9th Jan 2019 at 10:46.
-
Thanks, I'll try applying that first and then see about good settings afterward
Is there a preferred way to process a video with different settings for different sections of frames? I can split the whole movie up into different clips, process separately and rejoin them all. But may run into issues with proper clip points being where each scene starts/ends (could prob just clip any corrupt frames in this case)
Or is there a good way to feed the different sections/settings into Avisynth without chopping it all up? -
There are several ways to do this. You can use Trim() to break it up into named sections that are treated differently, then append them at the end:Originally Posted by autephex
Or you can use ReplaceFramesSimple(), part of the RemapFrames package. This lets you specify ranges of frames in one named clip that replace frames in another named clip:Code:source = WhateverSource("filename.ext") part1 = Trim(source, 0, 10000).Filters() part2 = Trim(source, 10001, 20000).OtherFilters() part3 = Trim(source, 20001, 30000).YetOtherFilters() part1++part2++part3
This method is especially useful when you have many sections that are treated the same way because you can enter several ranges in ReplaceFramesSimple().Code:source = WhateverSource("filename.ext") filtered1 = source.Filters() filtered2 = source.OtherFilters() filtered3 = source.YetOtherFilters() ReplaceFramesSimple(filtered1, filtered2, mappings="[10001 20000]" # replace frames 10001 to 2000 of flitered1 with frames from filtered2, creating a new clip called last ReplaceFramesSimple(last, filtered3, mappings="[20001 30000]" # replace frames 20002 to 30000 of last with frames from filtered 3
Code:ReplaceFramesSimple(filtered1, filtered2, mappings="[10001,20000] [50001,60000] [80001,90000]")
 Quote
QuoteSimilar Threads
-
Method for cleaning 8mm transfer
By film in forum RestorationReplies: 23Last Post: 11th May 2020, 19:30 -
An inexpensive way of cleaning moldy VHS tapes
By Master Tape in forum RestorationReplies: 17Last Post: 13th Jan 2020, 12:02 -
Cleaning Analog Gear Before Transfer - VHS, VCR, Hi8, MiniDV
By Dinkleberg in forum CapturingReplies: 1Last Post: 18th Oct 2017, 15:55 -
Help cleaning up spotlighted area in VHS restore (using AE)
By msimon7 in forum RestorationReplies: 18Last Post: 25th Oct 2016, 22:13 -
Problem with audio on VHS-C tapes - only with one VCR - need cleaning?
By undyingfire in forum Newbie / General discussionsReplies: 4Last Post: 25th Sep 2016, 21:27