


I’m starting this thread to get help on a lifelong project of restoring my grandfather’s Kodacolor regular 16mm home movies, shot in the 1930’s. I’ve tried many different methods, but I’ll only describe the current “solution” so far. If there’s anyone who wants to get into more specifics just ask.
Here’s the original problem:
When the HD transfer was made from the original film, most of the cyan and yellow dyes have faded leaving only the magenta visible (yes, I know all about RGB etc., I’m just describing the visual impression I get in looking at the transfer). Since the video transfer used frame blending to increase the frame rate from 16fps 29.97fps, I sped up the frame rate to 200% in Premiere Pro to eliminate the frame blending and use the result as the work file for subsequent steps.
I primarily use Adobe software (PrePro, AE, Photoshop) to do most of this manipulation and plan on doing dust/dirt removal with rotoscoping etc. But for now lets focus on color restoration.
I am using a neural network colorizing method described in this thread https://forum.doom9.org/showthread.php?t=175314 to create a new color channel and merge the results with the original transfer.
The results are a great start, and while not totally accurate it’s the basis I’m using to get a pleasing result (i.e. blue sky, green grass, good flesh tones etc.) Where I’m getting stuck at the moment is the new color channel made from the colorization process varies too much since the process is really only geared to working on still images. So there’s no attempt at keeping the “colorizing guess” consistent from frame to frame. The result is different hues fading in and out as the scene progresses.
I’m thinking of some sort of temporal smoothing in the color channel, and ideally a way to indicate “model” frames that the “filter” could use to rectify the frames who’s hue drifts. Does anyone know of a way to temporally blend the hue throughout a scene without manual rotoscoping?
I've attached my latest result for reference.
+ Reply to Thread
Results 1 to 26 of 26
-
-
If the original transfer really used "frame blending", you will never be able to undo that. Most of the restoration steps (dirt removal, stabilization, grain reduction, sharpening, etc.) require a frame accurate transfer. Also, any other restoration you want to do, such as "temporally blending the hue," will also require clean, individual frames, without blending.
[edit]I was finally able to download your sample (very slow download). The good news is that the clip doesn't have any obvious blending. The bad news is that, even at 15 fps, it plays way too fast. I highly doubt that the original film was shot at 7 fps (or less). Thus, whatever you did to eliminate the blending seem to have left you with something that has a lot of frames missing.
Just as important, the transfer completely lost all the highlights. Everything is blown out. This is a common problem from companies that don't know what they're doing.
Then there is the weird vertical banding that comes and goes. This looks like some artifact from whatever processing you've already done. You won't be able to get rid of that.
IMHO, color is the least of your problems. The only solution is to get a transfer done by a company that knows what they're doing. Sorry to be negative, but that's the obvious conclusion.
P.S. Depending on how your transfer was actually done, there is an AVISynth script that was developed to undo the blending that results from doing a transfer by simply pointing a video camera at the screen while the film is projecting:
The power of Avisynth: salvaging "botched" transfers of old 8mm films to DVD.
If your original transfer plays at the correct speed (unlike the video you posted), then this script might be able to eliminate the blending without losing over half of all the original frames.Last edited by johnmeyer; 27th Oct 2018 at 13:10.
-
An untouched sample might be a good start. No one wants to see something that's already been monkeyed with.
And where does a company get off blending frames to achieve some arbitrary final framerate. They should have given you what was on the film - no more and no less. -
Yeah. The sample is weird
The transfer co start with 16 fps but increase that to 29.97. The OP now processes that back to 15 fps yet ends up speeding up the footage.
But if the OP does not have access anymore to the original film and only the 29.97 transfer maybe he should upload a direct sample of that. -
You can easily apply a temporal smoothing to the colors with MergeChroma() and your favorite motion compensated temporal noise reduction filter. Something like:
Code:MergeChroma(TemporalDegrain(SAD1=1600, SAD2=1200, sigma=64))
-
That is actually quite common, for two reasons. First, until ten years ago, the only thing that would play on NTSC TV was 29.97 fps video. So, the movies had to be telecined.Originally Posted by manono

The other reason is that many transfer houses use equipment that simply records the projected image onto a video camera. This includes the shutter closures, which introduces flicker, and also includes a blending of some adjacent frames, which may or may not be the blending to which the OP refers. Since these cheap transfers are so common, we had a long discussion over in doom9.org about how to "recover" the original frames from such a transfer, which is the link I provided above. Under the right circumstances, that software can do an amazing job at giving you something that is pretty close to a frame-accurate (one frame of film on one frame of video) transfer.
And I totally agree with everyone else: we need a clip of the original video, exactly as received from the transfer firm. However, as I stated above, if the exposure is as bad on the original as on the sample already posted, the final result is going to still look pretty bad. -
Thanks so much for all your replies. To clarify a bit with the clip I uploaded. This is a clip after all sorts of post-processing I've done to the original transfer. To summarize:
I removed the frame blending by speeding up the clip by 200% (effectively getting 15fps), so that's why the sample is speeded up.
I blended a colorized copy with chroma blend with the above.
I used Lumetri color filtering to skew most of the chroma to the blue end (for now) and altered the levels.
I made an encoded and compressed version to upload here, but at a frame rate of 29.97, just to make it easy to show the chroma variance and encode with an easy preset. I will use optical flow to slow down the whole film and get it back to normal (for video) 29.97fps speed. But I don't want to do that until I'm done with everything else to keep my frame accuracy accurate and not have weird wavy artifacts due to dirt or scratches.
Without getting into too much detail why I can't easily upload a copy of the original transfer, the current version of Premiere Pro 2019 has trouble decoding and encoding AVI files. The original transfer is in that format and is huge (a couple hours worth of footage). I could reinstall a version of PrePro that can deal with AVI files, but that's a lot extra work to do just to create this sample, however I'll do it if its absolutely critical to this discussion.Last edited by TFLeonard; 29th Oct 2018 at 09:30.
-
I'm totally new to AVISynth. I've successfully run the beginner scripts through Windows Player, but I don't understand how one saves a script modified video file? Does Windows Player just apply the modifications automatically upon playing or do I need some other tool?Originally Posted by jagabo
-
Having viewed the film footage projected, the blown highlights are typical of the original film. Let's remember that when my grandfather took these movies in the 1930's, home movies were "bleeding edge" and the camera was a windup with fixed focus lens and he probably had fixed exposure control for an average daylight scene (interior shots are unintelligible).Originally Posted by johnmeyer
The banding is also on the original footage, but may be a result of age too. The dyes are fading at different rates both over time and location on the frame. The reels were stored in a closet for 40 years and all sorts of horrible temperature situations. Fortunately when I started getting interested in this in the 1970's, I had the idea to do a homemade transfer to Super 8 film, preserving the colors that were there at that time. Unfortunately since I did the manually frame by frame, optically with a rotoscope, the dupe does increase the contrast (blowing out highlights even more) and I cropped the image by 20% so if I try to blend the two versions in Premiere Pro, the edges are missing.
As I said in my original post, this is a project I've been working on off and on for forty years and as technology advances, I take new cracks at it. -
AviSynth serves uncompressed frames to the client application. From there, you need to save into a new file, optionally with compression. GUIs such as VirtualDub will do this, as will command-line apps such as FFmpeg.Originally Posted by TFLeonard
-
Since this was an issue in the source, you might want to prefilter that before using the neural network to colorize. It might yield more consistent results right off the batThe banding is also on the original footage
In general, you would treat this as "flicker" . You implied it affects the "color channels", but it really affects luminance as well
So the general approach would be temporal smoothing, deflicker filters . There are some available in avisynth, virtualdub. The side effect is blurring of details. The stronger the flicker, the stronger the settings you would need to use, the worse the blurring
Adobe has some several 3rd plugins available as well. Some of them are able to use a reference frame. They tend to work best per scene
What type of AVI is the original ? You can use mediainfo (view=>text)
Virtualdub2 can be used to handle AVI files , including marking in/out sections (home/end keys for in/out) to stream copy. Video=>direct stream copy , audio=> no audio , file=>save as avi
If it's uncompressed AVI, you can zip it up with 7zip, winrar etc... to cut the filesize down -
I tried uploading the an AVI version from Virtualdub but even zipped it came out to almost 6gb which is too big for an attachment here. Therefore I attached an mp4 encoding instead. This shows the original transfer with no manipulation of frames, colors or levels.
It looks like the original transfer is a mjpeg AVI file and as I remember it used the Blackmagic encoder.Last edited by TFLeonard; 29th Oct 2018 at 12:09.
-
I doubt very much that the original source had completely blown-out highlights. I say this because I've transferred a LOT of film, and if the general exposure is correct (which appears to be the case with your clip), there is usually some detail in most highlights. You may think you remember the highlights being blown out, but I'll bet that if you look carefully at the original footage, you'll find that the bright sections actually contain detail.Having viewed the film footage projected, the blown highlights are typical of the original film.
-
Here's an mp4 of the Super 8 dub showing the color it had in the seventies (for comparison to the state its in now). Please note the dub was made backwards (left to right) due to my not being able to tell the right way to load the film in the rotoscope because regular 16mm has sprocket holes on both edges, and being a novice filmmaker at the time

My original idea was to "copy the chroma" from this Super 8 duplicate and put it in the magenta tinted copy. Is there a way to do this? Chroma blend doesn't bring enough of the color over in my tests, and since the Super 8 copy is cropped, I don't get any chroma on the edges of the frame. Is this something MergeChroma can do? -
In AviSynth MergeChroma(video1, video2) combines the luma channel of video1, with the chroma channels of video2. Of course, you need sync the two videos and scale/align them first.Originally Posted by TFLeonard
-
So if there's no chroma on the edges of the chroma source then I'm SOL, right?
-
I compared your original to the modified version you initially posted. As I suspected, your decimation attempt removed every other frame of film!! I verified this by counting the number of frames in your original that it took the person to go from their position in the first frame of the bridge scene, until their head was above the next vertical railing on the bridge. In the original, it took 18 frames, but in your modified version, it took 9 frames.
I then looked at the Vegas videoscope levels for the original capture. The whites are crushed in a way that almost certainly means that the capture was done incorrectly. I'll give you 99.9% confidence that your original film has perfectly intact highlights.Last edited by johnmeyer; 29th Oct 2018 at 14:41. Reason: typos
-
I believe you about the transfer quality, but getting another transfer done at this point is problematic (I don't live near the films so I'd have to travel to just get the films and ship them to get transferred again), so at this point lets just say this is a learning exercise and if I can come up with a wonderful recipe for renovating this transfer, I can always apply it to a better one, assuming the films survive long enough for that.
-
I know how to restore films:Originally Posted by TFLeonard
https://www.youtube.com/watch?v=tBAHzO7rJS0
but I have no idea how I could make your transfers look much better. Sorry about that.Last edited by johnmeyer; 29th Oct 2018 at 17:19. Reason: edited link (initial link was bad)
-
Didn't have any luck getting your example to work. I think its because I didn't install TemporalDegrain properly. I'm a bit lost about exactly what dependencies it needs and which versions to use. If there's a simpler Temporal smoothing plugin, that might be better just to see if the results are what I'm looking for. Any ideas?Originally Posted by jagabo
-
I watched your reel, and its excellent work. How did you get the color corrected for the ladies with sunglasses and the parrot scene?Originally Posted by johnmeyer
-
In that shot there's enough color left in the source to restore them. Johnmeyer probably did something more complex but this simple sequence gives very similar levels and colors:
Code:ColorYUV(gain_y=200, off_y=-65) # similar levels brights = ColorYUV(off_u=16, off_v=-14) # white balance brights darks = ColorYUV(off_u=6, off_v=-19) # white balance darks Overlay(darks, brights, mask=ColorYUV(cont_y=120, off_y=-20)) # blend the two ColorYUV(cont_u=300, cont_v=300) # increase the saturation
[Attachment 47043 - Click to enlarge]
On the left is the left half of the video processed with the above sequence. On the right is the untouched right half from youtube. -
Originally Posted by johnmeyer
I agree with John there - you're dropping good frames. And fixing that doesn't require a re-transfer since you have the original AVIOriginally Posted by TFLeonard
It looks more like frame duplicates to me in the "Original Transfer endoded as mp4.mp4" sample .
If that sample was representative, the way you would do that in premiere is create a sequence with 15 fps , interpret the footage as 30.0 fps (instead of 29.97) , drop the footage on the timeline and it will pick every 2nd frame exactly .
There are preferential duplicates , at least in that sample, (you want the odd, or every 2nd frame, because the quality is higher, edges are cleaner, fewer artifacts), but it might be the way that sample was re-encoded . You could use SelectOdd() in avisynth for example . -
I did the same thing as jagabo, although I did it in my NLE (Vegas) which is a lot simpler because it is interactive. I used the Color Corrector plugin, which permits separate corrections for shadows, midtones, and highlights. For each range, I found something in the frame that should be neutral color, and then clicked on the "opposing color" button. This adjusts the image to remove any color cast from that range. I then repeated for the two remaining ranges. This removes the cast, and as jagabo says, if there is any remaining color in the other RGB channels, those faded colors will start to show up. If there is no color left, then you have to colorize. The OP did a pretty decent job of that.How did you get the color corrected for the ladies with sunglasses and the parrot scene?
As far as fixing the dropped frames, poisondeathray as usual is correct: it is trivial to fix by simply doing the decimation correctly. You can do it in AVISynth with a singlestatement, or in Vegas by setting an undersample rate of 0.5. I unfortunately do not know how to use the OP's NLE, Premiere, but there is probably an equally simple way to do it there.Code:Selectevery(2,0)
The reason I can't do much restoration with the OP's transfer is that the highlights are so blown out that the result is still going to look pretty bad. Also, the compression artifacts in the "original" are pretty bad, and these artifacts will interfere with some of the restoration tools. If this is truly what was delivered by the transfer house, then the OP is SOL. However, if he re-encoded in order to cut the video prior to upload, perhaps the true original doesn't have these artifacts.
[Edit]
Here is my NLE showing what a normal histogram looks like for a film transfer where the operator exposed for the highlights (which is what you do to avoid the blown highlight problem). Note the uniform range of luminescent values with dark pixels (the bottom of the diagram) and light pixels evenly distributed. Note also that the very bright ship's hull still contains lots of detail, and none of the pixels go all the way to 100% (i.e., very few pixels in the circled area at the very top of the diagram):

By contrast, here is a frame from the OP's original. Note the massive concentration of pixels pegged at 100% white (the top of the diagram). All detail has been lost:
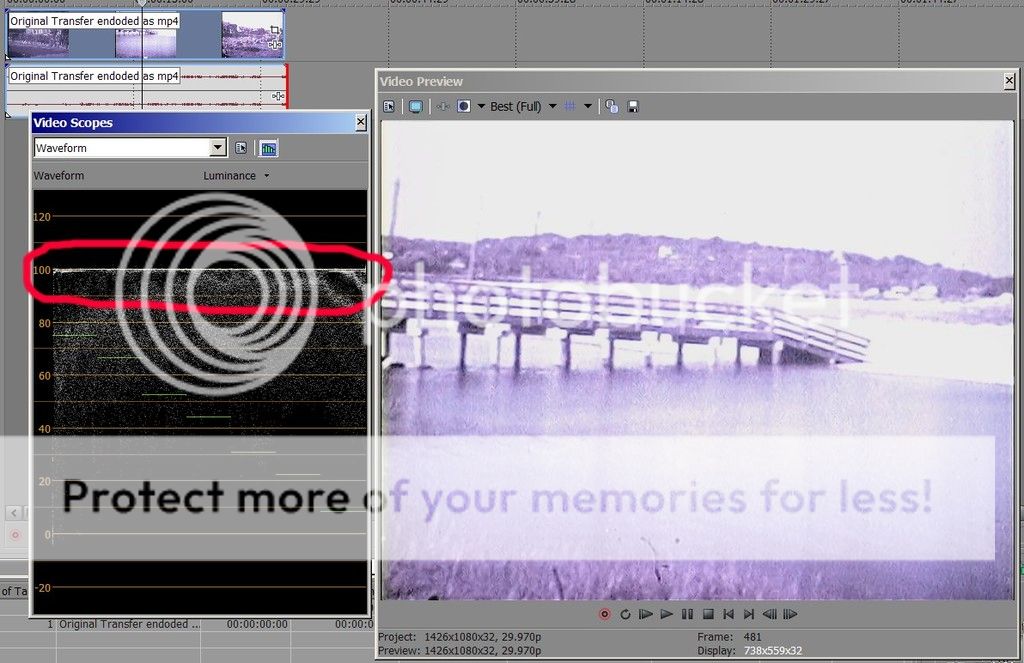
Last edited by johnmeyer; 29th Oct 2018 at 20:29. Reason: added images
-
Here's an example of using the chroma from one video along with the luma of another.
Code:v8 = LSmashVideoSource("Super 8 dub.mp4") v16 = LSmashVideoSource("Original Transfer endoded as mp4.mp4") v8 = v8.FlipHorizontal().BilinearResize(1168,874).TDecimate(mode=2, rate=18) v16 = v16.SelectEven().Trim(45,0).ColorYUV(off_y=-30, cont_u=-30, cont_v=-30) Overlay(v16, v8, x=142, y=172, mode="chroma")
[Attachment 47044 - Click to enlarge]
Unfortunately, the S8 dub only includes part of the frame. And it's not always the same part (it looks like someone panned and scanned a bit during the transfer). I darkened the 16mm video to make the levels match a little better. I made no attempt to adjust the colors. -
Originally Posted by jagabo
That someone is me, having manually matched the frames in PrePro. Since the Super 8 film dupe I made in the seventies was completely homemade with my Canon Super 8 camera shooting single frames on Kodachrome movie film from the Rotoscope I borrowed from school over spring break, consistency was lacking. There were duplicate frames, variances in the exact positioning of the camera to the rotoscope image and magnification variances. So I did my best to match and scale each frame to the 16mm transfer which was made from the original regular 16mm film stock.
As I think is becoming apparent, the Super 8 footage is really only good for a reference to what the real colors were and some sort of artificial colorization will probably be the way to go. That's why I used the Neural Network technique mentioned in my original post to get a start on that.
I suspect that a part of this Neural Network technique could be adapted to help "train" the system to reference restored frames (relatively straightforward on a still frame basis in Photoshop) and use the existing colorizing system's scene and region detection to automatically colorize the frames in a scene. Even just using the scene detection bit to create masks for After Effects would help tremendously in achieving my goal. Unfortunately my computer science ability isn't up to the task of doing this, but perhaps someone reading this thread would take a crack at it. Listed below are links to the AI project:
http://hi.cs.waseda.ac.jp/~iizuka/projects/colorization/en/
https://github.com/satoshiiizuka/siggraph2016_colorization
Alternatively, does anyone know of any software that will help automate the creation of masks which could be used to colorize regions of each frame/scene?
 Quote
QuoteSimilar Threads
-
FILM9 - Restoration software for old films (8mm, Super8, 16mm) and video
By Gelinox in forum RestorationReplies: 707Last Post: 19th Jun 2024, 21:18 -
Beginner with AVISynth and AvsPmod (16mm Kinescope Restoration)
By goodiesguy in forum RestorationReplies: 20Last Post: 28th Mar 2017, 02:02 -
Can this video made with 16mm cine-cameras?
By marcorocchini in forum Newbie / General discussionsReplies: 1Last Post: 12th Mar 2016, 12:33 -
16mm telecine service recommendation
By mikel in forum Newbie / General discussionsReplies: 0Last Post: 12th Apr 2015, 21:12 -
Archiving 8mm or 16mm to h.264
By diprotic in forum RestorationReplies: 2Last Post: 15th Nov 2013, 08:02