I mentioned in another post that I used a Wolverine movie digitizer to turn a bunch of old 8mm movies into mp4's to pass out to family members on DVD. The device captures frame by frame images and turns them into an mp4. Now that I see what others are doing with 8mm restoration I'm interested in seeing if these captures can be improved.
I believe that all of my movies were made on a mid to late 60s Kodak Instamatic. A second one of probably early 70s vintage was also used. My first question is: is it possible that making my own telecine like here to get higher resolution captures will improve the quality of the frame by frame capture? There's a lot of noise in some of these films and I'm wondering if the fact that a cheap camera was used to make these movies is going to quash the possibility of getting any NOTICEABLY better captures. I really don't want to take the time to build a telecine if it's going to be a coin toss as to whether the telecine captures improve the quality over the Wolverine.
In the meantime, I ran a couple of my existing Wolverine 720x480 digitized movies through Blender to get rid of the left/right black border and to set the fps to 18. This increased the file size on a 2 minute movie from 40MB to 223MB. The bit rate jumped from 3000 kbps to 9300 kbps. That seems like an incredible jump in size. Is that normal? Is there any way to control the bit rate in Blender? Given what I changed (a crop and change in fps only) it doesn't make sense that the bit rate would change that much.
Finally, after using Blender I then ran the output through video Fred's AviSynth script from doom9 to improve the overall quality of the movies. This took the file size from 223MB to either 4GB or 7GB (depending on the settings I used)!! Again, is this normal? That's a huge increase in file size! The bit rate jumps from 9300kbps to 179 Mbps after using the script. i just tried reducing the bit rate with ffmpeg and the file size does drop to 93MB when reducing the bit rate to 4Mbps, but the video won't play in MPC for some reason. I'll play around with ffmpeg so I'm not really worried about that at the moment though.
+ Reply to Thread
Results 1 to 21 of 21
-
-
I've got some bad news for you:
1) The grain is there, in the source...the sharper the scan of the frame, the more grain you'll have. Grain is murder on compression algorithms because they work by calculating the difference between frames...If there's thousands of tiny dots "jumping" all over the place it's going to require a buttload of bitrate to maintain something close to the original image. Even relatively "clean" sources like high quality bluray transfers of film movies require MUCH more bitrate than pristine computer animated films because of the unavoidable film grain. Example..for the bluray transfer of Back to the Future to maintain a certain level of quality it required about 8GB for the move vs. Tangled (computer animation) which only required about 2GB. Your film strips are likely WAAAAY more noisy than Back to the Future .
.
2) The wolverine commits the cardinal sin of capturing straight to mp4 where any hope of further clean-up while retaining quality is lost. Ideally you'd capture to uncompressed AVI which is around 100GB (?) per hour of video or some other lossless compression scheme. Your workflow seems to be going backwards in that you're going from highly compressed to less and less compressed but the damage is already done in step one.
So double whammy...bad source + super lossy compression before you even have a chance to work with in on the computer. Ideally you would scan to uncompressed .avi or lossless format, perform cleanup/denoise/degrain/etc. (understanding that you will lose some detail/sharpness), then attempt to compress with a good quality encoder. Most do not have the time or energy for such a feat. All the clean-up should be done while uncompressed or in a lossless format. The only time you compress is at the end. -
Regarding the file size you have most likely converted in RGB instead of Ycrcb thus you get a giant gap (with virtualdub, open the script use fast recompress> compression and choose a codec like lagarith, configure the codec to YV12).
It seems to me you're using various softwares (blender, avisynth) and that's bad to keep quality (rgb<> ycbcr rounding errors, multiple files convertions etc..)
My advice: keep it simple use avisynth throughout and convert directly in mpeg2 with a software that support avisynth scripts (HCenc come to mind) unless you script is cpu intensive / a memory hog in such case use make an avi with lossless codec (lagarith or else)*** DIGITIZING VHS / ANALOG VIDEOS SINCE 2001**** GEAR: JVC HR-S7700MS, TOSHIBA V733EF AND MORE -
-
So is there any hope of improving things if I build my own telecine? As I said, I don't mind doing it. I'm an electrical engineer so I like home projects like that, but I just don't want to waste my time if the payoff is iffy. It sounds like even if I make a telecine and use a nice macro lense it's still going to pick up lots of noise because the camera/film was crap to begin with.
That said, on the two films I used to test with the AviSynth script the color did look better and there seemed to be less jitter in motions, but maybe that was just the result of slowing the speed down to 18 fps. A number of these films were made indoors so a light was used for illumination. This creates bright white spots. If film is anything like simple images it's easier to add detail/color from darkness than from white blobs.... I don't know if AviSynth has a filter for handling that sort of thing. -
I really don't understand how this script works. I've been going through it line by line and reading the notes for each filter it uses to try to understand it. Here are the two places where I see conversions being done:
This one is in the beginning after all the variables are set.
Various types of results can be returned depending on if you want the script to use certain defaults or if you want to use set values. Since I'm just starting with this I started with the default result so it uses this line:Code:source= AviSource(film).assumefps(play_speed).trim(trim_begin,0).converttoYV12()
Code:result1= interpolated.converttoRGB24().autolevels(output_low= autolev_low, output_high= autolev_high)\ .converttoYV12().coloryuv(autowhite=true).addborders(bord_left, bord_top, bord_right, bord_bot)
Is any of that causing the file to get bloated in size? -
There was no choice on my part. I just used the script as is. Perhaps there's further post-processing suggested by the guy who wrote it. He posted all of this on doom9 several years ago and there are 50 pages of discussions so perhaps it's in there somewhere. Their site has been down for several day so I guess I'll just wait to see if the answer is there when they come back online. I can compress with ffmpeg which I already did as noted above and the size dropped down to merely double what the original Wolverine mp4 was which is definitely acceptable. It just wouldn't play. Might have been because I converted it to h265. I'll try it with another compression and see if it plays.
-
It's not the script, it's the program you opened it with and the settings you chose there.
If you want to experiment a bit, open the script in Virtualdub2, set video/compression x264 8 bit
hit configure/load defaults
experiment with "rate factor" 18 - 23 (higher number smaller file less quality)
File/ save as "save as type" mp4 -
The source filter in AviSynth decompressed the incoming video, it then converted whatever the source filter gave (RGB? YUY2? YV24?) to YV12. The editor received uncompressed YV12 frames (likely tens of times bigger than a compress MP4 source, depending on the compression) from AviSynth and and you didn't choose a compression codec. So you got uncompressed video (or maybe some default compression selected by the editor) in your output file.
-
Ah, ok, thanks guys. Yeah I was using VirtualDub (not 2). I'll try VDub2 and see how that goes.
-
If you applied any filters in VirtualDub it probably converted the incoming YV12 to RGB (most VirtualDub filters only work in RGB). With no compression codec selected, or specified output color space, you would get uncompressed RGB in the output (3 bytes per pixel, YV12 is 1.5 bytes per pixel).
-
Is possible to be done?
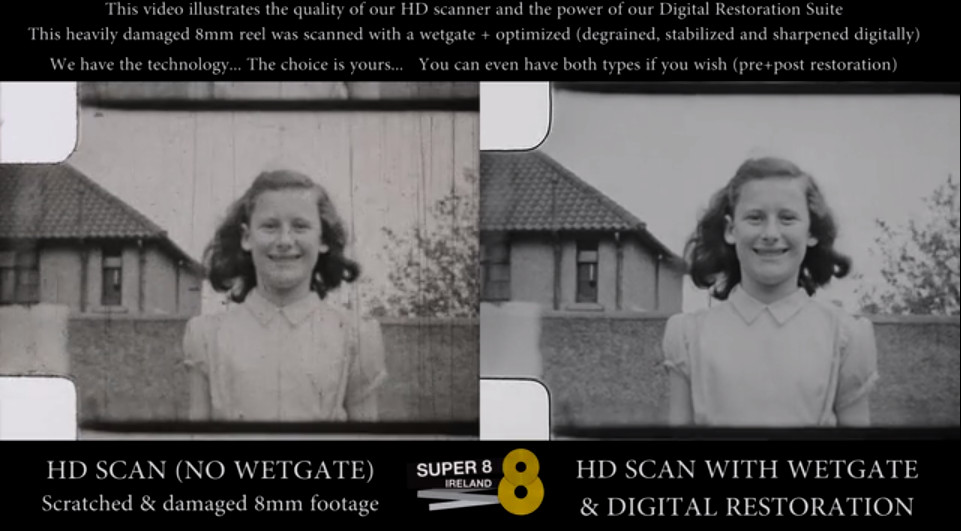
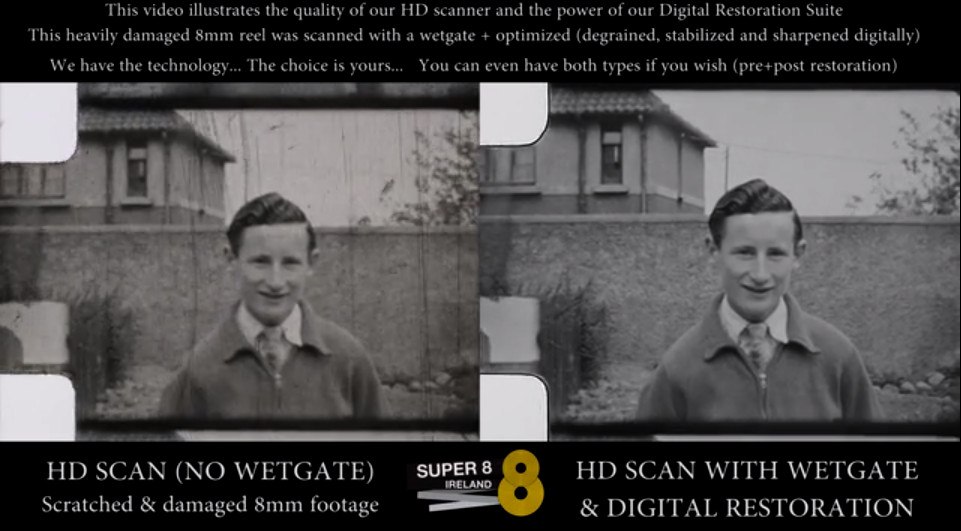
Yes, it is. With some wet scanning, this will mask out or fill in most of the grain and imperfections, without changing anything, the rest you do it in post.
Source:

https://vimeo.com/155598238
Can be done cheap?
I'm afraid not.
A Davinci pro does this with a push of a button using proper plug-ins and stuff, you can see a technician using Davinci Pro doing that around de 2:45 mark
https://vimeo.com/84135659
If you want to do it yourself look for wet gate film scanning.
https://en.wikipedia.org/wiki/Wet-transfer_film_gate
http://www.filmfabriek.nl/filmscanner/
The free Davinci version can do all the basic work.
Or look for professionals to do it for you. -
-
Wow, that was incredible. Thanks so much for pointing it out. With rate factor at 23 the final file size in mp4 is 53MB. I see some loss at that setting so I'll play around with it at the lower numbers. I didn't know you had to set all those things in VDub. The directions I had from doom9 didn't say anything about that. I think I've used VDub once over the years.
-
Virtualdub was never designed as a beginners program, however a little understanding makes a big difference
and it can be powerful when you've played with it for a while and start to understand what is going on.
Once you choose the x264 compression (you have to at least do that), the settings in the configure box are
set to pretty good defaults - so even if you never went in there you would have been OK as a place to start.
Good luck with your project -
Yes it can be done (relative)cheap:
https://www.youtube.com/watch?v=Nsk4Eb1Lzq4&t=5s
Fred. -
-
-
really fascinating stuff here about restoring old film! I had not heard about using a liquid solution to clean up the source before capturing!
How is the frame stabilized? Partially by the capturing tool and then again by de-shake or similar filters? I'm sure the capture device gets pretty close but I don't see how it could possibly keep the alignment as perfect as it should be... -
The capturing tool is not stabilizing.
I use Avisynth for stabilizing afterwards. But instead of DepanEstimate() to create the motion vectors, I use Mdepan() (from MVTools). Much better!
But Vdubs Deshaker will do the job too.
Fred.
Similar Threads
-
8mm film strips from Epson v550 to avi file from slides
By mammo1789 in forum Video ConversionReplies: 32Last Post: 21st Feb 2017, 12:17 -
Recommended VirtualDub (Or Avisynth?) Plugin(s)-Filter(s) To Remove Grain
By LouieChuckyMerry in forum RestorationReplies: 14Last Post: 7th Oct 2015, 00:21 -
What avisynth script to play a .VOB file in Virtualdub?
By brassplyer in forum Video ConversionReplies: 8Last Post: 4th Jun 2014, 03:45 -
HC Encoder input file challenge/ AVIsynth script?
By Canon GL-2 Guy in forum Newbie / General discussionsReplies: 16Last Post: 10th Jan 2014, 14:02 -
8MM Film & Improving Quality
By newsgroup guy in forum Capturing and VCRReplies: 5Last Post: 11th Nov 2013, 06:36


 Quote
Quote
 )
)