


64-bit operating system, x64-based processor")
Hello all again,
I am going back into some of my 8mm films I had scanned, some here may remember helping me out in the past with my implementation of John Meyers restoration script.
One thing I noticed, but didn't dig into at the time, was what I perceived to be a slight brightening of the final image after the script was run. To appreciate the improvements, I would often load up my original scans in Vegas, with the color and exposure corrections done, and then also underneath it put the final .264 file, and then toggle between the two to see the improvements. I did the same thing tonight, and began to wonder if I could do anything to get it back closer to what I felt was optimal when I made my corrections. I'm using the WYSIWYG policy in making my adjustments. Basically, an added effect of running the script was a brightening and "softening", for lack of a better word, in the final product. Probably all of the averaging that the script absolutely needs to do results in something a little less dynamic? Just me spit-balling there .....
So, as an experiment, I played with the brightness and contrast Video event fx in vegas, on the final file. At first I darkened it some, but that didn't truly fix it. So then, I added contrast, which did get it back closer to what I was aiming for. I kept adjusting both, and what I ended up with was the brightness back to no adjustment, and contrast boosted .095, in Vegas #'s, whatever that translates into.
I don't want to run it back through Vegas to get there, (you guys spent a lot of time helping me get everything done in the script to avoid additional runs/transcodings in Vegas or other programs, and I don't want to give in and add more now) I am sure there is probably a way to do this in the script.
A quick google tells me there is something called "tweak" that has a contrast component. If that is what I need, some help with the syntax and placement would be appreciated.
It looks like cont=1.0 is the default value, I'm guessing something pretty close to it, 1.1, or 1.05, might get me close to what I need, I can experiment I'm sure. I also saw recommendations of AVSPmod to use as a tool to see the effects of the tweaks, I never had luck getting that program running, but I'll probably just do some really short clips to try the variables with, until I find one that looks good to me.
I am using result4 in Johns script, Manual Levels, Manuel Color Corrections.
Any thoughts or guidance are as always, really appreciated.
+ Reply to Thread
Results 1 to 17 of 17
-
-
What you need is something to tell you what the change in settings does. Yes, Cont=1.0 is the default, but changes in contrast also affect the brightness. Increasing the Cont settings increases the contrast. Lowering it (towards 0) decreases the contrast. It's all explained in the Tweak page.Originally Posted by Bruce/Fl

Adding Histogram to the script will show you better what your changes in settings do. More often I use:
ColorYUV(Analyze=True).Limiter(Show="Luma")
to make it even more plain what I'm doing. You can't just eyeball these things. I have no idea what John's script is (and don't bother telling me).
As for a sample Tweak line:
Tweak(Bright=-2,Cont=1.05,Coring=False) -
Those are three filters that allow brightness/contrast changes, values given are null values (no change). You may also need to change gamma to bring out dark detail (without blowing out brights). And if you change the brightness/contrast a lot you may need to adjust color saturation too.Code:
ColorYUV(cont_y=0, gain_y=0, off_y=0)
Tweak(cont=1.0, bright=0.0, coring=false)
Levels(0,1,255,0,255)
When working in RGB you can use:
Be careful, different programs, even different filters, mean different things when they say "brightness" and "contrast".Code:RGBAdjust(r=1.0, g=1.0, b=1.0, rb=0.0, gb=0.0, bb=0.0)
And yes, learning how to use a waveform monitor like Histogram() will help you a lot.
https://forum.videohelp.com/threads/340804-colorspace-conversation-elaboration?p=212156...=1#post2121568
For a horizontal waveform monitor use:
Code:TurnRight().Histogram().TurnLeft()
Last edited by jagabo; 1st Nov 2016 at 08:15.
-
The script should make no changes to gamma. You must have tweaked a variable. Go back to the defaults.
-
I took a look John, to double check. All of the variables are identical as in your post here:Originally Posted by johnmeyer
http://forum.doom9.org/showthread.php?p=1595608#post1595608
with the exception of maxstabH=05, I bumped mine to 20.
That and my W=720 H=480 is changed to accommodate my 1920 x 1080 source files.
Could it be the way I view and adjust what is good, brightness/contrast wise? Maybe what I view as fine, technically has too much Gamma. Could it be me feeding the script something that doesn't have the gamma optimized that enables the script to correct for that, resulting in the slight change I am seeing? I make my adjustments in Vegas, utilizing the Histogram Scope. If it is light or dark, I adjust to bring it into the middle adjusting the brightness, then use contrast to flesh it out if it is too compressed in the middle of the scope. Of course, there are some scenes that that doesn't work too well with, but I adjust till I get it as good as I can.
Again, the change is very minor, but it is noticeable. When I tweaked in Vegas last night, I was able to get it very close to the original contrast/brightness wise, but still maintained all of the wonderful things the script does, the de-graining, the enhanced sharpness, and the motion compensation.
I love what the script does, it's just something I noticed.Last edited by Bruce/Fl; 2nd Nov 2016 at 00:52. Reason: grammar syntax
-
I haven't looked closely at that script but it's using autolevels. That could be changing the brightness of your video. It also uses Tweak() without "coring=false". That will clamp any superblacks and superbrights. You should post short samples of your source (to AviSynth) and the filtered videos.
-
The most likely cause of the shift is the codec you are using for encoding. You need to see if there are settings which affect the 0-15 and 235-255 conversions that, sometimes, are done by the codec to account for the differences between how video levels are encoded for TV vs. the PC.
I always create a test clip by encoding a few seconds of video from my AVISynth script. I then put that on a new track in Vegas, directly below the original and, while playing, mute and un-mute the upper track. If you do this, you should see absolutely no difference whatsoever in either gamma or color. Zero difference. If you see any shifts, then you need to play around with levels. These adjustments will be found in the settings for the codec you are using. Sometimes you also have to add a levels statement to your AVISynth script. This is one example of what such a levels statement might look like, although this will almost certainly not be the correct one for you:
Code:Levels(16, 1, 235, 0, 255, coring=false)
-
That is exactly the process I described above, and where I am seeing the difference when I toggle.Originally Posted by johnmeyer
I am taking the corrected clip in Vegas, frameserving via DMFS into MeGUI, and outputting to AVC, it's a 264 file. If there is a way to fiddle with the settings of the codec it is beyond me.
Here is the mediainfo on the finished product.Maybe that levels statement will get me there. I'll have to start trying different settings on a small sample.General
Complete name : C:\Users\Bruce\Desktop\BJM4.264
Format : AVC
Format/Info : Advanced Video Codec
File size : 6.70 MiB
Overall bit rate mode : Variable
Writing library : x264 core 148 r2638 7599210
Encoding settings : cabac=1 / ref=3 / deblock=1:-1:-1 / analyse=0x3:0x113 / me=hex / subme=7 / psy=1 / psy_rd=1.00:0.15 / mixed_ref=1 / me_range=16 / chroma_me=1 / trellis=1 / 8x8dct=1 / cqm=0 / deadzone=21,11 / fast_pskip=1 / chroma_qp_offset=-3 / threads=6 / lookahead_threads=1 / sliced_threads=0 / slices=4 / nr=0 / decimate=1 / interlaced=fake / bluray_compat=1 / constrained_intra=0 / bframes=3 / b_pyramid=1 / b_adapt=1 / b_bias=0 / direct=1 / weightb=1 / open_gop=1 / weightp=1 / keyint=30 / keyint_min=1 / scenecut=40 / intra_refresh=0 / rc_lookahead=30 / rc=crf / mbtree=1 / crf=23.0 / qcomp=0.60 / qpmin=0 / qpmax=69 / qpstep=4 / vbv_maxrate=40000 / vbv_bufsize=30000 / crf_max=0.0 / nal_hrd=vbr / filler=0 / ip_ratio=1.40 / aq=1:1.00
Video
Format : AVC
Format/Info : Advanced Video Codec
Format profile : High@L4.1
Format settings, CABAC : Yes
Format settings, ReFrames : 3 frames
Bit rate mode : Variable
Maximum bit rate : 40.0 Mbps
Width : 1 920 pixels
Height : 1 080 pixels
Display aspect ratio : 16:9
Frame rate : 29.970 fps
Color space : YUV
Chroma subsampling : 4:2:0
Bit depth : 8 bits
Scan type : Progressive
Writing library : x264 core 148 r2638 7599210
Encoding settings : cabac=1 / ref=3 / deblock=1:-1:-1 / analyse=0x3:0x113 / me=hex / subme=7 / psy=1 / psy_rd=1.00:0.15 / mixed_ref=1 / me_range=16 / chroma_me=1 / trellis=1 / 8x8dct=1 / cqm=0 / deadzone=21,11 / fast_pskip=1 / chroma_qp_offset=-3 / threads=6 / lookahead_threads=1 / sliced_threads=0 / slices=4 / nr=0 / decimate=1 / interlaced=fake / bluray_compat=1 / constrained_intra=0 / bframes=3 / b_pyramid=1 / b_adapt=1 / b_bias=0 / direct=1 / weightb=1 / open_gop=1 / weightp=1 / keyint=30 / keyint_min=1 / scenecut=40 / intra_refresh=0 / rc_lookahead=30 / rc=crf / mbtree=1 / crf=23.0 / qcomp=0.60 / qpmin=0 / qpmax=69 / qpstep=4 / vbv_maxrate=40000 / vbv_bufsize=30000 / crf_max=0.0 / nal_hrd=vbr / filler=0 / ip_ratio=1.40 / aq=1:1.00
Color range : Limited
Color primaries : BT.709
Transfer characteristics : BT.709
Matrix coefficients : BT.709 -
Most common error is using studio RGB in vegas in 8bit mode , but forgetting to account for that in the frameserver script (ConvertToYV12(matrix="PC.709"))
Does the preview in megui, before you encode look correct ? -
Yes, as far as I can tell.Originally Posted by poisondeathray
You really need to do what was suggested, load them both up on seperate timelines and toggle between them to see the difference. And it is a subtle very difference, but it is there.
Without them both right there and easily switchable, you wouldn't notice it. Well, I wouldn't. -
You're encoding with a lossy codec and chroma subsampling, color space conversions. There is expected to be minor differences. So how large are the differences ? How subtle is "subtle" ? Can you post a screenshot of each ?
-
Also, how are you loading the file ? Elementary AVC stream might not be importing correctly (try putting into a container first e.g. tsmuxer for transport stream, or mymp4boxgui for mp4) . When you put it into a container, then you can check properly in vegas or avspmod
-
I'm loading the avisynth script (which points to the frameserver) into MeGUI, outputting 264.Originally Posted by poisondeathray
You helped me alot in narrowing my workflow, going this route. Here: http://forum.doom9.org/showthread.php?t=173269
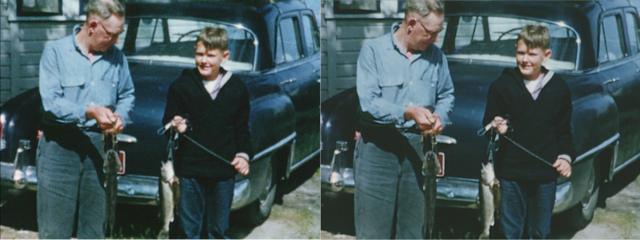
Here is a side by side screen cap:
-
This is definitely a PC vs TV levels issue. This is exactly what happens when you frameserve from an 8bit vegas project with studio RGB assets, and use the Rec instead of PC matrix when converting to YUV . (If you used smoothlevels(preset="tv2pc"), or if you prefer levels(16,1,235,0,255,false,dither=true) , which brings 16-235 to 0-255, the right side will look almost identical to the left side in terms of levels) . If you post the log file from megui that will have your script and settings
But besides that, in terms of levels - the black level is a bit high on the "left" side anyways -
Here is the log from MeGUI
Code:Preliminary log file only. During closing of MeGUI the well formed log file will be written. -[Information] Versions --[Information] [10/31/2016 7:28:19 AM] MeGUI: 2624 --[Information] [10/31/2016 7:28:19 AM] Operating System: Windows 10 Home x64 (10.0.0.14393) --[Information] [10/31/2016 7:28:19 AM] .NET Framework: 4.0 (4.0.0.0) --[Information] [10/31/2016 7:28:19 AM] .NET Framework: 4.6.x (4.6.01586) -[Information] Update detection --[Information] [10/31/2016 7:28:19 AM] AviSynth: 2.6.0.6 (31-03-2015) --[Information] [10/31/2016 7:28:19 AM] AvisynthWrapper: (18-03-2016) --[Information] [10/31/2016 7:28:19 AM] Haali Matroska Splitter not installed properly. --[Information] [10/31/2016 7:28:19 AM] Therefore DSS2() will not and certain functions of FFVideoSource() and the HD Streams Extractor may not work. --[Information] [10/31/2016 7:28:19 AM] Please download and install it from http://haali.su/mkv/ --[Information] [10/31/2016 7:28:19 AM] Haali DSS2: not installed --[Information] [10/31/2016 7:28:19 AM] ICSharpCode.SharpZipLib: 0.85.5.452 (18-03-2016) --[Information] [10/31/2016 7:28:19 AM] MediaInfo: 0.7.79.0 (18-03-2016) --[Information] [10/31/2016 7:28:19 AM] MediaInfoWrapper: 0.7.61.0 (18-03-2016) --[Information] [10/31/2016 7:28:19 AM] MessageBoxExLib: 1.0.2218.28317 (18-03-2016) --[Information] [10/31/2016 7:28:19 AM] SevenZipSharp: 0.64.3890.29348 (18-03-2016) --[Information] [10/31/2016 7:28:19 AM] 7z: 9.20 (18-03-2016) --[Information] [10/31/2016 7:28:20 AM] Connected to server: http://megui.tmebi.de/stable/ --[Information] [10/31/2016 7:28:20 AM] No package requires an update -[Information] Log for job143 (video, BJM4 HL.avs -> BJM4 HL.264) --[Information] [10/31/2016 7:28:46 AM] Started handling job --[Information] [10/31/2016 7:28:46 AM] Preprocessing -[NoImage] # adjusted borders to 240 -[NoImage] # film restoration script by videoFred. -[NoImage] # denoising, resizing, stabilising, sharpening, auto-levels and auto-white balance. -[NoImage] # -[NoImage] # Modified by John Meyer, October 7, 2012 -[NoImage] # -[NoImage] # Changes made by Meyer (June 8, 2010): -[NoImage] # 1. Replaced the MVDegrainMulti function, which was part of the original MVTools -[NoImage] # with the equivalent function using the newer and faster MVTools2. -[NoImage] # 2. Added RemoveDirt function prior to Degrain in order to eliminate large dust spots. This -[NoImage] # substantially improves the dirt removal capabilities of this script. The user will need to -[NoImage] # download this plugin at: -[NoImage] # http://www.removedirt.de.tf/ -[NoImage] # 3. Eliminated a great deal of sharpening. The original script did sharpening in at least four places. -[NoImage] # With grainy film stock, this sometimes created objectionable grain. Also, the limitedSharpenFaster -[NoImage] # function, while excellent for video, is uncessarily slow, and isn't really needed for this low -[NoImage] # resolution source. Too much sharpening can make the film look too much like video. -[NoImage] # 4. Added multithreading. I was able to roughly triple the script performance. It may be possible to -[NoImage] # substantially increase this, perhaps as much as 12x instead of 3x. However, the autolevels function -[NoImage] # would have to be replaced. -[NoImage] # 5. Fixed several things I found. The result3 option didn't have the manual color correction code, so I -[NoImage] # added that back in. All the numbered "stab" variables (stab1, stab2, etc.) aren't needed except -[NoImage] # for providing a test function for stabilization. I eliminated all of this to streamline the script. -[NoImage] # 6. Deflicker seemed redundant, given all the averaging that takes place with MDegrain, and also the averaging -[NoImage] # that is done when the autolevels outputs are selected. -[NoImage] # 7. I reduced the number of frames used for averaging autolevels from the default (which is 5) to 2. -[NoImage] # I probably should add a variable in the header so the user can change this. Something else to do -[NoImage] # in the future ... -[NoImage] # 8. I added yet another set of crop parameters. I did this because both my capture and my output are -[NoImage] # done using NTSC DV AVI which is 720x480. However, 8mm film is almost exactly square, so the captured -[NoImage] # 720x480 video has black bars on the side. These need to be cropped off prior to doing motion -[NoImage] # stabilization, but then added back prior to the final output, which must still be 720x480 with the -[NoImage] # black bars on the side. -[NoImage] # 9. I reduced the default depan settings to 20, which is what was recommended in the original script. I -[NoImage] # also reduced the post-depan cropping. I did this so I could keep as much of the original frame -[NoImage] # as possible. -[NoImage] # 10. I removed the second denoising and sharpening function. It just seemed to be too much, and made the -[NoImage] # result too artificial -[NoImage] # 11. I removed the MVFLowFPS interpolation. I did this during one of dozens and dozens of attempts -[NoImage] # to improve the speed of the script. I should probably add this back, but if I do so, I also -[NoImage] # need to make it work correctly for interlaced output. If the goal is to show this on an NTSC or PAL -[NoImage] # television set, then it is not correct to convert from the film fps to 25 fps progressive (PAL) or -[NoImage] # 29.97 fps progressive (NTSC). Instead, this should be done as follows (example given is NTSC): -[NoImage] # -[NoImage] # MFlowFPS(source,super,backward_vec, forward_vec, num=60000, den=1001,ml=200) -[NoImage] # SeparateFields() -[NoImage] # SelectEvery(4, 0, 3) -[NoImage] # Weave() -[NoImage] # -[NoImage] # This yields interlaced 29.97, which has twice the temporal resolution as 29.97 progressive, and will -[NoImage] # therefore look correct on a TV set. I have done a lot of this as part of my Kinescope to video -[NoImage] # conversion scripts. For those scripts, the goal is to make the filmed version of a TV show look -[NoImage] # like it was actually videotaped. However, for something that originated on film, this "does violence" -[NoImage] # to the original feel of the media. It is true that it can make horizontal pans less "juddery," but -[NoImage] # it won't feel like film anymore. Also, this technique does break down, espcially with fast motion -[NoImage] # in the foreground. -[NoImage] # 12. Removed the unecessary "coloryuv(off_U=blue,off_V=red)" statement from the denoising section. -[NoImage] # 13. Added killaudio() statement to prevent lockups when using SetMTMode(). -[NoImage] # -[NoImage] # Changes made on October 7, 2012 -[NoImage] # -[NoImage] # 1. Modified RemoveDirtMC function to do estimation in two steps. This improves performance and quality. -[NoImage] # 2. Modified MDegrain to do estimation in two steps. This provides roughly the same quality with blocksize=8 -[NoImage] # as what I was getting with blocksize=4, but with virtually no performance penalty -[NoImage] # 3. Updated to use special build of MVTools2 that works with SVP. -[NoImage] # 4. Moved Autolevels inside special multi-threading section in order to improve performance with autolevels. -[NoImage] # 5. Removed all trim commands because I do all editing outside the script (in Vegas). -[NoImage] # 6. Included two alternative ways to do frame interpolation: SVP and InterFrame. The InterFrame script is probably better -[NoImage] # but I included the SVP code because it may provide a starting point for more customized approaches. Neither is enabled by default. -[NoImage] # -[NoImage] #==================================================================================== -[NoImage] #VIDEO FILE -[NoImage] #---------------------------------------------------------------------------------------------------------------------------- -[NoImage] #Change the following line to point to your video file -[NoImage] source=AVISource("C:\Users\Bruce\Desktop\fs.avi") -[NoImage] #GENERAL PARAMETERS -[NoImage] #---------------------------------------------------------------------------------------------------------------------------- -[NoImage] result="result4" #specify the wanted output here -[NoImage] play_speed=16 #play speed (8mm=16; Super8=18; 16mm sound=24) -[NoImage] #COLOR AND LEVELS PARAMATERS -[NoImage] #---------------------------------------------------------------------------------------------------------------------------- -[NoImage] saturation=1.0 #for all outputs -[NoImage] gamma=1.0 #for all outputs -[NoImage] blue= -0 red=-0 #manual color adjustment, when returning result3 & result4. Values can be positive or negative -[NoImage] black_level=0 white_level=255 output_black=0 output_white=255 #manual levels, when returning result2 & result4 -[NoImage] -[NoImage] #SIZE, CROP AND BORDERS PARAMETERS -[NoImage] #---------------------------------------------------------------------------------------------------------------------------- -[NoImage] CLeft=16 CTop=16 CRight=16 CBottom=16 #crop values after Depan and before final resizing -[NoImage] W=1920 H=1080 #final size after cropping -[NoImage] bord_left=0 bord_top=0 bord_right=0 bord_bot=0 #720p= borders 150 -[NoImage] in_bord_left=240 in_bord_top=0 in_bord_right=240 in_bord_bot=0 #Borders around input that must be removed -[NoImage] #STABILISING PARAMETERS -[NoImage] #---------------------------------------------------------------------------------------------------------------------------- -[NoImage] maxstabH=20 #maximum values for the stabiliser (in pixels) 20 is a good start value -[NoImage] maxstabV=20 -[NoImage] est_left=40 est_top=40 est_right=40 est_bottom=40 #crop and contast values for special Estimate clip -[NoImage] est_cont=1.6 -[NoImage] #DENOISING PARAMETERS -[NoImage] #---------------------------------------------------------------------------------------------------------------------------- -[NoImage] #denoising_strength=600 #denoising level of first denoiser: MVDegrain() -[NoImage] #denoising_strength=300 #denoising level of first denoiser: MVDegrain() -[NoImage] #block_size= 16 #block size of MVDegrain -[NoImage] #block_size_v= 16 -[NoImage] #block_over= 8 #block overlapping of MVDegrainMulti() -[NoImage] denoising_strength= 600 #denoising level of first denoiser: MDegrain() -[NoImage] block_size= 8 #block size of MVDegrain -[NoImage] block_size_v= 8 -[NoImage] block_over= 4 #block overlapping of MVDegrainMulti() -[NoImage] #denoising_strength= 600 #denoising level of first denoiser: MDegrain() -[NoImage] #block_size= 4 #block size of MVDegrain -[NoImage] #block_size_v= 4 -[NoImage] #block_over= 2 #block overlapping of MVDegrainMulti() -[NoImage] dirt_strength=23 #sets amount of dirt removal (big spots) -[NoImage] #FOUR STEP SHARPENING PARAMETERS -[NoImage] #-------------------------------------------------------------------------------------------------------------------------------- -[NoImage] PRE_sharp_ness= 120 PRE_radi_us= 3 #presharpening (UnsharpMask) just after first denoising -[NoImage] #PRE_sharp_ness= 85 PRE_radi_us= 3 #presharpening (UnsharpMask) just after first denoising -[NoImage] LSF_sharp_ness=160 LSF_radi_us=2 LSF_sub=1.5 #second sharpening parameters (LimitedSharpenFaster) sub=subsampling -[NoImage] #Sharp_Strength = 0.4 -[NoImage] Sharp_Strength = 0.1 -[NoImage] #AUTO LEVELS PARAMETER -[NoImage] #-------------------------------------------------------------------------------------------------------------------------------- -[NoImage] X=4 #X is a special parameter for reducing the autolevels effect on the whites -[NoImage] X2=4 #X2 is a special parameter for reducing the autolevels effect on the blacks -[NoImage] #NUMBER OF THREADS -[NoImage] #-------------------------------------------------------------------------------------------------------------------------------- -[NoImage] threads=4 -[NoImage] # END VARIABLES, BEGIN SCRIPT -[NoImage] #================================================================================================================================= -[NoImage] SetMemoryMax(1000) -[NoImage] #LoadPlugin ("mvtools2.dll") #Version 2.5.11.9 2/24/2012 -[NoImage] #LoadPlugin("autolevels.dll") #Version 0.6.0.0 1/09/2011 -[NoImage] #LoadPlugin("Deflicker.dll") #Version 0.4.0.0 8/16/2004 -[NoImage] #Loadplugin("Depan.dll") #Version 1.10.0.0 4/09/2007 -[NoImage] #LoadPlugin("DepanEstimate.dll") #Version 1.9.2.0 3/25/2007 -[NoImage] #LoadPlugin("fft3dfilter.dll") #Version 2.1.1.0 2/20/2007 -[NoImage] #Loadplugin("mt_masktools.dll") #Version 2.0.23.0 3/14/2008 -[NoImage] #loadplugin("RemoveDirtSSE2.dll") #Version 0.9 5/05/2005 -[NoImage] #Loadplugin("RemoveGrainSSE2.dll") #Version 0.9 5/01/2005 -[NoImage] #Loadplugin("removegrain.dll") #Version 0.9 5/01/2005 -[NoImage] #Loadplugin("warpsharp.dll") # 4/05/2010 -[NoImage] #Use the following for alternative frame interpolation -[NoImage] #loadplugin("svpflow1.dll") #Version 1.2.1.0 5/29/2012 -[NoImage] #loadplugin("svpflow2.dll") #Version 1.3.1.0 6/02/2012 -[NoImage] #Import("InterFrame2.avsi") #Version 2.1.0 6/27/2012 -[NoImage] #Import("LimitedSharpenFaster.avs") #Not used in this script, but available if someone wants to experiment -[NoImage] #LoadPlugIn("LimitedSupport_09Jan06B.dll") #Used with LimitedSharpenFaster -[NoImage] #Remove all setmtmode statements (there are three in this script) if not using multi-threaded (MT) AVISynth -[NoImage] #setmtmode(5,threads) -[NoImage] source1=AVISource("C:\Users\Bruce\Desktop\fs.avi").assumefps(15000,1001).ConverttoYV12(matrix="rec709").killaudio -[NoImage] #source1= Avisource(film).assumefps(play_speed).converttoYV12() -[NoImage] cropped_source=source1.crop(in_bord_left,in_bord_top,-in_bord_right,-in_bord_bot) #remove any black borders on input video -[NoImage] #setmtmode(2) -[NoImage] #cropped_source=filldrops(cropped_source) #Use this when removing bad frames that have been removed by duplicating previous frame -[NoImage] #STABILIZING -[NoImage] #.................................................................................................................................................................... -[NoImage] stab_reference= cropped_source.crop(est_left,est_top,-est_right,-est_bottom).tweak(cont=est_cont).MT_binarize(threshold=80).greyscale().invert() -[NoImage] mdata=DePanEstimate(stab_reference,trust=1.0,dxmax=maxstabH,dymax=maxstabV) -[NoImage] #stab=DePanStabilize(cropped_source,data=mdata,cutoff=0.5,dxmax=maxstabH,dymax=maxstabV,method=1,mirror=15).deflicker() -[NoImage] stab=DePanStabilize(cropped_source,data=mdata,cutoff=0.5,dxmax=maxstabH,dymax=maxstabV,method=1,mirror=15) -[NoImage] #DENOISING -[NoImage] #................................................................................................................................................................... -[NoImage] input_to_removedirt=stab.crop(CLeft,CTop,-CRight,-CBottom) -[NoImage] stabcrop=RemoveDirtMC(input_to_removedirt,dirt_strength,false) -[NoImage] prefiltered = RemoveGrain(stabcrop,2) -[NoImage] superfilt = MSuper(prefiltered, hpad=32, vpad=32,pel=2) -[NoImage] super= MSuper(stabcrop, hpad=32, vpad=32,pel=2) -[NoImage] halfblksize= (block_size>4) ? block_size/2 : 4 -[NoImage] halfoverlap= (block_over>2) ? block_over/2 : 2 -[NoImage] bvec1 = MAnalyse(superfilt, isb = true, delta = 1, blksize=block_size, overlap=block_over,dct=0) -[NoImage] bvec1 = MRecalculate(super, bvec1, blksize=halfblksize, overlap=halfoverlap,thSAD=100) -[NoImage] fvec1 = MAnalyse(super, isb = false, delta = 1, blksize=block_size, overlap=block_over,dct=0) -[NoImage] fvec1 = MRecalculate(super, fvec1, blksize=halfblksize, overlap=halfoverlap,thSAD=100) -[NoImage] bvec2 = MAnalyse(super, isb = true, delta = 2, blksize=block_size, overlap=block_over,dct=0) -[NoImage] bvec2 = MRecalculate(super, bvec2, blksize=halfblksize, overlap=halfoverlap,thSAD=100) -[NoImage] fvec2 = MAnalyse(super, isb = false, delta = 2, blksize=block_size, overlap=block_over,dct=0) -[NoImage] fvec2 = MRecalculate(super, fvec2, blksize=halfblksize, overlap=halfoverlap,thSAD=100) -[NoImage] # bvec3 = MAnalyse(super, isb = true, delta = 2, blksize=block_size, overlap=block_over,dct=0) -[NoImage] # bvec3 = MRecalculate(super, bvec3, blksize=halfblksize, overlap=halfoverlap,thSAD=100) -[NoImage] # fvec3 = MAnalyse(super, isb = false, delta = 2, blksize=block_size, overlap=block_over,dct=0) -[NoImage] # fvec3 = MRecalculate(super, fvec3, blksize=halfblksize, overlap=halfoverlap,thSAD=100) -[NoImage] #super = stabcrop.MSuper(pel=2) -[NoImage] #bvec1 = MAnalyse(super, isb = true, delta = 1, blksize=block_size, overlap=block_over,dct=0) -[NoImage] #fvec1 = MAnalyse(super, isb = false, delta = 1, blksize=block_size, overlap=block_over,dct=0) -[NoImage] #bvec2 = MAnalyse(super, isb = true, delta = 2, blksize=block_size, overlap=block_over,dct=0) -[NoImage] #fvec2 = MAnalyse(super, isb = false, delta = 2, blksize=block_size, overlap=block_over,dct=0) -[NoImage] #bvec3 = MAnalyse(super, isb = true, delta = 3, blksize=block_size, overlap=block_over,dct=0) -[NoImage] #fvec3 = MAnalyse(super, isb = false, delta = 3, blksize=block_size, overlap=block_over,dct=0) -[NoImage] #Use the second line below, and un-comment two lines above if you want to average more frames. Doesn't seem necessary for most work IMHO. -[NoImage] denoised=stabcrop.MDegrain2(super, bvec1,fvec1,bvec2,fvec2,thSAD=denoising_strength).levels(0,gamma,255,0,255).tweak(sat=saturation).unsharpmask(PRE_sharp_ness,PRE_radi_us,0) -[NoImage] #denoised=stabcrop.MDegrain3(super, bvec1,fvec1,bvec2,fvec2,bvec3,fvec3,thSAD=denoising_strength).tweak(sat=saturation).unsharpmask(PRE_sharp_ness,PRE_radi_us,0) -[NoImage] #SHARPENING -[NoImage] #................................................................................................................................................................... -[NoImage] sharp1=denoised.sharpen(Sharp_Strength) -[NoImage] #sharp1=limitedSharpenFaster(denoised,smode=1,strength=LSF_sharp_ness,overshoot=50,radius=LSF_radi_us, ss_X=LSF_sub, SS_Y=LSF_sub, dest_x=W - bord_left - in_bord_left - bord_right - in_bord_right,dest_y=H - bord_top - in_bord_top - bord_bot - in_bord_bot) -[NoImage] PreBorderFrame = sharp1.Lanczos4Resize(W - bord_left - in_bord_left - bord_right - in_bord_right, H - bord_top - in_bord_top - bord_bot - in_bord_bot) -[NoImage] #FRAME INTERPOLATION (optional) -[NoImage] #................................................................................................................................................................... -[NoImage] #superfps= MSuper(PreBorderFrame,pel=2) -[NoImage] #backward_vec2 = MAnalyse(superfps, isb = true,blksize=16) -[NoImage] #forward_vec2 = MAnalyse(superfps, isb = false,blksize=16) -[NoImage] #PreBorderFrame = MFlowFps(PreBorderFrame,superfps, backward_vec2, forward_vec2, num=60000, den=1001, ml=200).SeparateFields().SelectEvery(4, 0, 3).Weave() -[NoImage] #The following alternative can provide synthesized frames for hi-def material that causes MSuper to choke -[NoImage] #////// Begin alternative to MFlowFPS //// -[NoImage] #super_params="{pel:2,gpu:1}" -[NoImage] #analyse_params="""{block:{w:32,h:32}, -[NoImage] # main:{search:{coarse:{distance:-10}}}, -[NoImage] # refine:[{thsad:200}] -[NoImage] # }""" -[NoImage] #smoothfps_params="{rate:{num:60,den:16,abs:false},scene:{mode:0,limits:{scene:8500}},algo:21,cubic:1}" -[NoImage] #The following provides smooth output -[NoImage] #super = SVSuper(PreBorderFrame,super_params) -[NoImage] #vectors = SVAnalyse(super, analyse_params) -[NoImage] #PreBorderFrame = SVSmoothFps(PreBorderFrame,super, vectors, smoothfps_params, url="www.svp-team.com", mt=threads).SeparateFields().SelectEvery(4, 0, 3).Weave().assumefps(29.97) -[NoImage] #////// End alternative to MFlowFPS //// -[NoImage] #The following is another alternative that can provide synthesized frames for hi-def material that causes MSuper to choke. Probably better than the one above. -[NoImage] #////// Begin alternative to MFlowFPS //// -[NoImage] #PreBorderFrame=InterFrame(NewNum=30000,NewDen=1001,PreBorderFrame,GPU=true,Cores=threads) -[NoImage] #////// End alternative to MFlowFPS //// -[NoImage] #Change SetMTMode for Autolevels -[NoImage] #SetMTMode(5,threads) -[NoImage] #RESULT1: AUTOLEVELS,AUTOWHITE -[NoImage] #...................................................................................................................................................................... -[NoImage] result1= PreBorderFrame.coloryuv(autowhite=true).addborders(X,0,0,0,$FFFFFF).addborders(0,0,X2,0,$000000).autolevels(filterRadius=2).crop(X,0,-X2,-0).addborders(bord_left+in_bord_left, bord_top+in_bord_top, bord_right+in_bord_right, bord_bot+in_bord_bot) -[NoImage] #RESULT3: AUTOLEVELS, MANUAL COLOR CORRECTIONS -[NoImage] #..................................................................................................................................................................... -[NoImage] result3= PreBorderFrame.coloryuv(off_U=blue,off_V=red).addborders(X,0,0,0,$FFFFFF).addborders(0,0,X2,0,$000000).autolevels(filterRadius=2).crop(X,0,-X2,-0).addborders(bord_left+in_bord_left, bord_top+in_bord_top, bord_right+in_bord_right, bord_bot+in_bord_bot) -[NoImage] #SetMTMode(2) -[NoImage] #RESULT2: MANUAL LEVELS, AUTOWHITE -[NoImage] #...................................................................................................................................................................... -[NoImage] result2= PreBorderFrame.levels(black_level,gamma,white_level,0,255).coloryuv(autowhite=true).addborders(bord_left+in_bord_left, bord_top+in_bord_top, bord_right+in_bord_right, bord_bot+in_bord_bot) -[NoImage] #RESULT4: MANUAL LEVELS, MANUAL COLOR CORRECTIONS -[NoImage] #..................................................................................................................................................................... -[NoImage] result4= PreBorderFrame.coloryuv(off_U=blue,off_V=red).levels(black_level,gamma,white_level,0,255).addborders(bord_left+in_bord_left, bord_top+in_bord_top, bord_right+in_bord_right, bord_bot+in_bord_bot).ChangeFPS(30000,1001) -[NoImage] #PARAMETERS FOR THE COMPARISONS -[NoImage] #..................................................................................................................................................................... -[NoImage] W2= W+bord_left+bord_right -[NoImage] H2= H+bord_top+bord_bot -[NoImage] source4=Lanczos4Resize(source1,W2,H2) -[NoImage] #COMPARISONS: ORIGINAL VS RESULTS -[NoImage] #...................................................................................................................................................................... -[NoImage] resultS1= stackhorizontal(subtitle(source4,"original",size=28,align=2),subtitle(result1,"autolevels, autowhite",size=28,align=2)) -[NoImage] resultS2= stackhorizontal(subtitle(source4,"original",size=28,align=2),subtitle(result2,"autowhite, manual levels correction",size=28,align=2)) -[NoImage] resultS3= stackhorizontal(subtitle(source4,"original",size=28,align=2),subtitle(result3,"autolevels, manual color correction",size=28,align=2)) -[NoImage] resultS4= stackhorizontal(subtitle(source4,"original",size=28,align=2),subtitle(result4,"manual colors and levels correction",size=28,align=2)) -[NoImage] Eval(result) -[NoImage] # END SCRIPT, BEGIN FUNCTIONS -[NoImage] #================================================================================================================================= -[NoImage] #REMOVE DIRT FUNCTION -[NoImage] #...................................................................................................................................................................... -[NoImage] function RemoveDirt(clip input, int "limit", bool "_grey") -[NoImage] { -[NoImage] clensed=input.Clense(grey=_grey, cache=4) -[NoImage] alt=input.RemoveGrain(2) -[NoImage] return RestoreMotionBlocks(clensed,input,alternative=alt,pthreshold=6,cthreshold=8, gmthreshold=40,dist=3,dmode=2,debug=false,noise=limit,noisy=4, grey=_grey) -[NoImage] # Alternative settings -[NoImage] # return RestoreMotionBlocks(clensed,input,alternative=alt,pthreshold=4,cthreshold=6, gmthreshold=40,dist=1,dmode=2,debug=false,noise=limit,noisy=12,grey=_grey,show=true) -[NoImage] # return RestoreMotionBlocks(clensed,input,alternative=alt,pthreshold=6,cthreshold=8, gmthreshold=40,dist=3,tolerance= 12,dmode=2,debug=false,noise=limit,noisy=12,grey=_grey,show=false) -[NoImage] } -[NoImage] function RemoveDirtMC(clip,int "limit", bool "_grey") -[NoImage] { -[NoImage] _grey=default(_grey, false) -[NoImage] limit = default(limit,6) -[NoImage] # prefiltered = fft3dfilter(clip,sigma=1,sigma2=2,sigma3=3,sigma4=5,bw=64,bh=64) -[NoImage] -[NoImage] prefiltered = RemoveGrain(clip,2) -[NoImage] superfilt = MSuper(prefiltered, hpad=32, vpad=32,pel=2) -[NoImage] super=MSuper(clip, hpad=32, vpad=32,pel=2) -[NoImage] bvec = MAnalyse(superfilt,isb=true, blksize=16, overlap=2,delta=1, truemotion=true) -[NoImage] fvec = MAnalyse(superfilt,isb=false, blksize=16, overlap=2,delta=1, truemotion=true) -[NoImage] bvec_re = Mrecalculate(super,bvec,blksize=8, overlap=0,thSAD=100) -[NoImage] fvec_re = Mrecalculate(super,fvec,blksize=8, overlap=0,thSAD=100) -[NoImage] backw = MFlow(clip,super,bvec_re) -[NoImage] forw = MFlow(clip,super,fvec_re) -[NoImage] clp=interleave(forw,clip,backw) -[NoImage] clp=clp.RemoveDirt(limit,_grey) -[NoImage] clp=clp.SelectEvery(3,1) -[NoImage] return clp -[NoImage] } -[NoImage] #This function is the previous way to do motion estimation. It is slower and not as accurate. -[NoImage] function RemoveDirtMC_old(clip,int "limit", bool "_grey") -[NoImage] { -[NoImage] _grey=default(_grey, false) -[NoImage] limit = default(limit,6) -[NoImage] i=MSuper(clip,pel=2) -[NoImage] fvec = MAnalyse(i,isb=false, blksize=16, delta=1, truemotion=true) -[NoImage] bvec = MAnalyse(i,isb=true, blksize=16, delta=1, truemotion=true) -[NoImage] backw = MFlow(clip,i,bvec) -[NoImage] forw = MFlow(clip,i,fvec) -[NoImage] clp=interleave(forw,clip,backw) -[NoImage] clp=clp.RemoveDirt(limit,_grey) -[NoImage] clp=clp.SelectEvery(3,1) -[NoImage] return clp -[NoImage] } -[NoImage] # This function will remove near duplicates ("0.1") or exact duplicates (change to "0.0"). It replaces these -[NoImage] # duplicates with a motion estimated frame. -[NoImage] # Use: In your video editor, replace any single bad frame (burned frame, jump, missing frame from splice, etc.) with a duplicate of the -[NoImage] # previous frame. Then, include a call to this function -[NoImage] function filldrops (clip c) -[NoImage] { -[NoImage] super=MSuper(c,pel=2) -[NoImage] vfe=manalyse(super,truemotion=true,isb=false,delta=1) -[NoImage] vbe=manalyse(super,truemotion=true,isb=true,delta=1) -[NoImage] filldrops = mflowinter(c,super,vbe,vfe,time=50) -[NoImage] fixed = ConditionalFilter(c, filldrops, c, "YDifferenceFromPrevious()", "lessthan", "0.1") -[NoImage] return fixed -[NoImage] } --[Information] [10/31/2016 7:28:46 AM] Avisynth input script --[Information] [10/31/2016 7:28:47 AM] resolution: 1920x1080 --[Information] [10/31/2016 7:28:47 AM] frame rate: 30000/1001 --[Information] [10/31/2016 7:28:47 AM] aspect ratio: 16:9 (1.778) --[Information] [10/31/2016 7:28:47 AM] target device selected: Blu-ray --[Information] [10/31/2016 7:28:47 AM] changing --keyint to 30 as required for the selected device --[Information] [10/31/2016 7:28:47 AM] Job command line: "C:\Users\Bruce\Desktop\Tools\MeGUI\tools\x264\avs4x264mod.exe" --level 4.1 --bluray-compat --keyint 30 --open-gop --slices 4 --vbv-bufsize 30000 --vbv-maxrate 40000 --fake-interlaced --pic-struct --colorprim bt709 --transfer bt709 --colormatrix bt709 --sar 1:1 --output "D:\BJM4 HL.264" "D:\BJM4 HL.avs" --[Information] [10/31/2016 7:28:47 AM] Process started --[Information] [10/31/2016 7:28:47 AM] Standard output stream --[Information] [10/31/2016 7:28:47 AM] Standard error stream ---[Information] [10/31/2016 7:29:18 AM] raw [info]: 1920x1080p 1:1 @ 30000/1001 fps (cfr) ---[Information] [10/31/2016 7:29:18 AM] x264 [info]: using SAR=1/1 ---[Information] [10/31/2016 7:29:18 AM] x264 [info]: using cpu capabilities: MMX2 SSE2Fast SSSE3 SSE4.2 AVX FMA3 AVX2 LZCNT BMI2 ---[Information] [10/31/2016 7:29:18 AM] x264 [info]: profile High, level 4.1 ---[Information] [10/31/2016 3:09:35 PM] x264 [info]: frame I:4399 Avg QP:18.51 size: 95975 ---[Information] [10/31/2016 3:09:35 PM] x264 [info]: frame P:39814 Avg QP:22.48 size: 18350 ---[Information] [10/31/2016 3:09:35 PM] x264 [info]: frame B:1337 Avg QP:14.94 size: 608 ---[Information] [10/31/2016 3:09:35 PM] x264 [info]: consecutive B-frames: 96.0% 0.2% 0.4% 3.5% ---[Information] [10/31/2016 3:09:35 PM] x264 [info]: mb I I16..4: 27.2% 65.9% 7.0% ---[Information] [10/31/2016 3:09:35 PM] x264 [info]: mb P I16..4: 0.2% 2.4% 0.1% P16..4: 17.4% 7.9% 4.3% 0.0% 0.0% skip:67.6% ---[Information] [10/31/2016 3:09:35 PM] x264 [info]: mb B I16..4: 0.0% 0.0% 0.0% B16..8: 3.2% 0.1% 0.0% direct: 0.1% skip:96.6% L0:48.2% L1:50.2% BI: 1.5% ---[Information] [10/31/2016 3:09:35 PM] x264 [info]: 8x8 transform intra:70.1% inter:76.0% ---[Information] [10/31/2016 3:09:35 PM] x264 [info]: coded y,uvDC,uvAC intra: 70.8% 57.6% 18.0% inter: 16.2% 9.6% 0.0% ---[Information] [10/31/2016 3:09:35 PM] x264 [info]: i16 v,h,dc,p: 89% 2% 6% 3% ---[Information] [10/31/2016 3:09:35 PM] x264 [info]: i8 v,h,dc,ddl,ddr,vr,hd,vl,hu: 14% 21% 15% 6% 8% 9% 9% 8% 11% ---[Information] [10/31/2016 3:09:35 PM] x264 [info]: i4 v,h,dc,ddl,ddr,vr,hd,vl,hu: 20% 16% 10% 8% 11% 11% 9% 8% 7% ---[Information] [10/31/2016 3:09:35 PM] x264 [info]: i8c dc,h,v,p: 59% 22% 14% 5% ---[Information] [10/31/2016 3:09:35 PM] x264 [info]: Weighted P-Frames: Y:1.0% UV:0.3% ---[Information] [10/31/2016 3:09:35 PM] x264 [info]: ref P L0: 87.7% 6.2% 6.1% ---[Information] [10/31/2016 3:09:35 PM] x264 [info]: ref B L0: 99.0% 1.0% ---[Information] [10/31/2016 3:09:35 PM] x264 [info]: ref B L1: 96.9% 3.1% ---[Information] [10/31/2016 3:09:35 PM] x264 [info]: kb/s:6072.15 ---[Information] [10/31/2016 3:09:35 PM] encoded 45550 frames, 1.65 fps, 6072.15 kb/s ---[Information] [10/31/2016 3:09:35 PM] avs [info]: AviSynth 2.60, build:Mar 31 2015 [16:38:54] ---[Information] [10/31/2016 3:09:35 PM] avs [info]: Video colorspace: YV12 ---[Information] [10/31/2016 3:09:35 PM] avs [info]: Video resolution: 1920x1080 ---[Information] [10/31/2016 3:09:35 PM] avs [info]: Video framerate: 30000/1001 ---[Information] [10/31/2016 3:09:35 PM] avs [info]: Video framecount: 45550 ---[Information] [10/31/2016 3:09:35 PM] avs4x26x [info]: "x264_64" - --level 4.1 --bluray-compat --keyint 30 --open-gop --slices 4 --vbv-bufsize 30000 --vbv-maxrate 40000 --fake-interlaced --pic-struct --colorprim bt709 --transfer bt709 --colormatrix bt709 --sar 1:1 --output "D:\BJM4 HL.264" --frames 45550 --fps 30000/1001 --input-res 1920x1080 --input-csp i420 --[Information] [10/31/2016 3:09:36 PM] Final statistics ---[Information] [10/31/2016 3:09:36 PM] Constant Quality Mode: Quality 23 computed... ---[Information] [10/31/2016 3:09:36 PM] Video Bitrate Obtained (approximate): 6072 kbit/s --[Information] [10/31/2016 3:09:36 PM] MediaInfo ---[Information] [10/31/2016 3:09:36 PM] File: D:\BJM4 HL.264 -[Information] Format: AVC -[Information] FormatString: AVC -[Information] FileSize: 1153596091 -[Information] PlayTime: ---[Information] General -[Information] ID: -[Information] StreamOrder: -[Information] Width: 1920 -[Information] Height: 1080 -[Information] FrameCount: -[Information] FrameRate: 29.970 -[Information] FrameRateOriginal: -[Information] FrameRateMode: -[Information] ScanType: Progressive -[Information] Codec: AVC -[Information] CodecString: AVC -[Information] Bits Depth: 8 -[Information] Format: AVC -[Information] AspectRatio: 1.778 -[Information] AspectRatioString: 16:9 -[Information] Delay: -[Information] Title: -[Information] Language: -[Information] LanguageString: -[Information] Default: -[Information] DefaultString: -[Information] Forced: -[Information] ForcedString: ---[Information] Video --[Information] [10/31/2016 3:09:36 PM] Postprocessing ---[Information] [10/31/2016 3:09:36 PM] Deleting intermediate files --[Information] [10/31/2016 3:09:36 PM] Job completed
-
When frameserving from a studio rgb 8bit vegas project, that matrix should be pc.709, not rec709Code:
source1=AVISource("C:\Users\Bruce\Desktop\fs.avi").assumefps(15000,1001).ConverttoYV12(matrix="rec709").killaudio -
I took a bunch of small samples, and after making the adjustment to pc709, I am happy to report that the difference is gone, or so close to being eliminated that I can't see the difference. I am on my laptop presently, and will double check my findings once I get home and verify what I am seeing on my desktop with the better monitor, but I think we can call this issue I was having resolved.Originally Posted by poisondeathray
Thank you all for your help and insights in getting me a solution, and once again thanks to John and Fred for the amazing script.
 Quote
QuoteSimilar Threads
-
MakeMKV adding contrast to Blu-ray rips and also slight quality loss
By Speeny in forum Blu-ray RippingReplies: 11Last Post: 23rd Jul 2015, 20:51 -
avisynth - How to write avisynth script for rgba overlay
By moelover in forum EditingReplies: 3Last Post: 13th Apr 2014, 12:24 -
How can i Use VDub Script[.vcf] into Avisynth Script[.avs] ( Megui )
By Maskoff in forum EditingReplies: 1Last Post: 25th Jun 2013, 15:30 -
trouble adding a different script to a trimmed section in my script
By unclescoob in forum RestorationReplies: 20Last Post: 11th Aug 2012, 22:59 -
Avisynth equivalent of VDub brightness/contrast/gamma
By Mephesto in forum Newbie / General discussionsReplies: 37Last Post: 31st May 2012, 10:48