


 Build 7601,
Intel Core i5-4430, 16GB RAM,
C:\ disk SSD840 250GB,
D:\ disk WD- 1TB")
By the way, I installed MPC-HC, English version, looks nice.
However, as soon as I click the PLAY button it says (in Dutch) something like:
"An error occurred and consequently the program no longer runs properly.
The program will be closed and you will be notified as soon as a solution is available"
Any clue? Other programs still run OK.
+ Reply to Thread
Results 91 to 120 of 253
-
-
What are you loading into MPCHC ? avs script ?
Did you try something simple in RGB like
Colorbars()
If that works, then try this next
Colorbars(pixel_type="yv12")
How about other videos? Open random video directly mpchc, like youtube video => any problems ? Try other filetypes like DV-AVI -
Sorry, no nothing works. Tried avi's and simple avs like Colorbars.
The splash sreen looks normal, but as soon as the the Play-button is depressed this is what I see:
The tekst in Dutch means:
"An error occurred and consequently the program no longer runs properly.
The program will be closed and you will be notified as soon as a solution is available.
Close Program" -
Start MPCHC. Select View -> Options. In the left pane select Playback -> Output. In the right pane use the DirectShow Video pulldown to select a different output device. Close the program and restart it. See if it still crashes when you play a video. Repeat with different devices selected. In general, the pulldown starts with the simplest devices at the top of the list. Note the different features available with each selection.
Last edited by jagabo; 7th Nov 2014 at 07:53.
-
This is strange. I tried all Direct Show alternatives and in each case I ot the same error, except with Null (anything). However, now the Output box is "glued" on top of the splash screen, so you don't see anything of the movie that seems to be playing. The player has also switched back to Enhanced video Renderer (custom presenter), like this:
As you see, this is the Carnaval-1 avi, which does not carry sound. If I choose another avi (finished in Adobe Premiere), the 'Output' box disappears,
I see the MPC-HC splash screen, I hear the sound, but there is no picture...
What could this be? -
The null renderers send the video nowhere. So it's not surprising the window shows whatever was left over from before.
I don't know what's going on. Maybe a graphics driver problem. Is the Desktop running in a truecolor mode? 24 or 32 bit RGB? -
Sorry jagabo, it's the computer!
As a trial, I installed MPC-HC on our office-computer and there it runs fine.
As mentioned before, I do not trust my 'AV-computer'. I am afraid something went very wrong during my scripting experiments, since other programs too suddenly do not run any longer.
So, I tried to do a system restore, but that did not work either...
Consequently, I shall have to tackle that problem first. -
Hello,
During the 1980's I was tempted to use Super-8 stock from an untraceable OEM, marketed by the Dixons chain at a comparatively low price .
To my regret, over the roughly 35 years of storage, it developed nasty stains which cannot be removed manually. See attached clip.
Consequently, I tried to remove them using AviSynth.
You may remember the questions I raised here in November last year.
Since approx. 10 years I've been digitizing my N-8 and S-8 movies from the 1960's - 80's, using a converted Elmo-FPE double standard projector, running at 4 fps, and a Canon MVX-25i camcorder, firewire connected to my computer, using CineCap for the conversion to AVI.
When, in the course of our communications, even programs like MPC-HC stopped functioning and nothing seemed to work, in spite of your great help, I had to conclude that my (then) 8 months old computer was at fault. So, I did a full re-install of Windows 7.
Meanwhile I have also re-installed AviSynth 2.6-32bit, VirtualDub 1.10.4 -32bit, Xvid and Cedocida. And MPC-HC 1.7.7, which now runs flawlessly.
Being still an absolute newbie in scripting, I started reading again 'First Script' and 'Getting Started' http://avisynth.nl/index.php/Getting_started
and went through the steps of 'Version' , 'Fade Out' and 'Trim'. Everything runs just fine with the short test-avi I prepared.
However, when trying to call or load filters either nothing happens or I get an Error message.
Example 1:
AviSource("D:\Desktop\TEMP\1986-test 1b interl.avi")
despot
ConvertToYV12()
DeSpot(p1=35, p2=14, mthres=25)
It runs, but does not seem to work, so I tried a filter with an immediately visible effect.
Example 2:
I downloaded AddGrain and copied AddGrain.dll to the AviSynth plugin folder.
AviSource("D:\Desktop\TEMP\1986-test 1b interl.avi")
AddGrain
Error: I don't know what "AddGrain" means (D:\Desktop\Avisynth\1986-test 1bAddGrain.avs, line 2)
Example 3:
Then I tried a Load Plugin command:
AviSource("D:\Desktop\TEMP\1986-test 1b interl.avi")
LoadPlugin("C:\Program Files (x86)\AviSynth 2.6\plugins\AddGrain.dll")
Error: The script's return value was not a videoclip, (Is a string, 'AddGrain'Add some correlated gaussian noise).
The test-avi is an interlaced AVI. The above tests have been repeated with the attached progressive avi. The results were the same.
Since the 'Getting started' examples run fine with the same clip I must be doing something wrong.
It looks like the core filters work alright but those from the plugin folder don't.
Your help will be greatly appreciated!
D:\Desktop\1986-test 1e.avi -
Loading a plugin makes it available. It doesn't call the function. I like to load everything at the start of the script:
But plugins in AviSynth's plugins folder are supposed to auto load. Don't know why it isn't on your system.Code:LoadPlugin("C:\Program Files (x86)\AviSynth 2.6\plugins\AddGrain.dll") AviSource("D:\Desktop\TEMP\1986-test 1b interl.avi") AddGrain() -
Thank you jagabo, for your speedy reply.
Meanwhile I tried using the modified script you sent me. This time I got no error: the clip runs but I see no difference with the original.
1. As a check I made this script, using one of the core-filters:
AviSource("D:\Desktop\TEMP\1986-test 1f prog.avi")
Tweak(sat=0)
It works perfectly: after changing the setting to sat=0, the movie turns from color to black & white.
2. Then I tried another filter from the plugin folder: TweakColor.
LoadPlugin("C:\Program Files (x86)\AviSynth 2.6\plugins\TweakColor.dll")
AviSource("D:\Desktop\TEMP\1986-test 1f prog.avi")
TweakColor(sat=0,startHue=20,endHue=80,maxSat=75,m inSat=50,smooth=0)
I played around with the settings, but no effect whatsoever.
As mentioned before, it seems AviSynth is perfectly autoloading its 'core-filters' and at the same time unable to load anything from the plugin folder.
3. Therefore, I am now wondering wether I installed these plugins correctly. This is what I did:
From http://avisynth.nl/index.php/External_filters#Download_sites I downloaded this one:
After unpacking, this is what I see:
from this lot I only copied the dll (TweakColor.dll) and simply pasted it into AviSynth's plugin folder.
Is this the correct way? If not, what should I do?
4. Would it be better to install external filters in Avisynth's core-filters? If so, where are they located and how do I go about it?
Many thanks! -
If you're not seeing error messages AviSynth is working. AddGrain's default is very subtle. Try AddGrain(var=100) for a very obvious change. I'm not familiar with TweakColor but again, your changes may be too subtle.
Yes, all you need to do with most filters is put the dll in AviSynth's plugins folder.
<edit>
I just looked at TweakColor. Try just TweakColor(sat=0). That will give you an obvious conversion to greyscale. Your earlier arguments only changed some highly saturated magentas to grey. If your source didn't have those colors you would see no change. Or try this script:
Step through the video and watch the magenta bar.Code:ColorBars() ConverToYV12() Interleave (last.Subtitle("source"), TweakColor(sat=0,startHue=20,endHue=80,maxSat=75,minSat=50,smooth=0).Subtitle("TweakColor"))Last edited by jagabo; 3rd Feb 2015 at 08:17.
-
OK, according to your advice I made this script
DirectShowSource("d:\desktop\1986-test 1e.avi")
AddGrain(var=100)
The result is this: Script error: Invalid arguments to function "AddGrain" etc.
I am using AVSEdit for scripting and I found that in the script, the word AddGrain turned blue and this seems to be an indication that the script is working? TweakColor for example stayed black.
DirectShowSource, which apparently operates from the plugin folder also turned blue.
By the way the Preview function in AVSEdit does not work; any clue? -
minimax,
You haven't attached a clip to your post. You've included a link to a file on your own PC, which only you will be able to see.
Cheers,
David. -
I think you are using a different AddGrain. Earlier you gave a script that explicitly loaded AddGrain.dll. But the one I have is called AddGrainC.dll.Originally Posted by minimax

This is the version I'm using: http://ldesoras.free.fr/src/avs/AddGrainC-1.7.0.7z
Referenced from: http://avisynth.nl/index.php/External_filters#Effects -
Thank you David.
Yes, I realized there was something strange when I tried to post that clip. It seems I need some sort of an internet account, which I don't have. At my age one does not have time for things like Facebook etc.
Below you will find 3 consecutive frames from the clip, demonstrating the type of stains I am trying to remove. These were exported from Premiere.
Could you recommend a filter that actually works?
Would be most grateful,
minimax
-
All you need to do us use the "Upload files/Manage attachments" button below the edit boxex here. Then browse to the file and select it. Note the 500 MB size limit.Originally Posted by minimax
-
jagabo, it worked, thank you!
I downloaded AddGrainC, modified the script and exaggerated the var-value.
DirectShowSource("d:\desktop\1986-test 1e.avi")
AddGrainC(var=400)
The grain effect quite noticeable.
Readjusting my former conclusion: AviSynth is able to load external filters from the plugin folder, but some filters seem to be defective...
1. Now that we know that AviSynth seems to be working properly I would like to go back to my original question: how do I get rid of the stains in my 8mm stock, see my posting to David/Tekvilla.
2. Could you possibly also help me with the AVSEdit Preview function? Below is the message I get and I had Xvid and ffdshow already installed.
-
Alright jagabo (and David), here we go.
-
I have done a lot of Polavision restoration. That instant movie film emulsion has massive chemical stain problems because the film is stored in the cassette in which it was instantly developed. I created a significant modification of the script I derived from VideoFred's film restoration work, with changes made specifically to get rid of the big chemical stains, most of which look very similar to your clip. Here is a "before/after" clip showing what this script can do with Polavision:
https://www.youtube.com/watch?v=ud1XNIoh1P8
I applied the script to your clip, and it removed the stains, but only where there were two adjacent frames without another chemical stain in the same location. This is a basic limitation of using information from adjacent frames to determine where a stain is located.
This is the script I start with (I always modify the script settings for each film):
Code:# film restoration script by videoFred. # denoising, resizing, stabilising, sharpening, auto-levels and auto-white balance. # # Modified by John Meyer, October 7, 2012 # Modified for Polavision (large dirt removal) by John Meyer, October 15, 2013 # # Changes made by Meyer (June 8, 2010): # 1. Replaced the MVDegrainMulti function, which was part of the original MVTools # with the equivalent function using the newer and faster MVTools2. # 2. Added RemoveDirt function prior to Degrain in order to eliminate large dust spots. This # substantially improves the dirt removal capabilities of this script. The user will need to # download this plugin at: # http://www.removedirt.de.tf/ # 3. Eliminated a great deal of sharpening. The original script did sharpening in at least four places. # With grainy film stock, this sometimes created objectionable grain. Also, the limitedSharpenFaster # function, while excellent for video, is uncessarily slow, and isn't really needed for this low # resolution source. Too much sharpening can make the film look too much like video. # 4. Added multithreading. I was able to roughly triple the script performance. It may be possible to # substantially increase this, perhaps as much as 12x instead of 3x. However, the autolevels function # would have to be replaced. # 5. Fixed several things I found. The result3 option didn't have the manual color correction code, so I # added that back in. All the numbered "stab" variables (stab1, stab2, etc.) aren't needed except # for providing a test function for stabilization. I eliminated all of this to streamline the script. # 6. Deflicker seemed redundant, given all the averaging that takes place with MDegrain, and also the averaging # that is done when the autolevels outputs are selected. # 7. I reduced the number of frames used for averaging autolevels from the default (which is 5) to 2. # I probably should add a variable in the header so the user can change this. Something else to do # in the future ... # 8. I added yet another set of crop parameters. I did this because both my capture and my output are # done using NTSC DV AVI which is 720x480. However, 8mm film is almost exactly square, so the captured # 720x480 video has black bars on the side. These need to be cropped off prior to doing motion # stabilization, but then added back prior to the final output, which must still be 720x480 with the # black bars on the side. # 9. I reduced the default depan settings to 20, which is what was recommended in the original script. I # also reduced the post-depan cropping. I did this so I could keep as much of the original frame # as possible. # 10. I removed the second denoising and sharpening function. It just seemed to be too much, and made the # result too artificial # 11. I removed the MVFLowFPS interpolation. I did this during one of dozens and dozens of attempts # to improve the speed of the script. I should probably add this back, but if I do so, I also # need to make it work correctly for interlaced output. If the goal is to show this on an NTSC or PAL # television set, then it is not correct to convert from the film fps to 25 fps progressive (PAL) or # 29.97 fps progressive (NTSC). Instead, this should be done as follows (example given is NTSC): # # MFlowFPS(source,super,backward_vec, forward_vec, num=60000, den=1001,ml=200) # SeparateFields() # SelectEvery(4, 0, 3) # Weave() # # This yields interlaced 29.97, which has twice the temporal resolution as 29.97 progressive, and will # therefore look correct on a TV set. I have done a lot of this as part of my Kinescope to video # conversion scripts. For those scripts, the goal is to make the filmed version of a TV show look # like it was actually videotaped. However, for something that originated on film, this "does violence" # to the original feel of the media. It is true that it can make horizontal pans less "juddery," but # it won't feel like film anymore. Also, this technique does break down, espcially with fast motion # in the foreground. # 12. Removed the unecessary "coloryuv(off_U=blue,off_V=red)" statement from the denoising section. # 13. Added killaudio() statement to prevent lockups when using SetMTMode(). # # Changes made on October 7, 2012 # # 1. Modified RemoveDirtMC function to do estimation in two steps. This improves performance and quality. # 2. Modified MDegrain to do estimation in two steps. This provides roughly the same quality with blocksize=8 # as what I was getting with blocksize=4, but with virtually no performance penalty # 3. Updated to use special build of MVTools2 that works with SVP. # 4. Moved Autolevels inside special multi-threading section in order to improve performance with autolevels. # 5. Removed all trim commands because I do all editing outside the script (in Vegas). # 6. Included two alternative ways to do frame interpolation: SVP and InterFrame. The InterFrame script is probably better # but I included the SVP code because it may provide a starting point for more customized approaches. Neither is enabled by default. # # Changes made on October 15, 2013 #==================================================================================== #VIDEO FILE #---------------------------------------------------------------------------------------------------------------------------- #Change the following line to point to your video file film="e:\fs.avi" #GENERAL PARAMETERS #---------------------------------------------------------------------------------------------------------------------------- result="resultS4" #specify the wanted output here play_speed=15 #play speed (8mm=16; Super8=18; 16mm sound=24) #COLOR AND LEVELS PARAMATERS #---------------------------------------------------------------------------------------------------------------------------- saturation=1.0 #for all outputs gamma=1.0 #for all outputs blue= -0 red=-0 #manual color adjustment, when returning result3 & result4. Values can be positive or negative black_level=0 white_level=255 output_black=0 output_white=255 #manual levels, when returning result2 & result4 #SIZE, CROP AND BORDERS PARAMETERS #---------------------------------------------------------------------------------------------------------------------------- CLeft=16 CTop=16 CRight=16 CBottom=16 #crop values after Depan and before final resizing W=720 H=480 #final size after cropping bord_left=0 bord_top=0 bord_right=0 bord_bot=0 #720p= borders 150 in_bord_left=0 in_bord_top=0 in_bord_right=0 in_bord_bot=0 #Borders around input that must be removed #STABILISING PARAMETERS #---------------------------------------------------------------------------------------------------------------------------- maxstabH=15 #maximum values for the stabiliser (in pixels) 20 is a good start value maxstabV=15 est_left=40 est_top=40 est_right=40 est_bottom=40 #crop and contast values for special Estimate clip est_cont=1.6 #DENOISING PARAMETERS #---------------------------------------------------------------------------------------------------------------------------- denoising_strength=600 #denoising level of first denoiser: MVDegrain() #denoising_strength=300 #denoising level of first denoiser: MVDegrain() block_size= 16 #block size of MVDegrain block_size_v= 16 block_over= 8 #block overlapping of MVDegrainMulti() #denoising_strength= 600 #denoising level of first denoiser: MDegrain() #block_size= 8 #block size of MVDegrain #block_size_v= 8 #block_over= 4 #block overlapping of MVDegrainMulti() #denoising_strength= 600 #denoising level of first denoiser: MDegrain() #block_size= 4 #block size of MVDegrain #block_size_v= 4 #block_over= 2 #block overlapping of MVDegrainMulti() dirt_strength=93 #sets amount of dirt removal (big spots) #FOUR STEP SHARPENING PARAMETERS #-------------------------------------------------------------------------------------------------------------------------------- #PRE_sharp_ness= 120 PRE_radi_us= 3 #presharpening (UnsharpMask) just after first denoising PRE_sharp_ness= 85 PRE_radi_us= 3 #presharpening (UnsharpMask) just after first denoising LSF_sharp_ness=160 LSF_radi_us=2 LSF_sub=1.5 #second sharpening parameters (LimitedSharpenFaster) sub=subsampling #Sharp_Strength = 0.4 Sharp_Strength = 0.07 #AUTO LEVELS PARAMETER #-------------------------------------------------------------------------------------------------------------------------------- X=4 #X is a special parameter for reducing the autolevels effect on the whites X2=4 #X2 is a special parameter for reducing the autolevels effect on the blacks #NUMBER OF THREADS #-------------------------------------------------------------------------------------------------------------------------------- threads=6 # END VARIABLES, BEGIN SCRIPT #================================================================================================================================= SetMemoryMax(1000) LoadPlugin ("mvtools2.dll") #Version 2.5.11.9 2/24/2012 LoadPlugin("autolevels.dll") #Version 0.6.0.0 1/09/2011 LoadPlugin("Deflicker.dll") #Version 0.4.0.0 8/16/2004 Loadplugin("Depan.dll") #Version 1.10.0.0 4/09/2007 LoadPlugin("DepanEstimate.dll") #Version 1.9.2.0 3/25/2007 LoadPlugin("fft3dfilter.dll") #Version 2.1.1.0 2/20/2007 Loadplugin("mt_masktools.dll") #Version 2.0.23.0 3/14/2008 loadplugin("RemoveDirtSSE2.dll") #Version 0.9 5/05/2005 Loadplugin("RemoveGrainSSE2.dll") #Version 0.9 5/01/2005 #Loadplugin("removegrain.dll") #Version 0.9 5/01/2005 Loadplugin("warpsharp.dll") # 4/05/2010 #Use the following for alternative frame interpolation #loadplugin("svpflow1.dll") #Version 1.2.1.0 5/29/2012 #loadplugin("svpflow2.dll") #Version 1.3.1.0 6/02/2012 #Import("InterFrame2.avsi") #Version 2.1.0 6/27/2012 #Import("LimitedSharpenFaster.avs") #Not used in this script, but available if someone wants to experiment #LoadPlugIn("LimitedSupport_09Jan06B.dll") #Used with LimitedSharpenFaster #Remove all setmtmode statements (there are three in this script) if not using multi-threaded (MT) AVISynth setmtmode(5,threads) source1= Avisource(film).killaudio().assumefps(play_speed).converttoYV12() #source1= Avisource(film).assumefps(play_speed).converttoYV12() cropped_source=source1.crop(in_bord_left,in_bord_top,-in_bord_right,-in_bord_bot) #remove any black borders on input video setmtmode(2) #cropped_source=filldrops(cropped_source) #Use this when removing bad frames that have been removed by duplicating previous frame #STABILIZING #.................................................................................................................................................................... stab_reference= cropped_source.crop(est_left,est_top,-est_right,-est_bottom).tweak(cont=est_cont).MT_binarize(threshold=80).greyscale().invert() mdata=DePanEstimate(stab_reference,trust=1.0,dxmax=maxstabH,dymax=maxstabV) #stab=DePanStabilize(cropped_source,data=mdata,cutoff=0.5,dxmax=maxstabH,dymax=maxstabV,method=1,mirror=15).deflicker() stab=DePanStabilize(cropped_source,data=mdata,cutoff=0.5,dxmax=maxstabH,dymax=maxstabV,method=1,mirror=15) #DENOISING #................................................................................................................................................................... input_to_removedirt=stab.crop(CLeft,CTop,-CRight,-CBottom) stabcrop=RemoveDirtMC(input_to_removedirt,dirt_strength,false) prefiltered = RemoveGrain(stabcrop,2) superfilt = MSuper(prefiltered, hpad=32, vpad=32,pel=2) super= MSuper(stabcrop, hpad=32, vpad=32,pel=2) halfblksize= (block_size>4) ? block_size/2 : 4 halfoverlap= (block_over>2) ? block_over/2 : 2 bvec1 = MAnalyse(superfilt, isb = true, delta = 1, blksize=block_size, overlap=block_over,dct=0) bvec1 = MRecalculate(super, bvec1, blksize=halfblksize, overlap=halfoverlap,thSAD=100) fvec1 = MAnalyse(super, isb = false, delta = 1, blksize=block_size, overlap=block_over,dct=0) fvec1 = MRecalculate(super, fvec1, blksize=halfblksize, overlap=halfoverlap,thSAD=100) bvec2 = MAnalyse(super, isb = true, delta = 2, blksize=block_size, overlap=block_over,dct=0) bvec2 = MRecalculate(super, bvec2, blksize=halfblksize, overlap=halfoverlap,thSAD=100) fvec2 = MAnalyse(super, isb = false, delta = 2, blksize=block_size, overlap=block_over,dct=0) fvec2 = MRecalculate(super, fvec2, blksize=halfblksize, overlap=halfoverlap,thSAD=100) # bvec3 = MAnalyse(super, isb = true, delta = 2, blksize=block_size, overlap=block_over,dct=0) # bvec3 = MRecalculate(super, bvec3, blksize=halfblksize, overlap=halfoverlap,thSAD=100) # fvec3 = MAnalyse(super, isb = false, delta = 2, blksize=block_size, overlap=block_over,dct=0) # fvec3 = MRecalculate(super, fvec3, blksize=halfblksize, overlap=halfoverlap,thSAD=100) #super = stabcrop.MSuper(pel=2) #bvec1 = MAnalyse(super, isb = true, delta = 1, blksize=block_size, overlap=block_over,dct=0) #fvec1 = MAnalyse(super, isb = false, delta = 1, blksize=block_size, overlap=block_over,dct=0) #bvec2 = MAnalyse(super, isb = true, delta = 2, blksize=block_size, overlap=block_over,dct=0) #fvec2 = MAnalyse(super, isb = false, delta = 2, blksize=block_size, overlap=block_over,dct=0) #bvec3 = MAnalyse(super, isb = true, delta = 3, blksize=block_size, overlap=block_over,dct=0) #fvec3 = MAnalyse(super, isb = false, delta = 3, blksize=block_size, overlap=block_over,dct=0) #Use the second line below, and un-comment two lines above if you want to average more frames. Doesn't seem necessary for most work IMHO. denoised=stabcrop.MDegrain2(super, bvec1,fvec1,bvec2,fvec2,thSAD=denoising_strength).levels(0,gamma,255,0,255).tweak(sat=saturation).unsharpmask(PRE_sharp_ness,PRE_radi_us,0) #denoised=stabcrop.MDegrain3(super, bvec1,fvec1,bvec2,fvec2,bvec3,fvec3,thSAD=denoising_strength).tweak(sat=saturation).unsharpmask(PRE_sharp_ness,PRE_radi_us,0) #SHARPENING #................................................................................................................................................................... sharp1=denoised.sharpen(Sharp_Strength) #sharp1=limitedSharpenFaster(denoised,smode=1,strength=LSF_sharp_ness,overshoot=50,radius=LSF_radi_us, ss_X=LSF_sub, SS_Y=LSF_sub, dest_x=W - bord_left - in_bord_left - bord_right - in_bord_right,dest_y=H - bord_top - in_bord_top - bord_bot - in_bord_bot) PreBorderFrame = sharp1.Lanczos4Resize(W - bord_left - in_bord_left - bord_right - in_bord_right, H - bord_top - in_bord_top - bord_bot - in_bord_bot) #FRAME INTERPOLATION (optional) #................................................................................................................................................................... #superfps= MSuper(PreBorderFrame,pel=2) #backward_vec2 = MAnalyse(superfps, isb = true,blksize=16) #forward_vec2 = MAnalyse(superfps, isb = false,blksize=16) #PreBorderFrame = MFlowFps(PreBorderFrame,superfps, backward_vec2, forward_vec2, num=60000, den=1001, ml=200).SeparateFields().SelectEvery(4, 0, 3).Weave() #The following alternative can provide synthesized frames for hi-def material that causes MSuper to choke #////// Begin alternative to MFlowFPS //// #SmoothFPS2(PreBorderFrame,threads) #////// End alternative to MFlowFPS //// #The following is another alternative that can provide synthesized frames for hi-def material that causes MSuper to choke. Probably better than the one above. #////// Begin alternative to MFlowFPS //// #PreBorderFrame=InterFrame(NewNum=30000,NewDen=1001,PreBorderFrame,GPU=true,Cores=threads) #////// End alternative to MFlowFPS //// #Change SetMTMode for Autolevels #SetMTMode(5,threads) #RESULT1: AUTOLEVELS,AUTOWHITE #...................................................................................................................................................................... result1= PreBorderFrame.coloryuv(autowhite=true).addborders(X,0,0,0,$FFFFFF).addborders(0,0,X2,0,$000000).autolevels(filterRadius=2).crop(X,0,-X2,-0).addborders(bord_left+in_bord_left, bord_top+in_bord_top, bord_right+in_bord_right, bord_bot+in_bord_bot) #RESULT3: AUTOLEVELS, MANUAL COLOR CORRECTIONS #..................................................................................................................................................................... result3= PreBorderFrame.coloryuv(off_U=blue,off_V=red).addborders(X,0,0,0,$FFFFFF).addborders(0,0,X2,0,$000000).autolevels(filterRadius=2).crop(X,0,-X2,-0).addborders(bord_left+in_bord_left, bord_top+in_bord_top, bord_right+in_bord_right, bord_bot+in_bord_bot) #SetMTMode(2) #RESULT2: MANUAL LEVELS, AUTOWHITE #...................................................................................................................................................................... result2= PreBorderFrame.levels(black_level,gamma,white_level,0,255).coloryuv(autowhite=true).addborders(bord_left+in_bord_left, bord_top+in_bord_top, bord_right+in_bord_right, bord_bot+in_bord_bot) #RESULT4: MANUAL LEVELS, MANUAL COLOR CORRECTIONS #..................................................................................................................................................................... result4= PreBorderFrame.coloryuv(off_U=blue,off_V=red).levels(black_level,gamma,white_level,0,255).addborders(bord_left+in_bord_left, bord_top+in_bord_top, bord_right+in_bord_right, bord_bot+in_bord_bot) #PARAMETERS FOR THE COMPARISONS #..................................................................................................................................................................... W2= W+bord_left+bord_right H2= H+bord_top+bord_bot source4=Lanczos4Resize(source1,W2,H2) #COMPARISONS: ORIGINAL VS RESULTS #...................................................................................................................................................................... resultS1= stackhorizontal(subtitle(source4,"original",size=28,align=2),subtitle(result1,"autolevels, autowhite",size=28,align=2)) resultS2= stackhorizontal(subtitle(source4,"original",size=28,align=2),subtitle(result2,"autowhite, manual levels correction",size=28,align=2)) resultS3= stackhorizontal(subtitle(source4,"original",size=28,align=2),subtitle(result3,"autolevels, manual color correction",size=28,align=2)) resultS4= stackhorizontal(subtitle(source4,"original",size=28,align=2),subtitle(result4,"manual colors and levels correction",size=28,align=2)) Eval(result) # END SCRIPT, BEGIN FUNCTIONS #================================================================================================================================= #REMOVE DIRT FUNCTION #...................................................................................................................................................................... function RemoveDirt(clip input, int limit, bool _grey) { clensed=input.Clense(grey=_grey, cache=4) alt=input.RemoveGrain(2) return RestoreMotionBlocks(clensed,input,alternative=alt,pthreshold=30,cthreshold=8, gmthreshold=40,dist=3,dmode=2,debug=false,noise=limit,noisy=4, grey=_grey) # Alternative settings # return RestoreMotionBlocks(clensed,input,alternative=alt,pthreshold=4,cthreshold=6, gmthreshold=40,dist=1,dmode=2,debug=false,noise=limit,noisy=12,grey=_grey,show=true) # return RestoreMotionBlocks(clensed,input,alternative=alt,pthreshold=6,cthreshold=8, gmthreshold=40,dist=3,tolerance= 12,dmode=2,debug=false,noise=limit,noisy=12,grey=_grey,show=false) } function RemoveDirtMC(clip,int limit, bool "_grey") { _grey=default(_grey, false) limit = default(limit,6) # prefiltered = fft3dfilter(clip,sigma=1,sigma2=2,sigma3=3,sigma4=5,bw=64,bh=64) prefiltered = RemoveGrain(clip,2) superfilt = MSuper(prefiltered, hpad=32, vpad=32,pel=2) super=MSuper(clip, hpad=32, vpad=32,pel=2) bvec = MAnalyse(superfilt,isb=true, blksize=16, overlap=2,delta=1, truemotion=true) fvec = MAnalyse(superfilt,isb=false, blksize=16, overlap=2,delta=1, truemotion=true) # Increase thSAD if moving objects are being removed!! bvec_re = Mrecalculate(super,bvec,blksize=8, overlap=0,thSAD=20) fvec_re = Mrecalculate(super,fvec,blksize=8, overlap=0,thSAD=20) backw = MFlow(clip,super,bvec_re,thSCD1=900,thSCD2=200) forw = MFlow(clip,super,fvec_re,thSCD1=900,thSCD2=200) clp=interleave(backw,clip,forw) clp=clp.RemoveDirt(limit,_grey) # Alternative to RemoveDirt call above # clp = clp.DeSpot(p1=20, p2=4, pwidth=30, pheight=30, mthres=22, merode=33, sign=1, seg=0, color=false, \ # motpn=false, fitluma=true, mark_v=255) # clp = clp.invert.DeSpot(p1=12, p2=6, pwidth=18, pheight=16, mthres=22, merode=25, p1percent=10, sign=1, show=Show, seg=1, \ # color=true, motpn=false, mark_v=255).invert clp=clp.SelectEvery(3,1) return clp } #Function to remove vertical lines function Fix1 (clip c) { TurnRight(c) Merge(Yadif(0,1),Yadif(0,0),0.5) Merge(Yadif(0,1),Yadif(0,0),0.5) TurnLeft() }Last edited by johnmeyer; 3rd Feb 2015 at 13:17. Reason: removed repeated word
-
Thank you johnmeyer.
The results you achieved are absolutely breathtaking!
You obviously are a master in scripting which, to my regret, I am not. It literally took me months to get a working version of AviSynth, as you may have seen. I realize it will again take me months, if not years to get to the level you have achieved. Regretfully, time has become a scarcity to me. I still have some 85 rolls of Super-8 to process plus another time consuming job: synchronizing these with the audio cassettes I recorded at the time.
My main concern is to get rid of the stains. Therefore, I would be most grateful if you could give me some guidance on
that subject i.e. which filter(s), settings and download sites.
For subsequent editing I use Premiere CS5.5 which could possibly take care of sharpening and color correction, unless you would think that both could fairly simply be included at the AviSynth stage.
These are the contents of my plugin directory at this time.
I shall be looking forward to your suggestions with great interest! -
You'll have to do most of this on your own. Here is a link to what I think are most of the DLLs I use:
Film Restoration Script (Meyer version) DLLs
I suspect there may be a few things not contained in this zip file. I use AVISynth 2.60 build March 9, 2013, Ben Rudiak-Gould.
There are so many other things that are important in doing a good film transfer that I would recommend not getting hung up on using this script. Proper gamma correction and color correction are far more important and are better done manually. In the movie industry they call this "color timing," and it cannot be done properly with an automated function, like autolevels. You may also find that you have "flash frames" at the beginning of each scene, where the camera was just getting up to speed, and the spinning shutter was still spinning slowly, resulting in overexposure of the first 1-2 frames. Those should be removed. I have scripts that detect these, although "StainlessS" over at doom9.org has built the ultimate flash frame detector. If you don't remove them, it really interrupts the flow of the film. -
The main filters responsible for the stain removal are RemoveDirt() and RemoveDirtMC().
-
Thank you both johnmeyer and jagabo for your efforts to get me going.
I have tried several of the filters I found at Film Restoration Script (Meyer version) DLLs, e.g. this one, for which I tried this script:
LoadPlugin("C:\Program Files (x86)\AviSynth 2.6\plugins\RemoveDirtSSE2.dll")
DirectShowSource("d:\desktop\1986-test 1e.avi")
RemoveDirtSSE2()
Unfortunately they refuse to run, no matter in which order I type the lines or with or without the 3rd line.
Instead I am getting this messages like these:
or
I must be doing something wrong, but cannot find out what..
Just in case you wonder, I DID copy these filters to the Avisynth plugin folder.
Could you also give me a clue on start values for the parameters?
Thanks again.
minimax -
That's really cool denoising, man! Great script. Maybe I missed something, but...what's the difference between these two frames?
Maybe one could restore some of the original color back in there?Originally Posted by johnmeyer
I think that RemoveDirtSSE2.dll needs a Windows MSVC runtime. I don't recall which one, though. Anyone recall?
Could also be the fftw3 system files. Were those copied into Windows System folder?Last edited by LMotlow; 5th Feb 2015 at 18:46. Reason: posted wrong pic
- My sister Ann's brother -
I installed 32 bit AviSynth 2.6 RC1 on a 64 bit Windows system just this morning and it installed in a folder called "AviSynth 2.5", not "AviSynth 2.6". I don't think the error message you got indicates that problem though.Originally Posted by minimax
-
Yes, you are most definitely missing something: the stains!!!Maybe I missed something, but...what's the difference between these two frames?
Go back and read minmax's earlier post (#105), the one where he first shows the still image. In that post he says: "Below you will find 3 consecutive frames from the clip, demonstrating the type of stains I am trying to remove." So, the issue he is trying to solve is not correcting color, but removing stains.
With that in mind, if you look at my "before/after" picture in post #109, you'll see a really big stain just to the right of the right wheel of the paddle boat. In the "after" version, the stain is gone, and is replaced by what looks to be exactly what would have been there without the stain.
So, they key problem being discussed is stain removal, not color correction, although I agree, there is certainly room for a lot of improvement in the colors. -
Be careful with heavy filtering like this. Notice how the fins on the yellow wheel have partially disappeared in johnmeyer's filtered image. In other frames it might be even worse. The more you increase the strength of the filter to remove the stains the more other details get lost. In this particular shot it may not matter much but in some scenes you may lose more critical details.
I don't mean this as a criticism of johnmeyer's work. Just pointing out what kind of problems minimax should watch out for -- once he gets AviSynth working.
On my computer I have all my plugins in AviSynth's plugins folder so they load automatically. I'm not sure why that doesn't work on some peoples computers. But here's a simplified script that I came up with that uses VideoFred's RemoveDirtMC():
This script doesn't work on my 64 bit Win7 machine (probably because of the assortment of filters I have on that computer) but I've run it successfully on 32 bit XP and Win7 without problems. I used a strength of 55 because that gave the most stain removal. Lower left more spots, higher didn't remove any more (and led to a little more ghosting of other spots).Code:AviSource("1986.avi") RemoveDirtMC(last, 55, false) #================================================================================================================================= #REMOVE DIRT FUNCTION #...................................................................................................................................................................... function RemoveDirt(clip input, int limit, bool _grey) { clensed=input.Clense(grey=_grey, cache=4) alt=input.RemoveGrain(2) return RestoreMotionBlocks(clensed,input,alternative=alt,pthreshold=30,cthreshold=8, gmthreshold=40,dist=3,dmode=2,debug=false,noise=limit,noisy=4, grey=_grey) # Alternative settings # return RestoreMotionBlocks(clensed,input,alternative=alt,pthreshold=4,cthreshold=6, gmthreshold=40,dist=1,dmode=2,debug=false,noise=limit,noisy=12,grey=_grey,show=true) # return RestoreMotionBlocks(clensed,input,alternative=alt,pthreshold=6,cthreshold=8, gmthreshold=40,dist=3,tolerance= 12,dmode=2,debug=false,noise=limit,noisy=12,grey=_grey,show=false) } function RemoveDirtMC(clip,int limit, bool "_grey") { _grey=default(_grey, false) limit = default(limit,6) # prefiltered = fft3dfilter(clip,sigma=1,sigma2=2,sigma3=3,sigma4=5,bw=64,bh=64) prefiltered = RemoveGrain(clip,2) superfilt = MSuper(prefiltered, hpad=32, vpad=32,pel=2) super=MSuper(clip, hpad=32, vpad=32,pel=2) bvec = MAnalyse(superfilt,isb=true, blksize=16, overlap=2,delta=1, truemotion=true) fvec = MAnalyse(superfilt,isb=false, blksize=16, overlap=2,delta=1, truemotion=true) # Increase thSAD if moving objects are being removed!! bvec_re = Mrecalculate(super,bvec,blksize=8, overlap=0,thSAD=20) fvec_re = Mrecalculate(super,fvec,blksize=8, overlap=0,thSAD=20) backw = MFlow(clip,super,bvec_re,thSCD1=900,thSCD2=200) forw = MFlow(clip,super,fvec_re,thSCD1=900,thSCD2=200) clp=interleave(backw,clip,forw) clp=clp.RemoveDirt(limit,_grey) # Alternative to RemoveDirt call above # clp = clp.DeSpot(p1=20, p2=4, pwidth=30, pheight=30, mthres=22, merode=33, sign=1, seg=0, color=false, \ # motpn=false, fitluma=true, mark_v=255) # clp = clp.invert.DeSpot(p1=12, p2=6, pwidth=18, pheight=16, mthres=22, merode=25, p1percent=10, sign=1, show=Show, seg=1, \ # color=true, motpn=false, mark_v=255).invert clp=clp.SelectEvery(3,1) return clp }Last edited by jagabo; 5th Feb 2015 at 22:12.
-
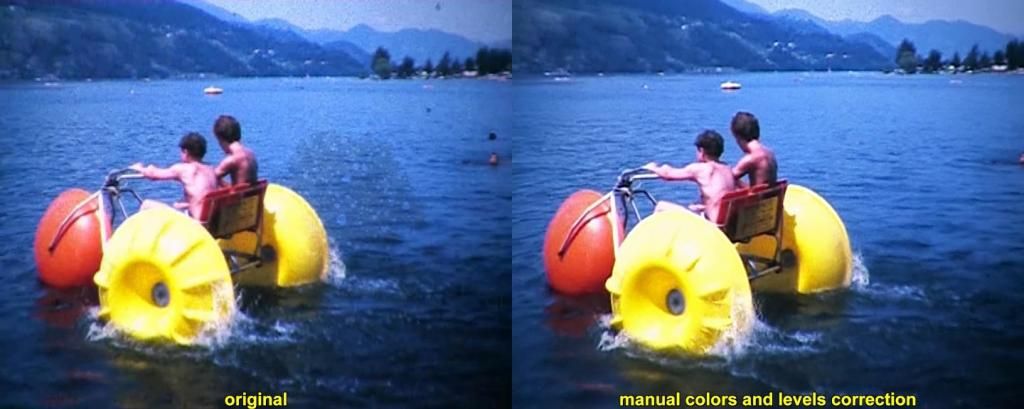
I'm not talking about the stains and other noise. Your excellent script took care of those. I referred to the "manual colors and levels correction".Originally Posted by johnmeyer
Last edited by LMotlow; 6th Feb 2015 at 01:41.
- My sister Ann's brother -
Yup. That's the tradeoff. For really critical work, you can make two passes with the script, one with very little filtering, and the other with the aggressive filtering I used. With huge blotches like this, you can't reduce them very much without increasing the settings substantially. In addition, if you compare the RemoveDirtMC in my original script (I actually gave VideoFred this code, which I in turn got from someone else) with what I posted above, you'll see that I did a lot more than simply increase the dirt removal setting. I did all sorts of other things within the function itself.Be careful with heavy filtering like this. Notice how the fins on the yellow wheel have partially disappeared in johnmeyer's filtered image. In other frames it might be even worse. The more you increase the strength of the filter to remove the stains the more other details get lost.
I do a lot of film restoration work for a passionate sports film collector, with lots of original football films from the 1950s. Even after I've cleaned the film and done the transfer, I have to do a lot of digital restoration. The problem is that the dirt removal also likes to remove the football when it is passed or kicked. So, I create a moving mask, and re-insert the football (with dirt around it) into the cleaned version of the film.
Yes, I never use the automatic color or levels corrections. They simply don't work. Even in VideoFred's newest scripts, where he completely re-worked the autolevels and autowhite logic, the results are far from what they could be. I therefore always do all my color timing in my video editing program (Sony Vegas Pro). It takes a lot of work, but the results are much better.I'm not talking about the stains and other noise. Your excellent script took care of those. I referred to the "manual colors and levels correction". -
#115 jagabo
Yes, I saw the same thing on installing version 2.6.0.4 and I changed the folder's name to 2.6.
Likewise, I do not think this is the cause, since the AddGrain dll did function alright from that same directory.
#117 jagabo,
Thanks for the warning and yes, I already experienced in Premiere that filtering is easily overdone.
The RemoveDirtMC plugin I have, was downloaded from Videofred's site.
It seems to be a script, NOT a dll. Is that correct?
Its full name is "03_RemoveDirtMC" and I copied it to my AviSynth plugin directory.
Then I did the following. First I copied from your script the 2 lines in the heading:
AviSource("1986.avi")
RemoveDirtMC(last, 55, false)
and modified it to my situation:
AviSource("d:\desktop\1986-test 1e.avi")
RemoveDirtMC(last, 55, false)
Result:
A logic response since the actual name in the plugin folder is not "RemoveDirtMC", but "03_RemoveDirtMC". So I changed the script to
AviSource("d:\desktop\1986-test 1e.avi")
03_RemoveDirtMC(last, 55, false)
and now I get this message:
My first objective is to get this thing running and start learning from there, so I sincerely hope you'll bear with me for a while.. Now I have many questions:
1. Instead of Fred's script, should I have I have a dll? If so, where could it be downloaded?
2. If not, should I modify the script in "03_RemoveDirtMC"? If so, what should be changed?
3. Similarly, for the script you sent, would the first two lines suffice, or should I include the whole page and and make changes? If so, which changes.
Thanks again!
 Quote
Quote