


Graphics
SMBX2031 (1600x900@60Hz)
896MB NVIDIA GeForce GTX 260 (ASUStek Computer Inc)
Storage
931GB SAMSUNG HD105SI ATA Device (SATA)
931GB Western Digital WD Elements
Optical Drives
TSSTcorp CDDVDW SH-224DB ATA Device
Audio
VIA HD Audio")
I have used VD in the past.
I need advice on 2 aspects-
1. What filters to use to get the best results for 8mm film that was captured on VHS in order to convert to digital. The original films have been destroyed.
2. How to install filters with version 1.9.11.0
1. Filters for 8mm film on VHS
I live in South Africa and we use the PAL system. I am busy capturing my VHS videos in AVI using VD.
The video of the 8mm film was recorded by displaying it against a wall and capturing it with a JVC-C camcorder.
I use a Super VHS recorder, although the cassettes are of the VHS format, to play the videos. I use a JVC HR-S8960 which has a Time Base Corrector with Digital Noise Reduction.
During a previous effort to convert the same films, I used the following settings:
Deflicker;
Level 20-235;
DNR 8;
2D cleaner 8;
Hue 1.41;
Sharpen 10.
The results were pretty average. I suppose if you start with a bad product, you cannot really expect miracles!
I have read that SpotRemover is a good filter to use. Any other ideas? I have cropped the original video on VD.
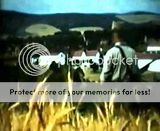
This is a very short clip. It is in AVI, but I converted it to mpeg 2 to post a clip. It is interlaced.
2. How to install filters with version 1.9.11.0
If I download VD 1.9.11.0, it would download as a Winrar file. The default folder to extract to, is ...AppData\Local\temp\... If I copy that folder to Program Files, I lose the empty plug-in folder. ( I have up to now, used the VirtualDub.exe link to start VD.)
Should I install VD from VirtualDub.exe or what method should I use?
Thanks for any advice.
+ Reply to Thread
Results 1 to 30 of 109
-
-
VirtualDub can be run from any folder you place it in, although a "temp" folder would be less than ideal. Most people create a folder called "VirtualDub" on their hard drive (it doesn't have to be in "Programs"). Download the VdUb zip or rar file into that dedicated folder, not into a temp folder. Unzip it into the "current folder"or whatever you've called Vdub's home folder (mine is called "D:\VirtualDub". It doesn't have to be complicated). Unzipping creates the main executable and the plugins folders and a few other goodies. Everything you need. The first time you double-click and run VirtualDub.exe, it's installed. All it basically does is tell the Windows registry about it's location.
Inside the VirtualDub folder you'll see a file called auxsetup.exe -- if you need to uninstall VDub (i.e., remove its registry entries), run that file. It will not delete the VirtualDub home folder or anything in it.
Most add-in VirtualDub filters and plugins are furnished as a compressed zip, rar, or other compressed package containing one or more files. DO NOT unzip that download package into VirtualDub's area. Make a folder for all your plugins, and a separate subfolder for each plugin that you download. In that way you can keep various versions and documentation separate. The download will contain a plugin file with a "*.vdf" file extension. The .vdf is the plugin. Copy that plugin into the VirtualDub "plugins" folder in VirtualDub's home folder. When you start VirtualDub and look for filters in the filters menu, all plugins loaded in the plugins folder will be listed.Last edited by sanlyn; 25th Mar 2014 at 14:18.
-
Thanks for your excellent and clear advice!
Any ideas on what filters to use for this difficult problem? -
As described, your videos are limited by the quality of your projection screen and camera. The image you posted certainly shows some work ahead, and you'll have to accept serious shortcomings. Obviously, it's possible to sharpen detail but it's not possible to create it. But two main points:
First, while your image tells us something, and the brief sample tells us something about what you encoded and how another website's media player shows it, these don't say that much about your source video. Members would base their advice on your original AVI captures. Are your AVI's uncompressed, or compressed with lossy compression such as DivX or with lossless compressors like huffyuv or Lagarith? "AVI" is a container that accepts many types of video. We can tell you more if we know more about your captures. You can also post directly in the forum, within limits, and make AVI cuts in VirtualDub without otherwise altering the results. Download the free MediaInfo utility. It shows an ad when installed (but you won't hear from it again). Open an AVI with it and use its menus to save the info to text that you can copy and paste here. Ask if you need more info.
Second: Your first steps should be with your AVI captures, not with VirtualDub per se. I'd suggest that rather than open an AVI capture directly with VirtualDub, there's a better and more colorspace-safe way to do it with simple Avisynth text commands that VDub runs for you. You don't have to be a code-writing guru. If you can type something like "Open this AVI ("C:\path to folder\name of video.avi")" and save it with some basic parameters as text for VirtualDub, that alone can make a big difference. One thing your quick video sample did say: it needed serious but simple prep in its original format before being opened and processed with RGB filters.Last edited by sanlyn; 25th Mar 2014 at 14:19.
-
What is the maximum file size that I can upload? These AVI files are quite big and I'm not sure if the size is reduced when I upload it directly to Videohelp.
-
The maximum is 100MB. If you have captured to uncompressed AVI then, yes, those are big files. But you can reduce the size by compressing with Lagarith, which is a lossless compressor (similar to ZIP or RAR, but faster and optimized for video). First, we have to know the structure and any compressor you used for the AVI. The best and easiest way to get that info is to use the free MediaInfo utility, as described earlier. Opening the AVi with MediaInfo, you can use "View" and choose the "Tree" view, then copy that readout directly from the screen, or you can save the readout as a text file. Then you can submit the text file, or copy and paste the text directly into a post here.
MediaInfo does nothing to files. All it does is display info. We need that data to tell you the best way to make a short cut to submit. It's a simple process in VirtualDub, but it varies depending on the structure of your AVI.Last edited by sanlyn; 25th Mar 2014 at 14:19.
-
Thanks again for your comments.
As background, this film was taken in the early 1950's. Unfortunately, the original films got lost. I still have my father's 8mm films and started a few years ago trying to capture it with Cinecap. I was very active in that post, but that project has stalled. I am also nearly done with my original VHS home videos. I have captured them and am now editing with PowerDirector.The quality seem to be quite good, but I will post examples at a later stage to decide if I need to use VD filters.
Back to the topic:
The AVI's are compressed with Lagarith.
MediaInfo
General
Complete name : C:\Users\User\Desktop\Welgegund Mei.avi
Format : AVI
Format/Info : Audio Video Interleave
File size : 92.8 MiB
Duration : 15s 560ms
Overall bit rate : 50.0 Mbps
Writing library : VirtualDub build 32842/release
Video
ID : 0
Format : Lagarith
Codec ID : LAGS
Duration : 15s 560ms
Bit rate : 48.5 Mbps
Width : 720 pixels
Height : 576 pixels
Display aspect ratio : 5:4
Frame rate : 25.000 fps
Standard : PAL
Color space : YUV
Chroma subsampling : 4:2:2
Bit depth : 8 bits
Bits/(Pixel*Frame) : 4.673
Stream size : 89.9 MiB (97%)
Audio
ID : 1
Format : PCM
Format settings, Endianness : Little
Format settings, Sign : Signed
Codec ID : 1
Duration : 15s 560ms
Bit rate mode : Constant
Bit rate : 1 536 Kbps
Channel(s) : 2 channels
Sampling rate : 48.0 KHz
Bit depth : 16 bits
Stream size : 2.85 MiB (3%)
Alignment : Aligned on interleaves
Interleave, duration : 41 ms (1.03 video frame)
Interleave, preload duration : 500 ms -
Thanks for taking all this trouble. Looking things over, the sample isn't quite as "bad" as you describe. A little fuzzy maybe, and the screen texture and slight vignetting are visible (I wouldn't worry about vignetting. Trying to remove it would likely do more harm than good).
Your best cleanup choice would be with Avisynth to get the basic levels and chroma correct, then VirtualDub. PowerDirector would be a far lesser choice. I am wondering how the sample was cut and saved. I see that it used Lagarith (good). If you opened the AVI in VirtualDub and left VirtrualDub in "full processing mode", then recompressed to Lagarith, then a color conversion to RGB and back to YUY2 would have occurred. But if your original capture used Lagarith (or is uncompressed), it's a different story. More on that later.
Looking to see what's to be done first in Avisynth, and keeping simplicity in mind........Last edited by sanlyn; 25th Mar 2014 at 14:19.
-
Still looking over your sample. I'm working on simple techniques for the color problems (and those VHS rainbows and off-kilter screen effects are giving problems). You have a yellowed border along the right, but I'm fairly certain that can be fixed.
Members who are more experienced in film-speed glitches will have to help. Your video is interlaced (most standard PAL is interlaced) 25 FPS, but there are some frame blending effects. If I remove duplicate and blended fields, I get a frame rate of 20 FPS. Your original 8mm film camera and/or projector ran at one speed, your recorders ran at another. So cleaning up some motion problems will have to be done in Avisynth. Anyone familiar with these frame rate problems can chime in. For the most part you don't see these blend effects on TV.Last edited by sanlyn; 25th Mar 2014 at 14:19.
-
Thanks for your comments.
This is how I have captured this video and all the other "original" VHS ones:I am wondering how the sample was cut and saved. I see that it used Lagarith (good). If you opened the AVI in VirtualDub and left VirtrualDub in "full processing mode", then recompressed to Lagarith, then a color conversion to RGB and back to YUY2 would have occurred.
- Created a capture file in VD
- Set Compression to Lagarith
- Every time I opened VD, I had to change my settings from NTSC to PAL
- When I edited in VD, I used the "brackets" and deleted scenes.
- To finalize that cassette, I would not use full processing mode, but 'direct stream copy"
With my other VHS video cassettes, I did the same, but had to do more editing.
For example, I made a series for every child way back and would then cut out certain scenes that were not applicable to that child. I am now combining all the scenes of the three children, holidays, etc into one file/ film per year- heaps of cutting and pasting. I also found some of the original VHS-C cassettes and, where possible, replaced this with the scenes on the VHS cassettes, as the initial quality was usually better. I hope this all made sense.
The problem was that I struggled to open these captured AVI files with many editing programmes, for instance, I usually use Pinnacle, but Pinnacle could not open these files that used the Lagarith codec. So, I used PowerDirector. After editing, I again saved these files as AVI.
I do not want to confuse the issue, so at this stage, enough said about that project- I had to edit at least 90 hours ad there are still heaps of work left.
MediaInfo about the "master" file of the posted clip
General
Complete name : E:\Videos\1. Projek\Welgegund 9 Mei.avi
Format : AVI
Format/Info : Audio Video Interleave
Format profile : OpenDML
File size : 38.4 GiB
Duration : 1h 53mn
Overall bit rate : 48.3 Mbps
Video
ID : 0
Format : Lagarith
Codec ID : LAGS
Duration : 1h 53mn
Bit rate : 46.8 Mbps
Width : 720 pixels
Height : 576 pixels
Display aspect ratio : 5:4
Frame rate : 25.000 fps
Standard : PAL
Color space : YUV
Chroma subsampling : 4:2:2
Bit depth : 8 bits
Bits/(Pixel*Frame) : 4.512
Stream size : 37.2 GiB (97%)
Audio
ID : 1
Format : PCM
Format settings, Endianness : Little
Format settings, Sign : Signed
Codec ID : 1
Duration : 1h 53mn
Bit rate mode : Constant
Bit rate : 1 536 Kbps
Channel(s) : 2 channels
Sampling rate : 48.0 KHz
Bit depth : 16 bits
Stream size : 1.22 GiB (3%)
Alignment : Aligned on interleaves
Interleave, duration : 171 ms (4.27 video frames) -
Thanks for those notes.
One reason for the frame rate discrepancies: your projector shows images in progressive mode. Apparently something was sync'd to prevent projector flicker (which was necessary). VCR's record and play as interlaced. So even with interlace, most of the interlaced AVI frames when split into top and bottom fields show the same image, not the 2-images-in-time that you usually see in interlaced video. That's just some quickie considerations. Back a little later.Last edited by sanlyn; 25th Mar 2014 at 14:19.
-
Will try to work up a preliminary (very preliminary) trial run later today. I haven't solved the frame rate or blended frame problems yet. I'm sure someone will jump on this and suggest a solutio0n.
Last edited by sanlyn; 25th Mar 2014 at 14:19.
-
I didn't have time to research and solve the frame rate problem -- or, let's say, the blended frame problem. The attached is a first run that still needs some work. It's 25FPS interlaced PAL. When I treated it as progressive, nothing worked. There are still a few spots (camera motion makes it impossible for de-spotters to work effectively), a few streaks, and the usual color balance changes in VHS and home movies with every scene change. Note the last scene is a total color change, with bad blue chroma shift. That scene would require separate treatment. The attachment is denoised a bit too much, needs a little fine film-grain to look more authentic. But most of the chroma noise and tape grime are gone.
Half the work was Avisynth, half was VirtualDub. I can write up more detail later tomorrow about what was used; I have to pack for a trip due tomorrow at 5:30 A.M. <yawn>.
The Avisynth filters and features used (all at medium to low power):
Levels (Avisynth built-in)
ColorYUV
QTGMC
RemoveSpots
DeVCR
Santiag
aWarpSharp2
AddGrainC
In VirtualDub (all at moderate power and settings):
ColorMill
gradation curves
NeatVideoLast edited by sanlyn; 25th Mar 2014 at 14:20.
-
Thanks! There is absolutely no hurry
-
Sorry for the delay. I'm traveling and wih a tiny Netbook, which is impossible to work with. I'll be returning to this thread. Meanwhile, I menioned 3 VirtualDub tools that you might not be fmiliar with. WHile I did work some basic color and levels fixes in Avisynth, this was followed by VirtualDub with 3 filters. The ColorMill plugin is superior to Red-Green-Blue and brightness/contrast conrols, and far ahead of anything like a "Tint" filter. The ColorMill page is http://fdump.narod.ru/rgb.htm . Scroll down for examples and links. The second tool is an advanced gradation curve filter similar to those in Photoshop Pro, Premiere, After Effects, etc: https://forum.videohelp.com/threads/287113-Gradation-Curves-VirtualDub-filter-v1-45 . Likely these will have to be run with VDub in XP Compatibility mode on a Win7 machine.
When working with old, aging, damaged, badly discolored or noisy analog sources, many find that NeatVideo is essential (http://www.neatvideo.com/examples.html). Unfortunately it's not free, but it's very popular even with high-end video programs. I don't us NeatVideo for everything (it's not a one-button "total filer solution"). It's usually a last-step procedure after other major problems are fixed, and one should never use it at full high-power settings.
Two other VDub essentials I worked with were the ColorTools histogram/vectorscopes (https://forum.videohelp.com/threads/212099-Guide-to-using-a-Vectorscope?p=1219401&viewf...=1#post1219401 ) , and the Csamp pixel sampler ( http://www.netreach.net/~gavin/gavsfreeware/csamp.htm).
Will return later with notes on the Avisynth plugins listed. Those were just as essential as the steps I took in VirtualDub.Last edited by sanlyn; 25th Mar 2014 at 14:20.
-
While traveling I made several versions of the sample clip, but couldn't un or tweak them until I got back on a real computer today (not a Netbook!). The .m2v posted earlier in post #13 is interlaced PAL 25FPS, which used this script:
The script deinterlaces and denoises with QTGMC, separates the duplicate Even and Odd frame numbers for RemoveSpots and DeVCR, then reinterlaces, fixes some edges, halos, and some of the color bleed, converts to RGB32 for Avisynth filters later, and fixes the black borders. This is one way of doing it and achieving 25 FPS and DVD compliant PAL. There are still some defects, frame blending, and some clumsy motion. Much of that comes from recording film from a projection screen, and the color balance of the projector left much to be desired.Code:AviSource("patgh to video"\Welgegund Mei.avi") Levels(2, 1.4, 255, 8, 230, coring=false) ColorYUV(off_y=-15,off_v=3) # -------- input is YVY2 ------------ # ---- Use mt_masktools-25.dll ------ AssumeTFF().QTGMC(preset="fast") santiag(1,1) ConvertToYV12(interlaced=false) Q1=last e=Q1.SelectEven().RemoveSpots().DeVCR(20) o=Q1.SelectOdd().RemoveSpots().DeVCR(20) eo=Interleave(e,o).SeparateFields().SelectEvery(4,0,3).Weave() eo mergechroma(awarpsharp2(depth=20, type=1, blur=1, chroma=4)) AddGrainC(1.5, 1.5) ConvertToRGB32(matrix="Rec601",interlaced=true) Crop(12,4,-8,-6).AddBorders(10,4,10,6) return last
Sources for some of these Avisynth plugins:
QTGMC: a big plugin and a long script, with several support files. The doom9 thread for QTGMC has links for everything required: http://forum.doom9.org/showthread.php?t=156028 . This is a long thread. Most people use default "presets" for QTGMC, which is handy for newcomers to this plugin.
mt_masktools-25.dll: http://manao4.free.fr/masktools-v2.0a48.zip. Used by QTGMC and some other popualr filters. Necessary for running QTGMC in YVY2. The newer version of masktools "26" runs QTGMC in YV12 colorspace only. I will post additional scripts and plugins in the next post, below.Last edited by sanlyn; 25th Mar 2014 at 14:20.
-
Working with so many duplicate, blended, and interlaced frames was a headache. The closest I could get to the original super 8 frame speed was 20 FPS. So i made an .mkv version with an x264 encoder that is 20 FPS progressive. I'm not familiar with super 8 speeds, but I keep reading that either 28 nor m20 FPS is used. I used QTGMC to deinterlace, then used SRestore to remove as many duplicate and blended frames as I could. Now, all we need is an expert around here to get the video from 20 FPS to 25 FPS using some form of pulldown.
The 20FPS version has fewer rips and spots. Getting rid of all of them wasn't possible, but I used three pluigins to get what I did: RemoveSpots (which also removed some chroma noise and rainbows), DeVCR, and ReplaceFramesMC.
Some of the white stripes or flashes endure for several frames, making it impossible for many filters to clean them. An example of one of the frames fixed with ReplaceFramesMC(), below (original on the left, a frame from the mkv on the right):Code:Levels(2, 1.4, 255, 8, 230, coring=false) ColorYUV(off_y=-15,off_v=3) # -------- input is YVY2 ------------ # ---- Use mt_masktools-25.dll ------ AssumeTFF().QTGMC(preset="very fast") ConvertToYV12(interlaced=false) Srestore(frate=20) santiag.avsi RemoveSpots() DeVCR(20) mergechroma(awarpsharp2(depth=20, type=1, blur=1, chroma=4)) AddGrainC(1.5, 1.5)
[Attachment 17989 - Click to enlarge]
The last a shot in the sample had serious color bleed and color imbalance. I cut it from the sample and treated it separately, then joined it again for the encode. The code added to the original script were these lines:
Fixing the color was real headache, and it's a very unevenly coloored image, but at least skin tones look better and there is more color in the flowers:Code:ChromaShift(c=6) mergechroma(awarpsharp2(depth=30, type=1, blur=1, chroma=4)) return last
[Attachment 17990 - Click to enlarge]
Joining the two videos was done after filtering in Avisynth and VirtualDub, then converted back to YV12 for the encoder:
You will undoubtedly have questions (and I have some of my own), ao I invite readers to chime in.Code:v1=AviSource(vidpath+"avz10_04dCR_NVb_vd1f.avi").Trim(0,254) v2=AviSource(vidpath+"avz10_04dCR_2_NVb_vd1f.avi").Trim(255,0) v3=v1+v2 v3 ConvertToYV12(interlaced=false) return last
Last edited by sanlyn; 25th Mar 2014 at 14:21.
-
Just encode for 25fps and run the result through DGPulldown set for 20->25fps. Also, be sure to jack up the bitrates in your encoder by 25%. 25/20=1.25. So, if your max bitrate is usually 9000, set it for 11250.Originally Posted by sanlyn

If using an encoder that requires the correct framerate in the source AVS file (one such as HCEnc), add an 'AssumeFPS(25)' at the bottom of the script.
Of course, avz10 asked for VDub filters so maybe this is all academic. -
Right. I listed the VDub filters I used in an earlier post. Forgot to mention that Vdub's Camcorder Color Denoise set to 12 was also used. I wouldn't set that one any higher, it often makes its own brand-new artifacts. I'd suggest that VirtualDub was needed for the color and levels tweaks -- that off-color projected screen image generated real problems, for me at least. I don't think there's anything in VDub that could match the Avisynth "prep" plugins, but Vdub's ColorMill and very-low-octane NeatVideo proved very handy.
Will give AssumeFPS a try. HCenc sure didn't like it at 20.
Time to go back to Video Fred's thread and re-read from page 1.Last edited by sanlyn; 25th Mar 2014 at 14:21.
-
Probably. I see problems in the source that can't be fixed in VirtualDub. But using VirtualDub alone would give seviceable results, if not as clean as prepping with Avisynth. One problem is field blending and pulldown effect in the source. I used VDub's yadif field- discard deinterlace, which was softer and not as clean as QTGMC and required pumping up NeatVideo to help clean up some stuff that QTGMC and RemoveSpots handled better in the Avisynth/VDub version. VDub's Spot Remover removed no spots and created new problems, after over an hour of fiddling with it. Never cared for that plugin.Originally Posted by manono
With VDub alone, I used the following, in this order:
gradation curves (YUV mode)
yadif deinterlace (keep top field)
Camcorder Color Denoise (setting 20)
chroma smoother (built-in)
gradation curves (RGB mode)
ColorMill
NeatVideo
Border Control
Posted mpg sample is 25FPS progressive PAL. Play was a little clumsy in VLC, but OK with MPC-BE and Windows Media Player (gasp!). I gave this one a little more contrast, but that's a matter of taste.Last edited by sanlyn; 25th Mar 2014 at 14:22.
-
Thanks for everyone's efforts.
While waiting for replies, I studied Avisync as well as how to use annd write scripts. The scripts initially looked like an impossible task, but at least I understand the basics. I have used a number of filters for VD in the past and I am using Photoshop regularly, so I am not a total newbie in this regard.
I have now looked at my original "Welgegund avi" as well as the others. I do realize that we are starting from very poor quality since the original films are missing and we just have a VHS copy to work with.
Welgegund-interlace very prominent, but sufficient detail
Trial run- very clean, but loss of detail and perhaps not as sharp
v4 - more detail
PAL 25- most detail, but more noise or other interference.
I am very happy with what I see, please let me know how you progress so that I can get the best possible!
Thanks
Albie -
Yes, the final PAL has more visible noise (will probably not seem as severe on TV), but it is also sharpened more. As you say, the original has what one would describe as "more noise than detail" and is dark as well, meaning that the video signal is barely stronger than the residual noise signal. When the original is brightened, the noise is brightened as well. I didn't add VDub's temporal smoother, but it will smooth the image a little more at low settings from 4 or lower. Higher settings will start generating ghost trails.
Last edited by sanlyn; 25th Mar 2014 at 14:22.
-
Again, thanks for all the efforts.
As I stated before, I have started studying Avisynth and installed it on my computer. Some very basic questions:
- One of the youtube videos that I watched, stated that one should use VirtualdobMod. I use Virtualdub.exe. I suppose that would be OK??
- I have read that one should write the script on notepad and start with avisource(filename.avi) and then open the file with VD.
- I am confident to download VD filters and put them in the plugins folder.
- With regards to the Avisynth plugins, should I put them in the Avisynth 2.5 pluginfolder?
- If you still have the basic script, it will help me a lot just to change your template with new filters (Much easier than for me to write a whole new script!!). Could you perhaps post that?
Just encode for 25fps and run the result through DGPulldown set for 20->25fps. Also, be sure to jack up the bitrates in your encoder by 25%. 25/20=1.25. So, if your max bitrate is usually 9000, set it for 11250.
Many thanks
Albie -
VirtualDubMod is obsolete and hasn't been updated for 7 or 8 years. Some newer VDub plugins and decodcers won't run properly in VDubMod. It's apparently suggested because it has a few Avisynth script editing features. But I find Windows Notepad is sufficient. While VirtualDub doesn't use "scripts" for its filters, filter settings can be saved in a .vcf file using "File... -> "Save processing settings...". A .vcf can be edited in Notepad...not a great idea if you don't undertstand the logic in it, but it's not difficult to determine once you see a .vcf. A few older filters don't translate properly in .vcf's, but many of those are seldom used anyway.
Avisynth can load many formats, photos, and audio files. AviSource() is designed for Windows video-for-windows "AVI" interface and other AVI formats as well if the required decoders are in your system (huffyuv, Lagarith, DivX, etc.). If an AVI is captured with VirtualDub, the proper encoders/decoders are present. If you have Avisynth loaded on your PC, you can find its documentation (and a lot of it) in your "Program" -> "Avisynth" program group under "Avisynth Documentation". You can find a few thousand additional articles in Google by entering "Avisynth" and a keyword or two. The built-in docs also have a guide to coding. Don't be put off if you try rewading 100% of Avisynth's material and find your brain swimming. You'll need only a small percentage of its functions.
There are a few examples of AviSource() in the earlier posts,bbut basicalkl all of them work in this way:
Note that everything inside the parenthesis is enclosed inside quotes. Follow that with the filters and commands you want to use, then save the file as filename.avs . You can open that script with "File"...."Open" in VirtualDub. With a default install of Avisynh, an .avs file should open automatically in Notepad when the avs is double-clicked. If it doesn't, there's an easy way to fix it.Code:AviSource("drive:\path to video folder\video_name.avi")
AVisynth uses three basic file types in its plugins folders: dll, avs (text scripts), and avsi (avs scripts that load automatically with an Avisynth script). When you download the .zip or compressed plugin packages for Avisynth, don't download the package to the plugins folder. Make a subfolder for each plugin so that you can manage different versions. Decompress the download its subfolder, and then copy the relevant dll or script into Avisynth plugins. Almost all Avisynth plugins download with documentation and/or other files that should not be placed in the plugins folder.
As you will soon discover, dll's in the plugins folder load automatically when your avs script references their code and functions. avsi scripts load the same way. However, an .avs script must be imported explicitly with:
Or you can paste the text of the avs script itself at the bottom of your script, below the last line of regular code. Careful: some avs scripts such as MCTemporalDenoise, TemporalDegrain and QTGMC have hundreds of lines of code. "Import" is easier.Code:Import("drive:\path to folder\file_name.avs")
I will relocate and post the scripts and VDub filter settings I used, a little later today.Last edited by sanlyn; 25th Mar 2014 at 14:22.
-
1. Yes, better even, most times. Maybe the video was several years old?
2. However you plan on encoding (for DVD, for example), it's often a good idea to test the script in VDub first as it'll give an error message that might point you to the mistake, if there's something wrong with the script. An MPEG-2 encoder usually won't. If you can't figure out an error message, post both the script and the error message here.
3. I have no idea what you mean here.
4. Yes.
5. That's for sanlyn, I think. He'll be back. I have a bunch of template scripts with different filtering so often all I have to do is change a few things rather than write everything out all over again.
Now most important... Must be for sanlyn. If you're asking anyone a general question (not necessarily about your own video, which I haven't looked at), I'd say there's no recommended filters and no recommended settings that'll work on everything. Each new video needs its own specific filtering.
That last quotation, from me, explains how to set up your encoder and run DGPulldown afterwards to effectively encode and apply DGPulldown for a 20fps video and make it compliant for a PAL DVD. Since you're from a PAL country and have never had to learn what pulldown is all about, that quotation may sound like gibberish. But it'll work wonders if you follow the instructions. Ask if you have any problems. In your encoder you may have to ignore any DVD template and do a custom encode, but it'll turn out OK in the end.Last edited by manono; 22nd May 2013 at 20:09.
-
Adressing DGpulldown: Avisynth can give you the original 20FPS film speed, or can give you 25FPS interlaced with some cleanup of interlace and frame blending issues. QTGMC and Srestore() gave me the cleanest set of frames at 20fps. The Avisynth restoral doesn't require that you use the other Avisynth plugins for cleanup -- you could go from there to VirtualDuib if you wish without additional AVisynth code. Using only VirtualDub, I used VDub's built-in yadif deinterlace and got 25FPS progressive -- the cleanup wasn't as "clean" as the avisynth methods and was actually a softer image before further filtering. Frankly I think 20FPS + DGPulldown ran more smoothly.
I'll include samples of both methods.Last edited by sanlyn; 25th Mar 2014 at 14:22.
-
Notes and files for VirtualDub-only version:
The only avs script used here was one that opens the original AVI and performs a proper YUY2-> RGB conversion ("Open_toRGB.avs").
No added Avisynth plugins were used. Included in the attached .zip file are the VirtualDub .vcf settings files for Step 1 and Step 2. Also included are some VirtualDub plugins and two files used by NeatVideo.Code:# #--------------------------------------------- # Converts YUY2 to RGB with proper matrix # and interlace parameters # # Change the AviSource path for your system # #--------------------------------------------- AviSource("E:\forum\avz10\Welgegund Mei.avi") AssumeTFF() ConvertToRGB32(matrix="Rec601",interlaced=true)
I had to modify the .vcf files this morning because not everyone has a copy of NeatVideo. It's a popular filter for VirtualDub, Premiere Pro, After Effects Pro, Vegas Pro, and some other high-end apps. But it's not free. So I prepared and tested a "Step 2" .vcf that doesn't use NeatVideo. It's not as clean as NeatVideo, but you're welcome to play with other denoisers and sharpeners as you wish.
VD_Only_Step1.vcf = deinterlace, initial denoise, color correction, blacken borders.
1. gradation curves (YUV mode)
2. yadif deinterlace (top field first - keep top field). VirtualDub built-in.
3. Camcorder Color Denoise (ccd_sse2.vdf)
4. gradation curves (RGB mode)
5. ColorMill
6. BorderControl (This last plugin is not in the .vcf file. Unfortunately, BorderControl doesn't save its settings properly in a .vcf, so it has to be added at the bottom of the filter chain. Make this plugin is the last plugin in the filter list. The basic reason is that the 4 image borders are ragged and uneven, and color correction changes the border colors. Black borders were configured as follows: left=12 pixels, top=6 pixels, right=6 pixels, bottom=8 pixels.
Save the output of this step as Lagarith RGB. The output is 25FPS progressive.
VD_Only_Step1.vcf = noise reduction and sharpening. The input is the AVI file from step 1.
1. 2D Cleaner optimized (2dcleanopt_k7.vdf)
2. temporal smoother (built-in)
3. chroma smoother (built-in) - has a very slight effect, but does help somewhat.
4. xsharpen 1.0 b2 (xsharpen.vdf)
Save the output of this step as Lagarith RGB. I don't know what you're using as an encoder, but I used TMPGenc Plus 2.5 for 25FPS progressive PAL. That encoder takes RGB AVI's as input and converts them to encoded YV12 MPEG2. If you want to use an encoder that accepts YV12 (such as the free HCenc), save the file as Lagarith YV12. To open a file in HCenc or other encoders, you would need this simple Avisynth script:
Should you decide to acquire a copy of NeatVideo for VirtualDub, I included two files used by NeatVideo: a .dnp file (noise profile) and .nfp file (noise reduction profile). Each of these should be manually loaded into NeatVideo's advanced interface. You can place these two files anywhere -- the folder containing the original AVI source is a good place, or use NeatVideo's "profiles" subfolder in NeatVideo's program folder in Windows. NeatVideo for VirtualDub is a 32-bit application.Code:AviSource("drive:\path to subfolders\file_name.avi")
A .vcf usually doesn't require editing, but it can be edited in Notepad. However, be extremely careful when saving a .vcf and turn off "Word Wrap" in the "Format" menu. Some lines in a .vcf often exceed 132 characters and cannot be read properly if saved with Word Wrap turned on.
When you load the .vcf and its filters into VirtualDub, open the filters and look at their configurations. Especially useful for learning about color control are settings for gradation curves and ColorMill, each of which have multiple settings. Use "File..." -> "Load processing settings' to load a vcf. If you change the settings, use "Save processing settings" to save a new version of the original .vcf so that you can return to the previous version if needed. These .vcf's can't be used in VirtualDubMod.
As Manono noted earlier, these filters are suggestions. With home video, and especially with VHS sources, the same exact settings often require changing for different parts of a video. It's best to work with small sections of a long video and join the repaired sections later, then encode as one.
I'll return later today with some notes for an Avisynth "prep" that gives cleaner output. I have to modify my old scripts to make them readable -- they're a mess right now.Last edited by sanlyn; 25th Mar 2014 at 14:23.
-
I cannot believe that I have received so much info and help!! I plan to use AviSynth and VD for this video.
This is a steep learning curve for me, but I have started to download most of the plugins mentioned and installed them in the plugin folders(AviSynth/VD). I will eventually use what you recommend, but will obviously experiment.
I am thinking of getting the Neat Video plugin, as most of the work I want to do, will be on the VHS videos that I have converted to AVI with VD
This is how I have captured this video and all the other "original" VHS ones:
- Created a capture file in VD
- Set Compression to Lagarith
- Every time I opened VD, I had to change my settings from NTSC to PAL
- When I edited in VD, I used the "brackets" and deleted scenes.
- To finalize that cassette, I did not use full processing mode, but 'direct stream copy"
For example, I made a series for every child way back and would then cut out certain scenes that were not applicable to that child. I am now combining all the scenes of the three children, holidays, etc into one file/ film per year- heaps of cutting and pasting. I also found some of the original VHS-C cassettes and, where possible, replaced this with the scenes on the VHS cassettes, as the initial quality was usually better. I hope this all make sense.
The problem was that I struggled to open these captured AVI files with many editing programmes, for instance, I usually use Pinnacle, but Pinnacle could not open these files that used the Lagarith codec. So, I used PowerDirector. After editing, I again saved these files as AVI.
I do not want to confuse the issue, so at this stage, enough said about that project- I had to edit at least 90 hours and there are still heaps of work left.With regards to encoding, I bought TMPGenc a few years ago, but have not used it lately with the videos I am currently making- I have a Canon Legria HV 40 and use Pinnacle to edit- probably not the best way to go??!Save the output of this step as Lagarith RGB. I don't know what you're using as an encoder, but I used TMPGenc Plus 2.5 for 25FPS progressive PAL.
Thanks again! -
I think that Avisynth, VirtualDub, and TMPGenc or a free encoder like HCenc (don't worry, it has a GUI and isn't difficult if you've used other encoders). I used the old TMPgenc Plus 2.5 encoder for the PAL sample, so it depends on which version of TMPGEnc you have. The method you show above seems sound to me, although with what you learn about other software you probably won't need Pinnacle very often. I have an old copy of Pinnacle myself.
I've been tweaking the Avisynth scripts today. Sorry, it's taking a while because family is still driving me crazy. I've also collected all the plugins required for the script I'm using, although most of them aren't difficult to find. It's assembling them that is the devil's work. Will post as soon as I can. Meanwhile I've been replacing NeatVideo as the last step in the chain, but I haven't found anything better for this particular video. Once you get a feel for the filters, however, it's the color and levels that are most troublesome. The source is really quite dark, and bringing up dark detail also brings up noise. Well...I'll keep at it today. Thanks for checking.Last edited by sanlyn; 25th Mar 2014 at 14:23.
-
I discovered a silly typo in my scripts late last night, so I'll re-run and correct, and post later. Meanwhile, I finally found an earlier .zip file that includes all the plugins we've discussed in this thread, plus a few others. The .zip includes a "contents.txt" file of notations, the dgpulldown utility, and some plugin folders with dll's, scripts, and documentation. The QTGMC folder contains dll's and scripts used by QTGMC, so if you have those installed you have most of the support files that are used by many popular Avisynth filters.
This .zip file collection was posted earlier in the forum, but I never re-located the old post.
 Quote
Quote
Similar Threads
-
please list the virtualdub filters to remove vhs tape video noise
By perfection in forum Newbie / General discussionsReplies: 6Last Post: 7th Jan 2020, 13:45 -
Suggestions on filters and adjustments on captured VHS Video
By Xmetalfanx in forum EditingReplies: 2Last Post: 26th Nov 2012, 08:31 -
Telecine Machine for 8mm film super 8 film transfer to dvd
By igotregister in forum Capturing and VCRReplies: 5Last Post: 2nd Feb 2009, 16:50 -
Any good VirtualDub filters to remove common VHS color bands?
By rijir2001 in forum Newbie / General discussionsReplies: 1Last Post: 15th Nov 2008, 17:10 -
8mm Film and Menus
By ia2azbound in forum Authoring (DVD)Replies: 7Last Post: 26th Aug 2008, 18:17