


This guide will show you how to fit a movie (preferably a DVD Rip) of whatever length on one CD without overburning. First of all you will need a DVD ripping program like DVD Decrypter, DVD2AVI, TMPGEnc, and a burning program that supports VCD burning like Nero.
I would like to add for anyone who has successfully DVD ripped and burned a movie with my guides to please post their standalone DVD player model here. It helps me to know what models this format works on. Thanks in advances. :)
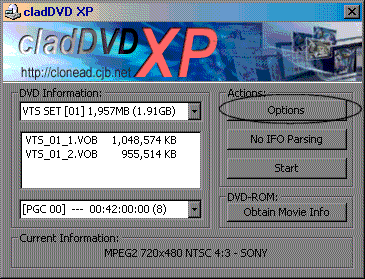
First rip the movie to your hard drive. For the example I will use CladDVD XP 1.3. You can download it from here: http://clonead.cjb.net/ . It now also has frameserving built in so you can skip the DVD2AVI step because it loads it for you. You can use any ripping program you want but have more then one installed in case one doesn't work. Here's what the window should look like after you have insterted the movie.
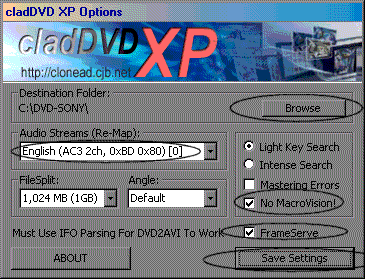
Next select that options you want. I high have outlined all of the imprtan settings. Audio track, remove macrovison and frameserving.
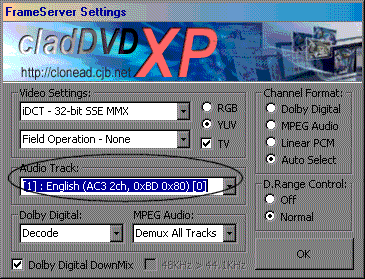
Don't check off frameserving if you will manually do it your self. If you do click on it a window will pop up allowing you to set up DVD2AVI. Here's what to your settings should look like. Make sure you select the correct audio track depending on what language you want because there may be several.
When your done hit OK, save settings, and start at the main window. It will now start to rip the movie. If you selected frameserving then after the movie is done ripping the DVD2AVI status window will automatically pop up and start frame serving after it's done you can now work with the files in TMPGEnc. If didn't slect frame serving then after the ripping rogram is finished you can go into DVD2AVI and load the VOB files. Once you have the VOB files on your hard drive you can move on to step two.
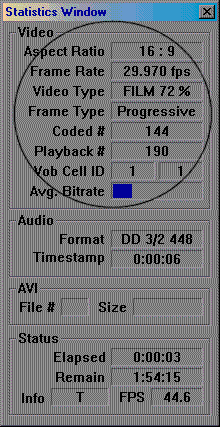
You will need to load these VOB files into DVD2AVI so that TMPGEnc will recognize them. Once you load the first file the other corresponding files will also be loaded. Go to the options menu and select preview. Make sure that the stats window is also open. Let the movie run through for a few seconds. What you will be looking for are the following: aspect ratio, frame rate, video type, and frame type. These specs are what will determine what to settings are in TMPGEnc. Here are where the specs might look like for a NTSC standard movie:
Stop the preview and select the sound quality you want. When you done select save project. After you have named and saved it in a directory the process will begin. Times will vary depending on the speed of your computer and the length of the movie. Once it is done you will have two new files with the extensions d2v and wav. You will need these two files to load into TMPGEnc.
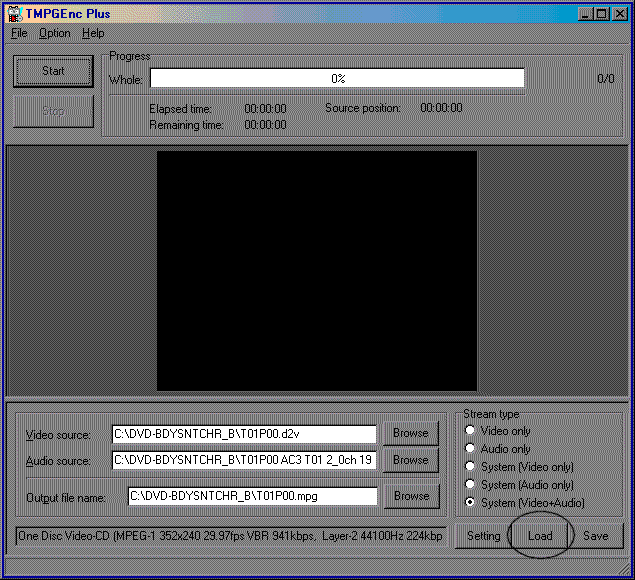
Open TMPGEnc. If you have version 2.5x close the wizard if it pops up. Here’s how to set up your movie to fit on one CD: First click on the load button pictured below.
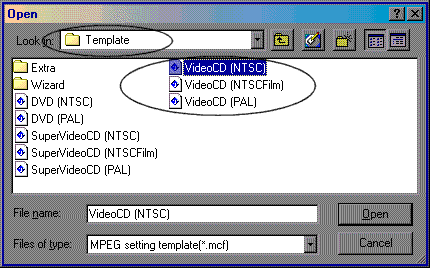
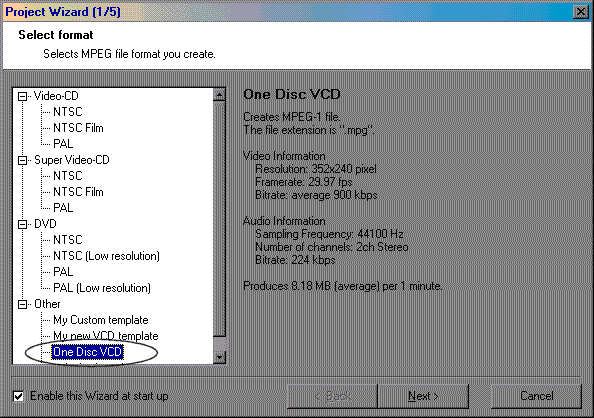
Browse to the template folder if it isn’t already open. Locate the template VideoCD (xxxx) the standard may vary depending on country.
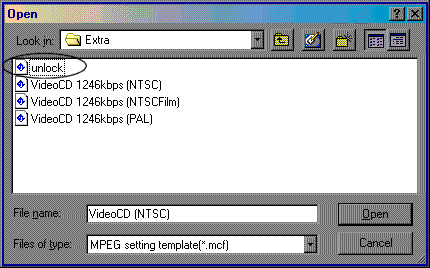
Next hit the load button again and in the same folder you see another folder called extra. Open this folder and you will see another template called unlocked. Double click on this template.
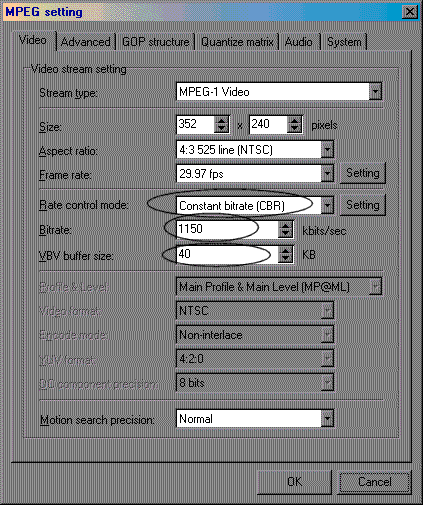
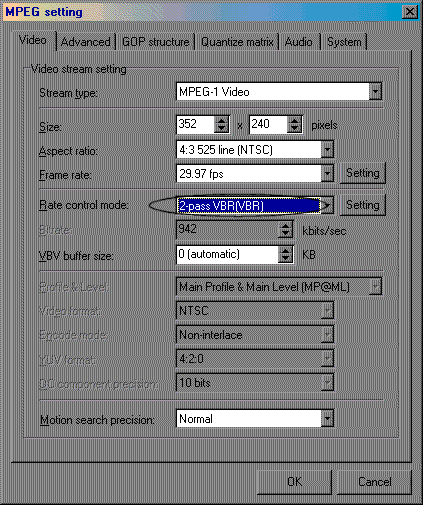
Now you will notice that the options that were all grayed out are now selectable. Hit the settings button in the main window. Below are the following settings that will allow you to adjust the size of your movie. You will be changing the bitrate and the VBV buffer rate. For the first time set the bitrate to something a little lower like 900. This will be the default setting for every time you load this template.
After testing out video samples you can find the lowest bitrate you are willing to go without the lowest quality. Set the VBV to 0.
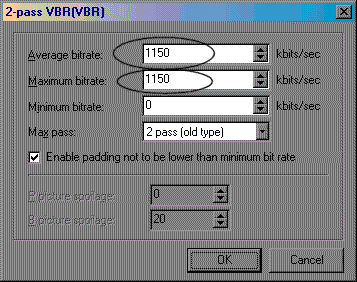
I also outlined the rate control mode. You can also use 2-pass VBR. This can improve video quality. A word of caution. I only suggest using this instead of CBR if you don't care about how much time it takes to encode and you plan on setting the rate control very low in order to accomodate for a long movie. When I set it to VBR on my computer the movie encoding time will take 9 hours instead of the normal 4-5 for me.
To change the settings just hit the settings tab next to its drop down menu. The average will be lowest bitrate you are willing to go. Maximum should be at least the standard which is 1150 for VCDs.
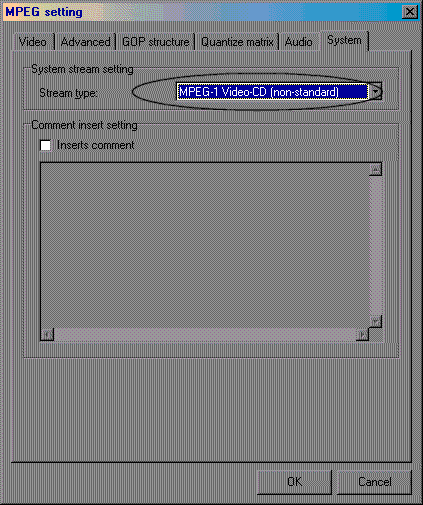
Hit the system tab and select MPEG-1 VideoCD Non-standard
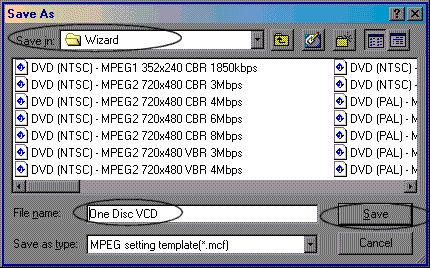
When you are done changing those setting click OK. Hit the save button. Now name your template whatever you want. Browse to the template folder if it isn’t already open.
If you have version 2.5 or higher then select the wizard folder as shown below. Next hit save.
Now every time you open TMGEnc and the wizard shows you will see you template listed in the other section. After you have changed all of the settings and saved you newly modified template you won’t have to go back and unlock anything again.
Now all you need to do is configure TMGEnc so that the output size will fit on one disc. If you are using the wizard then setting up the properties are easy. Open the project wizard. In the first window select the newly created template. If you saved it properly it should display in the other category.
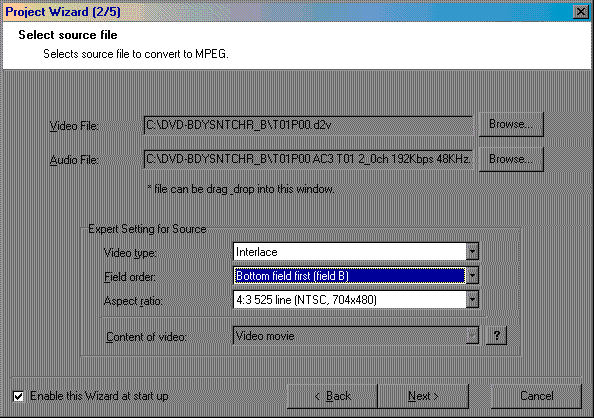
If it does not display go back to main window and resave the template in the wizard directory under the current version you are using. Sometimes if you have more than one version of TMPGEnc installed it will save things in different folders. Once you have selected you template hit the next button. Hit the browse button in video source at the top of the window. Find where you saved the d2v file you created with DVD2AVI. Once TMPGEnc is done checking it. Hit the browse button for the audio file. It should have been saved in the same folder with the same name but instead have a .wav extension. If you remembered the stats in DVD2AVI then select them under expert settings. For field order I use Bottom field first (field B). This setting may very depending on video type.
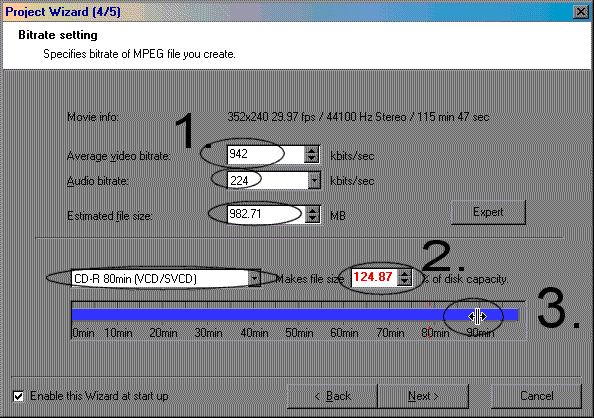
Hit the next button when you are done. In the filter settings screen select source range. Skip this step only if you know for sure that your settings will work. I suggest you do this in the beginning to make sure that the settings are configured properly. Scroll to a part of the movie that has dialogue or a scene with lots of action. Hit set start frame. Scroll again a couple of seconds further. Hit set end frame. Click OK when you are done. Click next in the filter settings window. The bitrate settings window is what will be the window that determines the size of the movie. Since you unlocked your template first then everything should be adjustable. There are several ways to make the movie an acceptable size for your media.
Here are the target sizes: 740MB for a 74min CD, 800MB for an 80min CD, 900MB for a 90min CD and 990min for a 99min CD. Please note that for the last two types of media you will only be able to burn to them if your burner supports it. If the movie file goes over the limit by a minute or two and your burner supports overburning then you will be able to squeeze it onto one CD. Assuming that you don’t have a burner that supports overburning then our target size is 80min since all burners support it and 80min CDs are very available.
Please note that you only need to use only one method to get a desired file size instead of all three.
To adjust the size of your movie there are 3 ways that I have circled. The first is by manually typing in the bitrate. This is good if you want to get the exact number. If you use the up and down arrow it will move in increments of 50 so it is better to manually type it in. To get the bitrate figure use the bitrate calculator that is available on VCDHelp's website. Here is the link: http://www.vcdhelp.com/BitrateCalc.zip . Theirs is very easy to configure. First, type in the length of the movie. You will find that number in the first column under movie info. Next select the type, which will be XVCD. Then select the media length and amount of CDs, which should be set to one. At the bottom you will see a number generated under the calculated average bitrate. Use this number in TMPGEnc under average video bitrate. After typing in the number generated your file should be about 800MB or less.
Here is a slightly easier way to get the same results. Without using an external bitrate calculator you can have TMPGEnc calculate the bitrate for you. Select the CD size you will be using. It will be either CD-R 74min for a 74min disc or CD-R 80min for an 80min disc. If you are using 90 or 99min CDs then you will need to use the bitrate calculator. Next to the media selection drop down menu you will be the percentage of the disc space used. Type in 100 to get a file size that will fit the discs capacity.
The last way is just as easy. With the media type still selected. Observe the blue bar at the bottom of the window. If you move you pointer over it will turn into an arrow pointing both directions. Drag the arrow to the red dotted line of the media capacity you selected. Now the estimated file size should be able to fit on one CD.
For movie lengths of 100min or below the bitrate shouldn’t have to be set too low. If the bitrate gets lower then what your limit is then start lowering the audio quality. Personally I rarely ever lower audio quality because most of the movies I do are in the 90min range. You start having to do that if you have a movie over 100min. The longest movie I’ve ever fit on one CD was 129min however I used a 99min CD.
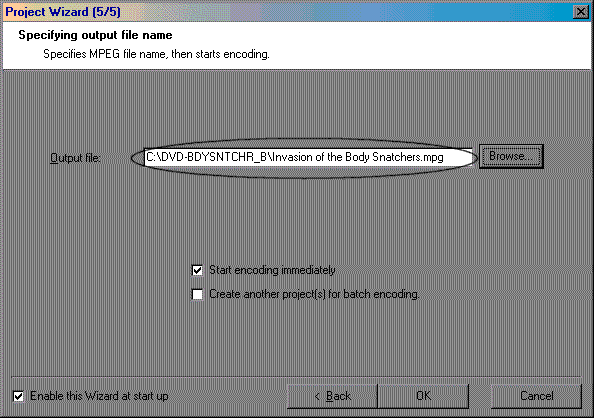
Hit next and you will be able to select the file name and where it is saved. Usually the movie will be saved in the same folder as the VOB files and have the same name as the d2v project. If these are the settings you want make sure that the “start encoding” box is checked and hit the OK button.
If you didn’t select a range for the movie then sit back and let it encode for a few hours depending on movie length and PC speed. If you selected a small portion of the movie for testing then wait a few minutes for the encoding process. Once it’s done open the folder where the movie was saved. Double click on the movie file and watch it. If the audio is in synch and the motion quality is good then you can go ahead and encode the entire movie. To set it to encode the entire movie then click the settings button and in the advanced tab uncheck the source range box. When you are done click OK. At the main window hit start. You will get a message asking you if you want to overwrite the file. Just hit yes. Sit back and let the movie encode.
When your movie is done check out my new guide on how to burn with chapters using VCDEasy at http://www.vcdhelp.com/forum/viewtopic.php?p=232254#232254
Once the process is done you should have an entire movie that will be small enough to fit on one CD. Open the finished movie and skim through it to make sure it came out. If everything looks good then you are ready to burn. Open your burning program of choice that supports VCD burning. I use Nero. Select VideoCD if you are burning with Nero. Name the volume label and volume set if you want. When you are done click new. Find the movie file in the browser window. Drag it into the video window. If a window pops up saying that the file isn’t valid then click the standard compliancy window. Once the movie is loaded you are ready to burn. For the burning speed use the speed that the CD shows it supports on the label. If your burner lets you burn at a higher speed then be careful. Sometimes if you burn a movie too fast the video may be messed up. You may even need to burn the movie even slower than the max speed of the CD. It is especially important with higher capacity CDs. When I burn on 99min CDs their speed is 16x, which is what the label says, but my burner will let me burn at 20x. I always get video problems when I burn at 16x even though the movie looked fine before I burned it. I have to burn at 12x instead. For regular CDs like 74 and 80min I usually burn at 24x or 32x if they are listed at 32x. If you have burned movies before at a higher speed then listed on the CD then go ahead and burn it faster.
After you have burned the movie the VCD should play in any standalone DVD player that will play VCDs and CDRs. You can also play it in you PC with any media player.
Here is an extra tip:
Do you want to really personalize the name of your template? Well here's how.
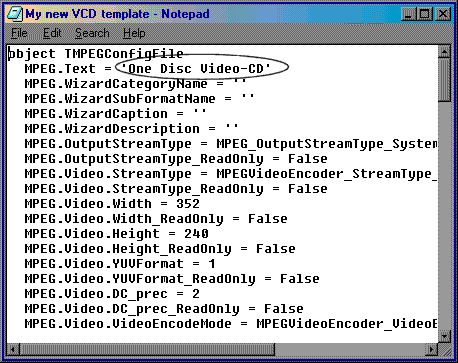
Open up a word processing program that will allow you to save in any format. For the example I am using Notepad. Browse to were you template and display all files to see it. Open it up and type in the name you would like to be displayed in the main TMPGEnc window between the two quotation marks next to MPEG text.
When you are done Click file and "Save As". Browse to the same place where you saved the template the first time if it isn't already there. Save it the same name it originally was and add the ext ".mcf". If if asked if you want to overright it say yes.
Now your template is totally original.
Thanks VCDHelp for all of the wealth of knowledge I learned from reading through the guides. It helped me to weed out many of the problems I was getting. I would also thank everyones comments. I have now corrected the guide. If anyone has anymore comments feel free
Try StreamFab Downloader and download from Netflix, Amazon, Youtube! Or Try DVDFab and copy Blu-rays! or rip iTunes movies!
+ Reply to Thread
Results 1 to 30 of 460
Thread
-
-
nice work with the guide...
but what's up with the EGGPLANT color scheme? Cheers~
JCPicache -
I followed the guide to the letter, but the resulting file size bore no relation to the estimated file size in TMPGenc 2.5.
The movie reports as 84 mins in length
I went for 99% of an 80 min CDR and the file when encoded was 849 MB.
Opened it up in VCDEasy to put the chapters in, then got a bummer when writing it. (should have gone for simulate :-( )
So, could you please explain where I'm going wrong. -
I ran into the same problem and just found out why the file size wasn't changing. In MPEG Setting on the System tab change the Steam Type to MPEG-1 Video-CD (non-standard).
-
Great Guide but you have to change to non-standard mpeg.
-
I set bitrate to 760kbps and I was able to put 2 hours on one cd.Video
quality is reduced slightly but I like the convenience.
Thanks newgen for the guide! -
Yep, altering the VCD to "non-standard" did the trick.
Thanks for the info, feel a lot happier now.
Cheers
Chris. -
Question. Can I do this without a dvd rip? I have a movie(cam) from one of the P2P filesharing proggys. So, with this type of movie do I need to load the vob files at the beginning or can i just load the movie and then adjust the settings? thanks
-
If you have a movie that's already done and just want to compress it then you can. Just load the movie like you would and other files the movie should be selected for the video and audio source. The quality might not be as good as the original. In the past I have done tapes with this method. If you have the original vob files from the movie then it would be better to frameserve those and use them in TMPGEnc
-
Question: For some reason, I just downloaded the new BLADE2 and it's in AVi clip format. It won't play in the DIVX and when i was trying to encode it, it said," file cannot be open, or unsopported!" Any suggestions to fix this idea?? I really want to burn BLADE2.. thanks!!!
-
I don't have a lot of experience with avi but I have seen a few guides on this site about converting avi/divx to mpg. Here is one of the guides http://www.vcdhelp.com/tmpgenc.htm. It is for just using TMPGEnc. Since it says it won't open in TMPGEnc then you should check to make sure you have the vfapi plug-in installed it allows you to open different files. If it is installed then make sure that the direct show box is checked off. It's in the file settings under the environmental settings. You should also make sure that you have the all of the divx codecs installed. The other guide is here http://www.vcdhelp.com/divxtovcd.htm. This guide shows you how to use Virtualdub and TMPGEnc.
-
Maybe you should look here:
http://ns1.shidima.com/kwag
If you want to put 2 hours with a quality close to SVCD ( or better )
Download some samples and try them out.
Greetings to all,
kwagKVCD.Net - Advanced Video Conversion
http://www.kvcd.net -
Member
- Nov 2000
- southfield, MI USA


worked like a charm! excellent guide.. thanks!!
-
I followed the above instructions, and was able to create a file of the perfect size, however, when I play it on my DVD player, the audio is choppy. If I play the dat file in windows media player the audio is fine.
I encoded the audio at 192 kbps from a wav file that I stripped out of the divx movie using Vitual Dub.
Any ideas why this would happen? Has it happened to someone else? I may have overlooked something obvious. Or is it possible that my DVD player just doesn't like VBR?
Swoogan -
Howdy!Originally Posted by swoogan
Choppy audio you say hmn ive never had that problem, you could try to save the the DivX movie as an AVI file with AVI Audio and direct stream copy.
Thats how i usualy convert my DivX movies to mpg with TempGen and it never seems to fail.
Best of luck to you.
//KGH -
Hey...
I'm experiencing the same audio problems as Swoogan, but it's not just when I'm fitting a movie onto one CD. Even normal 2-disc VCDs seem to play the choppy audio (but only on the DVD player... playback on a PC is fine).
I'm using DVDx, VCDEasy, and FireBurner, and everything seems to work fine until I pop the disc into a DVD player. I have even produced slide shows using JPGs and WAV files (with a tool called Slide Show Movie Maker) and ironically, these VCDs play just fine on the DVD player.
Since commercially-produced VCDs and the slide show VCDs that I have made give me no trouble, I'm confused.
Anyone have an idea?
Mac -
Howdy! you could try to lower the burning speed, ive hade some problemsOriginally Posted by mac72
with the sound also but those has been blown away with slower speed.
//KGH -
If you guys used Kwag's template and are getting the audio glitches, the template is probably why. Especially if you encoded at 352x480 or some variation of x480. Some DVD players do not like mpeg1 at x480 resolution. Such as my Apex 5131, darn it. I've been using his template all the time for making mpeg1 VCD at the standard 352x240 resolution, though.
If you're not using his template, then the audio problems are coming from somewhere else, so then disregard the above. -
I did everything you say, and when i went to the wizard guide, it's not the samse as your. i save it as 'one disc cd' and it's not there.
please help me. -
hey, can this guide work for CD-RW's or is it just CD-R's?
-
[hey i have done all u say.. and thank u it worked great have already done two dvd rips both around 94 mins ... both movies fit nicely on thier own disc...and i only use 80min discs... the quilty is just fine u can not tell the diff from the vcd and the dvd...u r the man.... i just have to say i fell bad for u what kinda computer r u useing that it takes 9 hours it only takes an hour and 40 mins for me.... and again the qulity is perfect....
-
Yep, you can record a CD-RW as it was a CD-R. But be sure it´s clean before doing the record. Erase it, if not (no format, format is for DirectCD and similars only)Originally Posted by BIOpunk41
-
When I said my computer takes nine hours I ment when I set it to 2 pass VBR. I always use CBR because it doesn't take as long Normally it will take about 4 hours to do an entire movie. I currently have an Athlon 1.1 Ghz PC. After really getting into this stuff I kind of regret that I didn't upgrade my computer even faster then that. Thanks for your comments.Originally Posted by dopey621
-
[dont get me wrong i was not making fun of your computer at all. is it and amd xp. i just moved to an xp 1700+... before that a full dvd rip took me 4 hours now 1 and 3/4.. but i also have a ddr mobo and 384 ddr pc 2100.... but even if i had to wait it would still be worth it with the info u give here.. and ur temeplate... thanks again
-
Hi. One problem that a few other people have been having is the estimated file size issue. The solution to that was supposed to be to make the video stream MPEG-1 Non standard. I did that, and did everything else selected in the guide. When I looked at the movie info in TMPGEnc, it said 145 min 19 sec....but on the dvd it says only 117 min. I don't know if this has anything to do with it, but I used the calculator to set my bitrate, and it said 99.9 percent of the CD would be used for a file size that was greater then the 650 mb cd I'm using, but not too much over, about 700. That's not the main problem I'm having though. What's really happening is after I put in the appropriate bitrate, and encode it, I'm getting a file size of over a gig. Any idea what happened?
-
Sometimes when you rip a movie to you hard drive you may also rip extras like trailers, outtakes and whattever else is one there. Even though I may selct the main movie files sometimes I will get extras. If you see the length way longer then it should then preview it first. If after the credits role you see previews or interviews or something cut them out. To preview a movie before it's encoded selct file and preview. Scroll through the movie until you get to the credits. If there's anything left at the end then you ripped the entire DVD. It happens. To solve this click on setting and doble click on source range. Scroll to where you want the movie to end. There now you won't have all of the extras.
I was just checking out VCDhelp's calculator and it showed you would have to set the bitrate at 522 for a 145min movie on 1 80min cd and for 117min it was 701. I double checked my settings and there shouldn't be anything else you have to change I'm a little stumped but look into seeing why the movie is so long. -
You can also set the bitrates at or around 900.. for very good qulity.. after toying with it thats what i found....
-
Is there anyway that I can put subtitle by using this program. I see that you can pick the language that you want but what about the sub.
Thanks, I really appreciate your reply. -
Well, when i selected the actualy VOB files in DVD2AVI, I made sure that it was just the movie - nothing else.
But then I watched it when the final thing came out and I realized that it was acting like a broken record, skipping back every couple seconds or so....This may be the reason why its 145 min. So, any idea why that's happening? Did I do something wrong in DVD2AVI? Also, would that make a difference in the bitrate calculator? I mean, It was 145 min....and I set it for 145 min....estimated file size was 700 mb...ended up over a gig..
Also, I tried using ForceFILM too, but the audio and video still kept skipping back.

 Quote
Quote

Similar Threads
-
TMPGEnc 4.0 XPress Guide
By Felo in forum Video ConversionReplies: 2Last Post: 22nd Oct 2009, 00:21 -
Newbies first post - FInalcut + what?
By fontenele in forum Newbie / General discussionsReplies: 0Last Post: 7th May 2008, 17:34 -
Fitting more clips into TMPGEnc DVD author. Anybody know?
By hellfire45 in forum Video ConversionReplies: 7Last Post: 22nd Feb 2008, 16:12 -
fitting more than one movie on a dvd
By LaLuna in forum Newbie / General discussionsReplies: 4Last Post: 21st Jan 2008, 18:15 -
I need a guide fot adding subtitles to DVDR of series- not movie
By dallylama in forum SubtitleReplies: 4Last Post: 8th Jan 2008, 20:22