


Theoretically there should be no need to adjust the focus as the scanner focuses tot he glass and maybe a few millimiters beyond. Except of course that the negative curls and is not held rigid. At that close a focus you actually get a depth of field problem. A better film holder for the scanner can solve this problem. This is also the theory behind wet scanning of film, it keeps the neg flat, aligned and in position.
This company http://www.betterscanning.com/ has many custom neg holders for many scanners and they do make a difference for the home scanner.
I've never been a big fan of having to focus a scanner, it can be beneficial but can be disasterous for the casual user. The problem is there is a tendancy to focus on the grain and miss the image, the result is a sharp imagewith pronounced grain. I have a Sony (made by Konica) UY-S90 in my basement that I love and hate. It is a full roll 35mm scanner for film and slides that has a preference for focusing on the grain rather than the image. It takes a lot of tweaking to get a good result, hence why it is in the basement.
--dES
+ Reply to Thread
Results 31 to 60 of 67
-
"You can observe a lot by watching." - Yogi Bera
http://www.areturningadultstudent.com -
One problem is the lack of flatness of the negative even it a good holder. The negative typically has a curl or buckle that prevents it from being on the same focal plane across it. And as you mentioned the depth of field poses a problem. I know little from my own experience; I haven't done that much negative scanning but it seems to me that a good holder would be two flat pieces of glass that the negative is sandwiched between so that the negative is forced to be completely flat.
-
That would be ideal, but you run into a problem with rings forming against the film. They are called Newton Rings. There is glass that can prvent them but they cause unsharpness of the image.it seems to me that a good holder would be two flat pieces of glass that the negative is sandwiched between so that the negative is forced to be completely flat.
--dES"You can observe a lot by watching." - Yogi Bera
http://www.areturningadultstudent.com -
Even 35mm slides have a similar flatness problem. I remember when I was kid and my dad would sometimes drag out the dreaded 35mm slide projector to show boring vacation and family pictures. He would frequently have to readjust the focus because the slide would pop out of focus due to the projector bulb's heat.
-
Yes. Autofocus projectors were nice when they came out. There are glass slide mounts and ones with anti-newton glass. Funny, with all of this technology: Everything old is new againOriginally Posted by SCDVD

--dES"You can observe a lot by watching." - Yogi Bera
http://www.areturningadultstudent.com -
Video Restorer

- Jun 2003
- dFAQ.us/lordsmurf


This has a ton of flare.Originally Posted by VegasBud
It's all soft, areas too bright, hazy, etc. I have some vs images of slides on different scanners.
Not much different that being heavily drunk or sedated, either, for that matter.
Everything has that dream-state look to it, nothing is really in focus, lights warp depth and perspective.Want my help? Ask here! (not via PM!)
FAQs: Best Blank Discs • Best TBCs • Best VCRs for capture • Restore VHS -
lordsmurf,
You may have missed the parts of the post (which included the scan) where I said:To keep things in perspective, everything is relative, and nothing is perfect.A consumer level multi-purpose flat bed scanner...(is) the most practical for their purposes, and the results should be quite acceptable to them.Still, since you took the time to critique the scan, and have an interest in these things, I'll share my view on why you're seeing the problems you mention....here's a worst-case-scenario example...a 50-60 year old 35mm slide, taken by an amateur photographer, using amateur equipment and consumer film. The slide was extremely damaged by time and improper care.
While both slides and negatives exhibit limited overall loss of density as they age, projector fade (unique to slides) is a much bigger problem, which manifests as a marked overall loss of density (the entire image becomes lighter). Projector fade is determined partially by the slide film characteristics, but is more directly connected to the power of the projector used, combined with how long and how often a slide is displayed. Consequently, the effect is much more pronounced with slides that were used in travelogues (for instance older Las Vegas material such as this particular slide) than slides shown in a family setting.
In the early stages of projector fade, the subtle tones in the highlights are the first to disappear (almost white becomes white). Projector fade is gradual, not abrupt, so the slide may continue to be used, in which case the tonal range just keeps being shifted along, becoming lighter, with darker and darker tones (in the original) being lost in the "almost white becomes white" zone. As I mentioned, I chose that scan specifically because it was, indeed, the "worst-case-scenario example" of a slide that I have ever seen (that wasn't entirely beyond recovery). What should have been shadows had the density of what you would expect for somewhere above midtones. The highlights and upper midtones of that slide were no longer just damaged, they appeared to be completely gone (when viewed using a lightbox and loupe). It's not the fault of the scanner that there was nothing left to acquire. On the contrary, it was impressive (at least to me) how much the scanner was able to pull out of the ruins.
A connected problem with projector fade is that it effectively reduces both the tonal range and the dynamic range of the image, which in turn reduces the abruptness of luminosity change between neighboring pixels, which is the basis of sharpness (or focus). You can expand the dynamic range (so the shadows are closer to where they should be) by stretching the tonal range, but the tonal range remains the same. Put another way...projector fade adversely (and permanently) affects apparent sharpness.
I suppose it's different for each person, but I have been both "heavily drunk" and "sedated", sometimes at the same time, and never had things look like that to me.Not much different that being heavily drunk or sedated... -
I had a feeling more information would be required, so I ordered one of the 4490s from B&H immediately after posting the scan. I should get the scanner next week. When it arrives (and I can set aside some time for the project), I'll scan some slides and negatives more representative of what the average family photo scanner (person, not device) would be working with, and post them. That way, everybody can make up their own minds as to whether a consumer level multi-purpose flat bed scanner is acceptable for their purposes...or not.
-
VegasBud - I think your scan of the ±60 year old much abused chrome of a Las Vegas street scene looks very good. Considering your description of it's condition - and the fact that it's a downrez for the purposes of posting - I would be proud of it.
My father was a photographer (amateur) and I've scanned many of his chromes from the 40's thru 60's with my Nikon LS-2000.
Maybe we need a scan-off?
Shutterbug's review of the Epson V750M is pretty positive - favorably comparing negative scans with the Minolta DiMage Scan Elite 5400 II.
http://shutterbug.com/equipmentreviews/scanners_printers/1106epson/ -
Sometimes the vintage look on an old photo adds to its "charm". This is so much so that sometimes people Photoshop new photos to make them look old to add an authentic dated look. So sometimes a 60 year old photo is going to look like a 60 year old photo.
This is also true with video when you see people edit nice sharp, well colored video to give it that old 8mm camera look with washed out, off colored flickering frames etc. You can even use dust and scratch filters to add the appearance of dusty and scratched film. Frankly this is sometimes overdone and it looks bad. -
Good point, but note this can be as big or even bigger problem on some dedicated film scanners. The Nikons are especially prone to focus issues: it is often impossible to get both center and edges of a 35mm frame in proper focus with a Nikon 35mm scanner (the combination of high-contrast lamp and very limited depth-of-field lens in the smaller Nikons provides zero tolerance or wiggle room). If you are considering the expense of a Nikon film scanner, this is another reason to opt for the multi-format Nikon 8000 or 9000: though optimized to scan larger 120 film sizes, they are perversely better at scanning 35mm than the 35mm-specific Nikons due to their larger lenses and softer lamps. Other brands of 35mm-only film scanner, such as Polaroid, MicroTek and Minolta, have a deeper focus range that rarely requires adjustment.Originally Posted by SCDVD
-
I did get the "Epson Perfection 4490 Photo" flat bed scanner (to use for testing) yesterday. I figured I would just throw in some negatives and their prints, and post the results, but which options were chosen in the "Epson Scan" scanner interface had a profound impact on the results, so I had to figure out what changes each option was making.
Since the process of scanning is basically analog to digital conversion, I decided to use a count of the unique colors in the digital image as a measure of the robustness (there must be a better word for it) of the conversion. That part worked as expected, with a negative scan consistently yielding from ~30% to ~60% more unique colors than a print scan for the same picture. The range of improvment is, of course, connected to the pictures I was working with, and will vary from picture to picture, but there was always a significant improvment in the number of colors.
A problem came up, though, in the apparent detail (even at actual pixel view), which was the same regardless of which source was scanned. It didn't take long to realize that in a 24 bit scan (which was chosen because that's what most home users would probably select), there are only 8 bits, or a maximum of only 256 possible values available for luminance. That's just not enough range to capture the difference between a print and film. Our eyes are more sensitive to light change than color change (the basis of jpeg compression), so in reality there is little or no visible difference in detail whether you scan film or (a good) print if you're scanning at 24 bit.
There is, however, a distinct difference in the color range, even at 24 bits. Film (slide or negative) is measurably better.
At this point, I plan on re-scanning at 48 bits. As a guess, 16 bits for luminance should be enough to differentiate film scans from print scans, but I won't know for sure until I do some more testing. Either way, it doesn't seem probable that the home user is likely to scan at 48 bit, so it's more an academic exercise than a practical one.
When my testing is done, I will post pictures scanned from both film and print, but from the experiments I've already done, just converting to jpeg drops much more colors in a film scan than in a print scan. Once converted to jpeg (at maximum quality) the color range difference between them drops to ~5% to ~10% (from ~30% to ~60%). With virtually the same luminosity range, and minimized color range difference, posted jpegs aren't going to really tell the whole story. -
If you're sick of reading text, and just want to see some pictures which were scanned on a flat bed scanner, skip down to my next post.
I'm going to jump right to the conclusion part, and omit all the technobabble that led up to this conclusion:
While the luminance range in 24 bit images is limited for human vision, it's all current (and near future) technology can deal with. It's more than needed for a print, and comes close to the capabilities of the best consumer monitors available. We use 24 bit because it's best suited for the times we live in.
Something that I learned from my tests, and haven't seen mentioned anywhere before, is that 24 bits is more than capable of storing the color range present in any photograph I've tried, whether from a scan or from the lastest dslr. Of the 16,777,216 possible colors, I have yet to see a photograph that had more than about 1,300,000 unique colors.
For reference purposes, the worst case scenario image I posted earlier has 79,009 unique colors and 229 gray tones. The full sized version of that image (before resizing and jpeg compression) has 814,174 unique colors and 229 gray tones.
The only reasonable use of 48 bit I found was as source material for controlled tone mapping into 24 bit, which can increase the true tonal range in a 24 bit image (in the highlights and shadows), but is unlikely to be of much, if any, use to the average person who just wants to scan (digitize/preserve) their family photos. -
I took a 35 mm slr (loaded with film I got at my local drugstore) down to the strip today, took some pictures, and had the same local drugstore develop the film and make the prints. The idea was to (as close as possible) mimic the source material the average person is going to be scanning, and hopefully give everyone a better idea of what general results they can expect from using a flat bed scanner for their purposes. The pictures below are straight out of the scanner with no extra processing.

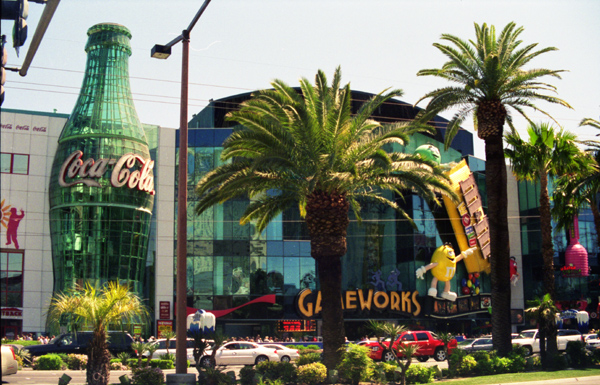


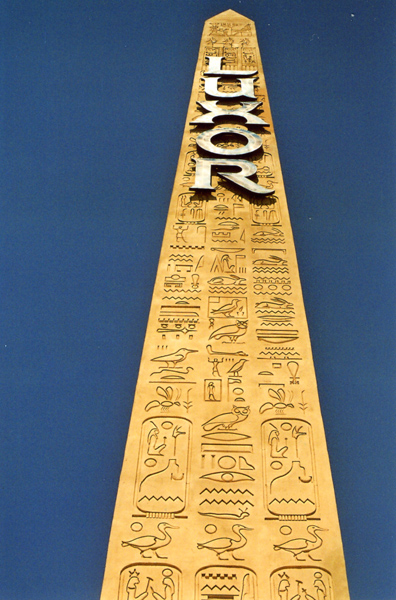
-
Just so you know, those specks in the photos aren't on the negatives...they're in the negatives. I can't say for sure whether the film was defective, or the local drugstore was incompetent. Either way, I'm glad I only shoot digital now.
Edit:
When I said "The pictures...are straight out of the scanner with no extra processing" I meant other than resizing and converting to jpeg (so they are web friendly). -
Wow! Great experiment and information on what the average user can expect Vegas Bud. My experience on the 48bit to 24bit converstion are the same as yours. I scan in 48bit when the material is 'trickier' so that I have greater control in editing for printing later on.
The white specs you ared seeing in the slide film are more than likely dust that fell onto the film froma inside the camera or from the felt edge of the film cartridge. It is bits of film that are not exposed hence showing as white in the slide (it's black on negatives). The other possibility is that the particles in the in the chemistry flecked off bits of the film emulsion during developing or emulsion was flecked off during handling at the lab, or defect in manufacturing of the film. That's fairly unlikely but is possible.
My wife was looking over my shoulder as I was reading you recent posts and NOW she wants to go to Vegas. Thanks!
Great job!
--dES"You can observe a lot by watching." - Yogi Bera
http://www.areturningadultstudent.com -
You're confusing gamut with precision. The gamut may be the same with 8, 12, or 16 bits per primary but the precision increases (in theory at least, many inexpensive devices will claim more bits of precision but all you get is noise in those extra bits).Originally Posted by VegasBud
Take a dark area in one of your film scans. Brighten and contrast stretch it to bring out details. If your scanner really supplies more precision you will be able to see more details in those shadows with 12 or 16 scans. The same may not be true of the photo scans. The photos may have crushed all detail in those dark areas -- ie, everything there is full black.
This is important when dealing with old faded film or photographs. Say all the blue is nearly gone. An 8 bit scan may only show 16 different levels between the darkest and lightest blues. A good 12 bit scan may show 256 different levels between the same darkest and lightest blues. If you perform a color correction to restore the original unfaded colors the 8 bit scan will show much more posterization than the 12 bit scan. -
Video Restorer
- Jun 2003
- dFAQ.us/lordsmurf
-
It's impossible to see the quality of a photo at web size.
I agree that scanning at highest bit can be helpful for important images, but you will often need to down-sample back to 8-bit (RGB 24-bit) for it to be printed either at home or at a non-pro lab. The images will be huge, and will often require special pro software (such as Photoshop CS3 Extended).
That's another aspect: CMYK vs RGB. Some printers actually handle the RGB conversion better, even though the print itself is CMYK inks or toner. Go figure.Want my help? Ask here! (not via PM!)
FAQs: Best Blank Discs • Best TBCs • Best VCRs for capture • Restore VHS -
Good point. I suspect the printer manufacturers did this out of self defense. Most consumer graphics software doesn't even have the ability to work with CMYK based files. That is true even with Photoshop Elements. You have to use Photoshop itself to work with CMYK files. The printer manufacturers have to provide product for the market as it is.Originally Posted by lordsmurf
Conversion from RGB to CMYK damages color accuracy. I imagine that the printer manufacturers have spent a lot of effort to optimize the conversion in their drivers to insure that it done optimally. Even Photoshop damages color when converting from RGB to CMYK. This is particularly true with multiple layer files with opacity adjustment and other effects. Actually the last chance to do it right is when a new file is created. If you want the file to be CMYK, it should be set as a property when the file is created. Otherwise it is probably better to let the printer driver convert it; it will probably do a better job at the conversion. -
Color bit depth is a confusing topic, so much depends on probable current and future use of the images. I know several photographers for newspapers/magazines who call me every week pulling their hair out because their systems bog down trying to process "camera raw" images or "scanner raw" scans. No amount of argument will dissuade them from the notion "more bits is better" even though the final published result will look like it was done on a Fisher Price Play Press anyway. I agree its a good idea to save initial scans at the highest bit depth possible, assuming you have the storage capacity, but most consumers will want to reduce to 8-bit working files for convenient manipulation and printing day-to-day at home.
Kudos to VegasBud for running a variety of flatbed tests using real-world images, I'm sure this is very helpful info to those considering the cheaper flatbed options. 8) -
Dust in the camera will be result in black whether slide or negative film is used. Either way light is blocked from hitting the film. That results in a light spot on a negative which becomes dark on the print or a dark spot on transparency after the reversal step.Originally Posted by Des
The second guess is most likely cause. Using clogged filters, scummy stabilizer, inadequate washing, or crud in the super stabilizer(film is often not washed these days, saves on plumbing). Wherever it came from it had to come before it was dried or it wouldn't appear to be in the negative.
Rewashing and then stabilizing may remove the mark.
Ethelred -
Video Restorer
- Jun 2003
- dFAQ.us/lordsmurf
-
I've never liked re-washing film.
Want my help? Ask here! (not via PM!)
FAQs: Best Blank Discs • Best TBCs • Best VCRs for capture • Restore VHS -
Not thrilled with it either. But it does fix a few problems. Like if one drop on the film takes much longer to dry it makes a divot in the emulsion, which scatters the light. I have a trick that takes care of it in a hurry but I like it much less than rewashing or restablizing in clean fresh stabilizer which usually is enough.I've never liked re-washing film.
The trick is to soak a cotton swap in isopropyl alcohol, ethanol does not work, wet the emulsion of the frame in question and let it dry. It works most of the time and restabilizing is not needed. I think isopropyl works because its a bent molecule unlike ethanol. That's using both chemicals at about the same strength, 90%.
Ethelred -
You are, of course, correct. I forgot about the fact that it is reversal film. 'White our fault, black their fault,' was what a lab manager used to remind everyone.Originally Posted by Ethlred
If the film is going through a card transport type machine, where the film is taped in pairs to a card that is then pulled through the machine, then it is possible the rollers have 'gunk' built up on them that has flecked off bits of the emulsion.
Too hard to tell really what is going on without seeing the slide itself.
Agree about re-washing and also using isopropyl.
--dES"You can observe a lot by watching." - Yogi Bera
http://www.areturningadultstudent.com -
jagabo,
Just as I finished the much longer post, I realized that "You're confusing gamut with precision" was perhaps tied to the semantic implications of "represent" versus "reproduce", and the longer post might be replaced by something as simple as "To store an image in a file, colors are represented by numbers, but just because any color can be represented doesn't mean any color can be reproduced". On the other hand, being concise is probably what led to our seemingly different viewpoints in the first place, so I'm including the longer post below, to hopefully cover all the bases. Besides, the longer version might contain bits of information that someone could use.
Here's the longer post:
The excerpt you quoted is an offshoot of, and connected to, the idea started in the previous paragraph, so it's best to consider them together. Their purpose is to concisely convey information in a manner that is most easily understood by a likely reader of this thread...someone whose goal is the most effective and efficient digitizing (and preservation) of their home photos. If you feel my presentation of the idea was inaccurate, I'll try again, this time using more words.
<begin "more words" version>
The first paragraph concerns two factors and how they interact:
24 bit representations of color are based (most commonly) on 3 channels, each representing one of the primary additive colors (red, green, and blue). The 24 bits are equally divided, with 8 bits used for each color channel. The 8 bits can represent a range of integer values from 0 to 255, so there are 256 possible values (each) for red, for green, or for blue. All possible combinations of channel bit values is 256 cubed, or 16,777,216 possible values (which represent colors) for 24 bits. While that limits the colors available, the limited luminance levels (which can not exceed the value range in a single color channel) have a relatively larger impact on how an image is perceived by a viewer. To demonstrate that principle, show someone an image in Lab color with all 3 channels active so they have a reference image in their mind. Then disable the a and b channels, leaving only the lightness channel, and the viewer still recognizes the image. Disable the lightness channel, re-enable both the a and b channels, and the viewer (in most circumstances) sees only a very crude representation of the image (if it's recognizable at all).
Computer monitors, as they currently exist, are 24 bit (or less) devices, which is why their specifications always list "Display Colors" as being no more than "16.7 million colors". When the "Display Colors" go to "281,475 trillion colors", it will signal that monitors have become 48 bit devices (don't hold your breath).
There's an obvious match between 24 bit representations of color and 24 bit output devices (monitors), but what happens when you try to display 48 bit on a monitor? The 48 bit tonal range is compressed (technically, it's tonemapped) to 24 bit, with varying degrees of perceived loss depending on the process used. You can see a 24 bit image, you can't see a 48 bit image (just a 24 bit approximation of it).
The second paragraph is just meant to convey that photographs only use a small amount of the color range available in 24 bit representations. Even when using using a 48 bit scan, and carefully tonemapping it into 24 bits (which truly increases, not stretches, the tonal range), the range used is a small part of the available range.
<end "more words" version>
I don't believe so...but if I actually was confused, how would I know if the level of my confusion wasn't confusing me as to the existence of the initial confusion? I'm always willing to learn something new, so I've included (below) my interpretation of those terms, to help you determine, if there is confusion, where it lies.You're confusing gamut with precision.
---------
I very much doubt it's the official definition, but from my viewpoint, gamut expresses (maybe "defines" is better...I can't decide) a range of colors which has been limited by the logical construct it applies to (color models, color spaces, input or output devices, etc.). The gamut remains the same as long as you stay within the construct it applies to, but changing from one construct to another requires conversion (or translation). Using the scans that I posted as an example...the film has a gamut, the scanner has a gamut, the minimal processing I did was done in sRGB (which has its' own gamut), and finally there is the display gamut. A series of gamuts were involved, yet whether I thought about gamuts, or not, the process would have remained the same, as would the end result. In scanning, and much of what I do (photography related), the process used is determined by other factors, and gamut is an added level of abstraction that doesn't help me much.
---------
In order to represent a range of colors as a finite number of bits, each bit value (and combination of bit values) represents one (and only one) color with absolute accuracy, plus a range of other colors which, while not exactly matching that bit value, are better represented by that bit value than any other. Within that range, some colors are closer to the bit value than others, which creates a variable loss of accuracy, with the greatest loss being at the ends of the range assigned to that bit.
By increasing the number of bits used, more colors are represented with absolute accuracy, but just as important is that the range of "close but no cigar" colors represented by a bit value is reduced by eliminating the colors from the outer ends of the range (which are the least well represented by that bit value). There is, however, no number of bits at which the representation becomes entirely accurate. That's one of the reasons I said (earlier in this thread) "everything is relative, and nothing is perfect".
---------
Finally, as to:
When my initial scans were converted to grayscale, and the unique colors (grayscale tones) counted, a 48 bit scan had at least 80 times the number of tones as the 24 bit scan of the same negative (24 bit ~250 tones vs 48 bit more than 20,000 tones). Of course, that was only using this one scanner, and results varied from one negative to the next, but there did appear to be a consistent (and substantial) increase. Unfortunately, even careful tonemapping to 24 bit still results in no more than 256 levels, so the benefit is minimized, but every little bit can help in restoration. Originally, I wanted to do the same test with the colors intact, but current computers just can't handle the number of possible unique colors with 48 bit. Logically, the unique colors also increase, but without a unique color count, it can't be measured....you will be able to see more details in those shadows with 12 or 16 scans. -
In invesitgating whether the test scans Vegas Bud presented were as good as the film scan, he privatley told me at this level of presentation they were the same.Originally Posted by VegasBud
I have decided to purchase a v500 Epson versus a 4490 to scan my archive of 35mm film. I had considered some dedicated Minolta and Nikon coolscan scanners, but decided it was probably overkill based on the extremely high quality they produce, and that they may be slower for processing large quantities . The discussions here are useful to get an idea of others experiences and expectations.
My vote for a V500 is primarily based on its reduced time for an ICE scan. Otherwise the units present almost identical scanning specifications. Yes, the LEDs in the v500 and/or ICE may make the image softer, but the time required if ICE is used is very important for me. I have spent hours digitally removing dust specs from some scanned images and I expect dust and small scrathes on some of my film, even if I attempt to blow them off with an air cansiter. I am pretty sure that there are some improvements in ICE on the V500 as discuced below.....I guess I'll see !
Here is some info I rec'd From Vegas and further information about comparisons of the two units. Note that Epson is running a special online deal on refurbished v500 units pricing them at 149$ including free shipping and no tax - see discussion below.
VegasBud wrote:
jed7786,
I've tried Digital ICE on several scanners, but it's not my cup of tea. The idea sounds good, but in practice it seems to "soften" or "blur" the image too much for my taste.
In the user's manual for the 4490, it directly says "Images scanned with Digital ICE may appear softer than your original image". Personally, I think the word "will" should replace the word "may" in that sentence. I checked the v500 manual, and that sentence is not included, so maybe they worked the kinks out of the system.
Also, turning on Digital ICE definitely takes longer for a scan. Currently the only scanner I have is the 4490 (I've already scanned all my negatives years ago), but if you're interested, I could find out the exact scan time difference on this particular scanner. The specific numbers would be different for a different scanner, but the relative speeds probably don't change all that much, so you would at least have a general idea of the impact on your workflow. Let me know if you're interested.
My reply to VegaBud
I think that they may have improved the ICE hardware/software between units:
What I could find about scan times of the two units suggests the V500 is faster in automatic mode with digital ICE. This may only be because the lamp warm up time is minimal but the large difference suggests that something in the V500 is improved for ICE. Comparisons from PCmag reviews:
http://www.pcmag.com/article2/0,2817,2213396,00.asp dated 11/07/07
v500:
"Scanning slides in advanced mode at 2,400 ppi took 27 seconds for the prescan and 48 seconds for the scan.
Digital ICE on the slides bumped the scan time up to 2 minutes 32 seconds."
http://www.pcmag.com/article2/0,2817,1865047,00.asp dated 9/21/05
4490:
"Scanning slides at 2,400 ppi took 53 seconds without Digital ICE, and 5 minutes 18 seconds with it."
Most of the other base specs are similair, aisde from the warm up time of the lamp in the 4490. However in the referbed units sold by Epson there is a curious statements for the 4490 that suggests the software may not be the latest software sold. I suspect the ICE software may have been improved in the v500.
4490: refurb unit now costs $109 incl shipping
http://www.epson.com/cgi-bin/Store/consumer/consDetail.jsp?BV_Use ... d=63060806
"This unit may not include the same software as new models."
v500: referb unit now costs $149 incl shipping
No disclaimers about the software
I find it surprising that the MTBF for the two units are the same 36000 hrs eventhough the V500 has LEDs. This means that failure is probably due to mechamical causes !
I believe the Epson deals on refurbished units end June 12th. -
NOTE EPSON FACTORY SALE ON REFURBISHED 4490 AND V500 - 109$ and 149$
http://www.epson.com/cgi-bin/Store/consumer/consDetail.jsp?BV_UseBVCookie=yes&oid=63060806
http://www.epson.com/cgi-bin/Store/consumer/consDetail.jsp?BV_UseBVCookie=yes&infoType...egory=Products -
I received the v500 Epson today. Here is my preliminary findings.
Does great on automatic scanning mode for photos, and the color restore feature works very nicely - saves ALOT of time !
Scanning of the negatives was nice especially how the unit automatically recognized and separates each 35mm frame and presents them as a thumbnail which can each be processed serially or differently.
One problem I had was some white specs on the film - probably not dust per say but some crude that was on the film prior to exposure. Using ICS or the dust removal tool had no effect on these. -
jed7786,
I'm happy to hear you're pleased with the results you're getting.
Have you tried scanning with/without DICE to establish the relative scan time difference, and compare the scans for potential softening of the entire image? If so, I would be interested in your findings. -
Hi,
Hoping for some advice.
I have only prints (no negatives or slides). I have tons in old family albums. So if all I want to scan are prints, would buying a scanner model such as the v500 be overkill? As has been mentioned, but not sure if I am understanding properly - prints don't many pixels to scan to start with - so I wouldn't be able to use full potential of a scanner like the v500 anyway right?
So i guess I am after some confirmation that the v330 would yield the same results as the v500 when scanning prints.
If however, the v500 would scan prints in better for whatever reason, I might just spend the extra $150 and get that one instead.
v330 = OPTICAL RESOLUTION Main 4800 dpi x Sub 9600 dpi
http://www.epson.com.au/products/scanner/perfectionv330photo_specs.asp
v500 = OPTICAL RESOLUTION Main: 6400 dpi x 9600 dpi
http://www.epson.com.au/products/scanner/perfectionv500photo_specs.asp
Hope someone can help
 Quote
Quote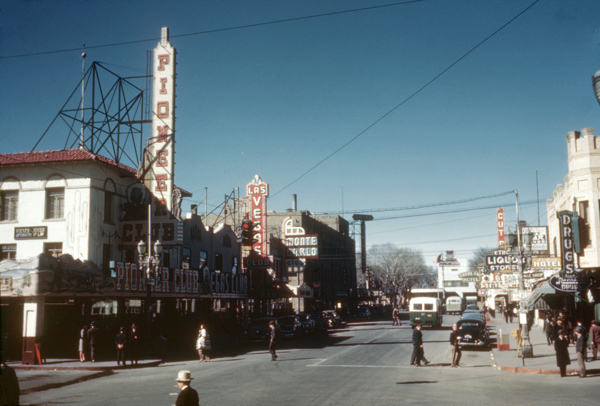
Similar Threads
-
What Format For Scanning?
By abrogard in forum Video ConversionReplies: 0Last Post: 10th Feb 2012, 18:15 -
Scanning photos
By didikai in forum Newbie / General discussionsReplies: 49Last Post: 27th Sep 2009, 17:55 -
document scanning
By alintatoc in forum ComputerReplies: 4Last Post: 10th Oct 2008, 08:20 -
Scanning photos
By didikai in forum Newbie / General discussionsReplies: 2Last Post: 7th Apr 2008, 09:19 -
Scanning 35mm slides?
By videobread in forum ComputerReplies: 1Last Post: 7th Sep 2007, 12:45