


1GB to 4GB each
9800GT, 7600GT, ATI-9550
Canopus ADVC-100, HVR-1600, ATI 550/650, PVR-350, ...
Philips 5992, Pioneer DV-363, JVC, Sony various
LG D787, Lite-On, Ony, various
Pioneer 111D, Sony BX-37 Blu-Ray
LG-BH10LS30 Blu-Ray Burner
GigaByte (2), VIA, Asus
1 Mac/FCE, 2 DV/HDV PC edit stations Sony Vegas Pro 11, Platinum 10, Premiere Pro, plus others")
dv2.jpg looks good for black and white. Color balance on the refrigerator looks reasonable. The ZR-40 did well with good light.

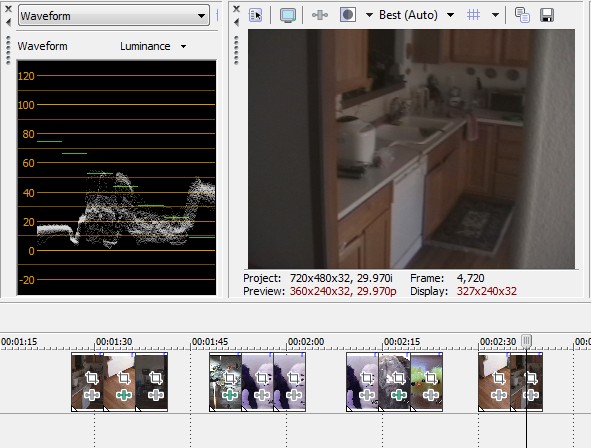
The dv1.jpg shot shows good black but the camera lacked the lens speed or gain range to reach full contrast. In other words, it didn't have enough light.
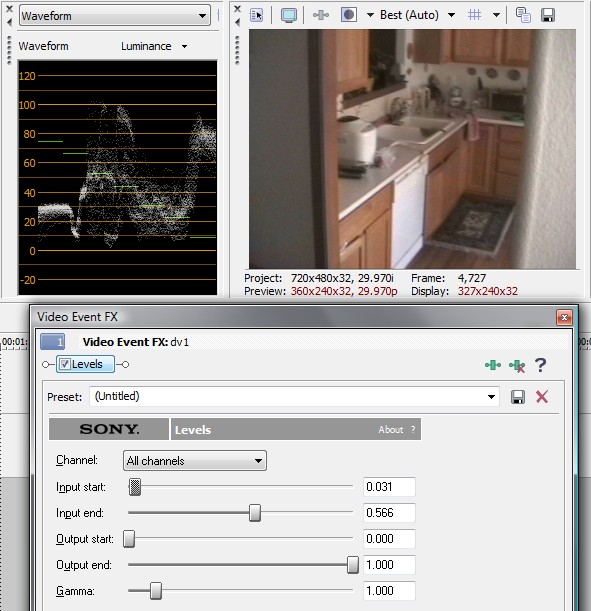
You can play with filters to increase contrast. As you do, noise will be amplified as well. After you get levels correct, you can attempt noise reduction. Here is the levels filter result. I got a good white and black.
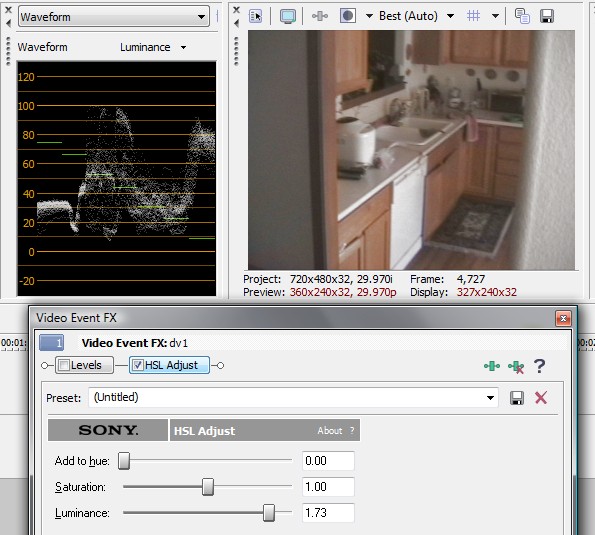
Here I attempted the same with the HSL (Hue-Saturation-Luminance) filter. Luminance sets contrast but this filter lacks a control for black level.
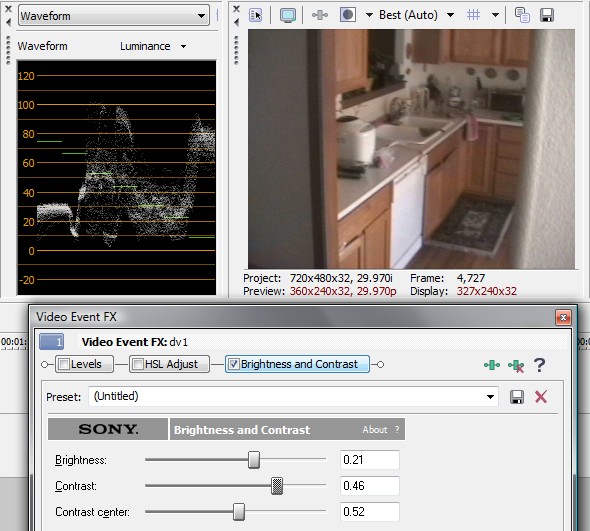
Here I used the Brightness and Contrast filter. This got a similar result to the Levels filter. This filter lacks a gamma adjustment.
Not all frames have full black or full white in the frame. You make these adjustments using context. Some frame in the segment probably has a black or white reference that you can use to set the full segment level.
You make these adjustments while watching the TV monitor. The waveform monitor is useful for a different view and to keep the levels "legal".
Note that all adjustments above were to luminance only. You will find that 80% of getting the picture to look right comes from adjusting black, contrast and gamma. Luminance should be optimized first. After that color correction (white balance and individual colors) will take it the rest of the way.
+ Reply to Thread
Results 31 to 60 of 62
-
Recommends: Kiva.org - Loans that change lives.
http://www.kiva.org/about -
edDV, thanks so much!
It's hard for me to understand the filters and levels without actually getting to experiment with them. Even after watching that JVC tutorial, I still feel a bit overwhelmed.
I have the levels FX, and piddled with it a bit. Setting the input start to something > 0 makes the black blacker, which I guess is nice. I think it would be more useful for me to see the vectorscope change at the same time, but according to this page, vectorscope is Pro-only.
I definitely like the "set and forget" idea. All 60 hours of footage were created with the same standard 8mm camcorder, so I'm hoping to be able to apply the same tweaks to all of it.Once you get the TV set to the reference bar, you don't touch these controls again for the session. You only adjust the filters.
Or, do you end up applying effects to each scene? (or even segments within a scene)? Are there some effects which can be applied to entire tapes, and others which should only be applied in "hot spots" (like where the camera transitions to/from an area with low light)?
Also, do you know of any free plugins or applications which give me the same features as vectorscope? Or is Vegas Pro's implementation the best way to go? -
edDV, I just saw this 2nd page of the post, along with your other correction examples. Great stuff!
I see that you used the Levels, HSL Adjust, and Brightness and Contrast FX to make the corrections. Movie Studio has all three of those FX. So, in theory, I can apply all of the corrections that you're recommending. I would just have to do them by "feel" rather than analytically, since I don't have vectorscope.
I'm not sure how much I should trust my "feel", since I am so new to video editing. I suppose at the very least I should calibrate my TV settings so that it looks representative of other TVs.
Aside: When I first started digitizing audio (a decade ago), I spent a lot of time applying noise reduction to each song. I ended up applying too much, making things sound "swishy", probably because I inadvertently trained my ears to be more accustomed to digital artifacts than analog hiss. In words, my "feel" was off. Nowadays, I don't bother with noise reduction, mostly because I prefer to work quickly, but also because I don't trust my "feel".
As for upgrading, I think I will wait until Vegas 9 comes out. Then, I'll see how the reviews are, and if Vegas Pro 9 a promising investment. And who knows, maybe vectorscope will be available for Movie Studio 9? -
I'm working on editing the video for one of my analog tapes (captured via the ZR40). On the TV, most of the video looks reddish. On the PC it looks more realistic (though darker). I'd like to apply FX to the entire track, so I want to be relatively conservative.
Which do you think is the best approach:
a) color balance - reduce red
b) color balance -add green and/or blue
c) hue - make it more greenish
d) saturation - reduce
e) brightness - reduce
f) levels - increase input start
g) something else?
Also, I'm notice that often when I turned off the power to the camcorder and then started taping again, there's a burst of static about 1 second after the tape starts. It's not 100% consistent, but it's often enough for me to have to watch each tape in order to find the static.
Is there a way to search for static within a track? -
I just looked at the original source material on the same TV. It's reddish too. So I think I'm gonna leave it alone, at least for now.
I noticed also that when I apply color correction, the resolution gets slightly worse on the monitoring TV. So I'm guessing any time we apply any video effects, it degrades the overall image. Since my source material is low-res to begin with (standard 8mm video), I want as little degradation as possible, which means no color correction. For now, at least. Maybe in a second pass.
My first priority is to get DVD copies which are as faithful as possible to the original footage, warts and all. It seems like to do that I need to:
a) minimize compression (so, no more than 60-80 minutes per DVD)
b) avoid color correction
I also want to have Vegas output the MPEG-2 files, rather than output .avi which DVD Architect then has to convert to MPEG-2, right? -
Okay, forget colors for now. When I expand Vegas' previous pane to almost full screen (anyone know how to make it fullscreen?), I can see pixelation in it. It's most noticeable when there's horizontal lines; they become jagged and "unstable". So, horizons look wobbly.
I just plugged my DV camcorder into my TV. When I play my MiniDV tape, I can see pixels, but they are much smaller than the ones I see on my computer. Even when I am playing copies of standard 8mm (recorded on MiniDV), the pixels seem smaller.
So if the camcorder is capable of recording small pixels, why do my digital captures on the PC have big pixels?
I can think of 2 possible sources of pixelation:
1) WinDV
2) my use of pass-through instead of recording to MiniDV and then transfering to PC
So my next test is going to be recording the same footage I've been testing to MiniDV, and then capturing/transferring it via WinDV. Then I can see if the pixels are small or big.
If the pixels are big, then pass-through isn't hurting, and the problem is with WinDV (or firewire). If the pixels are small, then I will need to do all my capturing to MiniDV before transferring to the PC.
Does that sound logical? Am I missing a possible source of pixelation? -
I don't think there's anything wrong with your DV AVI caps.
First let's make sure you understand interlaced video.
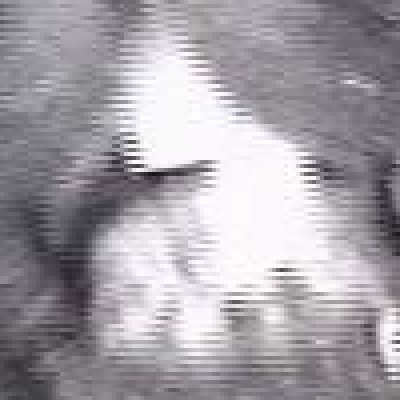
Each frame of interlaced video contains two separate half pictures. In interlaced NTSC video these half pictures were taken at 1/60 second intervals. Using one of your sample frames from an earlier post:
One half picture is contained in all the even numbered scanlines, the other in all the odd numbered scanlines. These half pictures are called fields.
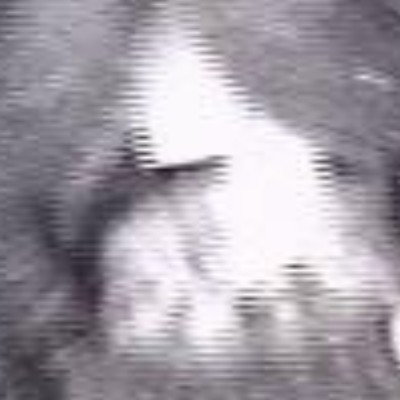
When you watch this on an interlaced TV you see only one of these half pictures at a time, like in the GIF picture above but faster and not as much flicker. But when you watch on a progressive computer monitor you see both fields at the same time (unless the playback software is deinterlacing). Anywhere there is motion you will see comb artifacts (4x nearest neighbor enlargment of the animals teeth):
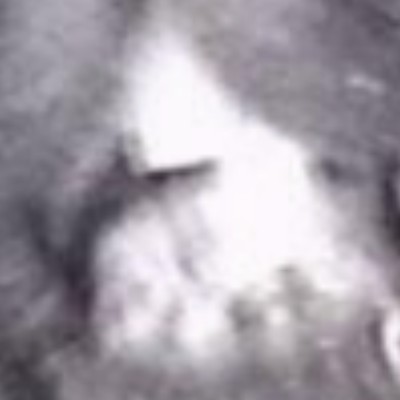
Note that different editors/players may use different enlarging methods to display enlarged frames (4x bilinear resize):
They might also deinterlace to hide the comb artifacts. Here's a blend deinterlace enlarged 4x with a bilinear filter (note the double exposure look):
If you are seeing artifacts like this on your TV after making a DVD you did something wrong in the processing. -
I don't think it's interlacing that I see.
I see the same blockiness when I play the DVD on my PC.
Here's a screen grab:
http://tripalot.com/issues/images/20080708-capture-blocky.gif
It's a GIF, so the colors are bad, but the blockiness (pixelation) is the same as what I'm seeing on the HDTV, although on the HDTV it's much more noticeable. I've highlighted 3 areas:
1) jagged line - the lamp post's thin shadow looks jagged
2) blocky - see how regular the block widths are? On my HDTV they are about 2/3 of a centimeter wide, and go across the whole screen.
3) noisy artifacts - not too worried about them, since it's more of a coloring issue
Is this making sense? Can you see the regularly spaced blocks (vertical columns), especially on the left?
I do not see those blocks when I view the DV camcorder, just when I view DVDs. They do, however, also appear in the AVI that I capture from the DV camcorder to the PC. So encoding is not the culprit. It has something to do with the camcorder, the firewire, or WinDV. -
The "jagged line" is caused by a drop-field deinterlace. The program has thrown out one field and resized what's left. This is probably only done by the software to preview the video on the computer monitor. Some deinterlacing methods: https://forum.videohelp.com/topic230828.html#985755
The "noisy artifacts" are a combination of problems. The bright halo around the pole is from over sharpening (maybe in the analog camcorder, maybe in the digital camcorder, maybe in the enlargement filter of the software). The random noise in areas with sharp edges is typical of DCT compression ringing (aka, mosquito noise). The latter is unavoidable with any DCT compression codec (DV, MPEG, etc).
The "blocky" artifacts are a combination of DCT macroblocking exacerbated by the drop field deinterlace. A small amount of DCT macroblocking is unavoidable with DV. Also, the 4:1:1 color subsampling used by DV can result in vertical stripes if the chroma samples are duplicated rather than interplated on conversion to RGB. I don't think that's the issue here since the image is rather monochromatic. But it can be visible with smooth color transitions across a frame. There's a few year old thread around here somewhere that discusses the problem and has some example images.
An enlarged screen cap from your editor or a media player isn't the best way to prepare a sample. The image was reduced to 256 colors (causing posterization artifacts) and it's hard to tell what problems were in the original image and what may have been caused by the enlarging algorithm. You're not running Windows in 256 colors are you? If so, switch to 24 or 32 bit truecolor.
I recommend you use VirtualDubMod's Video -> Snapshot Output Frame and save as PNG. That will give you a lossless pixel-for-pixel image so we can see exactly what is in the file. Or use VirtualDub and it's Video -> Copy Input Frame To Clipboard function, paste into an image editor, and save as PNG. Maybe Vegas has something similar. If you have to save as JPG use a high quality setting. -
don't forget your 8mm cam only produced 200~240 lines of resolution on a good day when it was new. you are now playing it on a tv with 1080 lines or a computer monitor with about the same. there just isn't enough video data in there to make it look good at hd res.
you are basically taking a small pixel and blowing it up to about 16 times it's intended size in square area. jaggies and blocking are the result, like enlarging up a jpeg picture too much.
ps - think of how small the lcd on the camera is....no enlargement needed there, so of course the video looks better on that screen.--
"a lot of people are better dead" - prisoner KSC2-303 -
My monitor is displaying 32 bits. The GIF watered down the colors. I used GIF instead of JPEG because I wanted to get accurate lines (rather than accurate colors).You're not running Windows in 256 colors are you?
Here a PNG (different frame, though):
http://tripalot.com/issues/images/20080708-capture-blocky-2.png
Does it seem like what I'm getting is typical, and therefore unavoidable?A small amount of DCT macroblocking is unavoidable with DV.
(I don't mind if you say "yes" because that means I can stop trying the impossible and get on with the fun part, which is editing the videos. However, if there are things I can do to reduce the blockiness, I'd rather learn about them now than after I invest a lot of time and disk space on captures.)
I appreciate all the help! -
That's better but one field has still been thrown out and the remaining field upscaled.Originally Posted by tripecac
No. I think it is made worse by the drop field deinterlace.Originally Posted by tripecac
The drop field deinterlace was probably only done to display the interalced DV on the computer monitor. The actual DV frame doesn't look like that.Originally Posted by tripecac -
for video shot through a moving car window with an 8mm cam 10 years ago, i wouldn't be unhappy with the result. not up to current broadcast standards but then again it wasn't 10 years ago either. relax, make some movies and have fun showing them.
--
"a lot of people are better dead" - prisoner KSC2-303 -
I went the Digital8 camcorder route, so there is one thing I want to mention that you gain by using a Digital8 camcorder is you get your Time and Date codes, that is embeded within your Hi8 video, included in the DV files. And to me, the analog video that I saved to DV, is actually better than the native Digital8 video (analog has less noise).
I bought mine several years ago, but if I had to do it over again. I'd borrowed a Digital8 (or temporarily bought one), and dumped my Hi8 tapes to my computer using the DV format. Then bought a MiniDV camera, and then copied the DV files back to the new MiniDV camera onto MiniDV tapes. Cause now I'm stuck with a Digital8 camera.
On the other hand, I skipped MiniDV, cause now I'm going straight to flash memory. -
Okay here's another PNG, this time using Vegas' "copy to clipboard" feature in the preview window:but one field has still been thrown out and the remaining field upscaled.
http://tripalot.com/issues/images/20080709-capture-blocky-3.png
I see the horizontal lines this time.
The previous 2 screen grabs were straight from the AVI that was captured. I played the AVI in Windows Media Player and then did a PrintScreen to copy to the clipboard. I then pasted into Fireworks. Did the deinterlacing happen:I think it is made worse by the drop field deinterlace.
a) on the DV camcorder
b) in WinDV
c) in Windows Media Player
d) in Fireworks
?
That's my goal! I'm just hoping to get to a point where I feel like any more testing and tweaking is a waste of time. Right now I still feel like there's still a chance of improving the capture quality. Until I lose all hope, I'm sort of stuck in "try to fix it" mode.relax, make some movies and have fun showing them.
Did the Digital8 camera do a good job of the analog-to-digital conversion? Do you think that's a higher quality route than recording from Hi8 camcorder to MiniDV camcorder? Or would there still be the pixelation issue?I went the Digital8 camcorder route -
It happens in Microsoft's DV decoder and WMP. People don't understand interlace comb artifacts so Microsoft hides them.Originally Posted by tripecac
The Vegas "copy to clipboard" PNG looks good. The blocky artifacts in the lower left are a normal part of interlaced video. Remember, there are two separate half pictures (fields) in each frame. When the two fields are separated the missing scanlines in each field must be replaced with something. Programs will either duplicate the existing scanlines or interpolate between them. Here's a crop from a frame of interlaced video:

As they would be seen on in interlaced TV, one after the other (note that the missing scanlines of each field have been replace with empty black lines):

Notice how the sharpest white line is missing several segments. This is because those segments appeared on the scanlines that were not included in that field, they were not recorded. The less sharp lines have a stair stepped appearance because some of their data is missing. If you were watching this at 60 fields per second on a TV the white lines would flicker badly.
When deinterlaced with a simple interpolation on a computer and displayed one after the other:

The missing segments of the sharp white line can't be restored at all and the less sharp lines have taken on a very jagged appearance. This is what's causing the blocky artifacts in the lower left hand portion of your sample image. The angle of the wall, the motion between fields, the motion blur, and the interlacing all combine to make the blocks.
The horizontal oversharpening is in the VCR or DV camcorder. If the VCR has a sharpness control you might try turning it down a little. Of course, the picture won't be as sharp if you do that.
The DV AVI should be encoded as interlaced, bottom field first, MPEG2 and authored as interlaced video on DVD. At 8000 kbps the result should be nearly indistinguishable from the DV on a TV. -
Does this mean I will not be able to get rid of them?The blocky artifacts in the lower left are a normal part of interlaced video.
The "VCR" in my case is a Hi8 camcorder. I don't see mention of sharpness controls in its manual.If the VCR has a sharpness control you might try turning it down a little.
According to gspot, it's:The DV AVI should be encoded as interlaced, bottom field first, MPEG2
- DV Type 2 AVI
- Multipart OpenDML AVI (2 parts)
- (15580 frames in first part, 0 frames follow)
- codec: dvsd (DVC/DV Video)
- audio: PCM Audio, 32000 Hz
- kbps: 27827
- Qf: 2.687
- pics/s: 29.970
- frames/s: 29.970
- Fields/s: 59.940
- I/L (interlaced)
- BFF (bottom field first)
- NTSC, 720x480, 4:3
- is there any other info you want?
I don't see mention of MPEG2 in the DV-AVI file's stats.
Yes, I'm pretty sure this is what I'm doing.authored as interlaced video on DVD. -
Do you think the blockiness and interlacing artifacts (as seen in my screen grabs) are unavoidable, given the low resolution of my source material (standard 8mm), particularly when viewed on an HDTV?
(If I were just viewing the DVDs on my standard TV, I doubt if I would ever notice digital artifacts). -
A little off topic, but I notice that your DV-AVI file has 32000Hz audio, which will have to be converted for DVD. You should be able to change this in the D8 camcorder to use 48000Hz audio, (the DVD standard).
"Shut up Wesley!" -- Captain Jean-Luc Picard
Buy My Books -
I meant your DV AVI should be converted to interlaced bottom field first MPEG2 and then authored to DVD. Around here conversion to MPEG2 and authoring are often considered separate steps. Vegas Movie Studio probably does this all in one step.
The blockiness you are seeing is a combination of the nature interlaced video, the nature of that particular video, and the deinterlacing technique used by WMP to display it. The WMP issue is immaterial when making a DVD. There is nothing you can do about the first two -- what you do care about when making a DVD.
The final DVD should not look much different than the original hi8 tape when played on the same TV via the same type of connection (which I guess is s-video or composite). If it does look significantly different there is something wrong with the process. But up through the point where you have captured the DV AVI file on your computer everything is fine. The DV AVI is fine. Any problems are occurring after that. -
The DV AVI has the same blocks that I notice on the DVDs. To me, this indicates that the blocks were introduced in the DV AVI. How could the later steps (like encoding) get rid of the blockiness? Once information is lost (watered down into blocks), it's gone forever, right?The DV AVI is fine. Any problems are occurring after that.
-
Yeah, that was weird. I just tried another capture (this time a pass-through) and it was 48000 Hz.but I notice that your DV-AVI file has 32000Hz audio
Do you convert to MPEG2 before or after editing?I meant your DV AVI should be converted to interlaced bottom field first MPEG2 -
No, most of the blockiness you see in the DV AVI is an artifact of the way video is viewed on the computer. The actual contents of the DV AVI is a very accurate reproduction of what's on the Hi8 tape. If you make a DVD from this properly it will look almost exactly like the orignal Hi8 tape. If not, there is something wrong with your MPEG2 encoding or DVD authoring.Originally Posted by tripecac
Post a few seconds of the DV AVI and the same video after converting to DVD. -
Here's a very brief bit of the DV-AVI file:
http://tripalot.com/issues/videos/test-short-1.avi [updated] -
I think your file was too big. The link is dead.Originally Posted by tripecac
-
Sorry about that. I guess we can't trust the forum's upload feature all too much...
I went ahead and uploaded the AVI to my site, and updated the link. -
here's what vegas pro rendered at 8kbps. doesn't look too bad. a little blockiness noticable in the clouds.... i haven't seen to many with square edges before.
 if it were mine i would crop the outer border back 8 pixels on each side to reduce the tape fuzziness, but other than that i'd say it's fine. play it full screen with powerdvd or windows media player.
test-short-1.mpg--
"a lot of people are better dead" - prisoner KSC2-303 -
Thanks! That looks pretty good! It's hard to tell the difference between that and what I've been doing.
Are you able to then use that 8kbps .mpg in DVD Architect w/o recompressing? What audio format would you render to match that? (I understand audio + video can't exceed 10 or so kbps).
Here's my Vegas Movie Studio 8 version, created via Movie Maker / Burn it to DVD:
http://tripalot.com/issues/videos/test-short-1-6kbps.mpg
(I thought it would be 6 kbps CBR like last time, but gspot says it's 8kbps vbr, which is surprising) -
with vegas pro i rendered to .mpv at 8000kbps(not 8, sorry) and the audio to ac-3 at 448kbps, that's what's in the mpg i posted. i muxed the .mpv with the ac-3 using tmpgenc mpeg tools, but the mpv and ac-3 can be imported into architect without re-encoding and then authored to dvd. personally i use dvdlab pro for importing the mpv and ac3 and then authoring to dvd, but that's just my preference.
the total comes out at around 8500kbps which is well under the max.
yours looks pretty much the same.--
"a lot of people are better dead" - prisoner KSC2-303 -
So do you think I'm already getting more or less the best quality possible for DVDs given the source material?
 Quote
QuoteSimilar Threads
-
Will a Digital 8 camcorder read 8mm tape?
By Tenacguy in forum Camcorders (DV/HDV/AVCHD/HD)Replies: 4Last Post: 10th Jun 2009, 14:24 -
Help with old 8mm camcorder tapes
By AmandaBMidlands in forum Portable VideoReplies: 2Last Post: 11th Nov 2008, 09:43 -
What is the best camcorder for 8mm to dvd.
By krlorenz in forum Camcorders (DV/HDV/AVCHD/HD)Replies: 0Last Post: 30th Dec 2007, 14:58 -
Problem with old 8mm camcorder
By neilf1234 in forum Newbie / General discussionsReplies: 15Last Post: 26th Jul 2007, 09:04 -
Record 8mm Home Movies w/Digital Camcorder?
By stahlhart in forum Newbie / General discussionsReplies: 6Last Post: 28th May 2007, 16:28