


Hi All,
I was wondering if anyone knows how to achieve the effect shown in the attached pictures?
I believe it is called 'over filtering' but have no idea how to do it. I use Sony Vegas Studio 8.
Thanks in advance.
+ Reply to Thread
Results 1 to 25 of 25
-
-
Mask the foreground subject, soften the alpha edges, then do what you want with the background.
Recommends: Kiva.org - Loans that change lives.
http://www.kiva.org/about -
So is that done on a per frame basis?
I was hoping there was just some filter I could apply to whole video.
Apologies if that sounds like a silly question, but I am a n00b. -
How they do it ...Originally Posted by jgabler
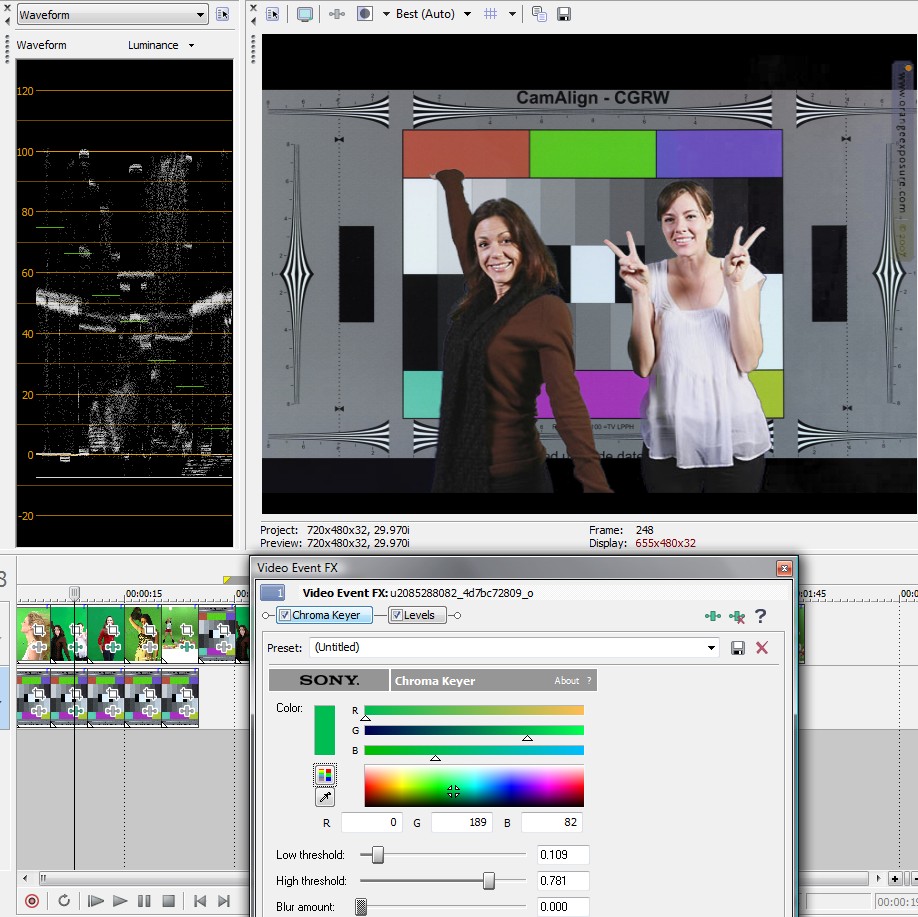
1. Shoot people over green screen like this. Create alpha mask from chroma key.

2. Apply filters to foreground.
3. Prepare background (e.g. soften)
4. Create composite of foreground over background using alpha .
This is my 3min effort. Expect to spend a half day getting this right.
If you don't have the green screen element, you need to find another way to separate the layers.Recommends: Kiva.org - Loans that change lives.
http://www.kiva.org/about -
Not identical, but a place to start.
1. Put your clip on the timeline.
2. Right-click on the clip header (far left) and select Duplicate Track.
3. Right-click on the top track and select Video Event FX.
4. Add a Brightness/Contrast plugin. Set the Contrast to 1.00.
5. Add a Sony Gaussian Blur to the plugin chain. Select Soften from the presets.
6. Close the plugin chain window.
7. On the header for the top track, click on Compositing Mode and select Soften from the drop down menu.
8. Finally, set the Level slider to approx 34% and preview.
You can play around with the levels in the various filters or add new ones to chain to vary the effect. Try adding a Glow filter after the blur, for example, of blurring in only one direction.Read my blog here.
-
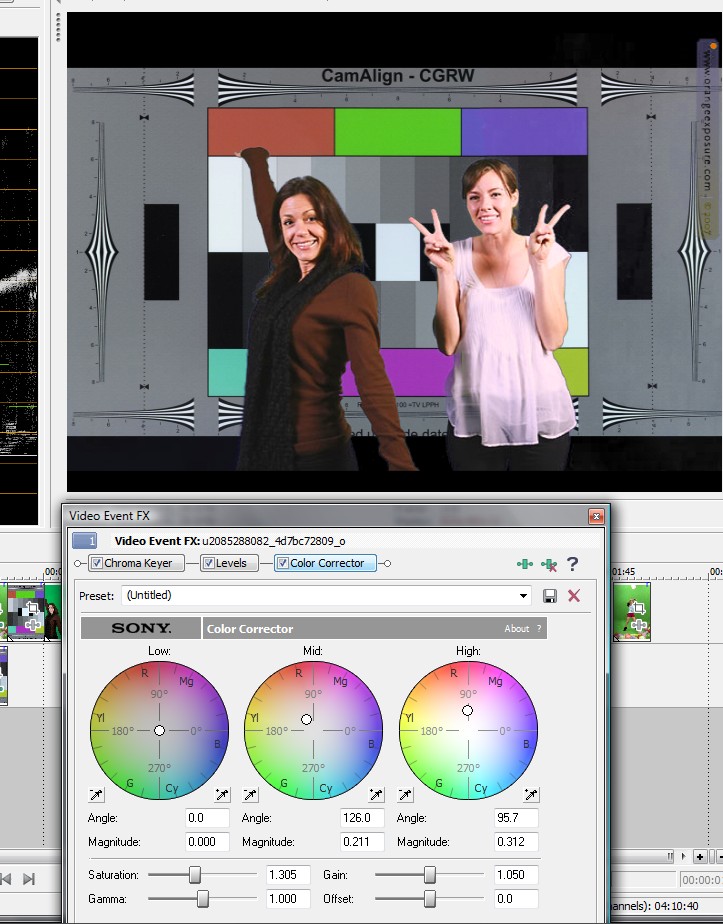
A few more filter tweaks. Gausian blur to background, minor color correction to foreground.
 Recommends: Kiva.org - Loans that change lives.
http://www.kiva.org/about -
Some of the survivor shots are obviously chromakey but a shallow depth of field can be used while shooting to get the blurry background.
http://en.wikipedia.org/wiki/Depth_of_field -
There are various methods to separate layers. Frame by frame rotoscoping is the last resort.
http://en.wikipedia.org/wiki/Rotoscoping
http://www.measurand.com/motion-capture-resources/motion-capture-history-rotoscope.htmRecommends: Kiva.org - Loans that change lives.
http://www.kiva.org/about -
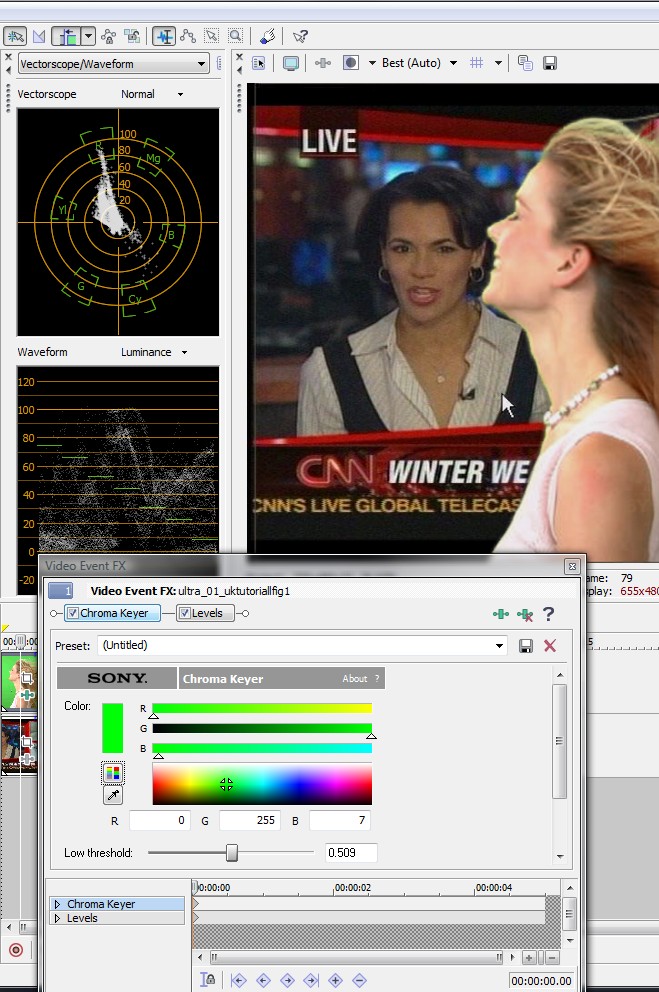
I have a question regarding the green screen example below. There seems to a fringe of green on the lady's face. Is this reflected color on her face from the green screen? To reduce this, does it help to increase the subject's distance from the green screen and add more direct lighting on the subject?
Originally Posted by edDV -
I'm not so bothered about having a blurry background. More so the vivid colouring.
-
Vivid colors? Just increase the Saturation.
-
I pulled that highly compressed sample JPG off the net because the model was prettyOriginally Posted by SCDVD

True it had green spill and it turned out the hair had green blur maybe an artifact of 27KB JPeg compression.
It also shows a strange issue with green saturation and and phase shift as a function of luminance value. A vectorscope should show a tight ball of chroma for the green background.
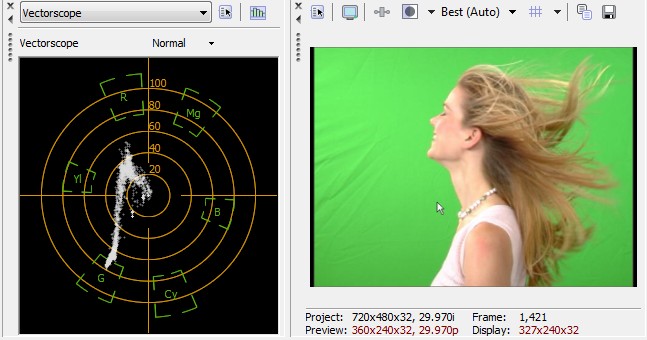
Ideally, one would have an RGB 4:4:4 camera capture and a well lit green screen (flat lit background without green spill to foreground subject). Distance of subject from the green screen helps.
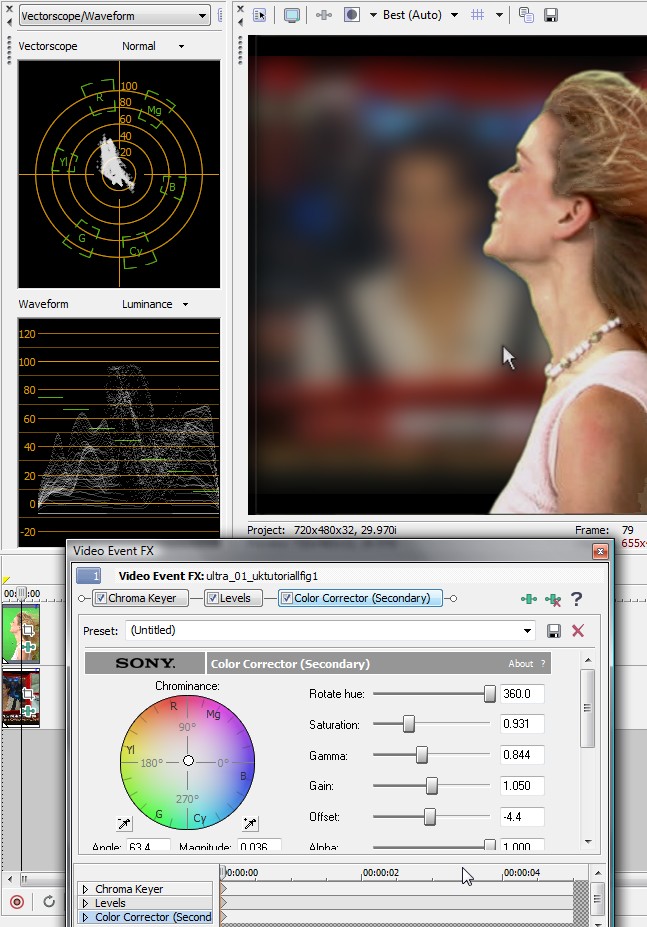
Even with a poorly lit subject, Vegas and other chroma keyers can be processed to remove green spill. Secondary color correction can be targeted to remove unwanted background spill color from foreground (reduced saturation) while affecting only that color.
This example shows a tighter green chroma cluster allowing a cleaner key with little adjustment needed.
 Recommends: Kiva.org - Loans that change lives.
http://www.kiva.org/about -
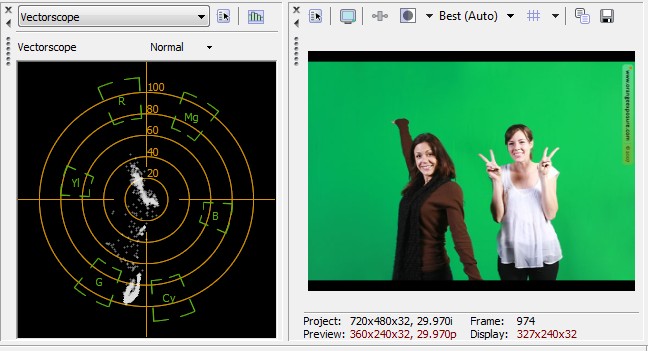
If you look closerly at those Survivor shots, one color adjustment wasn't applied to everything, the picture consisted of separate layered objects and each was colored and filtered uniquely. Video post production is all about working in layers.Originally Posted by jgablerRecommends: Kiva.org - Loans that change lives.
http://www.kiva.org/about -
Originally Posted by edDV
Could that be because the green background is uneven? It has a hot spot and also some creases with shadows. The net of that is quite a variation on the greens. -
Once the objects are in layers, color correction and other filters can be applied separately to any one layer. For example I added primary color correction to the girls layer below to give them a bit of a sunburn. The background was unaffected. I could also apply fiters separately to the backgound.
One could mask the forground into two objects and apply separate color correction to each girl. The mask would need to track their motion. That is the hard part.
 Recommends: Kiva.org - Loans that change lives.
http://www.kiva.org/about -
Thanks! I've got more or less the look I want now!Originally Posted by jagabo
-
This is the foreground layer with background turned off.

This is the alpha that describes the edges and opacity of the foreground object. The alpha is the forth component of the video object (i.e. YCbCrA or RGBA).
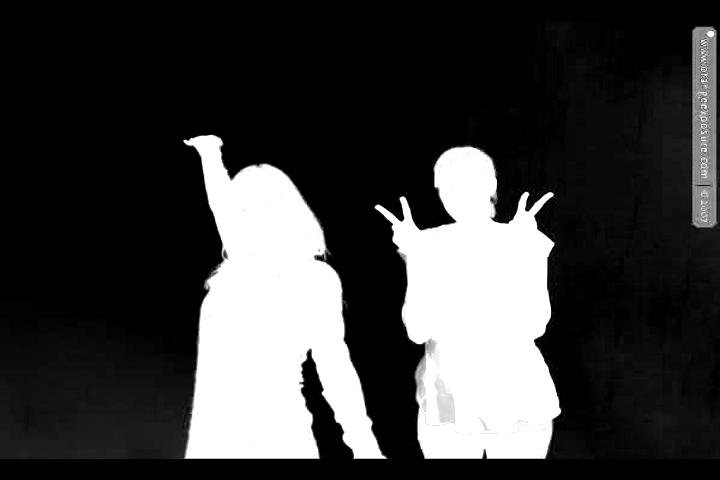
Now imagine these as moving video.Recommends: Kiva.org - Loans that change lives.
http://www.kiva.org/about -
I'm not trying to dispute your explaination edDV but I think there might be a different way this is done. I've just watched the clip of the intro on youtube and in fairness I can't see any green screening used in those particular clips. Out of experience I would say its more likely to have been done on a system similar to a Film Master or Avid DS Nitrus system which are specialized colour correction systems. From what I can see it looks like the saturation has been pulled up and the systems I wrote about have the ability to selectively grade or effect different parts of the image similar to that of rotorscoping in flame or combustion. I wouldn't guarantee this is how its done but I do work on and off at a Post House Company in London which specializes in this sort of thing and this is how we would tackle something like that.
As far as doing this yourself you could probably try this in after effects by upping the saturation on your general picture. Then create some new solid layers and mask them to the areas you want to be slightly darker, turn the opacity down slightly and add a feather. You could also try playing around with your colour correction tools and maybe a slight burnout effect if it fits.
Hope this helps, as I said its not guaranteed to be done like this but I'm fairly sure it would be something along these lines.
-Scot -
Having now (finally) watched the intro sequence for an episode (sorry - never thought survivor was worth wasting time on - no so-called 'reality tv' has been), I agree with the previous poster. There doesn't appear to be anything really clever about it, other than hyper saturation of colours. Maybe it varies from series to series (the one I saw was for the Cook Islands series), so if you have a link an example of what you are trying to get, I'd love to see it.
Read my blog here.
-
I can confirm that the effect is the same for all intro sequences.
-
I can confirm that the effect is the same for all intro sequences.
-
What is the U-Tube link to the sequence above? Several opens that I saw are just pan-zooms on Photoshop stills.
The the backgrounds in the "Julie" and "Chris" frames above have been digitally blurred. Optical background defocus won't have that contouring.
Regardless of whether the alpha was formed by chroma key or manually by drawing a mask or pulling a mask from luminance or some other picture characteristic, the principles are the same. If you want to selectively filter a portion of moving video, you need a mask or alpha that isolates the moving area.
This sort of show open has been done the hard way frame by frame with rotoscope on the Quantel Harry or other since the the early 80's. Newer equipment have multiple ways to "extract a key" to isolate a moving mask. The point is, if you want to selectively filter a moving image, you need a traveling mask.
Other objects like graphic elements or titles are layered on using alpha.Recommends: Kiva.org - Loans that change lives.
http://www.kiva.org/about -
Seasons 1-8
http://youtube.com/watch?v=JmPy1XecYzw
Seasons 9-16
http://youtube.com/watch?v=MZpO5BvtkGg -
The Season 9-1 Julie clip is no doubt a composite.

Starting with season 2, the US version of Survivor took all editing onsite with six Avid Media Composers later augmented with the Avid Unity server.
http://findarticles.com/p/articles/mi_m0EIN/is_2001_Jan_24/ai_69436374
Avid Media Composer compositing features
http://www.avid.com/products/1697.htm
By season 9 they were probably doing the show open on their local Avids as well, maybe for plot security reasons. The system can do compositing plus layered filtering and more so if they added a Symphony or Nitris expansion. The credits for the show include 3 special effects editors.
http://www.imdb.com/title/tt0761485/fullcredits
In 2008 (season 16) the show switched out 20 or so Digital Betacam cameras for XDCAM HD equipment.
http://tv.ign.com/articles/866/866231p1.htmlRecommends: Kiva.org - Loans that change lives.
http://www.kiva.org/about


 Quote
QuoteSimilar Threads
-
Madonna's Halftime-What video effect to make entire show look different?
By jimcornetet in forum Newbie / General discussionsReplies: 0Last Post: 6th Feb 2012, 13:40 -
How to create text effect like names on intro in CSI:Miami
By Northpole in forum EditingReplies: 11Last Post: 2nd Nov 2009, 14:24 -
Intro / How to get into video?
By FrankWatson in forum Newbie / General discussionsReplies: 8Last Post: 19th Mar 2009, 22:59 -
Real media show discolouring effect
By littlecramp in forum Newbie / General discussionsReplies: 1Last Post: 7th Nov 2007, 10:50 -
Intro Video?
By devnulllore in forum Newbie / General discussionsReplies: 5Last Post: 12th Jul 2007, 16:55