


I managed to buy a copy of Cinecap on the 23rd December last year and have only just found it is no longer available. This is a great shame because it does everything you need. Before I bought I searched for the author because I wanted to check his company still existed (at the time the web page was last updated in 2005) and I wasn’t sending money into nowhere. His name is Jeff Dodson and if you go to http://www.moviestuff.tv/testimonials.html you will find an email address for him. He told me he is working with Roger Evans of Moviestuff on new products. If you email Jeff it may be he will let you download and then purchase a licence. If he does let you download and you buy a licence be patient when waiting for the licence key. When I ordered it took two hours for the company that handles the orders to send out the licence key while I panicked that I had lost my money. The website warns that it can take 24 hours, so just relax and it will turn up.
Regarding the lost information at http://homepage.mac.com/onsuper8/diytelecine/index.html . I emailed them in January and they put it back on for me at http://homepage.mac.com/onsuper8/junk/. They said it would only be for a few days, but it is still there today. Such a shame they took the original pages down, from this thread it is obvious that a great many people have used the design.
I also have problems with the adjustment of the microswitch and end up with loads of missed frames or it stops capturing. I am looking at using a reed switch triggered by a magnet on the main drive shaft but I am having trouble finding a place to locate it.
One other recommendation I have as well as the bypass switch is to put a push button in parallel with the microswitch so you can trigger a few mouse clicks to make sure the mouse circuit is working. I found my mouse would hang and it was a pain to get everything lined up only to find nothing was capturing. I suspect it was hanging due to the length of cable between the microswitch and mouse, I am now going to make this as short as possible.
Try StreamFab Downloader and download from Netflix, Amazon, Youtube! Or Try DVDFab and copy Blu-rays! or rip iTunes movies!
+ Reply to Thread
Results 61 to 90 of 348
Thread
-
Regards
JamesReuben -
Hmmm...I explored the possibility of using a reed switch rather than a mechanical micro switch....like you I found it difficult to identify where to mount it ...gave up in the end and went back to the original mechanical switch but with a determination to improve on its reliability...
The thing is that because it depends on the tension of the actual film as it moves through the film channel,its always going to be a relatively 'unreliable' method of triggering the switch. In addition to this the onsuper8 instructions suggested the Eumig 610D because of the fact that the 610D worked on this tensioning system...no account was taken of how accurate the timing was in relation triggering of switch and position of film frame in the gate.
I have spent a lot of time working out how to get this method of triggering the switch to be as accurate and reliable as possible..and I think I have now achieved this with a very simple modification and the use of a multimeter. At 3fps the number of frames captured when in motion as opposed to being stationary in the gate is minimal...few enough that you can edit them out in your software editor if you wish.
There is another metal part of the gear mechanism that moves at the different fps speeds which could be used to trigger the switch...but again it has proved difficult to mount a mechanical switch so it could be triggered by this part of the projector mechanism.
I would really like to work out how to fit some kind of timing disc/cam or whatever to ensure that the micro switch was triggered at the precise moment when each and every frame is stationary in the gate...aint thought of how to do it yet ...but I am working on it...if anyone has any suggestions as to how we might achieve this I am all ears
-
i mentioned using an arduino micro in my previous post. i can give more details if anyone is interested. i think it solves the timing issue nicely. oh, by the way, i have no interest in those things apart from having bought one a year or so ago and am tinkerer by nature. so, you know, there certainly are other micro's out there that will work just dandy, i'm sure....
-
Since writing my posting I have also found it difficult to find anywhere to mount a reed switch, there is just so little space around the drive shaft. I have also looked at the mechanism that moves up and down to pull the next frame in. But again there is no obvious place to mount a reed switch or microswitch. I would prefer not to use 3 fps if I can help it I have about 25 hours to capture, much of it still on 50’ reels, so that’s about a week of just capturing without any time to swap the films over.Originally Posted by ronypony

I missed this when I first read this thread. Presumably you removed some of the gears at the top left (when viewed from the motor side) which then provided enough space to mount a cam and switch. I would be very interested in a photo of this. I am not sure how many of the gears are part of the rewind mechanism and which need to be there for the forward drive.Originally Posted by Hergow
I have since found http://www.jeffree.co.uk/pages/revmaster.htm which gives a design of a simple tachometer. I am going to try adapting this to get the sync pulse. If you look at his circuit I am going to make the sensor part shown in the top left corner of the diagram using the IR reflective sensor and two resistors. Ignoring the rest of the circuit I will connect this small part to the mouse (will now need three wires to the mouse using a stereo jack and socket). I hope to be able to place the reflective sensor close to the shutter blades and by painting one of them white I should get a pulse once per frame. This is described in the text just below photo 2 on the web page. I am hoping I won’t get reflection from the non painted blades or any false triggering by light from the halogen bulb in the gaps between shutter blades. I will use standard stripboard rather than create a printed circuit and again mounting the detector will be the tricky thing. I will let you know how I get on.Originally Posted by ronypony
Thanks for the suggestion mcleodjoe, I will try the optical sensor first.Regards
JamesReuben -
James...your potential solution to the triggering problem using a reflective sensor sounds very promising indeed. I hope you are successful with it...please let us know if you get it to work...
You mention a potential difficulty regarding light spilling from the halogen bulb...I now fit one of these G4 LED light sources....less heat..more directed light...might be a better choice for the system you are investigating....
http://cgi.ebay.co.uk/G4-LED-12V-AC-DC-6-Very-Bright-LEDs-DAY-WHITE-BULB_W0QQitemZ1302...d=p4634.c0.m14
mcleodjoe...I like the sound of your solution too but you use a different model of projector to those of us that have the eumig 610D. How does the arduino micro work. ?
Thanks for posting the pictures of your setup btw.
I think James might really be on to something with a reflective sensor activated by one of the shutter blades. -
the arduino is an open source hardware/software microprocessor mounted on a board with inputs, outputs, some volatges, and a usb connector. you plug it into a usb port on your pc, and run a little application that allows you to write progarms to the arduino. in the software, you define what the arduino should look for as inputs; switches, proximity sensors, temperatures, photo optic inputs, you name it. you then tell it to do stuff with what it see's coming in, then do stuff with the outputs you also define.
my cam switch is mounted directly to the motor shaft, and since i wanted mouse clicks every three shaft rotations, i wrote a little program that:
1/ counts the shaft rotations
2/ on every third rotation, click the mouse
apart from a little massaging to weed out switch bounce, (which, by the way, almost always happens with micro switches. it happens when the contacts open which can make whatever it is that is looking at that switch, be it a microprocessor or a software "capture" button, see multiple contact switch state changes. remember, those little things are mechanical, and they work with a tiny little spring inside. as the contacts open, the little contact thingy vibrates as it pulls away. you might wanna look at that if you are finding multiple captures of one image, or your capturemate software is hanging up. it could be due to massive amounts of mouse clicks!), some status messages to let me know it's working, and some led's to give me an idea of the general health of the thing, that's about it!
the entire program is at most 20 lines long. dead simple. so, i guess what i'm getting at here, is that by using a micro, you can expand you options in terms of what your cam switch is looking at, and what you want it to tell the capturemate software. for me that meant forgetting about trying to get into the frame advance mechanism, the speed mechanisim, or anything else. i simply count the motor rotations and the micro joyfully clicks my mouse for me.
please forgive me if i have talked down to anyone with experience in these sorts of things. i find myself that often when i participate in forums, there are always those that give explanations that take me ages to decipher so i can understand what the hell they are talking about.
have a look at your projectors, and see if there is a place where you can mount your micro with an eye towards being able to adjust it while the projector is running. then, figure out what the relationship is between the micro and where you want the mouse clicks to be. without doubt, the arduino can fill in the middle part for you. -
Now that is clever....
Correct me if I am wrong here ...your Bell and Howell projector has variable speed control which slows down the actual motor..so to achieve lower frame rates per second you simply slow down the motor..am I right ?
If this is the case then I dont think your system will work with the Eumig 607/610D projectors a lot of folk have used to construct their telecine machines. These projectors have a 'gear box' arrangement...the motor runs at a constant speed no matter what fame rate speed is selected 18, 12, 9, 6 or 3.
I do have another Chinon projector that has variable speed by slowing down the motor...it might be worth taking a look at in relation to your ingenious solution OR maybe I should be looking to acquire the same projector as yourself and you could help me configure an arduino board
-
Hi everyone. I have been dabbling with home telecine and I have a set up that captures images pretty well with Cinecap.
My problem is one of "jerkyness". Cinecap seems to set the captured film to play at a default rate of 10fps. I know that it can convert it to 18 fps or 25 fps, but how good a job does it do? Seems to end up with jerky footage. I have used virtualdub to change the source to a frame rate of 18 & 25 ready for Vegas to make it into a finished film. But I keep confusing myself over frame rate conversions etc.
I just want to get from a Cinecap captured film to a smooth playing PAL DVD.
Anyone advise on which settings on Virtualdub or Cinecap give the best settings to do this?
Thanks y'all -
I use the same editor as you Kintara...Sony Vegas. Never experienced 'jerkiness' due to CineCap at all
 Are you doing frame by frame captures with CineCap or real time captures..say 18 or 24 fps ? No matter what kind of capture session I do CineCap does its job really well...I then use the 'speed change' function to process the captured footage to whatever the original shooting frame rate was...usually 18fps with me...although I have captured carts where I hadchanged frame rate throughout the shoot..9, 24 and 36 fps...CineCap dealt easily with it.Once I have my captured footage I edit in Vegas Pro and render an mpeg using the default PAL setting and burn to DVD without any problems at all. I suspect the jerkiness is a result of dodgy projector registration...do you find that when you project normally on a screen or wall you experience the jerkiness ?
-
my bell and howell is not variable speed, actually. i use a variable frequency drive to change the motor speed. they can be expensive, but i happened to have one from something else i was fiddling with at some point in the past. that thing allows me to change the speed of the ac motor without sacrificing torque, which is the very reason you can't use a simple dimmer switch. all that does is lower the effective power of the motor until it simply will not overcome it's own resistance to movement.Originally Posted by ronypony
as for your chinon unit, if you can work out a relationship between your motor shaft and the frame you wanna catch, then a micro such as the arduino can help bridge the gap. it's wort nothing too, that the arduino could be set up to read an optocouple or proximity switch. an opto coupler is essentially an electronic eye that looks for some conditions. a prox looks for a magnetic field, or the presence or absence of an object. the problem with these darn projectors, is there is precious few options on where switches are mounted, and how their mounting relates to an open gate.
lets suppose that instead of using a microswitch, we mounted a small reflective disk with a black segment on it to the motor shaft. we could mount an electronic eye that would look at this disk, and the micro would monitor what the eye is doing. then you discover that every seventh time the eye sees that black segment, the gate is open and the film is stationary. the micro's job would be to count the number of times it see's the black mark, and to click a mouse button for a certain length of time, and keep on doing this until the power goes off or you turn it off, whichever comes first.
this sort of thing is done all the time. i once work for a newspaper as an industial electrician. we had to add another tower to our old metroliner press. we needed to know, with an accuracy of a couple of million points in 360 degrees, where the 75 HP AC motor was in relation to the offset rollers, and make adjustments to that relationship, with such a degree of accuracy as to make sure that the fragile newsprint web didn't snap from too much tension, or bunch up from too little.
that being said, that project didn't use the cheapest encoder we could find. that encoder, which is an electrical mechanical device that spits out those couple of million bits of info based on the rotation of the shaft, was worth several thousand dollars. but, as an example, i mention it because there are other ways to do pretty much the same thing.
i suggest, to get your imagination going, dropping by a robotics hobby website and have a look at what they are doing with position sensors. i think you'll be amazed to discover they are dealing with the same things we are, and they have come up with some clever solutions.
all that being said, i hafta point out that i am by no means an expert. i had a teeny bit of experience and a lot of time to build my little telecine. but, damn tootin, i would be MORE than happy to help you develop your projector!
-
Hi All
It seems that more and more people are creating telecine machines for their own use. I used a Eumig 607D as my mechanical set up. I replaced the 100 watt lamp with a Luxeon LED and led controller. I also ripped the guts out of the mechanics of the projector, ditching the motor and transformer. I then bought a small geared motor from Maplins, a 12 volt laptop power supply from Ebay, and mounted them on a plate in the space now vacated. I then removed the gate shutter (the small piece of metal that has two rectangle holes in it, so that the sprocket holes are not projected.) giving a projection of the full film frame. I then cut off two of the shutter blades with a Dremmel, and cut the 3rd so it left a tang, but not enough to cover the gate as it went past. Then I made a sensor from parts of an old PC mouse, and mounted so that as the blade tang went past, it broke the beam of the sensor, sending a signel to a circuit I made on vero board. I run the projector on the "9fps" gearing, so that on one revolution the film is advanced one frame, and on the 2nd revolution it produces a "capture" pulse, which is sent to a modified PC mouse to act as a right click on the "Capture" button in Cinecap. With the motor I have this works out at about 1fps capture. I used two revs / frame as the image capture webcam would need a little time to "settle" on each frame it was presented with.
For the Image capture I have done away with the original lens and mounted a 50mm camera lens on a tube. On the other side of the tube I have a 1.3 m pixel webcam looking towards the projector gate. The webcam has been stripped from its housing, had its lens removed (just unscrew it all the way and ditch it) and mounted in a box.
After a lot of fiddling I eventually got a good focused image. and was able to capture a pretty good AVI file with it.
The only problem I now have is that Cinecap, although it will change the frame rate, does not seem smooth out the jitter that comes in when there is panning in the captured film (i.e. when the person who shot the original cine film panned left to right.).
I can give a lot more details if needed, but as this is a different method of capture to your ariel image, I dont expect you to change horses mid stream. I would hovever love to know hot to get a smooth looking 25 fps AVI from my captured 18 fps Cinecap AVI film.
I don't have much time at the moment to stay on this forum (the wife will be back soon and will be wondering why Im wasting my time when there are companys who will do it - for a fee), but I will be looking in again on=ver the next few days and weeks.
Keep up the good work
Kintara -
I wonder why there is a jitter problem with CineCap. I copy my standard 8 films, shot at 16fps, and stretch them to 25 fps (PAL) in Vegas Home Studio. Also reverse the image so do not have to use a mirror in the telecine setup. Have no jitter problems at all. Good results every time. I certainly recommend Vegas and would not use anything else.
Hergow. -
Hey Kintara, I like the simplicity of your rig. Can you take some pics for us all to have a look? I firmly believe in the K.I.S.S. (keep it simple, stupid) principal, and it sounds like you have simplified the system nicely.
-
Kintara...I have been thinking about your jitter problems...it struck me that by removing the 'gate plate' of the 607D the film would not have the required pressure ,provided by this plate, to allow the claw to transport the film...I say this because I have several Eumig D series projectors and one has a fault (have not sussed what the cause is yet),,,but I do know its related to the pressure provided by the pressure plate integral to the lens housing pushing against the film as it runs past the gate plate you have removed...the fault causes the jittering you describe.
I too would like to see pics of your unit
mcleodjoe...have been studying arduino boards in great detail...when I have a little more time I fully intend to explore the possibility of developing a system that uses an arduino in my own setups...
-
Well, I've got everything I need. I got a Eumig 610, a mouse, a lens, the microswitch, etc. Will start to build in the next couple of weeks. My video camera is a 3CCD Panasonic NV GS250
Will keep you updated -
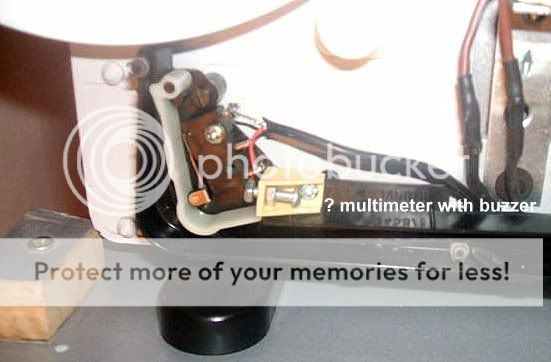
Excellent...when you do start to build your unit I can give you some valuable hints/tips on how to ensure absolute and stable triggering of the micro switch. If you haven't got a multimeter with an audible continuity buzzer function I would strongly recommend you get one....it will make life so much easier when setting up the the micro switch...here is a pic of the mod I came up with to ensure stable triggering....its adjustable too...believe me it will save a lot of grief and gnashing of teeth


-
Thanks a lot for your advice and willingness to help. I think the initial phase will be slow, as I will only be home on weekends for the next few weeks. But I will try to start and definitely contact you.
I attach your photo- is the multimeter that small device next (to the left) of my question mark? Where is the power coming from?
I will let you know when I start (hopefully start to fiddle this weekend)
Albie -
No mate...this is a multimeter

Get yourself one of these but make sure it has a buzzer function for testing continuity.
The micro switch will mis-trigger if it moves at all...even by a tiny amount
The little mod in the photo is simply a bit of plastic with a small nut and bolt through the end of it which is used to prevent the micro switch from moving to the right...and it can be adjusted if the switch does happen to move.
The multimeter is used to test and make sure that the micro switch is working properly...to get the switch operating you have to have film running through the projector...the projector is noisy and its diffucult to hear if the micro switch is operating....but you can use the multimeter buzzer function to 'hear' the switch working
If you look at the photo of the micro switch you can see that two of the pins are soldered to the wire that runs to the phono socket mounted on the plastic cover on the other side of the projector. When you have wired up the switch,modified the mouse and are ready to test that the micro switch is indeed operating correctly and reliably do this.
Set the multimeter to 'buzzer'...touch both the positive (red) and negative (black) probes together...the buzzer should BUZZ
Now place one of the probes on either of the wired pins of the micro switch and the other probe on the other pin.
Set the projector running at 3fps with film loaded...this should cause the micro switch to operate if you have mounted it correctly...if it is operating correctly you will hear nice strong itermittant buzzes from the multimeter as the switch is opened and closed.
If you do not hear any sound coming from the multimeter carefully adjust the micro switch by moving it either to the left or right using a flat bleded screwdriver or the like. Only tiny movements either direction should be used until you get those nice clear audible signals from the multimeter...notice in my photo of the micro switch it is only secured by the top hole...there is no fixing bolt through the lower hole (yet).
Once you have the the micro switch operating perfectly you may wish to very carefully drill a hole through this lower mounting hole to secure the lower half of the switch... -
'
' Sorry for my total ignorance! I like to fiddle with things, but these switches were all new to me!!
Your explanation makes perfect sense.
Will let you know when I start -
Problem that I had was solved
-
What problem was that ?
-
Sorry about that post- I deleted it, because I thought I have fixed the problem, but I have just started converting the mouse and need help (will only be at home over the weekend). I have found a Eumig 610 and it is working very well.
Just as background: If I connect my camcorder via firewire to my PC, open Cinecap, then I can record pressing the left click button on the mouse (that mouse still has that old round connection). (Cinecap shows the number of frames that I have captured and I can play it back)
So, I started soldering the cable to the two points under the left "click" button. I think I overheated it, as the red button did not click when I pressed it. It also did not work when I plugged the USB port in and touched the other two points of the cable. (That was my first post, which I deleted)
(Soldered the two points on the right)

Red "button"that stopped working/clicking:
I then removed the cable and with better soldering technique by now, soldered it below the right click button. That red button was still clicking. I plugged the USB of the converted mouse in to the PC, and when I connected the two free points of the wire, it was working- showing a typical right click box on the screen.
The problem is this: I then connected the two loose ends of the wire to the microswitch, connected my camera with the Firewire to the PC, opened cinecap, clicked begin with my other mouse, then pressed record with my other mouse and then pressed the microswitch repeatedly. But it did not record.
Hope this explanation is clear and not too confusing
So, my questions:
Should I buy a new mouse and connect the wires below the left click button?
What else might I have done wrong that it does not record? Should I remove the other mouse when doing this?
Regards and thanks for more advice
Albie -
Hi Albie
Yup its fiddly doing the mouse
Its got to be the left mouse button to work with Cinecap...so if you have goosed the switch on your mouse it looks like your going to have to buy a new one....I dont know if you have a Maplins or Radio shack/Tandy where you are but they sell USB mice very cheaply. Make sure you solder the correct two pins.
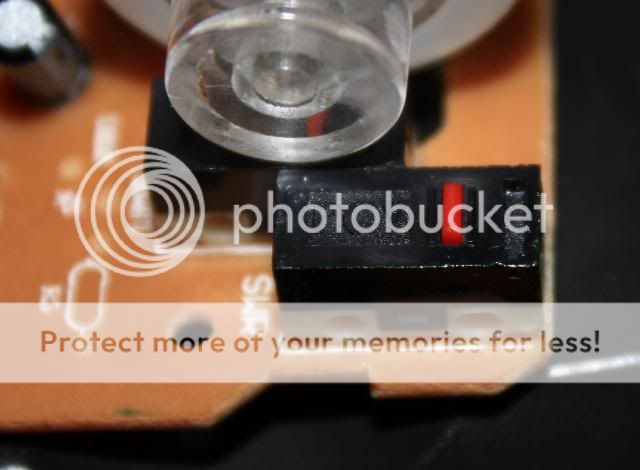
Here is a pic of the underside of mine showing the two pins that have to be soldered...
Take your time mate ...your getting there
No you do not need to remove other mice that you have connected to your computer ..they/it will not interfere with Cinecap. In fact its useful to have another mouse/pointing device so you can use it to click on anything you might have to while leaving the 'CineCap' mouse positioned over the capture button.

-
Thanks for the advice!
They are not too expensive here. Will tackle it over the weekend again.
Regards
Albie -
Hi, Im new here. I too have built the set up as described by super8.org. I purchased Cinecap back along and have been making a lot of tests. This is the latest one. http://www.youtube.com/watch?v=pPewh7TY4io
I also at the same time had the most precious of my films transferred by Video station http://www.videostation.co.uk/
at a rate of 25 frames per second. The idea is to restore individual frames and then later on incorporate them back into my footage. I will then use Cinecap to fix the frame rate to 18 frames per second as originally shot in camera. The results that I have had with Cinecap so far are quite disappointing. The footage when converted is very jerky and not at all interlaced. ( By the way, I have clicked the box.)
Back to the 601D set up. I am making a lot of test here also , I too am experiencing problems with the timing of the micro switch. I understand now that the tensioning of different films play a part in this. I also have bought lots of different sizes of condenser lenses and have yet found any to work properly. ( Tests were with a 10 time zoom lens camera, maybe that was the problem, but I don’t think so.)
By the way Video station did an excellent job on the films that I had sent them. the footage was all broken with bad splice prepares but if you want the last word in telecine, you know shot for shot, the price was prohibitive. Well. That’s why im so interested in do it yourself, you have the full control and know just how the film should look. Input anyone? -
I'm slowly progressing, but I'm working in Botswana this week.
I converted the mouse the previous weekend (bought a new one) and fixed the microswitch. It is working well when I project against the wall. I have only tried this on one film, so I suppose there might be some problems when I use different films (although theoretically, the tension should be the same??) This weekend I will change the light and try to set the system up.
I will need to read up on the settings of Cinecap to capture the frames. Is there a specific setting for 8mm and super 8? (I confess that I need to look at the tutorial again) (Any advice?).
My second question, although I'm not there yet, is if one should capture in complete darkness, once the lens is set up and one has adequate focus, or is some light OK?
Regards
Albie -
Albie...there is no specific setting in CineCap for super or Standard 8mm. CineCap is simply telling your camcorder to capture individual frames of film off the condenser lens and storing the captured frames as an avi file on the computer hard drive...it does not need to know if it is capturing super 8 or any other 8mm gauge of film . Its very easy to use...get your telecine system set up...ensure the best focus of the camcorder on the lens you can achieve...take your time with this stage...its crucial to the final capture. Once you have your captured footage use the speed change function of CineCap to change the frame rate (speed) of your captured footage to that which it was originally shot at.
Low light is best when you are transferring your cine films since you may experience some reflection on the condenser lens...it does not have to be done in total darkness though.
Boobootrasher...
Can't understand why you are experiencing jerkyness with CineCap...as I said to Albie its simply software telling the camcorder to capture individual frames...there is no processing of film at this stage by CineCap. Check the registration of your projector...is the film being transported steadily in the projector...when you project the film normally on the wall or screen ..is it steady then ? I do not think your jerky captures are due to CineCap.
I bought a 114mm (4 and a half inches) plano condenser lens off ebay for very little money...it needs to have a decent focal length to achieve half decent results...the original instructions stipulate a camcorder with at least 12x optical zoom....your focusing problems could lie there...borrow a 12x or more camcorder and see if there is an improvement... Read back through this thread ...I have detailed how you can mod the microswitch to be much more reliable...however since there is no timing device as such to ensure the switch triggers at exactly the point when a frame of film is stationary in the projectors gate ...you are always going to have moving frames captured which cause the abberations I observed in your youtube sample. I have found that 3fps is the best frame rate/speed to capture at...its slower but more reliable....good luck -
Thanks Ronypony!
Advice on the next step please!
The 20 Watt lamp is in and working, now I need advice on the 50 mm opal diffuser glass. What is that exactly, where does one usually get something like that and are there any alternatives? I might find one of those little editing machines, which one uses to attach films- would that glass be sufficient?
Thanks -
Sorry to have taken so long to come back, been very busy these last few weekends.
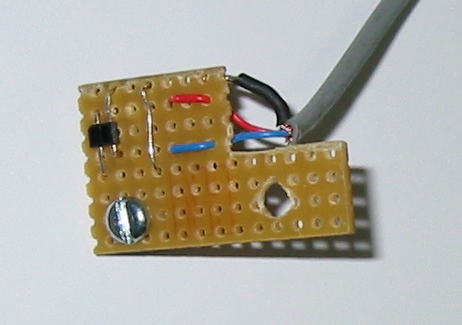
I have now built and installed the reflective sensor and it works a treat. As far as I can tell I am not dropping frames at all. I painted one of the three shutter blades white and the other two matt black for good measure. I put the sensor on an L shaped piece of strip board so it can just fit in and used a tie wrap to hold it to a mounting post nearby. The screw on the board is to protect the detector. If it gets too close to the shutter blades, the screw head will hit first.Originally Posted by ronypony
 Regards
JamesReuben -
Can't find how to get multiple images on one posting, so I'm doing this in several.
I only put the detector on the L shaped board, I put the resistors and switches on another piece of strip board in a small box connected to the mouse. This was to allow me to make resistor changes or add a capacitor if need without taking the projector apart again. In the end I used the same values as on the tachometer webpage.
img_5219%20mouse.jpgRegards
JamesReuben
 Quote
QuoteSimilar Threads
-
8mm film to dvd and which video transfer system to use
By krlorenz in forum RestorationReplies: 16Last Post: 28th Jul 2014, 16:12 -
Telecine Home Made Box cheap DIY
By wrathofbod in forum CapturingReplies: 9Last Post: 1st Feb 2014, 12:30 -
diy telecine - monitoring issues
By TopazUK in forum CapturingReplies: 0Last Post: 2nd Mar 2012, 14:56 -
Telecine Machine for 8mm film super 8 film transfer to dvd
By igotregister in forum CapturingReplies: 5Last Post: 2nd Feb 2009, 15:50 -
Trouble playing DVD-Rs on home system
By wysiwyg20 in forum Video ConversionReplies: 1Last Post: 14th Oct 2007, 08:27