


")
Hi All,
I've been shooting friend's weddings with my Canon XM2 miniDV cam, using them as practice to improve my planning, technique, use of the cam and to gain a better insight into arrangement and the use of Premiere Pro 1.5.
I've learnt a lot but still have a few basics that I want to get sorted out, one of which is what can I do to improve the quality of the original footage that's captured on the cam? I want to beat the GIGO trap...
Here's an example: I shot "the first dance" and turned the lights up to improve the lighting, knowing that this was important, until it "looked OK to my eye". I didn't want to do it too bright so as not to impact the occassion.
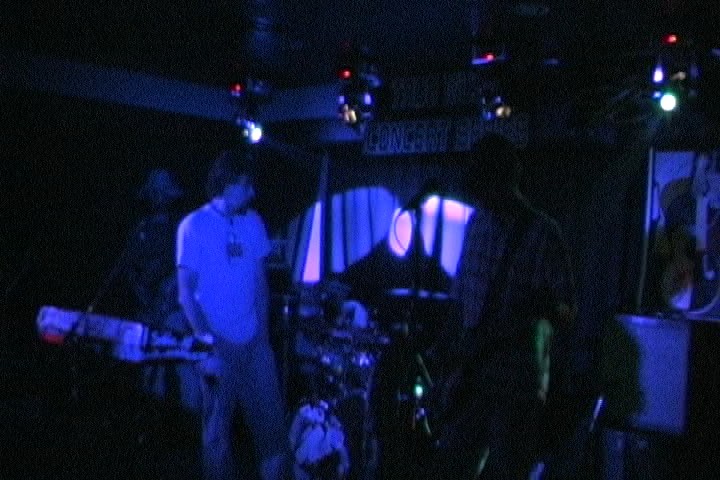
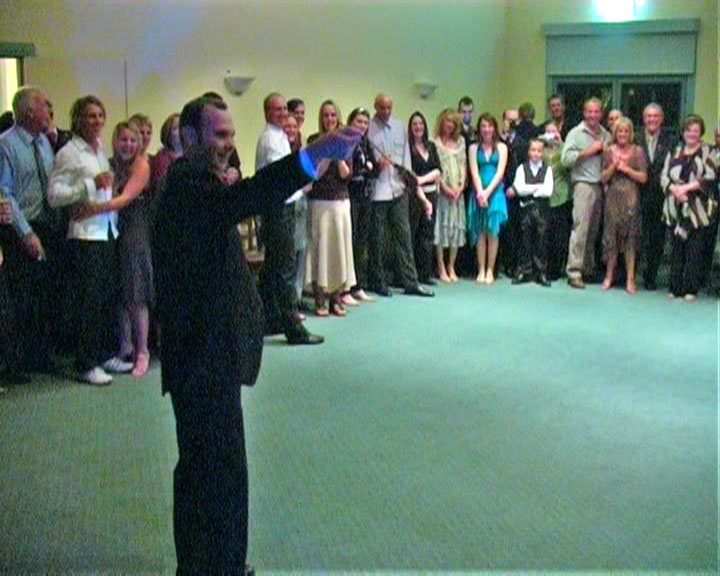
This first clip is taken from PowerDVD and de-interlaced in Photoshop. It's from the untouched DV AVI file straight from the cam:
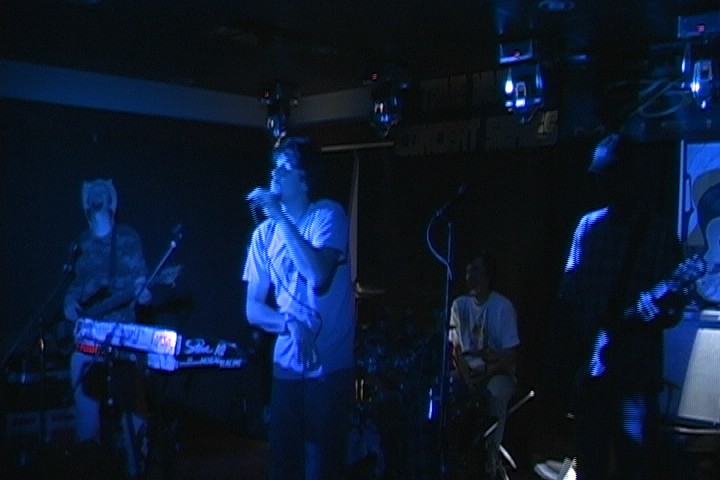
This second clip is also taken from PowerDVD and de-interlaced in Photoshop. It's from the MPEG2 that was encoded using Cinema Craft Encoder v2.70. The input was from the project in Premiere Pro 1.5 - the timeline had the same DV AVI file as above on it, with the "Shadow / Highlight" filter applied, but with no settings changed from the defaults:
You can clearly see the improvement to colours and contrast that the "Shadow / Highlight" filter has had - but you can also see the increase in graininess from an already grainy looking shot - especially if, in the second picture, you look at the grooms (supposedly) black jacket...
What can I do when I'm shooting to avoid the first clip?
Or, what can I do in Premiere Pro to the first clip to get a much better (less grainy) looking end result ready for encoding?
Thanks.
+ Reply to Thread
Results 1 to 10 of 10
-
There is some corner of a foreign field that is forever England: Telstra Stadium, Sydney, 22/11/2003.
Carpe diem.
If you're not living on the edge, you're taking up too much room. -
As a comparison, here's a screenshot from the untouched original DV AVI clip during the wedding service. I had no control over the lighting; it was daylight with natural light outside, but there were no clear windows - i.e. no natural light was coming inside.
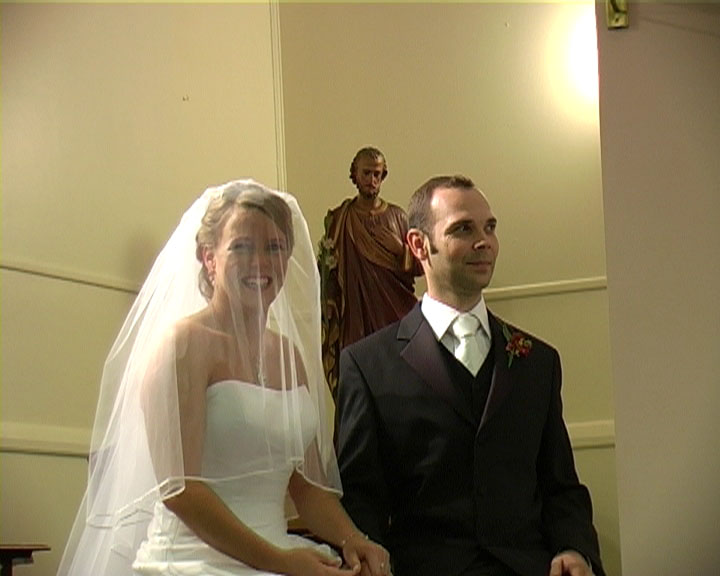
I want this level of clarity, depth of colour, and contrast that I know is possible with my XM2 - but in unnatural / lower light situations.
I should say that I regularly checked and reset the white balance, as required, throughout the whole day.There is some corner of a foreign field that is forever England: Telstra Stadium, Sydney, 22/11/2003.
Carpe diem.
If you're not living on the edge, you're taking up too much room. -
You have to adjust it manually, I'm still learning the properly adjust it myself. But for darker situations such as that for a starting point use the spotlight preset. that works great in any dark situation not just where spotlights are present. From there you can adjust the exposure manually. If you put it on the spotlight preset and switch it to manual exsposure it will reatain the spotlight settings unless of course you adjust them.
What you have above probably could have been averted by adjusting the gain. It would have been slightly darker but without the grain.
Auto setting:
Spotlight preset:
-
@ thecoalman: Wow! That "Spotlight" setting really reduces the grainy effect, as well as definitely improving the sharpness of the image - and your setting (physical environment) looks darker than my reception.
I'll have to have an experiment in a similarly lit situation and muck around with the spotlight, the exposure (manual) and any gain settings. I tend to avoid using gain as I find it introduces the grain - "no gain, no grain".
Do you (or anyone else) have any insight on whether the shutter speed can be used to any effect? I know that it shouldn't go below 1/50 as this causes jerky footage, and that faster speeds result in a darker picture - so I'm guessing "not"...
How about the AE level? Can that be used to any effect?
It's this more expert use of the cam that I need to understand the effects of and then put to use to refine my understanding...There is some corner of a foreign field that is forever England: Telstra Stadium, Sydney, 22/11/2003.
Carpe diem.
If you're not living on the edge, you're taking up too much room. -
Again I'm far from the guy to be asking, my knowledge is little. Mostly what I learned trying to get some good footage of fireworks which appears to impossible with the GL2. :P At least to my standards... eveyone else thought it looked ok but i thought it was crap. anyhow the spotlight function does adjust the gain. If you switch between a preset and manual it will retain whatever the settings were when you switched so you can see what they are and experiment from there.
It's not just the gain you have to adjust but the shutter speed and the iris as well. My experience with the gain is a lower setting greatly reduces grain but also is very dark. The Spotlight uses a setting of 0db on the gain. The GL2 does have a option for saving custom presets.... Like I said for a dark enviroment start out with spotlight and experiment with it from there. As far as shutter speed I'd just leave it at 60... or 50 in your case for lower light settings. -
Cheers thecoalman - much appreciated.
Adjusting the iris is done via the exposure (automatic or otherwise) setting right? I'll have to read up in the user guide...
I'll do some experimenting and look to save it as a custom preset as a basic starting point for future use - as each situation will have it's own needs and settings.
P.S. The third line in your sig has "Anthracite" spelt wrong... There is some corner of a foreign field that is forever England: Telstra Stadium, Sydney, 22/11/2003.
Carpe diem.
If you're not living on the edge, you're taking up too much room. -
It's the f-stop setting, there's only three. Shutter speed, f-stop and gain.Originally Posted by daamon
thx.P.S. The third line in your sig has "Anthracite" spelt wrong...
-
Got it...Originally Posted by thecoalmanThere is some corner of a foreign field that is forever England: Telstra Stadium, Sydney, 22/11/2003.
Carpe diem.
If you're not living on the edge, you're taking up too much room. -
Only f-stop and shutter are optical. Gain will be an electronic adjustment that could exagerate grain/noise. A lower f-stop will open the apeture, letting in more light, but will also reduce the focal range, potentially pushing the background/foreground out of focus.
Read my blog here.
-
I had a quick play last night. I had a semi-lit room (I wouldn't call it dark), set the cam to "Spotlight" and then switched to manual.
The settings were:
Shutter: 1/50
f-stop: 1.60 but sometimes (even on manual) reverted to 2.0
Gain: 0db
The picture on the LCD appeared much darker than the room actually looked. I zoomed in on a black object, and there was negligible grain - nothing compared to the first of the three pics posted above.
So, I guess there's no surprises there.
This got me thinking - especially with your "A lower f-stop will open the apeture, letting in more light, but will also reduce the focal range" guns1inger - for darker rooms (i.e. receptions that are lit OK to the human eye), I could turn up the lights to an acceptable level and then have a cam mounted spotlight. I'd need to be close-ish, and sideways on so that the subjects aren't blinded.
I've done some research into these already, and have been advised to get a decent one so that it doesn't result in a "hot spot" of bright light. So, more questions:
1) Any recommendations on good brands / actual units? Especially useful if they're readily available in Aus...
2) Would I need some kind of diffuser to spread the bright light over a broader area - at the sacrifice of reducing the effective range? Can these be home made? This'll be OK for "the first dance" close up work.
The only other thing I need to work out is how to mount a microphone AND a spotlight together...
3) Are there brackets available to allow multiple mounting of various / two units onto one hot-shoe attachment?
Cheers.There is some corner of a foreign field that is forever England: Telstra Stadium, Sydney, 22/11/2003.
Carpe diem.
If you're not living on the edge, you're taking up too much room.
 Quote
QuoteSimilar Threads
-
What was the last video game that you beat?
By yoda313 in forum Off topicReplies: 21Last Post: 29th Sep 2010, 15:50 -
Go Canadiens! Beat the Pens!
By yoda313 in forum Off topicReplies: 0Last Post: 12th May 2010, 21:25 -
New Canon Vixia/HG10. . any shooting tips? (newbie!)
By Woodserr in forum Camcorders (DV/HDV/AVCHD/HD)Replies: 18Last Post: 14th Jul 2009, 01:58 -
5 Helpful Tips When Shooting Video
By GabeJacobs in forum Camcorders (DV/HDV/AVCHD/HD)Replies: 7Last Post: 27th Jul 2008, 00:18 -
5 Helpful Tips When Shooting Video
By GabeJacobs in forum Off topicReplies: 1Last Post: 4th Jul 2008, 02:11