


Hi everyone:
I am building my own PC for the first time. Here are what I already have: a Pentium IV motherboard with built-in sound card, RAM, a brand new hard drive(120 GB), a floppy drive, a CD Rom, a video card, a keyboard with built-in mouse and an ATX case for Pentium IV.
Where can I find advice/instruction on how to build my PC from scratch and make it work?
Thanks
+ Reply to Thread
Results 1 to 27 of 27
-
-
There are many websites devoted to computer building, and I am sure many here know some good ones.
One thing, well actually two things, that I will suggest:
>Get yourself a cheap power supply tester; Newegg.com has Powmax brand for around $15 including shipping. It will save you hours of time trying to find a problem.
>Bench test your power supply (see above), and run Memtest86+ on your memory sticks by mounting them in a separate computer before you put it all together. If those two check out, sit your mainboard on the static bag and foam packer OUTSIDE the case, then mount your processor, video card (if you are using one), and memory, reset the BIOS back to default, plug in the power cable and try to get POST screen Before you mount it all in the case. Makes it much easier to find the problem if you can't POST. If you can't post, chances are the mainboard is DOA. -
http://www.pcmech.com/byopc/
That should be a good start. Good luck.
Its his first time. He should only worry about that stuff if there are problems. Too much complication. Chances are none of it will be needed.Originally Posted by ranchhand -
you didnt mention a cpu. make sure its supported by your mobo. does the mobo have on board ethernet, otherwise you will need a pci based card
http://www.motherboards.org/articles/guides/924_1.html -
Believing yourself to be secure only takes one cracker to dispel your belief.
-
Thank you!
I'm learning step by step. It's kind of fun to know how things work together inside the case. -
I've built quite a few machines before (all AMD based, but there shouldn't be too much difference). If you run in to problems and can't find a solution, post up here and I'm sure either I or someone else (who's probably more knowledgable than myself, isn't hard!) will be able to help.
Don't worry, though. Just take your time, and it'll be OK.
I do have one question. Do you have a good power supply? Obviously, that's quite an important component - PCs tend to run a little slow without it.
-
Hi everyone:

I want to thank all of you who responded to my post and to let you know I am progressing just fine. I am now at the stage of formatting the hard drive (fdisk, partitioning, blah blah blah) which I will do as soon as I have some time.
I have 2 questions for you, nonetheless.
1) CD Rom: I connected my CD Rom to one separate IDE - I mean completely independent from any devices. No matter how I set up the jumper (there are only 3 positions), it is still recognized as a SLAVE, not Master! Well, master or slave, the drive still works fine as it reads all CDs I put in it, but it bothers me.
Any ideas why this happens?
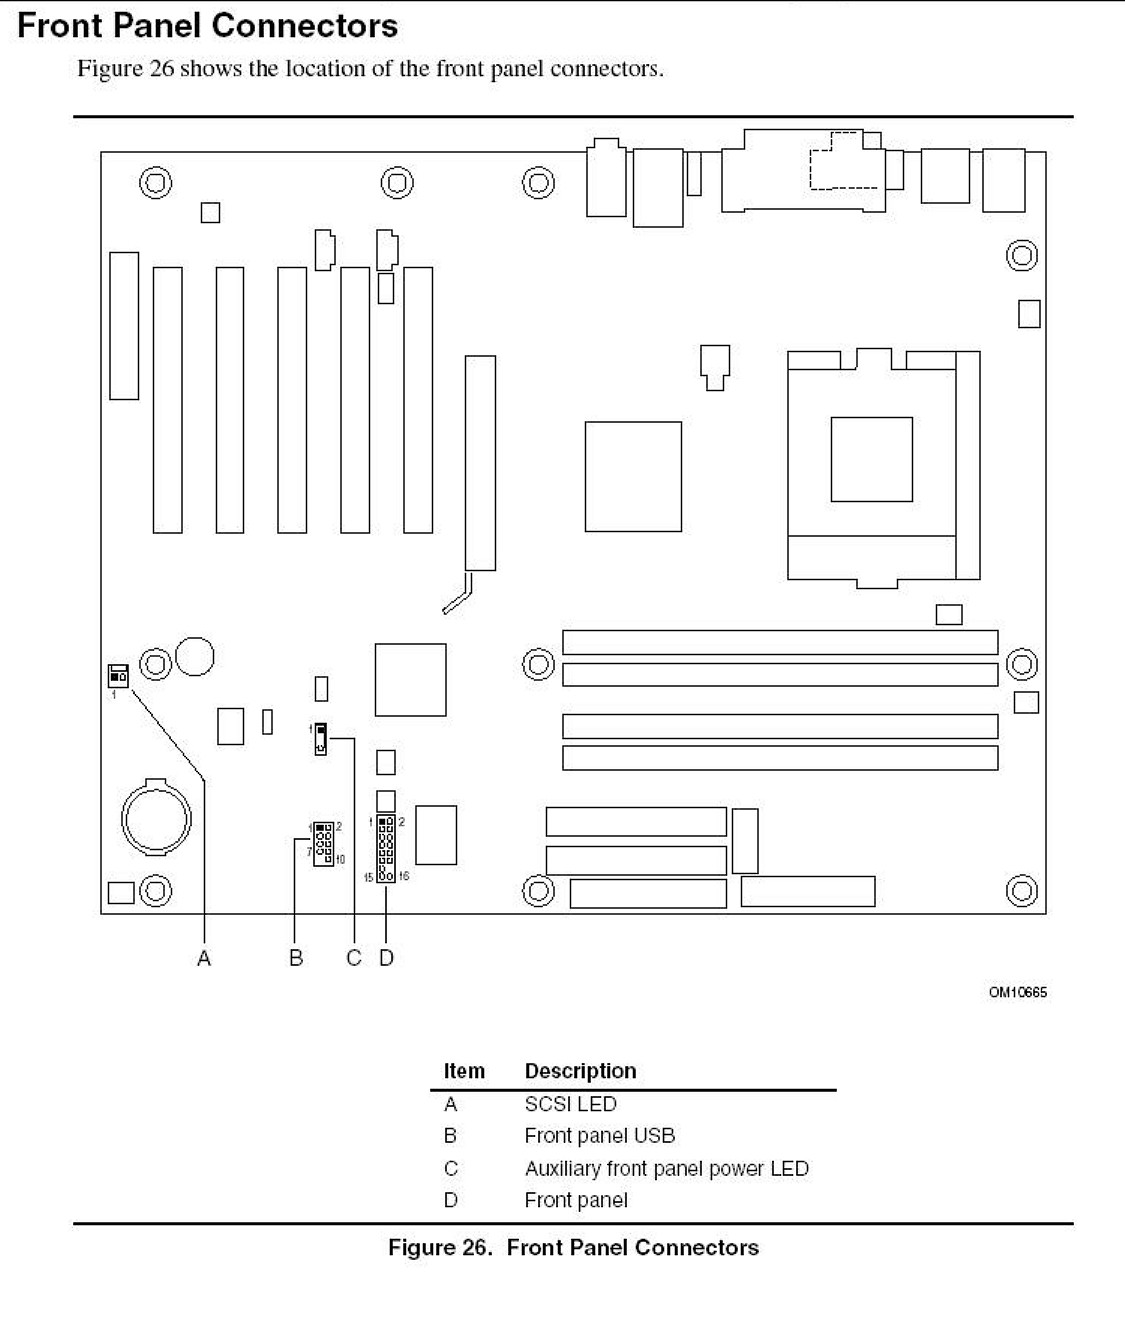
2) My case has 2 front panel USBs which have a bunch of wires (8, I think). I located the front panel USBs pins on the motherboard (Intel D 850GB) but do not know how to match those wires to the pins on the board. Intel indicates that they no longer support this model.
Any suggestions?
Thanks -
Are you sure it's not calling itself the "secondary". For the IDE Bus there is a primary slot and a secondary slot allowing both a Master and Slave device on each slot.Originally Posted by moviebuff2
See Page 70 of this linked document for pin out instructions.Originally Posted by moviebuff2
www.madsinc.com/PDFs/Intel850gb.pdf -
Hi:
Yes, it is called Secondary IDE SLAVE. The Secondary IDE Master is shown as "uninstalled" even though the CD Rom and nothing else is connected to it.
As for the front panel USB, I downloaded the entire manual for Intel D850GB. What you showed me looks different from what I have. In my copy, what you show me is called USB Port 2 Routing Jumper in both sections, Bookmarks & Diagram. In your manual, it is labeled in the diagram as USB Front Panel/ CNR Jumper Block, but then in the Bookmark section it is called USB Port 2 Routing Jumper.
USB Port 2 Routing Jumper is completely different from USB Front Panel/CNR Jumper Block. USB Port 2 Routing Jumper relates to the 2 USBs already installed on the motherboard. USB Front Panel/CNR Jumper Block relates to the USBs (if any) that are present on the front panel of the case.
Anyway, the Intel manual I downloaded only shows where the USB Front Panel/CNR Jumper Block is on the motherboard. It does not tell me which wire of the case will go to which pin of the board.
There are 8 wires for the front panel USBs of my case. 2 power, 2 ground, 2 D2 (+ & -) and 2 D3 (+ & -). It's quite confusing!
I am including the picture I got from my Intel manual. Moderators, if this violates the copyright rules, please let me know.
 [/b]
[/b]
-
As per page 66 of the linked manual above, PWR on pins 1 and 2, d2+ on pin 3, d2- on pin 5, d3+ on pin 4, d3- on pin 6, GND on pins 7 and 8.
-
Thank you, sir!
I will definitely try it out. -
As to your CD-ROM, you will need to look at the back of the CD-ROM and make sure the jumper next to the IDE pins is set to the master position. Drives usually have this listed on the back above the jumper block or on the top label of the drive. Place this jump over the master pins and place the CD-ROM on the end connector of the IDE cable.
-
My CD Rom is one of those cheapoes "made in
". I got it brand new for $5. It does not have any instructions, printed or engraved, on itself.
Anyway, as I said earlier, I tried all 3 positions and my computer still recognizes it as a slave. I wonder if this CD Rom was designed as slave no matter what (this sounds crazy, but who knows what to expect with these cheap machines).
BTW, I think the manual I downloaded from Intel does not have any instruction how to connect the wires because nowadays all front panel USBs have just one big connector. One only has to plug it in and voila!
Many thanks for your help. -
That's one of the many things which has made home PC building simplified. Another thing that has made life much easier is the ZIF Socket for chip insertion and the newer retention blocks for heatsink on motherboards. The time savings those things have done for PC building is immeasurable. SATA has done away with the slave/master configuration as well. It keeps getting easier and easier.Originally Posted by moviebuff2
-
Here are the steps that I follow...
1. Release the lever and insert the CPU into the ZIF socket. Press down the lever.
2. Apply heat paster to heat sink and mount onto cpu. Make sure it's properly seated and connect the heat sink power connect to the mobo.
3. Insert the RAM module. Make it's the right orientation and right memory bank. Usually it starts from bank 0.
4. I assume that the PSU is already mounted onto the case. Mount the motherboard onto the case. Some good casing has a motherboard try. You just mount the motherboard onto the try and mount the try onto the case.
5. Connect the motherboard power connector to the motherboard. Make sure it's the right orientation. Usually, there is a hook that need to hook onto a latch.
6. Install the videocard and secure it. Connect it to your monitor.
7. Connect the power supply.
8. Press the power on button.
9. You will hear a short beep. Your PC will POST i.e. a display on your monitor about the BIOS version, your CPU model and speed, and RAM size.
10. If you hear a long beep... swith off your PC immediately. Check your RAM and CPU connection again.
11. Now, you can install your Soundcard, floppy, CDROM, hard disk, and so forth..
12. Pop in your window cd and format the hard disk and install window OS. Install the motherboard driver, video and soundcard driver. -
You forgot one vital step (between 11-12 or before you power on for the second time)in most PC builds today.
Find the CMOS reset jumper and clear it as per the directions in your motherboard manual. This will save considerable time and curiousity when you find out your PC is operating slowly due to the CPU operating at motherboard safe specs.
I can't begin to tell you the amount of calls I get from people asking me why their PC is operating slowly and the POST shows their CPU operating at 1200mhz. It's almost equal to the amount of phone calls I get wondering why their single stick of RAM isn't operating in dual channel.
-
Hi ROF
Sorry! I tried to connect the wires per the instruction from the Intel manual you gave me, it did not work. My floppy stopped reading the boot disk.
Before connecting the USB wires, I could boot the disk using the floppy for both Windows 98SE and WinME. After, I got error messages "Boot Failed. System Halted" for the first trial; then I got error message "Diskette I/O Incorrect".
I tried to connect the wires in both directions. Each wire has one side with the label such as "power", "ground", etc. and the other side blank. I first connected the wires with all their blank sides facing one direction, it did not work. Then I tried with the opposite direction, it still did not work.
After I disconnected the wires, the floppy worked just fine.
I think I will have to try to pull some "teeth" out of some Intel employees.
I will keep you posted of my progress.
Thanks. It has been "fun"! aaagggrrrrr -
The problem may be in the cheap CDROM, and I wouldn't worry with it as long as it works. Suggest getting yourself a DVD writer which you'll eventually need or want anyway. Go to http://www.newegg.com/ who routinely have either NEC or Pioneer latest drives for $38 to $40 for OEM version. Also check http://www.acortech.com/ or other sites for Nero 6.6 OEM version for only $5, and then download latest updates from http://ww2.nero.com/enu/Downloads.html.
-
Hi everyone
I want to let you know that my computer is up and running.
Thanks to all of you who took time to respond to my inquiry.
My first computer built from scratch!
-
Feels good, doesn't it?
-
Although I've done it a thousand times over the feeling when a core comes to life for the first time is just a very good and satisfying feeling.
Congrats on the home built! -
WOOHOO! Now when you look at it you'll always know. Thats ALL mine.Originally Posted by moviebuff2
-
Try having no jumper at all.Anyway, as I said earlier, I tried all 3 positions and my computer still recognizes it as a slave.
-
He might get cold though.Originally Posted by offline

Buddha says that, while he may show you the way, only you can truly save yourself, proving once and for all that he's a lazy, fat bastard. -
not if he overclocksOriginally Posted by VCDHunter
-
Thanks for your kind words and encouragements.
I solved my CD Rom issue by replacing it with a DVD Rom. The BIOS now shows the DVD Rom as Secondary IDE Master.
Regarding the Front Panel USB wires, here are the correct connections:
PWR on pins 1 and 2, d2- on pin 3, d2+ on pin 5, d3- on pin 4, d3+ on pin 6, GND on pins 7 and 8.
The negative (-) pins are next the power pins.
I plugged in my external devices and voila, the computer asked and LET me install the drivers. Please note that I used the word "let". It is because if the negative (-) and positive (+) wires are switched, the computer will still recognize the unknown devices, but it will hang during the stage of driver installation.
I found the instructions for front USB connection at http://www.directron.com/installusb.html .
 Quote
Quote

Similar Threads
-
Advice needed for 1st time HTPC
By hanugro in forum Media Center PC / MediaCentersReplies: 19Last Post: 17th Mar 2012, 13:07 -
Building a new computer and need some advice.
By ingeborgdot in forum Media Center PC / MediaCentersReplies: 79Last Post: 11th Dec 2011, 13:00 -
My very 1st HDV burn to dvd/need advice please
By Canon GL-2 Guy in forum Newbie / General discussionsReplies: 13Last Post: 16th Jul 2010, 01:51 -
Panasonic DMR-E55-E55S or E55K?1st DVD recorder/1st time posting
By ToeTagged in forum DVD & Blu-ray RecordersReplies: 7Last Post: 19th Jan 2008, 15:33 -
Need advice on buying 1st LCD TV
By majax79 in forum Off topicReplies: 12Last Post: 5th Nov 2007, 12:22