


 / Vista 64bit
Intel Pentium D 950 @ 3400 MHz
SAMSUNG 250 GB / 80gig wd
1024 MB
Nvidia Corp GeForce 6600 LE
Avertv Usb2 / Winfast dvt2000h dvb
centrex , voxson , hyundia , xms888
liteon - xj-hd165h
LG / HL-DT-ST DVDRAM GSA-H10N
Ga - P4M800Pro-8237
Wintal dvdrx250 , Xbox360")
This guide explains how to convert "ANY" video format that plays back on the pc , provided the appropriate software player is installed .
Without such software , you wont beable to play them , mostly , the players are free , but convertors are not , commercial convertors , are
simply not worth buying as 65% , cause corruption in the final output .
This is where knowledge comes handy from those more experienced from years of testing applications .
To the good news :
CAMSTUDIO :
This program has been around for some time , and is freeware , though the creator ask's for donations , this is to help with additional addons
via second party developers .
I highly recommend donations ... but lets get on with this guide for now .
You will need :
Virtualdub (cutting , audio stripping , video sellecting , filters) .
Besweet (audio conversion).
Audiocity (cleaning up , filters , editing) .
Camstudio + capture codec from site (the tool you need) .
Bbmpeg (avi to mpeg2) .
Batchdemux (mpeg demultiplexing , seperate video from audio).
Ifoedit (pal) , muxman (nstc) ... dont ask , just do it this way ...
I wont explain here how to use all the mentioned tools , just how to do the capture part , and of course this is recommend for fast pc's with atleast 512mb's of memory .
Having the tools , I'll go throught the guide for converting to the final avi output , for those only wishing to go this far ...
For those wanting conversion to dvd , I recommend my dvd authoring guides as they explain the correct process using freeware tools , too the final , and enjoyable product .
Note : I have only tested this with flv files that play for 4.2 minutes .
The test subject is : Happy Tree Friends - boo do you think you are .
There funny , and I was asked if it could be done before , so here's the guide for them .
It maybe necessary , to break the original file into sub parts , this is done by starting the capture , stopping it after 5 minutes , save that part .
Rewind back a few seconds before starting next capture .
I am just adding this as a possible solution to any problems users may find when dealing with full title movies .
Another note : This also dose nstc to pal / pal to nstc
Frame rate for capture is selectable
There is almost no limit to the possibilities , however , those capturing to nstc based frame rates need to chose an exact frame rate , as camstudio at this time dosent support partial frame rates ... you know , that 29.3 , or is it 29.7 ... thankfully I live in australia , and we dont stuff around with that stuff .
You can capture to an exact frame just above the patial nstc value and use vdub to rewrite to the specified value required , this should be almost good enough for most users .
Some users may experience no audio , this depends on hardware , those using ac97 onboard should choose pc speaker , this can be detected by the app under settings .
The alternative is to join pc speaker out (or line out) , to mic input , though I have yet too test the quality this produces , or if it cause's any problems ...
Best audio is done by using a quality mic placed close to the speakers , the capture from pc speakers is crappy and sounds staticy .
===============================================
Now ... the guide .
Lets open camstudio , now it is installed (dont forget the codec from the site)
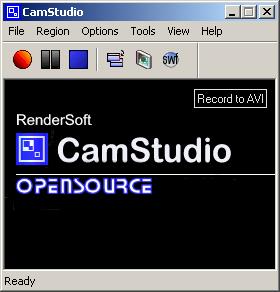
Most defaults will do what is required so
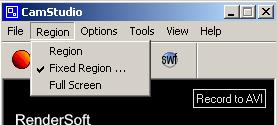
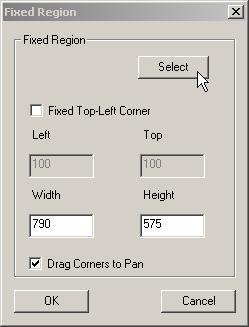
Having chosen "fixed region" , this next box appears , leave this for a second , will be back here in a second .
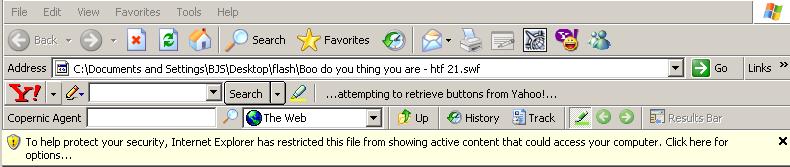
Next is to open the file we wish to record , I'll open a flash file (sfw) , and use windows internet explorer to play it back .
Those with xp sp2 will notice the yellow blocking tab appear .
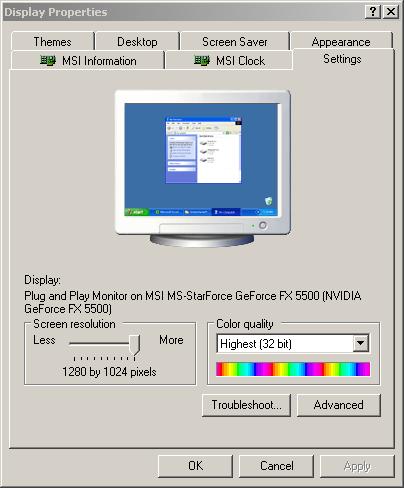
This becomes a little tricky here , so drop everything , or move all open programs to one side of the screen , and right click the screen , and sellect properties .
Go to "SETTINGS" , and notice your screen resolution ... mine is 1280x1024
Ok , close this , and bring internet explorer back onto the screen .
Now I'll downsize the window , so it fills an area of 780x580 .
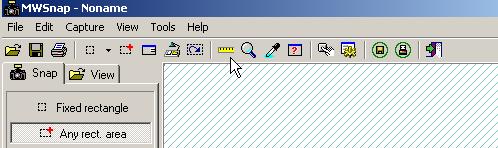
To do this , you can use a tool called mwsnap , which has a ruler built in to it for measuring things on screen
This is also the tool I use for all my guide snapshots , pretty cool ... http://www.mirekw.com/
Opp's , camestudio can be found here ... http://www.rendersoftware.com/products/camstudio
Ok , The reason I have internet explorer set to 780x580 is because I'll be downsizing it later to pal 720x576 for dvd , but for those only wanting
to convert to avi , you can choose any size you wish . This number is also dividable by 4 as required my most codecs .
Back in that Fixed region box , hit that select button , and place the mouse in the bottom right corner of the internet explorer window , then hold down the left mouse button , and drag to the upper most left corner , just inside the windowed area where the file will play back , then choose Ok .
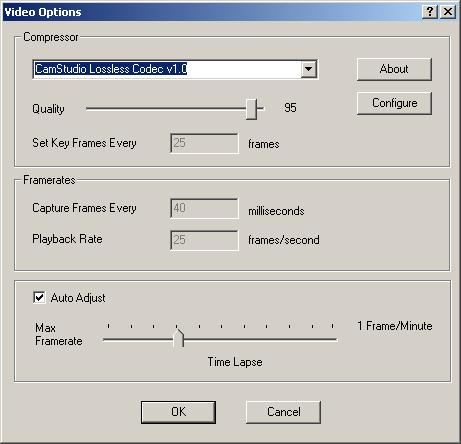
Now back in camstudio , chose options , then video options , and use the camstudio compressor for compression only .
That bar at the bottom is how you choose the frame rate , for pal it's 25 , for nstc , which can be almost anything , from memory I think 23 frames
is frame acurate , as this program dosent support partial frame captures , so if you know of an nstc frame rate which is frame acurate , I recommend you use it .
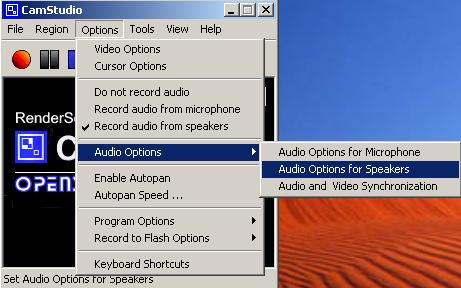
If you have not setup the audio as yet , you should
Then hit auto search
If you are unable to , then I would recommend you grab a double ended stereo cable , and link your line-out to mic input , then check the mic in feature and test it , however this might be only for those with fast systems as you will be recording 2 streams at once and this is considered memory intensive , esspecially if the recording gose for some time .
If audio is still unavailable , I recomend recording from mic , this can then be converted later in virtualdub .
Having succesfully tested for audio , click "close button"
Camstudio comes with a set of default keyboard functions , two of these are : F8 (record) , and F9 (stop) .
Now start the recording , F8 , and you should have a new screen box appear , just move it so it covers the playing window .
Go now to ie and do this ...
When finished recording , hit F9 .
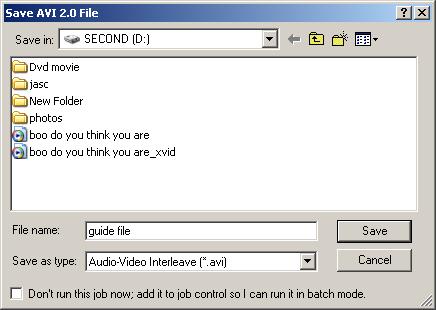
You will be asked for file name , and where too save it , then camstudio will go to work saving the file , just wait till it's done .
When done , close internet explorer , close camstudio , open virtualdub , and open that avi that was just saved .
------------------------------------------------------------------------------------
Virtualdub can now be used to extract components .
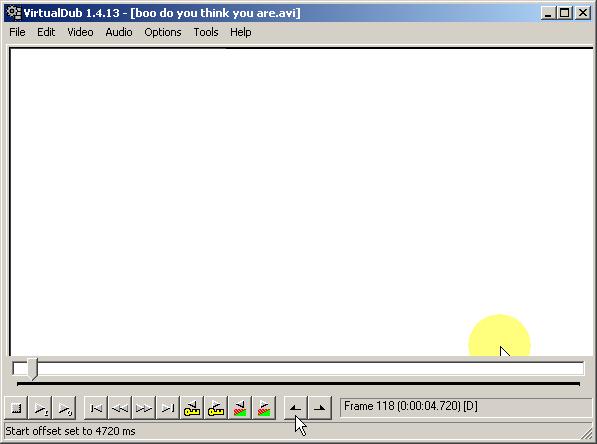
You may wish to remove rubbish from the start , so go to the first frame where the video you do want to keep starts from Then hit the button shown in this next picture with a mouse cursor .
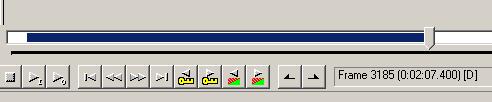
Now grab that button on that bar , and drag it right till the last frame of what you want is in the view , and hit the button to the right of the one
marked by the cursor .
This locks to only the chosen video sellection , and removes rubbish from the start and end , only the chosen part will be saved out .
As you will notice below is my chosen section locked in place ready to add filters , ect ...
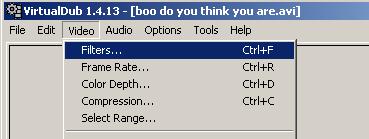
Now head to filters
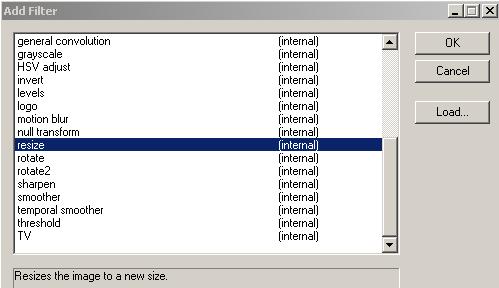
Choose add
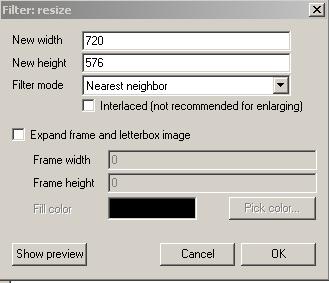
Then double click resize .
The following window , I have resized the video to suite the format I wish to produce later on dvd for pal
Click ok , then ok again to return to vitualdubs main window ...
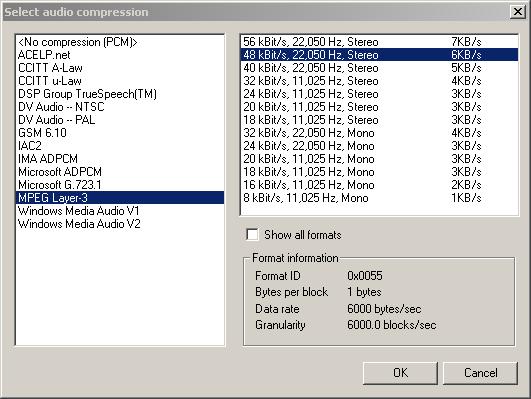
As for the audio tab , select full processing , then chose conversion , chose 48khz if its to be used for dvd later , if not , leave it at 41khz .
Now chose audio compressor ...
Thats the default I use all the time here , you can chose what you want , but you might get an audio error when you try saving the avi .
Now for those wanting dvd 48khz , dont compress , just go to File , Save Wav ... convert that audio file using besweet to ac3 later .
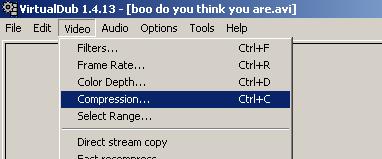
Video compression .
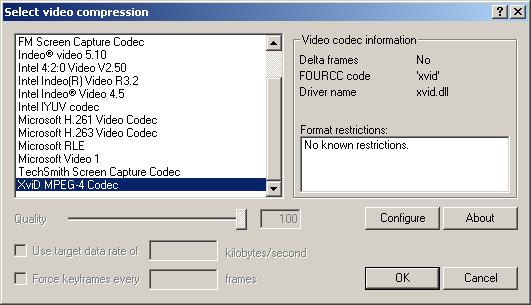
Then , for general avi compression I choose .
Now , for myself , I am happy not too fiddle with xvid's defaults , but you can if you wish ... but your on your own there ...
Back in virtualdub .
Chose location to store file , and name
And let it go , if error , this is normally experienced from audio compression problem , please choose a different mp3 value (most 4kpbs should work) .
=============================================
For info regarding conversion to mpeg2 or dvd mpegs , please refer to my other guides .
This concludes the conversion process of any type of video file , playable on your pc .
Just remember this guide wont help you if you dont have the software capable of playing the video file back on your pc .
Recommended too those with fast enough pc's , these process's can be memory intensive .
This guide and all conversions were carried out on :
Athlon 2800xp
512mbs ram
Windows xp + sp2
FAT32 partitioned drives .
Should work under other os's (win98 , win98se , winme)
Mov requires quicktime
Rm + Rmvb requires realmedia player
Wmv , windows default player
I hope you find this more helpfull than those crapware products that fail to do the job properly , after all , my way is free ...
Will next test mov , rm , rmvb , asf , and other weirdo formats soon ...yes , it woks , thank god for that .
I had a full title converted to rvmb once , now its in mpeg2 format , saved myself once more ...
Update :
Mov has problem under xp caused by directx9 screen overlay , use super instead to convert those , under 98 , no problem .
Super here :
http://super.free.free.fr/home.html
===========================
Just an addon : Zd soft screen recorder may also prove to be worth having ... capture a those visualization's in media player / winamp , or other media player ... even game's on pc .
Some of these will require a very good pc setup ... for 2 gig cpu setup's , open media file , dont start it yet ... setup screen recorder , then wait 2 minute's before you start playback ... convert via super ... trim with vdub ... and enjoy .
Just did a capture of iceage in koolplaya ... worked well ... that'll fix those other format's .
+ Reply to Thread
Results 1 to 1 of 1


 Quote
QuoteSimilar Threads
-
Convert Webcam Video for TV - uncompressed avi > asf > mov - best solution?
By nakedgun in forum Video ConversionReplies: 0Last Post: 17th Nov 2011, 06:41 -
backing up almost 2TB of video files (wmv, avi, ect)
By 5200north in forum Newbie / General discussionsReplies: 6Last Post: 14th Apr 2011, 21:08 -
Need Help trying to watch PC H264, AVI, ect. via Wireless router to TV!!
By angel77 in forum Newbie / General discussionsReplies: 1Last Post: 25th Feb 2010, 12:04 -
free sound effects , laser , explosions ect?
By Bansaw in forum AudioReplies: 9Last Post: 28th Nov 2008, 13:24 -
RMVB free edit tool?
By DereX888 in forum Newbie / General discussionsReplies: 10Last Post: 19th Aug 2007, 14:24