


Over the past 6 months or so, I must've made quite a few DVDs for others, using firstly with Windows Movie Maker & recently 2 DVDs using Adobe Premier Pro.
My very lastest video editing is around 32 min. & 30 seconds. as it can be seen from the image called "AdobeTimeline.jpg"
As it can be seen from the green coloured timeline that I've already rendered the file by going through "Sequence >> Render Work Area" option.
Next thing I did was to choose "File >> Export >> Adobe Media Encoder" which bring me on the screen as seen in image called "AdobeTranscodeSetting.jpg"
. I then press OK, which takes me on the Save As box, asking me to name the file & I then press Save, which then straight gets followed by "Rendering" by Adobe.
So far I've tried various settings including "PAL DV High Quality 4MB VBR 2 Pass" & "PAL DV High Quality 7MB CBR 1 Pass". (I wonder, however, if anyone can kindly enlighten me a bit towards the purpose of selecting each of the PAL related settings given).
Final state of Adobe I do is File >> Export >> Movie & save the movie, however, I get the error message, shortly afterwards that "Disk is full" when I already got around 50GB of disk space free in my hard drive. Also, do I HAVE to choose "File >> Export >> Movie" option to save the final movie OR does the final movie get created simply after "Transcoding Setting", since I can see the file name in my saved location though (which includes 2 files i.e. one video & one audio.
Finally, I used Nero to burn the whole work onto a DVD. I wonder why though (never happened before, but only this time) I'm getting sound clip LONGER than the video clip & the video clip is ONLY 18 min. instead of 32 min. & 30 seconds (the actual length of the movie, after editing in Adobe). Sound clip is extended up to 32 min. & 30 seconds but for some unknown reason video clip is ONLY around 18 min. This can be seen from an image called "nero.jpg".
Any help that can relieve my stressed brain cells would be greatly appreciated. [/img]
+ Reply to Thread
Results 1 to 17 of 17
-
Nope, I'm NOT God, but I'm British (which is the next best thing ;) !!!
-
"Capturing" (transferring) to DV isn't hard, so even Windows Movie Maker couldn't bugger that up I wouldn't think. If you're looking for alternatives, I like ScenalyzerLive, but there's also WinDV, DVIO and a few others in the tools section.
Premiere Pro should be great for your editing - encoding I'm not so sure abot. Maybe Daamon might have some pearls of wisdom regarding frameserving here ?
As for the settings, all I can tell is that one is non-interlaced, 2-pass VBR with 4000kbps average whilst the other is non-interlaced, 7000kbps CBR.
IMHO there are much, much better tools to author with. I like TMPGEnc DVD Author, which is pretty simple to pick up and not too many places to go wrong. This also means that there's not a lot of deviation "outside the square" in terms of what you can do in it though. DVD-lab or dvd-lab pro give you much more freedom at the expense of a much steeper learning curve. There's also freeware such as GUI for DVDauthor, dvdauthorgui, IFOEdit, and a few more in the tools section.
As for your 18 minute problem, may be this will help:
Why can't I capture to files bigger than 4 GB? / Why can I only capture(copy) ~18 min DV?If in doubt, Google it. -
Some questions:Originally Posted by j4mes_bond25
Is the original video from a DV camcorder? or something else?
Is the project format PAL DV 4:3 or PAL DV 16:9? or something else?
I'm attempt to explain the "Adobe Media Encoder" settings:
PAL DV High Quality 4Mb VBR 2 pass
PAL DV High Quality 7Mb VBR 2 pass
-------------------------------------------------------
2 Pass Variable Bit Rate (VBR) is used to force fit your program into a 4Mb/s or 7Mb/s average MPeg2 file. In this way you could be confident the DVD disk space will come out exactly at that total rate (or space). Within the file, playback will vary above or below that average rate based on motion detected in the first pass.
PAL DV High Quality 4Mb CBR 1 pass
PAL DV High Quality 7Mb CBR 1 pass
-------------------------------------------------------
Constant Bit Rate (CBR) encodes at a constant 4Mb/s or 7Mb/s over the full program segment. This is often used for handheld camcorder material because motion is almost always present. For DV video I would use an even higher 8Mb/s+ rate to get the best DVD quality possible. The cost is recording time ~1hr @8Mb/s.
PAL Progressive High Quality 4Mb VBR 2 pass
PAL Progressive High Quality 7Mb CBR 1 pass
-------------------------------------------------------
This would normally be used for progressive sourced material (e.g. captured animations, computer 3D animations, film transfers, progressive camcorders, etc.). This is not normally used for interlaced MiniDV camcorder information because there is a deinterlacing quality penalty and no real advantage for DVD to TV set playback.Recommends: Kiva.org - Loans that change lives.
http://www.kiva.org/about -
How did you know I'd end up reading this thread? Have you been peering through the window of my 3rd floor flat again?Originally Posted by jimmalenko

@ j4mes_bond25: I edit using Premiere Pro 1.5 and frameserve to TMPGEnc Plus using Debugmode Frameserver.
Why? Coz I've gotten to know TMPGEnc and like its results, and figure "why fix something if it ain't broken?". I don't save to DV AVI and then encode from that coz, to me, it's quicker and doesn't require as much disk space (though the latter isn't really an issue for me). Sure, the frameserver uses up some memory, but I've got 1Gb so it's not a problem.
If you do give it a go, use the RGB24 option.There is some corner of a foreign field that is forever England: Telstra Stadium, Sydney, 22/11/2003.
Carpe diem.
If you're not living on the edge, you're taking up too much room. -
The rendered video and audio on your timeline are in the "project format" (e.g. DV video and PCM audio for DV format).Originally Posted by j4mes_bond25
The Export -> "Adobe Media Encoder" function creates an encoded version (e.g. DVD MPeg2) of the timeline as defined by the yellow bar. It does not save your project timeline.
Your project file save saves all your settings on the hard disk including all rendered timeline segments. The "File >> Export >> Movie" option transfers the timeline to the Movie file (as defined in preferences) which is usually DV-AVI format.
You can also "Export Timeline - Export to tape" and record the timeline to your camcorder.
I don't know why you got "disk is full" unless the partition or drive specified had too little space for the DV-AVI file (13.5GB/hr).
It is also possible to "frameserve" the timeline to a third party encoder without first saving the timeline to a "Movie" (DV-AVI file).Recommends: Kiva.org - Loans that change lives.
http://www.kiva.org/about -
For a moment there I thought you said "peeing"Originally Posted by daamon
Needless to say, I was "pissing" myself laughing If in doubt, Google it.
 -
Thanks for your reply, however, I'm yet bit at sea, solving this problem seems a long way to go. Yes, i've uploaded the main video from a digital camcorder. The project format is PAL DV 4:3.Originally Posted by edDV
I've tried previously with 50min long & 37 min. long video (after editing in Adobe) & it worked well, but not too sure which settings I'd chosen at that time, out of the two you mentioned here. So, would you say, with this present 38 min. long video (after editing in Adobe, as you can see in the image itself), I should try selecting "PAL DV High Quality 4Mb VBR 2 pass" & then chose File >> Export >> Movie, cos as far as I know, I've already tried it & as soon as I chose File >> Export >> Movie, I get the error message saying disk is full.Originally Posted by edDV
I've got TMPGEnc software, which I used quite successfully in the past, however, that was when I used to use Windows Movie Maker. But now with Adobe as I'm NOT getting any FINAL MOVIE file in MPEG format thought File >> Export >> Movie (cos of getting error message), I couldn't possibly use it within TMPGEnc software, as well, since it mainly accepts AVI or MPEG files only.
Lastly, I've edited work of 3 different files in Adobe & the 1st & 2nd file has successfully managed to get into Nero (equal video time & equal audio time) so do you reckon, if I burn these 2 files onto 2 different DVDs & then DELETE these files from the computer & hence creating space, would help me work effectively towards the 3rd file & NOT encounter the error message saying "Disk Full" in Adobe ???Nope, I'm NOT God, but I'm British (which is the next best thing ;) !!! -
Personally, I believe that 4MB/s is not High Quality for either VBR or CBR encoding. The bitrate is simply too low for that type of qualitative description. If your footage is under 60 minutes long, use the 7 MB/s settings. Some recommend CBR for camcorder footage, simply because it is often shot handheld and therefore has a lot of movement, even if it isn't obvious.
A 7MB/s CBR encode will give you around 85 minutes on a single 4.38 GB disk, so 50 minutes should eat around 2.5 GB of disk. If you don't have this much in the target area, it won't work.
You say you have 50GBs of empty disk - it is in the same partition ?Read my blog here.
-
Thanks for your reply & I'll try using PAL 7MB setting. Let me know, whether I should go with 1 pass or 2 pass setting & whether it should be VBR or CBR, bearing in mind the overall edited video in Adobe less than 60 min.Originally Posted by guns1inger
I checked the disk space left as 50GBs simply clicking on "C" drive option, showing the pie chart. However, being not quite a technomaniac myself, I'm rather unsure about the "partition" aspect you asked. Any idea, how do I check it & if it's not what it should be, for my requirement, how do I get it changed ???
Your help would be greatly appreciated.Nope, I'm NOT God, but I'm British (which is the next best thing ;) !!! -
For my money, 1 pass VBR isn't woth it. If you want the speed of a single pass, go CBR. For your project it will be the simplest option.
It sounds like you have a single disk (c:\ ), which has planety of space free. Without actually being able to see your setup, I am at a loss as to why Premiere can't use it.Read my blog here.
-
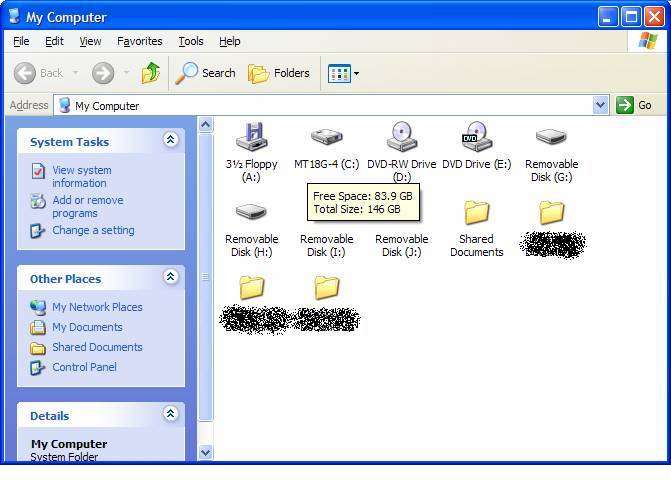
I've got quite a few disk, as it can be seen from the screenshot. Around 83GB is the free space I've within my C:\ as you can see from the comment within the screenshot, just next to the C:\ drive. Wonder, why I never encountered any of such problem before & now, it all came at once, all of a sudden.Originally Posted by guns1inger
 Nope, I'm NOT God, but I'm British (which is the next best thing ;) !!!
 -
The c:\ is the only fixed hard disk drive. D:\ and E;| are optical, and g:\ onwards are probably from a memory card reader.
When you try to export the video, you are saving to the c:\ drive, aren't you ?Read my blog here.
-
Yes, I would recommend the highest CBR encoding rate for camcorder video.
VBR is usefull when attempting to fit a longer video on a DVD.Recommends: Kiva.org - Loans that change lives.
http://www.kiva.org/about -
Yes, I'm saving everything on my C:\Originally Posted by guns1ingerNope, I'm NOT God, but I'm British (which is the next best thing ;) !!!
-
Thanks to every single one of you for trying their best to point me in the right direction & surely it did help hugely.
This project alone was taking around 60GB of my hard disk space, which includes the actual unedited video from the camcorder of around 3 hours, plus the Project space followed by further huge space of finished movie, along with few background music, I added, so overall was around 60GB.
What I did was firstly deleted all the rendered files that gets saved within an Adobe folders like Auto-save & Preview files, etc. which was taking around 12GB of space.
I then chose the option of File >> Import >> Adobe Encoder & then selected, as recommended PAL 7MB CBR setting. After this process, I did NOT choose File >> Import >> Movie option (as I had been doing, up until now, whereby I was getting error message saying the disk is full), I straight away uploaded the MPEG video & WAV audio files to Nero & burnt it & this time, I was getting exact length of video along with audio, as opposed to the earlier hash up.
All in all, since I had stressed every single of my brain cells over the last 2 weeks, it was getting bit annoying but then again I guess, losing patience is the last thing one should do when working on such a project, where you just ................ LIVE & LEARN (from mistakes & experiences).
P.S.
I still wonder as why WITHOUT choosing File >> Import >> Movie option, I could get away with it & straight after encoding, I was able to upload it in Nero ??? Lastly, if I use higher capacity of blank DVD i.e. more than standard 4.7GB then I presume, I can fit in longer video. However, I wonder whether Nero takes something that's MORE than 60min. [/b]Nope, I'm NOT God, but I'm British (which is the next best thing ;) !!! -
Any blank, be it single or dual layer, has a finite capacity for data. In the case of standard single layer disks it is 4.38 GB. How much video you can fit into this space is dependent purely on bitrate, and the amount of quality degradation you are prepared to accept. Lower the bitrate, get a longer running time, and depending on the source and just how low you go, a lower quality output as well. If you want to keep your DV at the highest possible quality, only put around 70 minutes of footage on a disk, with a CBR encode of around 8000 - 8400 kbps.
However, if you shoot on a tripod, use good lighting, and keep the camera steady, you will find you can lower the bitrate, possibly use VBR encoding, and push the amount of footage out to 100 minutes or so.
Look up the tools section for bitrate calculators, and choose one you are happy with. This site has an online calculator, and I also keep a copy of vcalc around for when I'm offline. Never encode without doing a quick check of your rates.
If your file sizes blow out to larger than a disk then your bitrate is too high. In this case, Nero will probably re-encode to fit, and I can guarantee you the results it produces will be much uglier than if you had encoded to the correct bitrate first time around.
Once you get a little more confident, move away from the templates (High Quality 7MB/s CBR stuff) and set the bitrate you want. You should be able to predict the size to within a few MB's if you use CBR or 2-pass VBR.Read my blog here.
-
Interesting stuff there. Thanks for enlightening me here.Originally Posted by guns1inger
By the way, since you are around, I wonder when we capture video from a digital camcorder to Window Movie Maker, we can do so, from start to finish in one go (so I can go downstair & munch on my lunch, in the mean time), however, when capturing in Adobe, I wonder why does it capture in "clips" rather than in one go, since this way of capturing makes me stay around the PC to press start recording again for the next clip & so on.Nope, I'm NOT God, but I'm British (which is the next best thing ;) !!!


 Quote
QuoteSimilar Threads
-
Adobe Premier 5 AVI's won't load into Nero Vision 10
By rlarden in forum Video ConversionReplies: 1Last Post: 2nd Jul 2011, 05:43 -
VOB sync problems when selecting within a file
By Fishcat in forum Newbie / General discussionsReplies: 6Last Post: 23rd Feb 2009, 13:50 -
Problem downloading AVI file to Adobe Premiere Eliments 7
By NP11073 in forum EditingReplies: 13Last Post: 12th Oct 2008, 03:45 -
Selecting different frame to display on video file
By MindF in forum Newbie / General discussionsReplies: 10Last Post: 11th Feb 2008, 17:41 -
Problem with iBook G3 after ffmpegx usage
By AndyPanda in forum ffmpegX general discussionReplies: 3Last Post: 25th Jun 2007, 17:46