


Tools required: DvdComposer
This guide shows you how you can use DvdComposer as a quick and easy video composer to add borders or other blending effects to your video clips.
For this example, we are going to add a filmstrip border to a video clip, and then blend the whole thing onto a background image.
1. Add a DropZone to hold our video clip:
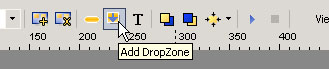
Start a new project. On the empty menu, add a DropZone by doing one of these:
a. Hold down the SHIFT key and drag the mouse across the menu.
OR
b. Click the "Add DropZone" button on the toolbar.
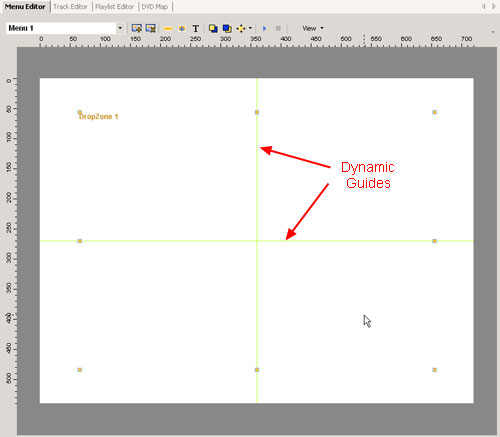
An empty DropZone will be created, and it acts as a placeholder for our video clip. You may resize and position this how ever you like; this is where the video clip will be blended onto. Since it is going to be our main video clip, we enlarge it to fill a big portion of the menu.
As you re-position the DropZone, notice the green dynamic guides popping up. These are helpful tools for positioning. Dynamic guides are automatically added to the center of the menu on both axis, and the edges of the TV-Safe region. If you have other components on the menu, dynamic guides will be added to their centers and edges. This allows you to align the components with respect to each other easily.
We align the DropZone to the center of the menu.
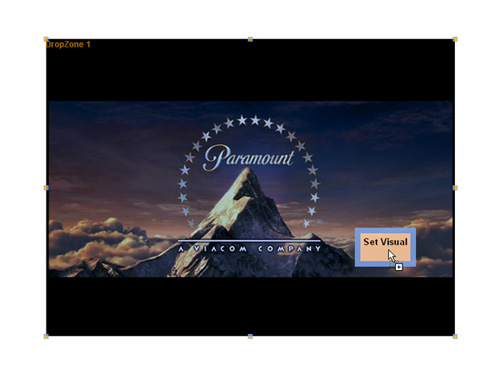
Next, we add our video clip onto the DropZone. Locate the video clip from the Explorer panel (you can also drag it from any other Windows Explorer) and drag it onto the DropZone, hold it there until the context menu pops up, and select "Set Visual".
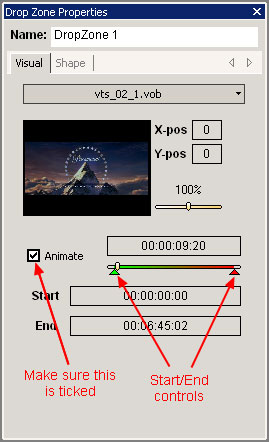
In the DropZone Properties window, ensure that the "Animate" checkbox is ticked.
Otherwise, only a Poster Frame still image of the video clip will be created. You may also crop and only use a portion of the video clip by setting the start and end time.
2. Adding a border and background
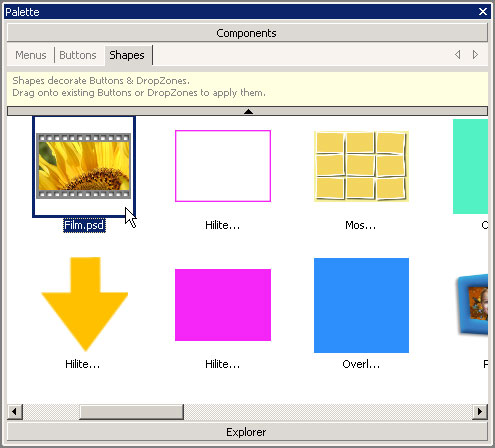
We decide to use a filmstrip as a border for the video clip. To do this, we are going to use one of the Shapes that come installed with DvdComposer. Go to the Palette panel and click on the "Shapes" tab under "Components". Locate the "Film.psd" file.
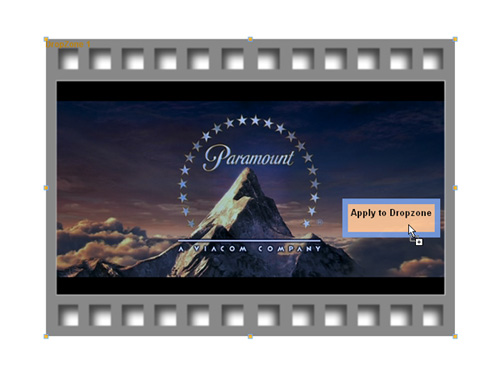
Drag this onto the DropZone with our video clip, and select "Apply to DropZone" in the context menu popup.
You may use other shapes that suit your needs. Shapes are basically a Photoshop PSD file that contains layers specifying the pixels to blend onto a visual, and the mask to apply to the visual. We will look into creating these shapes in a later tutorial.
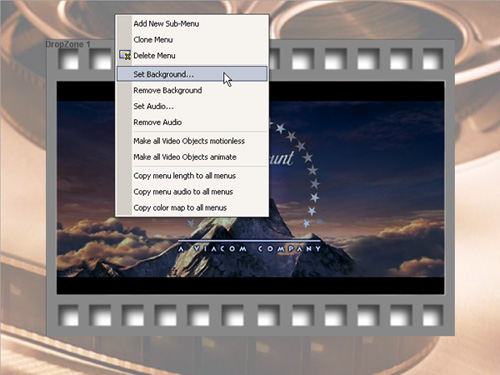
The last step is to set a background on which the bordered video clip will be blended onto. We do this by doing a right mouse click on the menu background, and select "Set Background..." in the popup menu.
We may also use the context menu popup like what we have done earlier for the DropZone, by dragging the background image file from the Explorer onto the empty menu, and select "Set Background" in the content menu popup. Remember, there is always more than one way to accomplish the same task in DvdComposer. Whichever way you choose depends on your preference and the situation at hand.
Note that you may also use a video clip for the background.
Once this is all setup, you can preview it all using the "Play" button on the toolbar.
3. Timing, Video type and Aspect Ratio adjustments
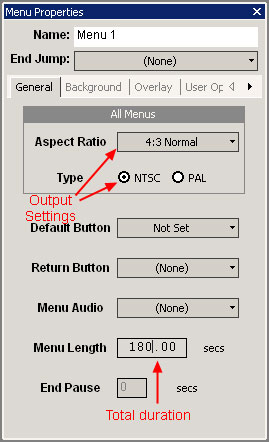
Click on the menu background to switch the Properties Panel to that of the Menu Properties. There are a few things to set here:
First, set the video type and desired aspect ratio of the output video. The supported video types are NTSC and PAL. For the Aspect Ratios, select "4:3 Normal" for a standard aspect ratio. For widescreen, select one of the 16:9 options; the "Letterbox" or "Pan & Scan" options don't make a difference here, the result will be a widescreen video. For now we leave it as a standard NTSC video.
Next comes the duration. By default, the duration is set at 30 secs. This should be set to the desired length of the final video (we set it to 180 seconds for this tutorial). If the length of the video clip in the DropZone is shorter than this, the video clip will be looped for the entire duration. If it is longer, it will be truncated at the end of the menu duration. You may also set the portion of the video clip to use, as stated above.
4. Generate the video file
We are almost ready to generate the video file. There is still one more thing to add: DvdComposer needs the project to have a video track added before it will generate anything. To satisfy it, we need to add a dummy video track to the project. A short one will do, as it doesn't affect the menu video, which is what we are interested in.
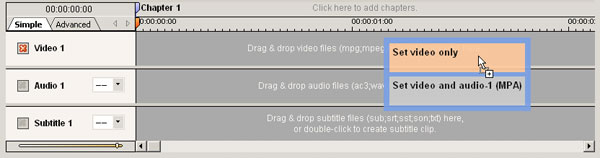
Click on the "Track Editor" tab to switch to the Track Editor. Drag a short video clip onto the timeline and select "Set video only" in the context menu popup. This will be our dummy video track, no other settings need to be done.
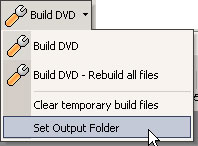
Last, click the downward arrow to the right of the "Build DVD" button on the toolbar, and select "Set Output Folder", to set the location where the video files will be generated.
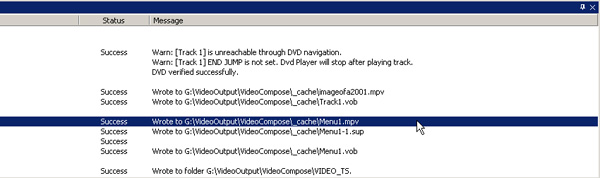
Once everything is set, click on the "Build DVD" button. DvdComposer will start to build the project. Other than some warning messages during the DVD verification stage, the process should complete successfully.
We ignore the warning messages, as it won't affect the menu video. The final video "Menu1.mpv", will be generated under a hidden folder "_cached" in the output folder.
Note
You may use this to blend and combine multiple video clips, by adding multiple DropZones for each clip and apply different shapes. Together with the ability to create customize shapes that blend into videos (to be detailed in a later tutorial), you will be able to use DvdComposer as an easy way to add effects to your video clips quickly.
Note that the final output is an elementary video file, without any audio components. You can use a muxer to multiplex a separate audio track.
+ Reply to Thread
Results 1 to 1 of 1

 Quote
QuoteSimilar Threads
-
Few avidemux questions, render clips in HD and remove black borders?
By Aeterna in forum EditingReplies: 1Last Post: 31st Jul 2011, 09:24 -
Help with cropping & adding black borders with Avisynth
By jda in forum RestorationReplies: 9Last Post: 11th Oct 2010, 07:10 -
Adding black borders with StaxRip
By denadel in forum Newbie / General discussionsReplies: 4Last Post: 29th Jan 2010, 10:01 -
Adding borders WITHOUT resizing...
By creamsoda in forum EditingReplies: 14Last Post: 4th Jan 2010, 15:40 -
Sony Vegas Pro 8 - Adding VideoFX to many video clips at once.
By jnaizer in forum EditingReplies: 2Last Post: 30th Dec 2008, 20:28