


Why resize the video at all? I mean, I plan to archive a copy of my DV videos in Xvid format on my PC to eventually be put on a DVD as MPG2 video. My TV is a regular TV (interlaced) so I don't need to de-interlace. Even if I did, I fail to see why a resize is necessary? If the original source is 720x480 (NTSC) and I want to play back on a TV, why would I ever need to resize?
thanks,
Kevin
Try StreamFab Downloader and download from Netflix, Amazon, Youtube! Or Try DVDFab and copy Blu-rays! or rip iTunes movies!
+ Reply to Thread
Results 31 to 53 of 53
Thread
-
-
If you go DV -> XviD -> mpg/DVD, you lose most of the original quality - much better to go DV -> mpg/DVD, resizing or not.
/Mats -
Hi all,
I bought a mid-range camcorder (Panasonic PV-GS39) and I can't say I'm all that impressed with it. The image quality is not as good as I had hoped. The indoor footage is always dark even with good lighting, and the outdoor footage is nice but is still grainy/blurry. It's not as crisp as I would like it to be.
My question is, would buying a higher-end camcorder give a better picture? (Especially those that record direct to DVD instead of using DV tapes?) -
DV is on all accounts better than DVD camcorders. The latter only caters for those who just want to instantly watch their recordings on a TV and then archive it, and won't be bothered with such arcane tasks as editing and authoring.
/Mats -
640:480 is 4:3Originally Posted by Stonechatz
720:576 is 5:4
720:540 is 4:3
for what it's worth. -
a) why do you resize the video? isnt it a loss in quality?
b) what about 16:9 vids?
c) what record method on my camcorder should i prefer for xvid/divx - prog scan (25p) oder normal (50i) (in PAL)?www.hc96.de -> All about the Sony DCR-HC96 and Camcorder accessories. -
I seem to be having a problem with this guide and need a hand.
I've captured an OOP VHS movie thats 92 minutes long using the ADVC-100 which produced a 21+GB file. I followed the steps in this guide and for the file size I set it to 972,800kB (1024kB x 950) to get a file just under 1GB. The only steps I added were two more filters, sharpen and contrast/brightness. After letting it work overnight I wake up to an XVID file thats about 3.5GB which is way bigger than I want.
How can I get the right file size?
Thanks. -
Are you sure you're not using some CQ / Target Quantizer (Encode mode) mode when encoding? Also, make sure you've configured the audio correctly.
Personally, I'd use AutoGK, at least as I'm no expert on configuring the codec. Produces reliable, predictable and very good results every time.
/Mats -
I use AutoGK 1.96 all the time but didn't realize the latest version supports DV file input.Originally Posted by mats.hogberg
Thanks Mats! -
If is there anybody still interesting in this. I have a little problem with this coversation.
I have Sony 355E Digital8 Camcorder with DV port. I have done everthing as told (except i used vdub's internal deinterlacer cus it's 2008 and vdub has this ability now ) Anyway on the pc everyhing is normal but when i try to watch my video on my Standalone DVD/Divx Player colors look like negative. When i switch to NTSC playback option in the dvd player's menu colors are normal. What is the problem? Why i cannot watch my videos in Pal TV. Is it is about resizing or what? ( i resized my video to 512 * 410 )
Any help will be appreciated
-
Yes, it's probably about the resize. 410 is only Mod2 (only divisible by 2). And how did you happen to pick 512x410? Oh, I know. You started with a 720x576 DV and wanted to keep the same aspect ratio. Well, 720x576 is 1.25:1 and in the wrong aspect ratio. Can't you tell that people look tall and thin? It gets resized at playback to 768x576 or some other 1.33:1 ratio, and you should do the same when encoding. Make it 512x384 or some other 1.33:1 ratio. And I bet your color problem will go away. The Resize section of the guide is very clear about how to resize properly:Is it is about resizing or what? ( i resized my video to 512 * 410 )
Or take the earlier advice and use AutoGK for the job.Resize
DV is 720x480 NTSC or 720x576 PAL with aspect ratio 4:3. DivX and XviD doesn't have any aspect ratio so we must resize the video or it will look stretched.
1. Add the resize filter, under Video->Filters, click add and add the Resize.
2. Set the new size, 640x480 or lower but with width divided height = 1.3333(4:3). Some common sizes, 640x480, 512x384, 384x288, 320x240.
3. Set the resize filter mode to Lanczos3. -
Thanks for your quick reply. I'll resize it. BTW people look just normal in 512 x 410. What if i use 512x384 is video will be cropped or streched?
And i must say my captured video doesn'T look like the original tape quality. Is it about my camcorder's streaming function or this WinDV method is outdated. Can you suggest me a better way to capture or this is the best capture method already. Check out the samples at http://www.100fps.com/ they look perfect so why mine not.
-
Member

- Feb 2002
- West Mitten, USA


There must be a problem with the way you are comparing if you see a difference between what's on the tape and what's capsferred with WinDV. WinDV isn't capable of changing the data stream coming from the camcorder. It simply takes the data and puts it in an avi container on the hard drive.
"Shut up Wesley!" -- Captain Jean-Luc Picard
Buy My Books -
I mean captured video's colours look more faded the the original tape quality.
-
Member
- Feb 2002
- West Mitten, USA
-
So how are you comparing them? If you've ever walked down the TV aisle of an electronics store, you've seen that no two TVs display colors the same way unless they've been properly calibrated. On top of that, monitors display different from TVs and the video usually appears darker. Unless your software is using overlay which can produce yet a different color result.
Rest assured that the video in the avi file that WinDV capsferred is the same as what's on the tape. If you doubt it, send the avi file back out to the camcorder on a different tape and compare the two tapes."Shut up Wesley!" -- Captain Jean-Luc Picard
Buy My Books -
@gadgetguy
@manono
Thank you. I have solved my all problems. -
My DV tapes are type-1 so do not have the seperate audio stream (as I understand it). How is it possible to use this method AND capture the audio too?
TIA. -
Member
- Feb 2002
- West Mitten, USA
-
Your DV tapes are neither Type1 nor Type2. WinDV will capsfer to DV-AVI as either Type1 or Type2 as directed by You. Both types will have audio, but some programs will not recognize the audio in Type1 because it's not in a separate channel. IIRC, there is a bug in WinDV when using device control (the checkbox between Config and Capture) that sometimes caused audio problems on some machines. Make sure that box is unchecked and start/stop your camcorder manually.
"Shut up Wesley!" -- Captain Jean-Luc Picard
Buy My Books -
gadgetguy is correct, and I'll add that I typically start the camcorder first and make sure that WinDV has started the transfer and then press the "Capture" button. This insures that the audio will be present as well - when I forget this procedure I don't get the audio.
Verified by the creator of WinDV:
https://forum.videohelp.com/topic208025.html#842293
HTH,
Jim -
Hi - thanks for the pointers. The DV tapes were already captured a long time ago by Windows Movie Maker, and it is the resulting hard drive DV files that are type-1. I have now found the excellent DVdate utility which will convert those to type-2, so now I'm away. I had already found the ulead converter but it has a problem with corrupt sound on files bigger than 4GB.
I'll use WinDV for my future captures.
Thanks for the excellent guide.
Cheers. -
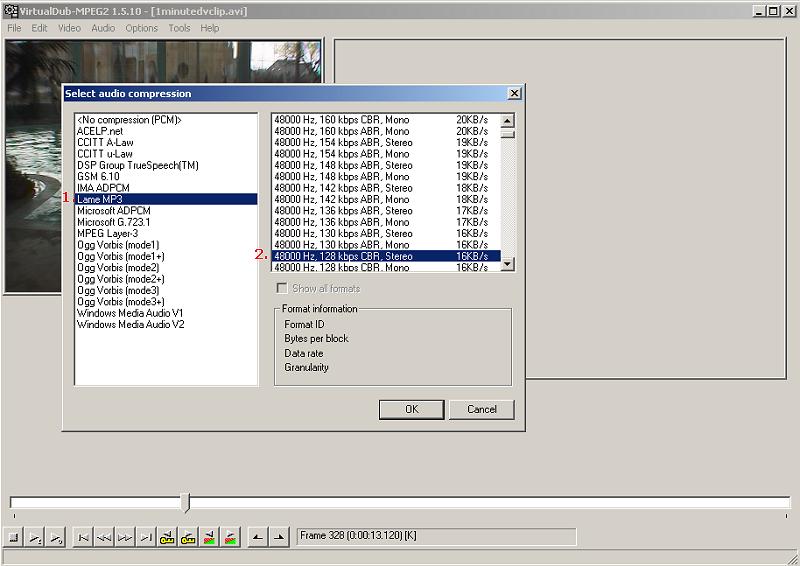
Hi! I hope you don't mind I quoted a pic from Mr. Baldrick's post, just to emphasize (my apologies, I do not know how to make a thumbnail out of it). I had tons of homevideos that I transferred using WinDV via firewire and a Sony HandyCam, to convert them from DV-AVI to DivX using this wonderful method written by Mr. Baldrick. I have been using this guide for years now with success. But lately, under MP3 AUDIO method, I cannot do "48000 Hz, 128 kbps CBR Stereo 16 KB/s" on LAME MP3 anymore. The highest option it's giving me is "32000 Hz 320 kbps CBR Stere 40 KB/s". There is no number 2 option as seen in the picture. I tried changing RCA cables, but still the same--I cannot make the option higher than 32000 Hz. I don't know why all of a sudden it became like that. My LAME MP3 tool is updated. Please help. I do a lot of captures via firewire and have them converted from DV-AVI to DivX, since I prefer to have all our treasured homevideos stored in two WD Elements External Drives, than to a DVD disc. They were recorded in various tapes (Betamax, VHS, VHS-C, hi8) as well as DVD. Just a side note, I am using MacBook with WinXP Home running by BootCamp. But it never gave me this problem before. Any help would be greatly apprecited.Originally Posted by Baldrick

-
megui dose a better job now the app Virtualdub is good to edit the video tho
-
is this guide still up to date?
 Quote
Quote
Similar Threads
-
Convert Divx to Xvid batch
By nick7461 in forum Video ConversionReplies: 8Last Post: 2nd Oct 2021, 11:37 -
Need help can't convert .mp4 file to xvid using VirtualDub
By s_joy09 in forum Video ConversionReplies: 12Last Post: 19th Jul 2011, 05:52 -
Divx/Xvid problem in Virtualdub (not mod)
By leeqk in forum Newbie / General discussionsReplies: 14Last Post: 11th Apr 2010, 01:18 -
FAST convert to Divx or Xvid
By nerys in forum DVD RippingReplies: 23Last Post: 2nd Oct 2008, 00:30 -
Problem with Divx/Xvid with Winamp and Virtualdub
By mekuka_pinasem in forum Software PlayingReplies: 5Last Post: 1st Aug 2007, 11:41