


VHS 2 DVD-Video
All VHS source should be interlaced video when capturing. However, should the user decide on the quickest method for transfer of VHS to DVD then I would recommend PowerVCR II Delux 3.0 as the best mpeg2 video quality capturing utility and WinDVD Recorder as the most DVD compliant mpeg2 capturing utility.
The Quick Method
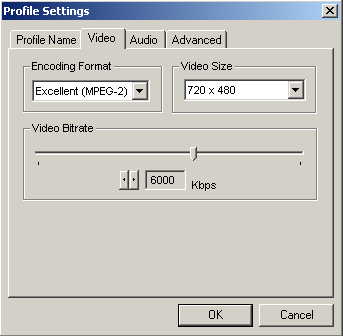
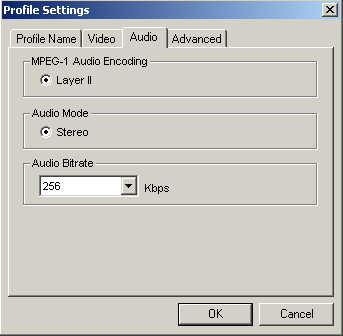
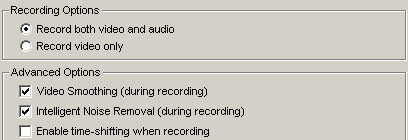
PowerVCR II Settings
Custom Profile
Recording/Advanced
STEPS
1. Capture in Cyberlink PowerVCR II
2. Demux to elementary streams with TMPGEnc*
3. Convert MP2 to WAV with dBpowerAMP*
4. Resample, clean, and normalize audio w/ Adobe Audition
5. Convert WAV to Dolby Digital AC3 using any AC3 utility
or
Convert WAV to MP2 using dBpowerAMP
6. Author with TMPGEnc DVD Author
7. Preview with PowerDVD
8. Burn with InstantCopy or DVDShrink
Provisor: Cyberlink PowerVCR II captures progressive MPEG-2 and 44.1 khz audio. I do not suggest attempting captures of VHS to interlaced MPEG-2. I have had zero success capturing to interlaced MPEG-2 where audio and video remained in sync. An alternate program that allows for capture to progressive MPEG-2 with lesser video quality but a correct audio sampling rate is Intervideo WinDVD Recorder. WinDVD Recorder also allows you to capture AC3 audio. In the event you capture to AC3 and desire to clean the audio or cut any video from the project, then use DVD2AVI to extract audio, TMPGEnc MPEG Tools to extract video, and BeSweet to convert ac3 to wav. Clean the wav, mux to video, and cut using MPEG Tools. Should you desire to skip cleaning your audio and you have captured to ac3, an alternative to MPEG Tools is Cutterman. Cutterman requires .NET technology and is capable of cutting and appending mpg with ac3 audio. Should the user desire to add transitions or any effects to the video, then MPEG-2 should not be used as a transferring format. Please transfer your video to AVI.
*Note: Should you have A/V sync issues after primarily demuxing your progressive mpeg file into mp2 and m2v elementary streams and secondarily resampling the audio to 48 khz, then I suggest as your primary step to encode your mpeg as a program/system stream with audio resampled to 48 khz wav and secondary step to demux the new stream into m2v and wav elementary streams. It seems that resampling the audio on-the-fly to an elementary stream or demuxing and then resampling, can cause sync issues. Encoding A/V data while resampling audio on-the-fly to a program/system stream keeps the A/V in sync: no issues should arise from subsequent cleaning or cutting. Be sure to encode to Half-D1 if so desired. If TMPGEnc doesn't work for you, try Canopus ProCoder.
The Thorough Method (NTSC Only)
PREPARING FOR TRANSER
Install AVISYNTH
Install a DV Codec (Panasonic is RGB and Canopus is YUY2)
Install Convolution3D (YUY2) to system32 folder
&
Install trbarry's Reinterpolate411 (4:1:1 Colorspacing) to system32 folder
TRANSFERING A/V DATA
Capture Type-2 AVI using ScenalyzerLive to C:\Movie Conversion as capture.avi
WRITING YOUR DIGITAL NOISE REDUCTION AVISYNTH SCRIPT
Verify field order of transfer data by loading in TMPGEnc XPress.
Open Notepad and create your avisynth script, saving the file as Convolution3D.avs
If your A/V data is Bottom Field First, use the following synth script:
LoadPlugin("Convolution3d.dll")
LoadPlugin("Reinterpolate411.dll")
avisource("C:\Movie Conversion\capture0001.avi")
ConverttoYUY2(interlaced=true)
ReInterpolate411()
Trim(x,y) // Do Not Add This Line Until After Loading in VirtualDubMod
crop(8,2,-8,-14)
SeparateFields()
odd=SelectOdd.Convolution3D (0, 32, 128, 16, 64, 10, 0)
evn=SelectEven.Convolution3D (0, 32, 128, 16, 64, 10, 0)
Interleave(evn,odd)
Weave()
DoubleWeave.SelectOdd()
AddBorders(8,8,8,8)
BilinearResize(352,480)
If your A/V data is Top Field First, simply remove the following line from your script:
DoubleWeave.SelectOdd()
If your A/V data is Progressive, simply use the following lines in your script:
ConverttoYUY2()
ReInterpolate411()
crop(8,2,-8,-14)
Convolution3D (0, 32, 128, 16, 64, 10, 0)
AddBorders(8,8,8,8)
BilinearResize(352,480)
Provisor: The above synth script is written for a 720x480 Source Aspect Ratio. The source is cropped to 704x464 to remove black bar horizontal and rainbow vertical overscan. Borders are added to return the resolution to its SAR. Resizing to Half-D1 resolution from a 720 SAR uses 3:1 compression and will sacrifice the Pixel Aspect Ratio. Sacrificing PAR causes blur to occur in the resulting image. However, sacrificing PAR maintains the Displayed Aspect Ratio on DVD Standalone Player playback by a total 16 horizontal pixels. The amount of blur incurred by sacrificing PAR for DAR is minimal. Nevertheless, should one decide to sacrifice DAR for PAR, using AddBorders(0,8,0,8) and a 704 horizontal SAR, resizing to Half-D1 resolution [ie. LanczosResize(352,480)] will result in a sharper image with 2:1 compression. Ultimately, in using Half-D1 resolution either DAR or PAR must be sacrificed. The only way to maintain PAR and DAR is to use Full-D1 resolution and 1:1 compression. To maintain as close as possible the PAR when resizing from a 720 SAR, it is better to use BilinearResize in place of LanczosResize.
If you decide on Full D1 resolution use the following script or no script:
LanczosResize(720,480)
Open Convolution3D.avs into VirtualDubMod and find your beginning frame and end frame points. Enter the beginning frame as value 'x' and end frame as value 'y' into the following line:
Trim(344,22665) ++ Trim(32677,47725) ++ Trim(51051,77018)
// The values shown are example points only
Provisor: The sole purpose of using VirtualDubMod is to find the Trim points. All frames between trim points will be included in final video. Multiple trim points can be created to leave out unwanted scenes or commercials.
ENCODING & DEMUXING
Open Convolution3D.avs in Cinema Craft Encoder.
Use following settings:
ES VBR 2-pass MIN: 0 AVG: 3000 MAX: 4000 Half-D1
ES VBR 2-pass MIN: 0 AVG: 6000 MAX: 8000 Full-D1
Under Video:
Closed GOPs
If Top Field First, uncheck Upper Field First. *
If Bottom Field First, check Upper Field First. *
*Note: Passing your video data through the avisynth script may reverse the field order. It is necessary at this time to load your .avs synth script into TMPGXPress to verify the field order.
Rename Audio to .wav for demuxing purposes.
Under Quality:
Interlaced
Uncheck all boxes.
DC Precision is 10
Block Scanning Order should be ALTERNATE
Flat Part Priority should be 16
Progressive
Uncheck all boxes except Progressive Frame Flag
DC Precision is 10
Block Scanning Order should be ZIGZAG
Flat Part Priority should be 16
Select ENCODE NOW.
Your video and audio should be in elementary streams.
CLEANING THE AUDIO
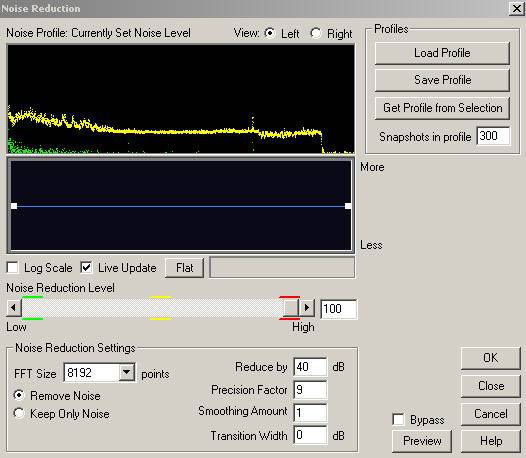
There are three preset Adobe Audition filters I use to clean the audio.
STEP 1 Noise Reduction Filter
(Go to EFFECTS-->NOISE REDUCTION--> NOISE REDUCTION)
The Noise Reduction function can dramatically reduce background and general broadband noise with a minimal reduction in signal quality. It can also remove tape hiss, microphone background noise, 60-cycle hum, or any noise that is constant throughout the duration of your waveform. The amount of reduction required depends upon the type of background noise, and the allowable loss in the quality of the signal that is to be kept. In general, you should be able to attain increases in Signal to Noise ratios of 5dB to 20dB. (Noise is reduced 21dB and signal 1dB for example).
Before you can perform noise reduction, you must load or get a noise profile first. This is done by pressing the Load Profile or Get Profile from Selection buttons.
Here’s the most common way to use the Noise Reduction function:
1.Record or a piece of music that has tape hiss or other background noise.
2.Select a short range (at least one half second) that contains only the noise that you'd like to reduce.
3.Choose the Effects > Noise Reduction > Noise Reduction option and click on Get Profile from Selection to sample the noise.
4.Click on Close.
5.Select the entire file (or the portion you want to noise-reduce).
6.Go to Effects > Noise Reduction >Noise Reduction again.
7.Click on OK to perform the noise reduction.
Preview
Press the Preview button to audition the current Noise Reduction setting before you apply it to the waveform. The selection is looped until you press the Stop button. Since Previews are dynamic, this gives you the opportunity to make and hear processing adjustments as the selection is continuously played.
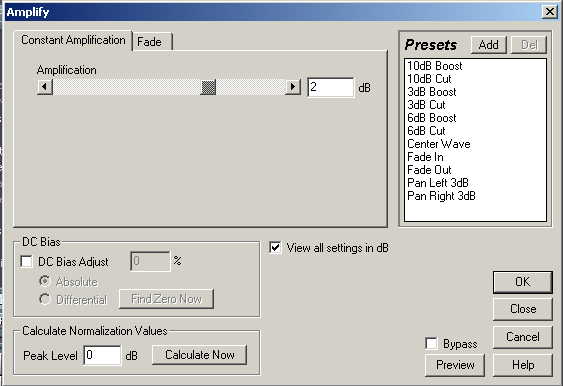
STEP 2 Amplify (Go to EFFECTS-->AMPLITUDE-->AMPLIFY)
Step 3 must be used when using Step 2 unless Peak is set to -1.89dB.
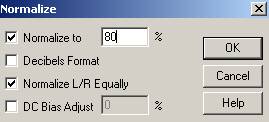
STEP 3 Normalize Audio (Go to AMPLIFY-->NORMALIZE)
Save Your Work!
CONVERTING WAV to AC3/MP2
AC3 is the standard for NTSC.
MP2 is the standard for PAL, but does work on most NTSC DVD players.
Do not convert to anything less than 256Kbps! Standard is 384Kbps.
To convert to MP2, I use either dBpowerAMP or Besweet. The conversion is straight forward and should not necessitate a guide for completion.
To convert to AC3 requires very expensive software. I have not had success with any of the freeware softwares though some users vouch for ffmpegGUI. Even this software has bugs, but offers the most compatible AC3 of the freeware programs. I suggest using a professional utility like Sony Acid Pro 4 for the creation of AC3 audio. Other AC3 programs include Sonic Foundry's Soft Encode and Scenarist's AC3Enc Utility.
AUTHORING YOUR DVD
I don’t make menus to increase compatibility in PS2 and Xbox playback; hence, I use TMPGEnc DVD Author even though movie-only can be done in other authoring softwares like DVDlab. I like DVD Author because it separates multiple titles into separate VTS sets unlike DVDlab that exports multiple titles to a single VTS/VOB set. I also prefer DVD Author over DVDlab because Author has the option to exports images and DVDlab does not. Finally, Author has a cut/editing option for the video that DVDlab does not. I add chapter points and write to disk as an image file.
BURNING YOUR DVD
For best quality use Pinnacle InstantCopy.*
For quickest results use DVDShrink (possible loss of PS2 & Xbox compatibility).*
*Note: It is always best to write/create an image file and preview your work before burning to disk. I simply export from TMPGEnc DVD Author to ISO and load using Daemon Tools and use PowerDVD to preview. InstantCopy, CloneDVD, and DVDShrink support ISO images when writing. Should you have exported to files or your authoring program does not offer image export, then an image can be created using IMGTools. Any and all errors occuring in playback will occur in Standalone playback. Do not question any errors or you will waste DVDR media. Check your work if any errors occur.
Common Setting Errors Not Detected in PC Software Playback Include:
1)Too low a video bitrate can cause interlaced video to produce interlaced lines and progressive video to hang or hiccup.
2)Failure to synchronize correctly the source field order with the output field order, checking or unchecking UPPER FIELD FIRST in CCE, can produce ghosting in interlaced video.
3)Audio compression below 192 kbps will not playback on a Standalone player.
GUIDES USED
Bb’s DV to DVD Guide
FulciLives Digital Noise Guide
SUGGESTIONS
AN ALTERNATIVE TO ADOBE AUDITION: SONIC FOUNDRY SOUNDFORGE
LordSmurf suggests the following use of Soundforge customized presets downloadable at above guide link:
HISS CUT -or- HISS CUT ALT 2 -or- ALT 0
NORMALIZE 80%
then if still not fixed:
HIGH RESTORE (any) ... if needed
and HIGH RESTORE/HISS REMOVAL combo (any) ... if needed
I am capturing via Canopus ADVC-100 Firewire.
I especially like ScenalyzerLive and WinDV for firewire.
I recommend Virtualdub 1.4.9.3 VCR + SYNC and VirtualVCR for transfering via Audio/Video PCI/AGP Cards. Visit www.doom9.org for these download.
For ATI cards, stick with Lordsmurf at www.digitalfaq.com
Both the Panasonic DV Codec and Canopus DV Codec are downloadable from www.videohelp.com under Tools. The Panasonic DV Codec is a .dll that comes with an .inf file. Right click on the .inf and click INSTALL. The Canopus DV Codec is self-extracting, although I had to place the setup files in a new folder as they would not execute in the folder created during the extraction. Reinterpolate411 can be downloaded from www.trbarry.com The convolution3D drivers can be downloaded from www.avisynth.org/warenterprises/
Take a look at bb's DV To DVD guide for other encoding options [ie. Procoder, TMPGEnc, MC Encoder.]
As FulciLives suggests, should you decide to use XPress or DVD Source Creator for your encode an synth script can be used by adding the following line to the end of your synth script:
ConverttoRGB(interlaced=true)
If using QuEnc, requires Convolution3D YV12 , then add the following line to the end of your synth script:
ConverttoYV12(interlaced=true)
Please refer to bb's guide for all PAL Interlace, PAL Progressive and Type-1 AVI captures: these use the DirectShowSource in place of AviSource. I do not suggest capturing to Type-1 AVI, as it has filesize limitations, and suggest converting any Type-1 data to Type-2.
+ Reply to Thread
Results 1 to 7 of 7
-
-
It should be the other way around. Otherwise nice guide.Originally Posted by LNielsen76
-
Thanks. Changes made in CCE.
-
Member
- Apr 2004
- Delaware, USA

")

 You might try using VideoReDo to correct the audio synchronization.Originally Posted by LNielsen76
I have a Hauppauge WinTV PVR-350 capture card, which always seems to produce audio synchronization issues whenever I capture from VHS (although it captures fine from TV). However, remuxing the MPEG file with VideoReDo fixes all of my problems! -
I have a much quicker, albeit more expnsive, alternative. I have a dual well JVC VCR with Mini-DV on one side and SVHS/VHS on the other side. This deck has a 1394 I/O port (Firewire) and will record directly between the mini-DV and VHS sections. If the right buttons are pushed you can instruct this VCR to output SVHS/VHS thru the 1394 port and out to a standalone DVD recorder with a 1394 port. I offer this as an alternative if you want to do this operation on a regular basis--more expensive, but by the same token much less hassle!
-
Even easier solution, if you want to spend $250 or so ..
Buy a VHS/DVD recorder combo, put in the VHS tape & blank DVD, and push "Dub"
I used capture cards, multiple steps, etc, but my time is worth more than the $280 I spent at Walmart to buy my settop recorder. All I do then is pull off the DVD with AC3 on my computer with DVD Author, add menus, and reburn. -
Same here , it made a pain in the arse a painless experience . It stopped the realigning hassles dead in the water , as an extra it means if I have an wmv or realmedia file , then I just connect my video cards tv out to the dvdr`s video in for a faultless conversion of those files as well .Originally Posted by ipdave
As you say IPDave , time is worth more than the money spent on it .

 Quote
QuoteSimilar Threads
-
EZCap(S-Video) vs Firewire to capture VHS
By Pepepaco in forum Capturing and VCRReplies: 9Last Post: 4th Dec 2011, 12:51 -
NTSC VHS Tapes To DVDR
By spliffy in forum Capturing and VCRReplies: 7Last Post: 9th Nov 2010, 16:59 -
Mitsubishi HD-HS2000U - vhs/svhs out of FireWire port?
By mikejaz2 in forum Capturing and VCRReplies: 29Last Post: 5th Aug 2008, 21:28 -
What device will enable recording of TV to DVDR and DVD or VHS to DVDR?
By enricomad in forum DVD RippingReplies: 1Last Post: 26th Jun 2008, 17:46 -
VHS to DVD (with DVDr)
By ds_36 in forum Newbie / General discussionsReplies: 7Last Post: 20th Apr 2008, 15:53