


whats a good program to create a photo collage ?
im guessing that adobe and ulead should have something, im going to try photoshop elements this weekend but has anyone done this and what program did you use.

+ Reply to Thread
Results 1 to 11 of 11
-
-
Member

- Mar 2003
- Chit, IDK I'm following you


there have to be some cheaper but
adobe photoshop or paintshop pro
would be my first choices. -
photoshop would be my first choice, because I'm familiar with their interface, but if money is an issue, try The Gimp - similar to Photoshop, but freeware.
- housepig
----------------
Housepig Records
out now:
Various Artists "Six Doors"
Unicorn "Playing With Light" -
thankyou
so in general would it just be using that magic wand cutting tool to cut people out of photos and then just layer them in photoshop with a nice background.
im at work at the moment so i'll be trying it when i get home -
Member
- Mar 2003
- Chit, IDK I'm following you
-
Nooooooo.....don't use the magic wand or magic lasso tool....there be a better way.Originally Posted by Sifaga
Use the "extract" command under the Image menu.
I will use this image

Steps:
Open your image and duplicate the layer (so you don't screw up the original )
)
With the duplicate layer selected go to Image > extract
This will open the extract window.
Now select the edge highlighter and a decent size for the brush. The color will be green by default, just leave it.
Now trace around the image everything you want to keep. Make sure that you trace the edge of what you want to keep, you want the green to be half on half off what you want to keep.
***if you screw up a little bit you can use the erase tool, the highlight marker works just like a paint brush
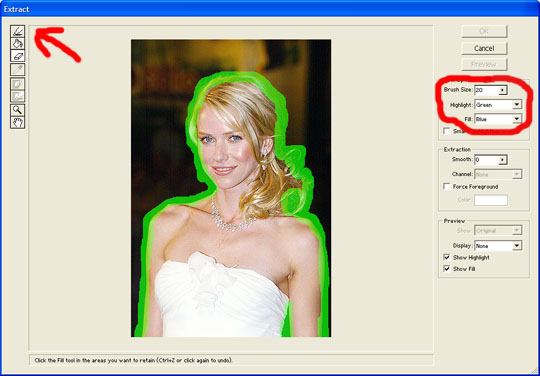
Once you have the whole selection outlined, select the paint bucket...blue is the default color, and fill the image you want to keep.

Click "OK" and you will be taken back to photoshops main interface but now your duplicate layer will be will be cut out.
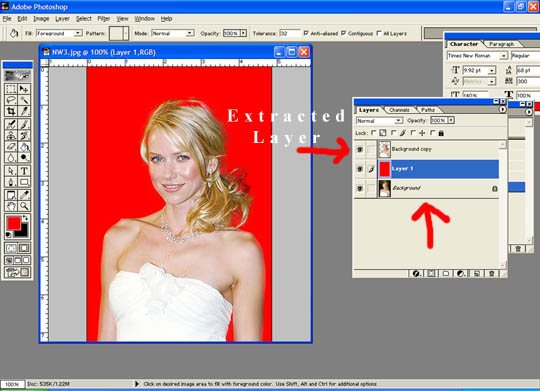
You will notice some parts are missing...that's ok, lets fix that. I insert a very contrasted solid layer between the picture layers just so I can see where I'm going. Select the history brush and select your extracted layer. Select a small soft edged brush (I prefer the soft edge brush, you may want to try the hard edged) and fill in the missing parts. I like to take that red layer and set the opacity to 30-40% so I have a contrast but can see the background image underneath so I can touch it up.
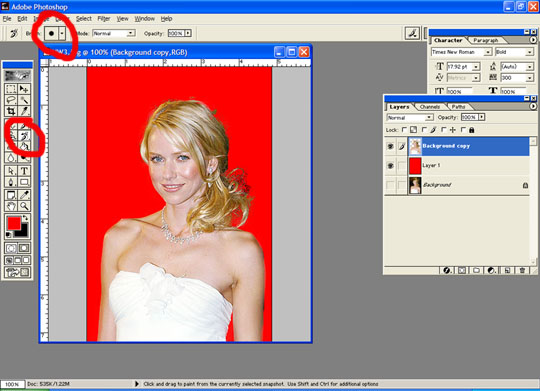
and finally place it on your desired background...

I chose black just because I'm in a bit of a hurry and I didn't feel like making one. But notice how using the extract method her hair doesn't looked chopped or hacked like it would using the lasso or wand tool. This method also keeps your images from looking cut out (hard edged). Anyway, just a suggestion, it really doesn't take that long and what I like about it is if I screw up I can just erase the highlight marker and redo it little by little, as opposed to when I use the wand or lasso tool where if you screw up you have to start completely back over. -
Northcat -
which version of Photoshop are you using?- housepig
----------------
Housepig Records
out now:
Various Artists "Six Doors"
Unicorn "Playing With Light" -
Hello Ladies

- Jul 2003
- Studio 54
-
I was going to say the same thing.. I'm using 7.0.1 and I don't have this commandOriginally Posted by housepig
edit
Unable to Find the Airbrush Tool or the Extract and Liquify Commands in Photoshop 7.0
In Adobe Photoshop 7.0, the Extract and Liquify commands are in the Filter menu; in previous versions, they are in the Image menu.
In Photoshop 7.0, the airbrush tool is not a separate tool but rather an option in the tool options bar. Its capabilities have been expanded to work in conjunction with the following tools: brush, burn, clone stamp, dodge, eraser, history brush, pattern stamp, and sponge. To use the airbrush option for a tool, select the tool, and then click the airbrush button in the tool options bar. -
Oooohhhhh Yeeeaaahhhh,
great instructions
i spent last night trying to use the magic wand and the eraser ... lol ... oh well learnt some other things so wasnt a total loss
will be getting the kids to bed early and get onto this later tonight
cheers -
Member
- Mar 2003
- Chit, IDK I'm following you
-
I'm using photoshop 6.0
I don't know where the commands or airbrushes are in 7 or CS.
We have CS at school and I have used it but I get frustrated quickly because I know what tools or commands I want but can't find them...the school also does not have the plugins I have (Eye Candy and quite a few Flaming Pear) so I usually just don't use theirs if I don't have to.
See I told you that I am actually working when I am screwing around with some of these goofy ass things I post on here :P
:P
-
This is how to do the above but in Photoshop 7 (and CS as well probably):
Extracting objects from their background (Photoshop)
--------------------------------------------------------------------------------
The Extract command provides a sophisticated way to isolate a foreground object and erase its background on a layer. Even objects with wispy, intricate, or undefinable edges may be clipped from their backgrounds with a minimum of manual work.
Note: For simpler cases, you can instead use the background eraser tool.
To extract an object, you use tools in the Extract dialog box. First you draw a highlight that marks the edges of the object, and define the object's interior. Then you can preview the extraction and redo it or touch up the result as needed. When you extract the object, Photoshop erases its background to transparency. Pixels on the edge of the object lose their color components derived from the background, so they can blend with a new background without producing a color halo.
You can add back opacity to the background and create other effects by using the Edit > Fade command after an extraction. (See Blending filter effects (Photoshop).)
To extract an object from its background:
In the Layers palette, select the layer containing the object you want to extract. If you select a background layer, it becomes a normal layer after the extraction.
To avoid losing the original image information, duplicate the layer or make a snapshot of the original image state.
Note: If the layer contains a selection, the extraction erases the background only in the selected area.
Choose Filter > Extract.
You use tools in the Extract dialog box to specify which part of the image to extract. You can resize the dialog box by dragging its lower right corner.
Specify options for tools in the dialog box (you can change these settings at any time):
For Brush Size, enter a value, or drag the slider to specify the width of the edge highlighter, eraser, cleanup, and edge touchup tools.
For Highlight, choose a preset color option, or choose Other to specify a custom color for the highlight.
For Fill, choose a preset color option, or choose Other to specify a custom color for the area covered by the fill tool.
If you are highlighting a well-defined edge, select Smart Highlighting. This option helps you keep the highlight on the edge, and applies a highlight that is just wide enough to cover the edge, regardless of the current brush size.
Adjust the view as needed:
To magnify an area, select the zoom tool in the dialog box, and click in the preview image. To zoom out, hold down Alt (Windows) or Option (Mac OS) as you click.
To view a different area, select the hand tool in the dialog box, and drag in the preview image.
Define the edge of the object you want to extract:
To draw a highlight that marks the edge, select the edge highlighter tool in the dialog box, and drag so that the highlight slightly overlaps both the foreground object and its background. Use Smart Highlighting to trace sharper edges. Use a large brush to cover wispy, intricate edges where the foreground blends into the background, such as hair or trees.
If you use Smart Highlighting to mark an object edge that is near another edge, decrease the brush size if conflicting edges pull the highlight off the object edge. If the object edge has a uniform color on one side and high-contrast edges on the other side, keep the object edge within the brush area but center the brush on the uniform color.
If the object has a well-defined interior, make sure that the highlight forms a complete enclosure. You do not need to highlight areas where the object touches the image boundaries. If the object lacks a clear interior, highlight the entire object.
To base the highlight on a selection saved in an alpha channel, choose the alpha channel from the Channel menu. The alpha channel should be based on a selection of the edge boundary. If you modify a highlight based on a channel, the channel name in the menu changes to Custom.
To erase the highlight, select the eraser tool in the dialog box, and drag over the highlight. To erase the entire highlight, press Alt+Backspace (Windows) or Option+Delete (Mac OS).
Define the foreground area:
If the object has a well-defined interior, select the fill tool in the dialog box. Click inside the object to fill its interior. (Clicking a filled area with the fill tool removes the fill.)
If the object is especially intricate or lacks a clear interior, make sure that the highlight covers the entire object, and then select Force Foreground. Select the eyedropper tool in the dialog box, and click inside the object to sample the foreground color, or click in the Color text box and use a color picker to select the foreground color. This technique works best with objects that contain tones of a single color.
Click Preview to preview the extracted object, or skip to step 10 to extract the object without a preview.
Selected area highlighted and filled, and extracted object
Zoom in as needed, and set any preview options:
Use Show menu options to switch between previews of the original and extracted images.
Use Display menu options to preview the extracted object against a colored matte background or as a grayscale mask. To display a transparent background, choose None.
Select Show Highlight or Show Fill to display the object's highlight or fill.
If necessary, repeat the extraction to improve the results (when you are finished, you can perform final touch-ups as described in step 9):
To perform another extraction after adjusting the highlight and fill, repeat steps 5, 6, and 7.
To perform another extraction with new extraction settings, change the Smooth, Force Foreground, or Color settings, and repeat step 7.
Note: To specify the amount of smoothing of the extracted object, drag the Smooth slider or enter a value. It is usually best to begin with a zero or small value to avoid unwanted blurring of details. If there are sharp artifacts in the extraction result, you can increase the Smooth value to help remove them in the next extraction.
Touch up the extraction results as needed:
To erase background traces in the extracted area, use the cleanup tool . The tool subtracts opacity and has a cumulative effect. You can also use the cleanup tool to fill gaps in the extracted object. Hold down Alt (Windows) or Option (Mac OS) while dragging to add back opacity.
To edit the edge of the extracted object, use the edge touchup tool . The tool sharpens edges and has a cumulative effect. If there is no clear edge, the edge touchup tool adds opacity to the object or subtracts opacity from the background.
Click OK to apply the final extraction. On the layer, all pixels outside the extracted object are erased to transparency.
Note: For best results in cleaning up stray edges, use the cleanup and edge touchup tools in the Extract dialog box. You can also clean up after an extraction by using the background eraser and history brush tools in the toolbox. -
Can't go wrong with Paint Shop Pro.. you may also find a V4 or V5 on the net as sharware. (try before you buy)
 Quote
QuoteSimilar Threads
-
Video collage/mosaic effect
By purplegreendave in forum EditingReplies: 1Last Post: 9th Aug 2010, 05:06 -
Video/Photo Software?
By RKelly in forum ComputerReplies: 3Last Post: 2nd Aug 2009, 10:44 -
Video collage help
By alyle5864 in forum Newbie / General discussionsReplies: 0Last Post: 13th Feb 2009, 17:53 -
create menu for DVDs usin photo shop
By hellbound in forum Authoring (DVD)Replies: 6Last Post: 4th Jul 2008, 05:34 -
Photo collage?
By foton in forum Newbie / General discussionsReplies: 6Last Post: 3rd Dec 2007, 06:29