


 Seagate's
1 gig
Ti4800
Hauppauge PVR-500 x 2 / PVR-250
Koss/Nexxtech
Lite-On 16x
LiteOn LDW-451S@832S
MSI K8N Neo4
21")
Using DVD2SVCD to convert a DVD to SVCD
--------------------------------------------------------------------------------
This is just a quick guide for those who want to convert movies from DVD to SVCD. The advantage of SVCD over VCD is that it has sharper and better overall picture quality. The quality is somewhere between VCD and DVD. You could get near DVD quality video if you use higher bitrates, but his means that you will also need more CDR's for your movie.
I am writing this with TMPGEnc in mind (any version of TMPG should work) to encode your movies.
If you're using CCE or Canopus, you can still get the basic idea from this guide.
You will need the following software for this guide:
DVD2SVCD
TMPGEnc
Assuming you have already installed the software, here goes...
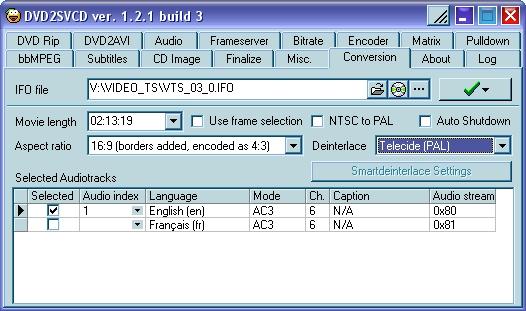
Run the DVD2SVCD program and it will start with the screen shown below.
Click on the tiny picture of a CD. If you have your DVD in the drive, it will read the DVD, and enter most of the information for you. The movie length is set to the main movie by default so you shouldn't have to change this. The aspect ratio should be set to 16:9 which is what most DVD movies come in but if you're not sure, check the back of the DVD box. If you want to deinterlace you movie, you can choose from different methods in the pull down menu but I would suggest using Telecide because it has the best results. I know that it says (PAL) beside it, but it can also be used for NTSC, with excellent results. Remember, this is just for ripping the DVD, not encoding it!
--------------------------------------------------------------------------------
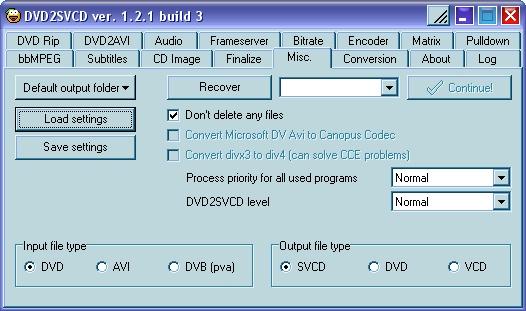
Now select the Misc tab and you should get the screen below.
Here you can select DVD as the input, and SVCD as the output, because this is what we want to do. You can set the process priority from Idle, Normal, or High. If you're going to be using your computer while encoding the movie, then you should set it to Idle. Crash Recovery will allow you to resume the whole process, in case something goes wrong. All you have to do is click Crash Recovery, and load the log file it created and press the continue button.
--------------------------------------------------------------------------------
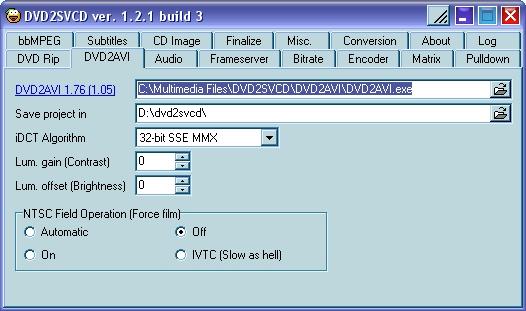
Proceed to the DVD2AVI tab
You should turn off Force Film. If you leave it ON or in the Automatic setting, it will perform a 2:3 pulldown and convert your movie to 23.97 fps which is not a valid SVCD frame rate. So leave it OFF and your movie will be encoded in 29.97 fps which is a valid SVCD frame rate. The whole idea is to get an SVCD that will play in your standalone DVD player, so it must be 29.97fps.
If you want to save the finished product in a particular folder, select it now, in the "Save project in" box.
--------------------------------------------------------------------------------
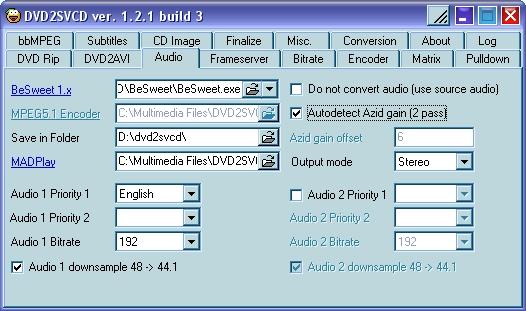
Now go to the Audio tab
Check the box for Autodetect Azid gain [2pass] to get the optimal audio volume. You can choose from to audio priorities here. I only selected English but you can select a second audio priority such as French. If English is not available then it will use the second audio priority you selected.
The audio bitrate should be 192 but you can use other bitrate settings if you want. Some feel that 160 is plenty, others prefer 224, only your ears can tell the difference. You can also check the Audio 1 downsample box if you want to convert the audio from 48 KHz to 44.1 KHz. Some DVD players can't play a SVCD at 48 KHz audio because the specs for audio is 44.1 KHz so you will need to downsample it. If in doubt, do it.
--------------------------------------------------------------------------------
Now go to the Frameserver tab.
Here you can select the resize method. I suggest using SimpleResize because it's faster. BicubicResize seems to provide the best results.
You need to check the box for Add ResampleAudio if you are using an AMD Athlon. I have no idea why, just do it. Select No editing for Avisynth Script File.
--------------------------------------------------------------------------------
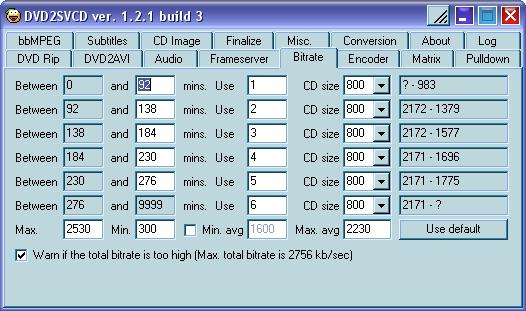
Next go to the Bitrate tab
The default bitrates are not great. I made the changes here. If you want to put the movie on more CD's or squeeze the movie onto fewer CD's then change the minute values accordingly. The last field in each line shows you the bitrate range for each length range.
Check the box at the bottom so it will let you know if your chosen bitrate is too high.
--------------------------------------------------------------------------------
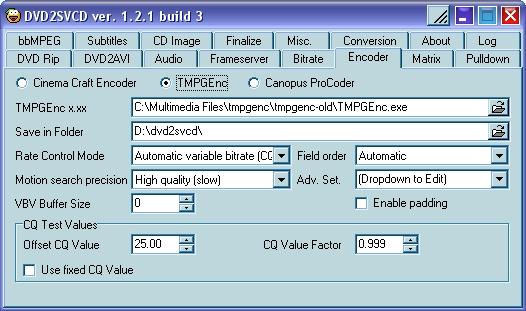
Now go the Encoder tab
First you have to provide a path to TMPGEnc on your computer. Then you can select where your movie will be saved.
In the Rate Control Mode box, select the quality of your finished mpeg. I suggest Automatic Variable Bitrate CQ-VBR for best quality, based on the number of CDR's you want to use from the settings on the Bitrate tab. If you want higher quality, I suggest you encode it on 3 CDR's instead of two, and then you can set this to Constant Quality CQ, use a Fixed CQ value of at least 85, if not 100. You could also set it to 2 pass VBR with 2 passes, although I find this a waste of time.
Set the Motion Search Precision to High Quality [slow] for best results. You can encode faster, with less quality (for playback on the computer), or encode slower with higher quality, but the difference between HQ and Highest Quality is not worth the extra encoding time. The difference between Normal and HQ is definitely noticable, especially on larger TV's.
--------------------------------------------------------------------------------
Proceed to the Subtitles tab - Optional
Here you can select what subtitles you want. If you want subtitles, check the box for "Rip subtitles" select the language from the drop down list. Then select SVCD or CVD subtitles at the top. Some DVD players only support SVCD subtitles while others may support CVD subtitles. So you'll have to figure out which one works with your player. There's also a chance that your player doesn't support any of these subtitles. If you want permanent subtitles, then choose "Permanent Subtitles".
--------------------------------------------------------------------------------
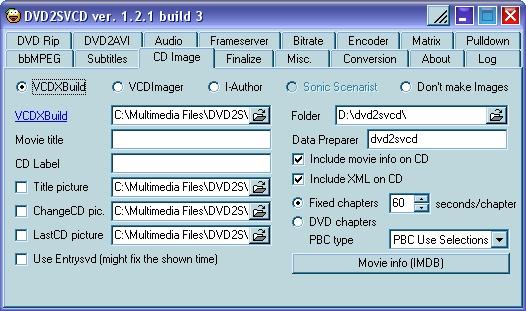
Now go to the CD Image tab-Optional
Here you can choose a title picture or a change CD picture for you SVCD. You can also Enter a label and title for you movie. If you don't want it to create CD images that can be burned after it's finished encoding, select "Don't make Images". You will get a muxed mpg file (or two or three) that can be burned using Nero. (Remember the Bitrate settings?)
Now everything has been configured so go back to the Conversion tab and press the green check mark button, then select Rip and convert to start encoding the movie.
In the end you should have an mpg file (your encoded movie) with the audio and video already muxed together.
If you chose to make CD images, then you should have some bin/cue files that can be burned with Nero.
--------------------------------------------------------------------------------
+ Reply to Thread
Results 1 to 1 of 1
-
Cheers, Jim
My DVDLab Guides

 Quote
QuoteSimilar Threads
-
Simple MKV to MP4 Conversion Guide (Xbox360)
By Cloud101 in forum User guidesReplies: 35Last Post: 8th Nov 2011, 16:41 -
Simple Guide : How to convert DD5.1 AC-3 448 / 640 to stereo.
By Bonie81 in forum User guidesReplies: 3Last Post: 13th Jul 2011, 08:55 -
Simple Guide : How to rip BD to mkv or mp4
By Bonie81 in forum Blu-ray RippingReplies: 8Last Post: 21st Jun 2011, 13:00 -
Simple guide for Virtual Dub Mod 1.5.10.3
By s_joy09 in forum Newbie / General discussionsReplies: 35Last Post: 31st Jul 2010, 15:33 -
Needed: a beginner's guide to simple software
By hyphenate in forum Newbie / General discussionsReplies: 7Last Post: 29th Nov 2008, 14:20