


Hello everyone. I’ve seen lots of posts on this forum asking how to create slideshows for DVDRs. Most of the time, they ask about software that can do that. Most people here have half-decent video editors on their systems and don’t require any slideshow software. I hate typing, but I decided to create a guide to making a slideshow for DVD using my favorite video editor, Adobe Premiere.
First let me warn you that Quality is my main concern, not speed. Also I work with NTSC only, so I don’t know the correct resolutions for PAL systems.
Step (1) Prepare the images:
If your images were taken with a digital camera, then your chances are good that they are already 4:3 Aspect Ratio and can be directly imported into the timeline if you want. But I’m very fussy and I like to crop them first. Remember that you’re going to loose about 10% around the edges for the title-safe region. Use a good quality image editor like Photoshop to crop the images to 720 x 534 @ 100 DPI. You can use 720 x 540, but Adobe recommends 720 x 534 and so do I. I always save the images as .bmps in their own folder.
Step (2) Edit Time:
Fire up Premiere ( I use 6.5 for the demonstration).
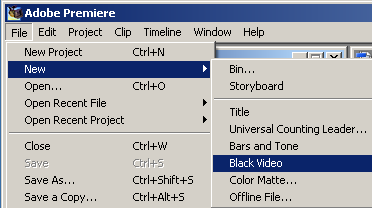
Click File > New > Black video. This will give you a black video clip that you can use to fade from and into black.
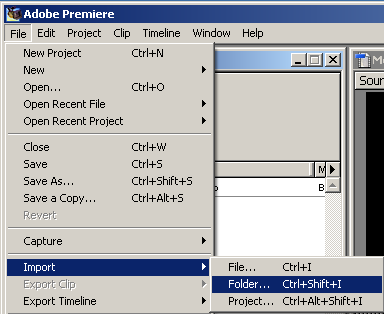
Click File > Import > Folder. Browse to the folder with the cropped images you made and click OK.
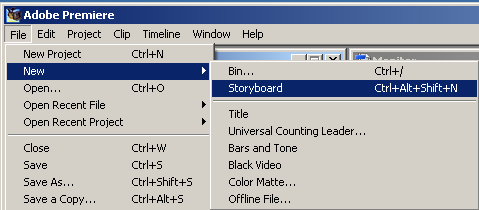
Click File > New > Storyboard. This will give you a storyboard that you can drag images, video and audio into. Once you get it in there, you can rearrange it the way you want it to play.
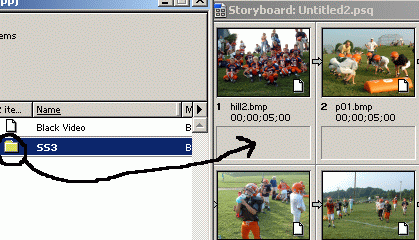
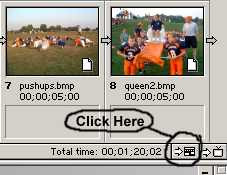
Now drag the image folder into the storyboard and all your images will be displayed. You can arrange them any way you want. Also, drag the black video into #1 position and also into the last. This will give a simple fade in from black and at the end, fade into black. Note that the default duration for the images is 5 sec. If you want to change the duration of a clip, just double click on the image to bring up the properties were you can change the duration of that clip.
When you’ve arranged the images the way you want, click on this little Icon on the lower right corner of the storyboard.
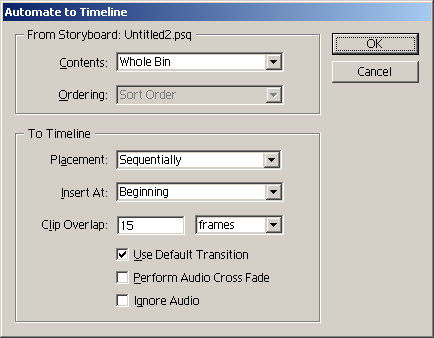
That brings up this dialog. You can make some changes, but I’m not going to get into that right now. Click OK, that sends you storyboard into the timeline with the default transition applied. I always use Cross-fade as default.
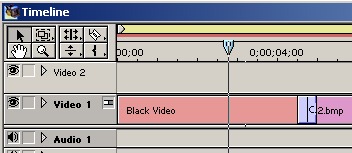
Here we have the clips in the timeline along with the transitions.
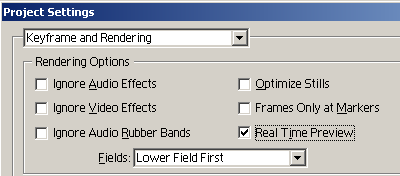
Premiere 6.5 offers Real-time Preview. To enable it, Click Project > Project Settings > Keyframe and Rendering…
That brings up this dialog. Check Real Time Preview and click OK.
Next, we bring in the audio file. Click File > Import > File and browse to you music folder and select the audio file you want to use. Then grab the song in the bin and drag it into Audio 1 track. If the song is to long, use the Razor Blade Icon to cut were you want, then select and delete the part you don’t want. Click the triangle (1) to expand the track to show the “Rubber Bands”. Insert an edit Keyframe near the end (2), then drag the last keyframe down (this will make the audio fade out). To get a realtime preview of your timeline, bring the cursor to the beginning and hit ENTER.
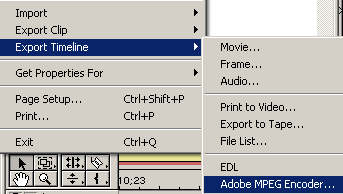
Once you are done, you want to export the timeline to an Mpeg-2 file for DVD. Click File > Export Timeline > Adobe MPEG Encoder…..
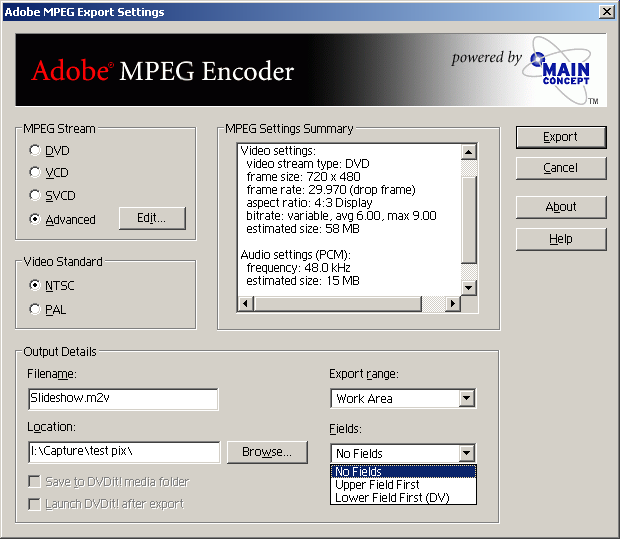
This will bring up this all important dialog box. You can use the settings you want, but being the high quality fanatic that I am, I’m going to give you some tips. Since these images are generated on a PC and are already progressive format, you’ll want to encode them in Progressive format to get the very best quality when you see them on the TV, especially when you pause the slideshow. In the Fields Box, choose No Fields. Click the Edit button and shove the quality slider all the way up to 50. Click the video tab and select Variable Bit Rate. Set the max to 9000 kbps. Set the Min to 4000 kbps. Set the average to 6000 kbps. Like I said, I’m a quality fanatic!
When your done with the settings, click Export to start converting to Mpeg-2. Then bring them Mpeg-2 files into your favorite DVD Authoring App (I recomend DVD-Lab). If you did it correctly, you’ll end up with an incredibly high quality slideshow that everyone will love..
Have Fun!
Try StreamFab Downloader and download from Netflix, Amazon, Youtube! Or Try DVDFab and copy Blu-rays! or rip iTunes movies!
+ Reply to Thread
Results 1 to 30 of 81
Thread
-
Got my retirement plans all set. Looks like I only have to work another 5 years after I die........
-
I normally do my slide shows with Ulead Picture Show. Will the quality
be any better with Adobe Premiere? If anybody has used both these
softwares, could please post your comments? -
Scott, Is that you man? Good info on Adobe slideshows. I use this program as well....Thanks for the info.
Thanks,
Mike
PS: This is from work...I have no broadband anymore because we moved to a new community. I miss MCM2 so bad... LOL!
It Cost No More To Go First Class, You Just Have To Pay A Little Longer
because we moved to a new community. I miss MCM2 so bad... LOL!
It Cost No More To Go First Class, You Just Have To Pay A Little Longer -
Following racer-x's tutorial exactly I created a slide presentation. On my home DVD/TV setup the quality was excellent. I've attempted Mpeg2/DVD movie/slide shows in other apps with similar dissolve transitions and Premiere was the best I've seen thus far. Good job.
-
How can I change the transition time a little bit longer. It seems that the default time is 1 sec. and also how to change the picture display time. My app. default time is 6 sec.
kfc888 -
Hey Guys,
Lal wrote:
I've never used Ulead Picture Show, but if it uses the same encoder as Video Studio amd MSP, then it can't compare to the Mainconcept encoder in Premiere 6.5.I normally do my slide shows with Ulead Picture Show. Will the quality
be any better with Adobe Premiere?
@ X_MikeB43,
No man I'm not Scott, but if he can pull some nice wheelies on a bike, than he's cool by me.
@ OSU,
Thanks.
kfc888 wrote:
I've never changed the transition duration, but I think if you double click on the transition, you'll get the properties, where you should be able to change the duration.How can I change the transition time a little bit longer. It seems that the default time is 1 sec. and also how to change the picture display time. My app. default time is 6 sec.
To change the default clip duration, click File > Preferances > General and still image. In the lower part of the dialog box, you'll find the default image duration in frames. If you want 7 sec, then enter 210 ( 7 x 30 fps = 210). You must do this before you send the images into the storyboard or timeline.Got my retirement plans all set. Looks like I only have to work another 5 years after I die........ -
racer-x , thanks for your info.
kfc888 -
Some informations:
I have done albuns with Premiere 6.5, and have some importants information to pass:
1 - Some times when you export the timeline with "Adobe Mpeg Encoder",
some images after export have a "noise" under the image, when you watch.
To solve it, I identified some procedures.
I always export the timeline as movie, because you have some controls.
1a - Export>Movie>settings timeline
choose "modify" and set "better resize". >OK.
I don´t know why, but this solve the "noise" when you export the timeline.
1b - Press "Next" until the "General" window.
1c - Press "Advanced Settings" and choose:
Basic Settings
Video Type = NTSC MPEG-2
Presets = -Custom Settings-
Fields = Lower FildFirst(DV)
Video bitrate(Kbps) = 7000 or lower (take care with estimated size)
Video encoder quality= 50
Video Settings
Bitrate type: choose "Constant bitrate" (you don´t have movement on
images, isn´t necessary "variable bitrate", are pictures)
1d - OK>OK>Save(choose a folder)
And begin the export of timeline.
good luck.
2 - To change the time of transition,after you have the pictures in the
storyboard.
I use 360 frames or 12 seconds, with 2 seconds of transition.
2a- Click on the button on the right corner of storyboard.
Choose "Automate to Timeline".
2b - In the "automate timeline" window choose the time of transition in
the option "Clip Overlap" (each 30 frames = 1sec or choose seconds)
3 - Very Important:
Before you create the storyboard:
3a- Edit>Preferences>General and Still Image
After you choose the duration of image in the timeline("Default Duration")
don´t forget to set "Lock Aspect".
This set mantain the Aspect of image when you watch.
Thanks,
Wood -
racer-x,
Thanks for posting the useful idea... Although I know how to do it manually (creating a slide show) doing it your way saves a lot of time.
Can you tell me how I can obtain the "Main Concept MPEG2 Encoder" for Premiere 6.01?
Or is it only for Premiere pro only??? -
Hi!
I tried to do the slideshow like you discribed, but when I played the file on tv, the picture was pulsing!
What I did wrong, thank you. -
Hello,
I had this problem, "pulsing"( Never witlh all pictures, sometimes 1 or 2 pics in the roll), what I do is change the local of picture with other.
Other possibility is change the bitrate.
Have a long time that I don´t have this problem after create albuns as I describe.
"Main Concept MPEG2 Encoder" for Premiere 6.01"
Did you see in the ADOBE site?
Sorry I don´t have idea.
In the Adobe site, have a "AdobeMPEGEncoder1.3EngBeta.exe" to substitute the MPEG Encoder default of Premiere 6.5. With this one you can identify the "estimated size" to be exported. Is free.
Thanks,
Wood -
Hello,
Other idea....for "PULSING"
Are you using catured pictures from films..???
Remember to "deinterlace" the picture in the "Photoshop".
After open the picture in the photoshop....
Filter>video>deinterlace
Save the picture and export the storyboard again.
PS: This hapen because the captured pics have 2 pictures in the same frame. Doing this procedure you eliminate one of it.
good luck
Wood -
Hello guys,
I've been away a little while and look at al these comments.
Jack Robertson wrote:
As far as I know, you'll have to get the standalone Mainconcept v1.4. There is a 30 day trial on it. I also use reguarly and I can tell you that it is excellent. If you decide to give it a try, I recomend you use this great free frameserver:Can you tell me how I can obtain the "Main Concept MPEG2 Encoder" for Premiere 6.01?
https://www.videohelp.com/tools?tool=295#comments
You'll be able to frameserve your timeline directly into the mainconcept standalone. It will save you a lot of time and the quality will be excellent.
jelenca wrote:
By pulsing, do you mean flickering? If some of your images have very thin horizontal line in them, they may flicker because of TV interlace scanning. Take those problem pictures and run a guasian filter set at .02 pixels. That should help stop the flickering on the TV.I tried to do the slideshow like you discribed, but when I played the file on tv, the picture was pulsing!
If you actually mean the entire slideshow pulses, then I don't know, I've never experienced that before.
Hey Wood,
Where did you come from? Are you really from Brazil? I didn't know they used NTSC in Brazil. My uncle lived in Brazil for a while. I hear the girls are real fine down there. I was born in Portugal and moved to the USA when I was 5 years old.
Most of what you say is good advice, but I have to disagree with you on some of them.
1) I don't know how you setup your images, but I never get any kind of noise in my finnished slideshows.
2) If you setup the images as 720 x 534, there is no need to set "Lock Aspect". Your images will not distort in any way.
3) The reason I specify to use "No Fields" instead of "Lower Field First" is to output the Mpeg as progressive and not interlaced. The material is allready progressive and you want to keep it that way for maximum quality.
Here is a simple test for you. Play your slideshow on TV and hit the Pause button. You will notice a slight degregation on the image when you hit the pause. If you made it progerssive like mine, the quality will be perfect when you hit the pause button. I've run back to back tests and it proves it conclusivly.
Time to go.Got my retirement plans all set. Looks like I only have to work another 5 years after I die........ -
Hello Racer-x,
I really live in Brasil, in the south(Curitiba, Paraná).
In Brasil, we use PAL-M, but when you play NTSC, the device transcode to PAL-M, no problem.
About the "Lock Aspect", thanks for the information. I did that because I didn´t know what to do and identified this solution that work ok.
The "noise" maybe because I don´t change the images to 720x534, after scanning and recover the image I use them in the Premiere....
Thanks for the information.
PS: As garotas brasileiras são tão bonitas como as belas portuguesas, francesas e italianas, só que moram no Brasil.
Thanks,
Wood -
Hi , I have been reading your recommandations how to create a high quality slide show with premiere 6.5 . I am from germany and therefor I have to deal with PAL . I tried all your recommandations and had no luck at all , are your recommendation for NTSC only , or do they work for PAL as well ?
Some of my pictures are flickering and pumping so bad that one would think they jump off the TV tube . I am using stills only , taken with a brand new digital Canon EOS 300D . There is only one thing that really elimintaes the problem , you right click on the clip in Premiere 6.5 (still picture) select videooption and then flicker remove .
That takes care of it , but you lose sharpness and that is not satisfying for me at all , you said , you are a quality freak , well , so am I .
Any idea what I could do ? One more observation , if I display my pictures from the camera directly to the TV , they are perfect !
My conclusion , there MUST be a setting …..if I only could find it , hopefully with your help .
Kind regards ANIT11 -
Bear with me, I've never used Premiere before, although I do have 6.0 installed. I use Ulead Movie Factory 2.0 to do slide show. Can anyone comment on these:
1. Can you bring in multiple audio tracks for the duration of the slide show with Premeire? How?
2. How do you set the transition time between tracks?
3. I assume you just fade out the last track, right?
4. Can you do chapters with it? How?
Any help will be greatly appreciated. -
anit11,
Yes all my settings are NTSC only. If you have some pictures that are flickering, it is because they have a very thin horizontal line in them that are 1 pixel thick or so. When the TV scans it, some times it gets it and sometimes it dosen't. That is why it flickers. If you right click the clip and choose Flicker remove, it just basically blurs the image. You might want to import that image into a decent photo image software like Photoshop. Then apply a Guasian blur filter to it. Set the blur filter to .2 pixels. this will blur just enough to remove the flicker, but not enough to mess up the image. Also if you sharpen the image too much, it will cause flickering.
If you have Photoshop or Elements and are really fussy, then you can use the blur tool to only blur the offending line.
twen,
Yes you can bring in multipal audio traks. If you want one to fade into another one, just import the 1st into Audio track-1 and the second into Audio track-2. Overlap them a little. Then click on the sideways triangle on the Audio tracks. This will let you set the fade-out and fade-in for the audios. You'll end up with a nice cross fade if you do it right.
I set all my chapters in my DVD Authoring App.Got my retirement plans all set. Looks like I only have to work another 5 years after I die........ -
The cross-dissolve transition doesn't have a default duration. You can specify the duration when you "automate to timeline"---the bottom of the box allows you to enter a duration in seconds or frames.
Thanks a bunch for this guide, I have a slide show I desperately needed to automate and you just did it. Now if you could only automate restoring the album photos that go into it.... -
Hi racer-x , again I tried your rcommendations , I did a matrix with a gaussian blur from .1 to 3.0 , the flickering dissapears approx. around 2.0 , just in time when you lose the sharpness . Is`nt there another way ? This is exactly what I get when I use `fliker removal´on Premiere 6.5 .
Anymore suggestions ? Thanks for yor help , kind regards , Anit11 . -
You are fighting the age old battle against the laws of interlace scaning. If it was a Progressive scan TV, there wouldn't be a problem.
The biggest culprits are thin horizontal lines, too much sharpness in the image and too much contrast. Either of those will cause flicker on a standard TV.
Photoshop and Elements have a tool called Blur Brush. If you can pinpoint the problem area, you can use the Blur Brush to blur only that area. This will keep the rest of the image sharp.
You might want to try adding a little noise to the image, that might also help.
Sorry, that's pretty much all I can think of right now. Well Good Luck!Got my retirement plans all set. Looks like I only have to work another 5 years after I die........ -
Just a couple of questions:
My digital camera takes "jpg" pictures and that's how I've saved them. Likewise, my scans have been saved in jpg as well, and all pictures have been cropped or resized to "around" 800x600. Will not the jpg pictures work as well as bmp pictures? The reason I ask is that I've read that you loose quality each time to edit a jpg file, and some have already been resized once, and most optimized for best viewing on TV. Also ... if I use my original 800x600 size that I now have, will Premier crop off the graphic that is over the 720x534 size? I know that if I use Ulead's PictureShow2 it resizes somewhat, so just being close is ok ... but it appears that it may NOT be ok using Premier, as I'll lose part of the picture?
Also .... I'm wondering if you have tried SpruceUp as the Author tool after exporting the timeline?
Thanks much ..........."No freeman shall be debarred the use of arms." - THOMAS JEFFERSON .. 1776 -
Hi Griz,
You are correct, everytime you edit and save a jpeg you loose a little quality. The main reason I use bmp, is because my Premiere dosen't import jpeg. I think it is because I didn't install QuickTime with initail Premiere Install.
You can use 800 x 600 if you want. Premiere will always resize it to 720 x 480 by default. I always use 720 x 534 because that's what Adobe recomends and I like to crop my images for best results. I also have a nice Tittle Safe template with transparent layer that I use to make sure I get everything that I want to be viewable. If you don't have a Tittle safe Template, figure on loosing about 10% of the outside edge of the image to TV overscan.
Sorry I've never tried SpruceUp. I have tried Ulead Movie Factory, Ulead DVDWorkshop, DVD Architect and DVD-Lab. I like DVD-Lab the best! It gives me virtually unlimited control of my menus.
Hope that helps.Got my retirement plans all set. Looks like I only have to work another 5 years after I die........ -
Thanks racer-x, I appreciate. I am doing a large geneaology slide show (which will completely fill a DVD) and I'm thinking that Premiere will give me more control over the project than Ulead's PictureShow2 which I used on a similar project. Especially the music and narration. Music in PS2 is pretty much manual and is a real pain, (calculating total time in seconds of slides to where they reach the end of the music track (as you cannot visually SEE where the music ends) , and with Premiere I can SEE the music track's beginning and ending ... much more precise and smooth. The only drawback with Premiere is that there seems to be no easy way to put accompanying text with each picture ... except manually with something like Photoshop where it's written over the graphic. PS2 lets you quickly advance and type in text for each picture WITHOUT re-editing the picture ... which again ... causes a loss in quality. Also, going with bmp in my case would cause the project to be too large to fit on a DVD ... so the reason for jpgs. Thanks again for the input.
"No freeman shall be debarred the use of arms." - THOMAS JEFFERSON .. 1776 -
Don't forget, you can always use the Premiere Tittler to add text. Click File > New > Tittle. Make sure you have the cursor on the image you want to add text on in the Timeline. That way you can preview how it will look. The Tittler will give you the Tittle safe marks so you can keep your text in the correct region. After you save your tittle, it will place it in the Bin. Drag the Tittle out of the bin and into the Video Track just above the image(s) you want. You can increase the duration by draging the end to the desired length. You can also adjust the opacity or the fade in / fade out. Or you can animate it with the Motion or Transform Filters.
For some really good Tutorials on Premiere, go to www.wrigleyvideo.comGot my retirement plans all set. Looks like I only have to work another 5 years after I die........ -
Thanks racer-x ..... I've a lot to learn! But I'm not complaining .... :^)
"No freeman shall be debarred the use of arms." - THOMAS JEFFERSON .. 1776 -
One problem that reappears occasionally: After exporting my timeline to a movie (avi as I don't have the Adobe MPEG Encoder yet) and I play back the results I find that an occasional picture is exported as a totally black frame ... no picture. It's happened in the past also and I finally ended up just removing that particular picture. Going back to the timeline the pictures is there and plays back in the preview mode ... but after exporting the result is a black picture. Maybe 1 pic in every 40 ... any ideas?
"No freeman shall be debarred the use of arms." - THOMAS JEFFERSON .. 1776 -
Sorry, never seen that happen. If you have Premiere 6.5, it comes with Main Concept encoder. If you have Premiere 6.0 or under, then you need an Mpeg encoder. I would rather frameserve the Timeline to an encoder than make an avi out of it.
You can try this free encoder:
https://www.videohelp.com/tools?tool=460#comments
I've never tried it yet, but once you install it , it should show up in the list of Movie Export Codecs. The Author claims it is fast and has great quality, but again I've never tried it. Give it a shot, it's free.Got my retirement plans all set. Looks like I only have to work another 5 years after I die........ -
I sownloaded and installed the free frameserver (YMPEG) but it doesn't snow up in the list in Premiere 6.0. Maybe my version is too old. I also downloaded the demo Main Concept MPEG2 Encoder and installed it ... but it also doesn't show up either in the list of encoders. So the comment that "You'll be able to frameserve your timeline directly into the mainconcept standalone." doesn't seem to apply to 6.0. Unless someone can point out where I've gone wrong? Thanks in advance for all the replies.
"No freeman shall be debarred the use of arms." - THOMAS JEFFERSON .. 1776 -
1st of all, YMPEG is not a frameserver. YMPEG is an encoder. According to the instructions on their site, you would click File > Export Timeline > Movie. Then in the Dialog box, click on the Compressor drop down and select YMPEG. I haven't installed it, so I don't know how well it works.
I do however use the Main Concept Standalone v1.4 encoder a lot. It will not show up in the list of encoders, you must frameserve the Timeline to it. For that I use this:
https://www.videohelp.com/tools?tool=295#comments
You must read the instructions, but I can tell you it works great. Make sure you leave Premiere running in full screen while you're frameserving.Got my retirement plans all set. Looks like I only have to work another 5 years after I die........ -
racer-x,
I'm not having a whole lot of success so I must really be missing the boat! After I rebooted (doahhh) YMPEG did show up, but when I select both the YMPEG video and audio codecs Premiere locks up hard causing me to reboot ... so scratch that one for now for me. So I tried Main Concept with PluginPac ... same thing ... locks up hard ... reboot. I get a message "PluginPac FrameServer is not serving". There really aren't any instructions at the forum link (just comments on successes and failures) and going to the site gives a one line instruction. Main Concept is about as helpful ... no info on how to make Main Concept talk to Premiere's Timeline though PluginPac. I haven't seen anyplace that would walk you through the entire process in it's simplest form ... but I'm still looking. I'm not new to creating this stuff and have created many DVDs with VirtualDub, TMPGENc, and SpruceUp .... but the concept of frameserving is understandable in abstract .... but the actual linking of the components isn't really explained all that well. If you know of a site that could walk me through the process just one time it would be appreciated."No freeman shall be debarred the use of arms." - THOMAS JEFFERSON .. 1776


 Quote
QuoteSimilar Threads
-
User guide for super video converter
By ocko in forum Newbie / General discussionsReplies: 2Last Post: 20th Aug 2012, 05:32 -
Export high quality videos from Premiere cs4 on mac
By hasanali00 in forum Video ConversionReplies: 2Last Post: 5th Mar 2010, 15:41 -
&fmt=18 does not give the same quality as playing by "high quality
By arminio in forum Video Streaming DownloadingReplies: 2Last Post: 9th Feb 2009, 18:33 -
Premiere CS3: How to import a high quality image of my computer screen
By paulinnorway in forum EditingReplies: 3Last Post: 12th Feb 2008, 14:58 -
StaxRip Guide-w-Templates for High Quality XviDs
By Trac in forum User guidesReplies: 0Last Post: 24th Jul 2007, 01:53